Skip to content
DisclaimerTerms Of UseGDPR PolicyCookie Policy

recipetorch

  • Home
  • Drinks
  • Appetizers
  • Dinner
  • Dessert
  • About
  • Contact
  • Privacy Policy
DisclaimerTerms Of UseGDPR PolicyCookie Policy

Nicole

To make Matcha Coconut Energy Bites, you need a few simple ingredients. Each ingredient plays a key role in flavor and texture. Here’s what you will need: - 1 cup rolled oats - 1/2 cup unsweetened shredded coconut - 1/4 cup almond butter - 1/4 cup honey or maple syrup - 1 tablespoon matcha green tea powder - 1/2 teaspoon vanilla extract - 1/4 teaspoon sea salt - 2 tablespoons chia seeds (optional) - 1/4 cup dark chocolate chips (optional) Each ingredient adds its own charm. Rolled oats give a hearty base. Shredded coconut adds sweetness and chew. Almond butter binds everything, while honey or maple syrup sweetens the mix. Matcha brings a unique flavor and energy boost. Vanilla enhances the taste, and sea salt balances it all. You can add chia seeds for extra nutrition or dark chocolate chips for a fun treat. These ingredients blend to create a tasty snack that fuels you throughout the day. {{ingredient_image_2}} First, grab a big mixing bowl. Add 1 cup of rolled oats. Then, mix in 1/2 cup of shredded coconut. If you like, add 2 tablespoons of chia seeds for extra crunch. Next, include 1 tablespoon of matcha powder and 1/4 teaspoon of sea salt. Stir everything well until it looks even. Now, take another bowl. Whisk together 1/4 cup of almond butter, 1/4 cup of honey or maple syrup, and 1/2 teaspoon of vanilla extract. Make sure it is smooth. This helps the almond butter blend well with the dry mix. Pour the wet mixture into the dry ingredients. Stir gently but well until everything is mixed. If you want a chocolate treat, fold in 1/4 cup of dark chocolate chips. With clean hands, take small scoops of the mix. Roll them into balls about 1 inch wide. If the mix sticks to your hands, wet them with a little water. This helps keep it from sticking. Place the rolled bites on a baking sheet with parchment paper. Put the sheet in the fridge for 30 minutes. This helps the bites firm up nicely. Enjoy your tasty snack! To make the best matcha coconut energy bites, stick to these measurements: - 1 cup rolled oats - 1/2 cup unsweetened shredded coconut - 1/4 cup almond butter - 1/4 cup honey or maple syrup - 1 tablespoon matcha green tea powder - 1/2 teaspoon vanilla extract - 1/4 teaspoon sea salt These ratios give a great flavor and texture. Too much liquid can make them soggy. If they feel too dry, add a touch of almond butter or honey. You can make your energy bites even better by adding fun extras. Try: - 1/4 cup chopped nuts (like almonds or walnuts) - 2 tablespoons sunflower seeds - 1/4 cup dried fruit (like cranberries or raisins) - 2 tablespoons chia seeds (for extra nutrition) Mix these in with your dry ingredients for a tasty twist. Feel free to experiment with different superfoods too! Serving these bites is part of the fun! Here are some ideas: - Use a pretty bowl or platter to display them. - Pair with a warm cup of green tea for a nice treat. - Wrap them up for a quick snack on the go. These bites are great for sharing or enjoying by yourself. They are both healthy and delicious! Pro Tips Use Fresh Matcha: For the best flavor and health benefits, use high-quality, fresh matcha green tea powder. Store it in an airtight container away from light and moisture. Customize Sweetness: Adjust the sweetness of your energy bites by using more or less honey or maple syrup according to your taste preference. Experiment with Add-Ins: Feel free to add nuts, seeds, or dried fruits to the mixture for added texture and nutritional benefits. Chill for Best Texture: Allow the bites to chill longer than the minimum time suggested for a firmer texture, making them easier to handle and enjoy. {{image_4}} You can easily change the flavor of your energy bites. Try using different nut butters. Peanut butter gives a rich, nutty taste. Cashew butter adds a creamy texture and sweetness. Each option brings a unique twist to the bites. If you want to switch up the sweetness, consider other options. Agave syrup offers a mild flavor and is great for vegan diets. Coconut nectar adds a caramel-like taste and is low on the glycemic index. Both options work well in this recipe. Making these energy bites vegan and gluten-free is simple. Just use maple syrup instead of honey. For gluten-free oats, check that they are certified. These small changes let everyone enjoy the bites without worry. To store your Matcha Coconut Energy Bites in the refrigerator, place them in an airtight container. This helps keep them fresh and moist. You can enjoy them for up to one week. Keep them in a cool part of your fridge to avoid melting any chocolate chips. For long-term storage, freezing is a great option. Place the bites in a single layer on a baking sheet. Freeze them until firm, then transfer them to a freezer bag or airtight container. This way, you can enjoy them for up to three months. Just remember to label them with the date! To keep your bites fresh, check for signs of spoilage. If they smell off or have a dry texture, it's time to toss them. Always store them in a cool, dry place, away from direct sunlight. Keeping them sealed tight will help maintain their taste and texture. Matcha is a superfood packed with many health perks. It gives you a boost of energy without the crash. Matcha is rich in antioxidants, which help your body fight off harmful free radicals. It also supports your metabolism and can aid in weight loss. Plus, it contains L-theanine, an amino acid that promotes calmness and focus. Each bite offers a tasty way to enjoy these benefits. Yes, you can make these bites ahead! They are great for meal prep. Just prepare them and store them in an airtight container. Keep them in the fridge for up to one week. If you want them to last longer, you can freeze them. They hold their taste and texture well in the freezer, making them perfect for on-the-go snacks. If you have any allergies, you can easily switch some ingredients. For nut allergies, use sunbutter or tahini instead of almond butter. If you cannot have honey, maple syrup is a great swap. For gluten-free options, ensure your oats are certified gluten-free. You can leave out the chia seeds if you’re not a fan. These bites are very flexible and fit many diets! These energy bites are easy and fun to make. You use simple ingredients like rolled oats, almond butter, and matcha powder. First, combine the dry and wet ingredients, then form them into bite-sized balls. You can chill them for a great snack anytime. These bites can fit your taste and needs. Try different nut butters or sweeteners. Enjoy a healthy boost that keeps you energized. With these tips, you can create delicious snacks tailored just for you.

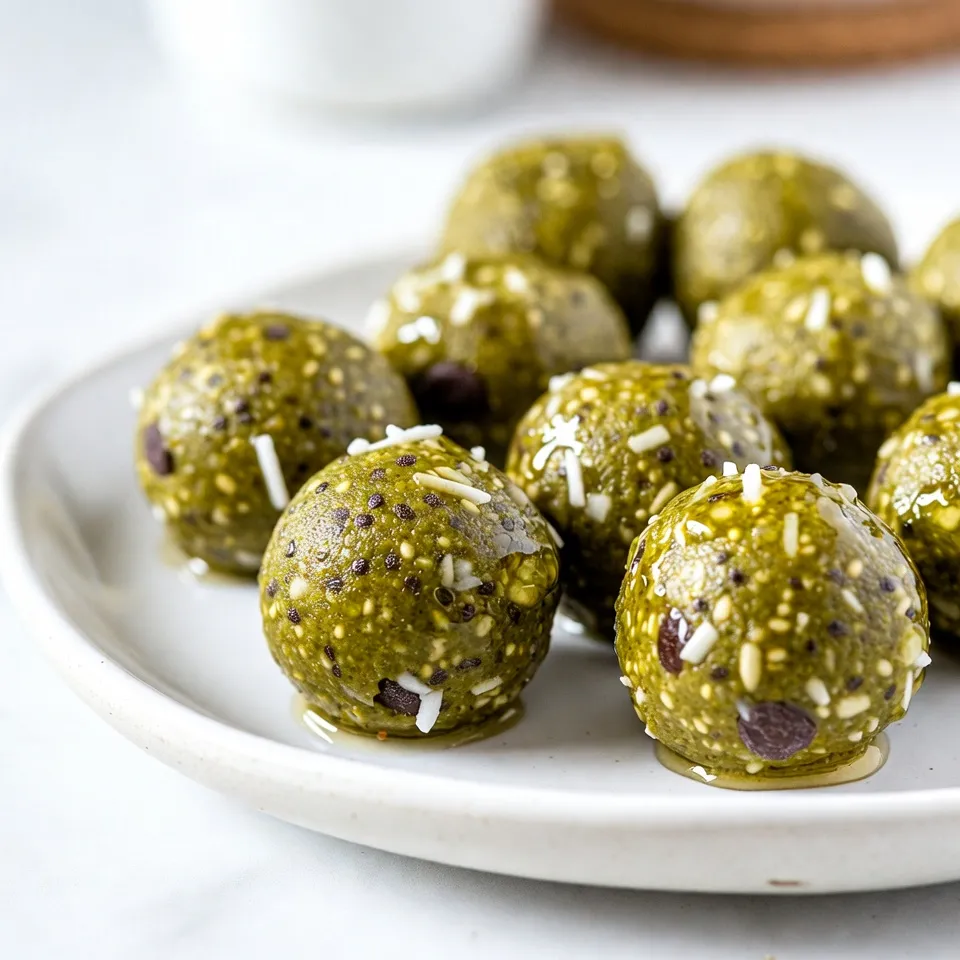
Matcha Coconut Energy Bites Simple and Tasty Snack

Looking for a quick and tasty snack that gives you energy? Try my Matcha Coconut Energy Bites! Packed with wholesome

To make this sweet treat, gather the following ingredients: - 1 cup semi-sweet chocolate chips - 1 cup milk chocolate chips - 1 cup toffee bits - 1/2 cup crushed pretzels - 1/4 cup sea salt flakes - 1/2 cup chopped nuts (almonds or pecans, optional) You can choose between semi-sweet and milk chocolate for this recipe. Semi-sweet chocolate offers a rich, deep flavor. It pairs well with the toffee bits. Milk chocolate gives a creamier and sweeter taste. Use both for a balanced flavor. Mixing them creates a delightful contrast that many love. Feel free to customize your bark with add-ins. You can use: - Nuts: Almonds and pecans add crunch. Walnuts or hazelnuts work too. - Pretzels: They give a salty twist. Try adding crushed potato chips for a different crunch. - Dried fruit: Chopped dried cherries or cranberries add a fruity touch. Experiment with these options to make your bark unique! {{ingredient_image_2}} First, preheat your oven to 350°F (175°C). This will prepare it for the pretzels. Next, take a baking sheet and line it with parchment paper. This will keep the bark from sticking. Now, take your crushed pretzels and spread them evenly on the sheet. Make sure they aren't piled up. Put the baking sheet in the oven and toast the pretzels for about 5 minutes. You want them to turn lightly brown. This step adds flavor. After toasting, take them out and let them cool completely. For the chocolate, grab a microwave-safe bowl. Add both the semi-sweet and milk chocolate chips. This mix gives you a nice balance of flavors. Heat the bowl in the microwave. Use 30-second intervals, stirring well after each one. Keep going until the chocolate is smooth. It should look shiny and creamy. Now, pour the melted chocolate over the cooled pretzels. Use a spatula to spread it out evenly. Make sure every pretzel gets a good coat of chocolate. Next, sprinkle the toffee bits all over the chocolate. If you like, add chopped nuts for extra crunch. Finish by lightly sprinkling sea salt flakes on top. This will make the sweet flavors pop. Now, place the baking sheet in the refrigerator. Let it chill for about 30 minutes. This will help the chocolate set and become firm. Once it's solid, take it out and break it into pieces. You can decide how big or small you want them! To get a smooth chocolate coating, start with good chocolate. Use semi-sweet and milk chocolate chips. Melt them slowly in the microwave. Heat in 30-second bursts. Stir well after each burst. This helps avoid burning. Once melted, pour it over the pretzels. Spread it evenly with a spatula. You want every pretzel to get coated. If the chocolate seems thick, add a teaspoon of oil. This will give it a nice shine and smooth texture. For the best toasted pretzels, spread them out on a baking sheet. Make sure they are in a single layer. This helps them toast evenly. Set your oven to 350°F (175°C). Toast for about 5 minutes. Watch them closely so they don’t burn. Once they are lightly brown, take them out. Let them cool before using. Toasted pretzels add a great crunch and flavor to the bark. Presentation makes your bark look even better. Serve it on a colorful platter or in a gift box. You can also add a sprinkle of toffee bits or nuts around the edges. This adds color and texture. For a fun touch, cut the bark into different shapes. Use a sharp knife for clean cuts. This makes sharing easy and fun! Pro Tips Use Quality Chocolate: The flavor of your bark heavily relies on the chocolate you choose. Opt for high-quality semi-sweet and milk chocolate chips for the best results. Chill for Firmness: Make sure to chill the bark until it's completely set. This will not only help with texture but also make it easier to break into clean pieces. Customize Toppings: Feel free to get creative with your toppings! Consider adding dried fruits, coconut flakes, or different types of nuts to personalize your bark. Storage Tips: Store your chocolate bark in an airtight container at room temperature for up to two weeks. If it's warm, refrigerate to prevent melting. {{image_4}} You can change the chocolate in your bark. For a deeper taste, use dark chocolate. Dark chocolate adds a rich flavor that pairs well with the sweet toffee. You can also try white chocolate for a creamy twist. Mixing different chocolates can make your bark special and fun. Feel free to get creative with toppings. You can add dried fruit like cranberries or cherries. They bring a nice chew and a burst of flavor. Sprinkles of mini marshmallows or M&Ms can also add color and extra sweetness. For a nutty crunch, try using crushed walnuts or macadamia nuts. The options are endless, so mix and match based on what you love! If you want a vegan version, swap the chocolate chips for dairy-free ones. Many brands offer great tasting vegan chocolate. Use coconut oil instead of butter for melting. You can also find vegan toffee bits or make your own using coconut sugar. Check the labels to ensure all ingredients meet your needs. Enjoy making a treat that fits your diet! To keep your Chocolate Toffee Crunch Bark fresh, store it in an airtight container. You can use a plastic or glass container with a tight lid. This helps protect the bark from moisture and keeps it crunchy. Place parchment paper between layers if you stack pieces. This prevents them from sticking together. This bark stays fresh for up to two weeks at room temperature. Keep it in a cool, dry place away from sunlight. If you want to enjoy it longer, refrigerate it. In the fridge, it can last about a month. Just remember, cold temperatures can slightly change the texture, making it a bit firmer. You can freeze Chocolate Toffee Crunch Bark for longer storage. Wrap pieces tightly in plastic wrap. Then, place them in a freezer-safe bag or container. The bark can last for up to three months in the freezer. When you’re ready to eat it, thaw it in the fridge for a few hours. Avoid microwaving it, as this can melt the chocolate. Enjoy your treat once it’s ready! If you don’t have toffee bits, you can use crushed caramel candies. They add a similar sweet flavor. Another option is to use chocolate-covered toffee candies. Just chop them into small pieces. You can even try using crushed cookies like Butterfingers for a different twist. To make the bark festive, you can add colorful sprinkles on top. Use seasonal colors like red and green for Christmas or pastels for Easter. You can also place small candies or chocolate shapes that fit the theme. A drizzle of white chocolate over the top can add a nice touch too. Yes! You can use any nuts you like. Almonds and pecans work well, but feel free to try walnuts or cashews. Just chop the nuts into small pieces for even distribution. This way, every bite of bark has a crunchy element. This post covered everything for making Chocolate Toffee Crunch Bark. We talked about simple ingredients and steps. You can tweak the recipe with different chocolates and add-ins. I shared tips for a smooth finish and great presentation. Plus, you learned about storage and variations. With these ideas, you can make your bark unique. Enjoy creating your own tasty treats!

Chocolate Toffee Crunch Bark Irresistible Treat Recipe

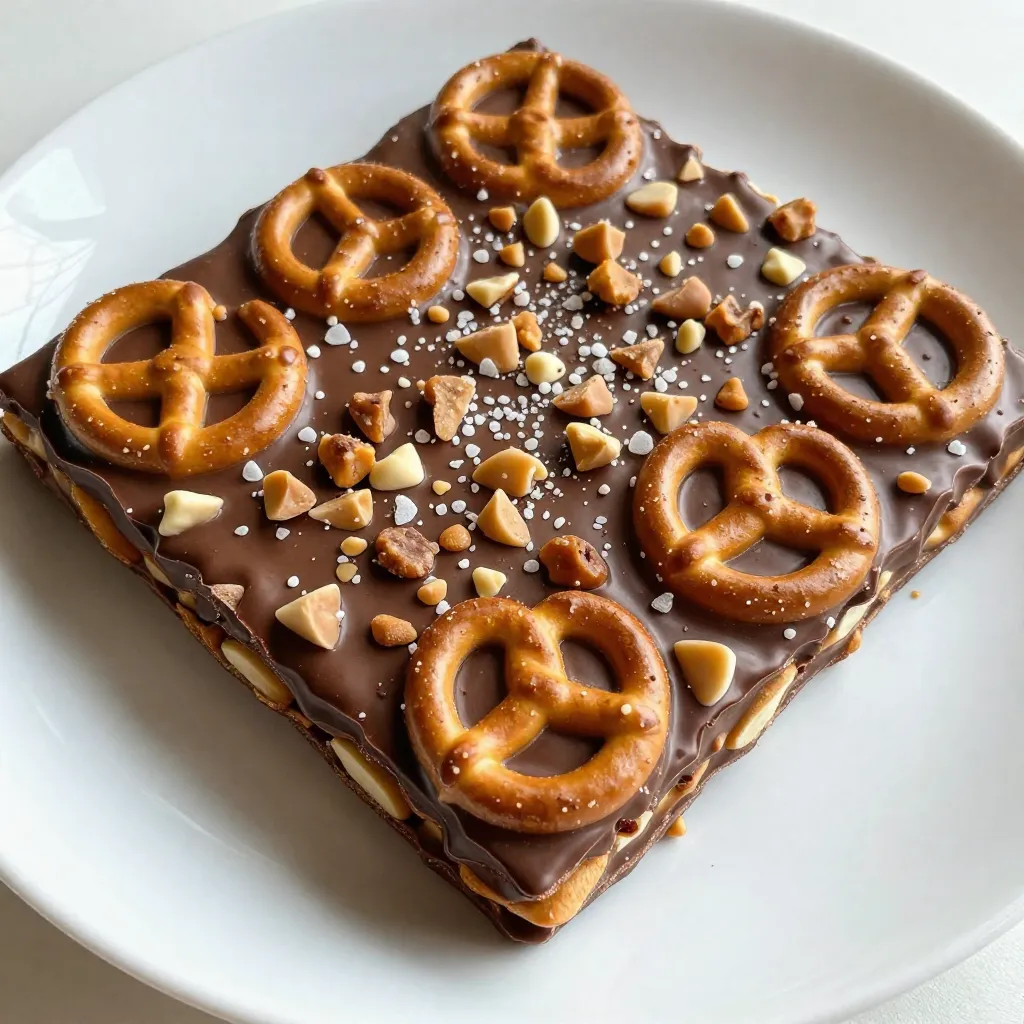
Are you ready to satisfy your sweet tooth? In this post, I’ll share my favorite recipe for Chocolate Toffee Crunch

- 1 lb shrimp, peeled and deveined - 2 tablespoons chipotle chili powder - 1 teaspoon garlic powder - 1 teaspoon ground cumin - 2 tablespoons olive oil - Juice and zest of 2 limes - Salt and pepper to taste - 1 cup quinoa, rinsed - 2 cups vegetable broth (or water) - 1 cup corn (fresh or frozen) - 1 avocado, sliced - 1 cup cherry tomatoes, halved - 1 cup black beans, drained and rinsed - Fresh cilantro, chopped (for garnish) To make these Chipotle Lime Shrimp Bowls, you need fresh shrimp and a mix of spices for the marinade. The chipotle chili powder gives the shrimp a nice kick. Garlic powder and cumin add rich flavor. Using lime juice and zest brightens the dish. For the bowl, quinoa serves as a hearty base. You can use vegetable broth for extra flavor. Corn, avocado, cherry tomatoes, and black beans add texture and color. Finally, fresh cilantro gives a nice touch. Gather these ingredients before you start cooking. This way, you can enjoy a smooth cooking process. {{ingredient_image_2}} First, grab a mixing bowl. Combine 1 pound of peeled and deveined shrimp with 2 tablespoons of chipotle chili powder, 1 teaspoon of garlic powder, 1 teaspoon of ground cumin, and 2 tablespoons of olive oil. Add the juice and zest of 2 limes. Don’t forget a pinch of salt and pepper. Mix it all well to coat the shrimp evenly. Let this sit for at least 20 minutes. This step helps the flavors blend. Next, take a medium saucepan. Pour in 2 cups of vegetable broth or water and bring it to a boil. Once boiling, add 1 cup of rinsed quinoa. Stir to mix and lower the heat to a gentle simmer. Cover the pot and let it cook for about 15 minutes. After that, remove it from heat but keep it covered for another 5 minutes. This makes the quinoa light and fluffy. Now, heat a large skillet over medium-high heat. Add the marinated shrimp in a single layer. Cook them for about 2-3 minutes on each side. You will know they are done when they turn pink and opaque. Avoid overcrowding the pan to keep them from steaming. Once cooked, take them off the heat. For the assembly, start with a generous scoop of fluffy quinoa at the bottom of each bowl. Layer the cooked shrimp on top. Then, add a colorful mix of corn, sliced avocado, halved cherry tomatoes, and black beans. This will make your bowls look vibrant and inviting. Finally, sprinkle freshly chopped cilantro over the top for a pop of flavor. For an extra zesty kick, squeeze some lime juice before serving. To present your bowls, use deep, wide bowls. Arrange the ingredients in neat sections for a colorful display. Adding a lime wedge on each plate allows guests to add a fresh squeeze of lime as they wish. - Avoid overcrowding the skillet: When you cook shrimp, keep them in a single layer. If you add too many at once, they will steam instead of sear. This can lead to a rubbery texture that nobody wants. - Recommended cooking time for best texture: Cook the shrimp for about 2-3 minutes on each side. They should turn pink and opaque when done. This short cooking time keeps them tender and juicy. - Ensuring quinoa is fluffy: Rinse the quinoa before cooking. This removes bitter saponins and helps it cook evenly. After cooking, let it sit covered for 5 minutes. This step allows it to steam and get fluffy. - Variations for broth or seasoning options: You can use vegetable broth for more flavor, but water works too. Try adding spices like garlic powder or onion powder to the broth for an extra kick. - Suggestions for additional spices: If you want more heat, add cayenne pepper or crushed red pepper flakes. You can also sprinkle some smoked paprika for a deeper flavor. - Recommended accompaniments or sauces: Serve with a dollop of sour cream or a drizzle of a tangy lime vinaigrette. Fresh toppings like diced jalapeños or pickled red onions can also add a nice crunch and zing. Pro Tips Marinate Longer for Depth: For even more intense flavor, consider marinating the shrimp for 30 minutes to an hour. This extra time allows the spices to penetrate the shrimp more thoroughly. Perfectly Fluffy Quinoa: After cooking the quinoa, fluff it with a fork before serving. This helps separate the grains and enhances the texture, making it light and airy. Fresh Ingredients Matter: Use fresh lime juice and zest for the best flavor. Bottled lime juice can lack the brightness and freshness that really elevates the dish. Customize Your Bowl: Feel free to add or substitute other vegetables in your bowls, such as bell peppers or spinach, to personalize your meal and increase nutrient variety. {{image_4}} Want to switch things up? You can easily swap shrimp for chicken or tofu. Chicken thighs work well; they stay juicy and tender when cooked. Just marinate them like you do the shrimp. For a plant-based option, try firm tofu. Press it to remove extra water, then cut it into cubes and marinate it. If you're a seafood lover, consider using scallops or fish. Scallops cook quickly and offer a sweet flavor. Fish like tilapia or salmon can also bring a tasty twist. Just adjust the cooking time, as seafood can cook faster than shrimp. Looking for a meatless meal? You can make a delicious bowl without any animal products. Start with the quinoa, then load up on veggies. Add roasted bell peppers, zucchini, or even sautéed kale for extra nutrients. For plant-based protein, include chickpeas or lentils. They are filling and packed with flavor. You can also use a store-bought vegan meat substitute. This gives you a hearty, satisfying dish that everyone can enjoy. Quinoa is great, but you have other choices too. Brown rice is a healthy option that adds a nutty taste. Farro, a chewy grain, can give your bowl a different texture. If you want something lighter, try cauliflower rice. It adds volume without many carbs. You can also use mixed greens as a base for a fresh salad bowl. Each option brings a unique flavor and texture to your meal. Store leftovers in an airtight container. This keeps the meal fresh longer. Use glass or plastic containers that seal well. Smaller containers help if you want to portion out the food. To freeze, separate the shrimp and quinoa. This helps maintain texture. Place shrimp in a freezer bag, removing air before sealing. For quinoa, use a different bag or container. To reheat, thaw in the fridge overnight. Heat shrimp in a skillet for a few minutes. Reheat quinoa in the microwave or on the stove. The dish stays fresh for about three days in the fridge. Look for changes in color or smell as signs of spoilage. If shrimp smells off or looks slimy, discard it. Fresh quinoa should remain fluffy and dry. Always use your best judgment when checking food freshness. Yes, you can prepare the components in advance. Cook the quinoa and marinate the shrimp the day before. Store them in separate containers in the fridge. This way, you can quickly assemble the bowls when you are ready to eat. Just remember to cook the shrimp fresh for the best flavor. If you need an alternative grain, try brown rice or farro. Both add great texture and nutrition to your bowls. You can also use cauliflower rice for a low-carb option. Each of these grains brings its own unique flavor and can make your meal special. Shrimp cooks quickly. You will know they are done when they turn pink and opaque. Each shrimp should curl slightly as they cook. Avoid overcooking, as shrimp can become rubbery. Always check the color and texture for perfect results. Yes, this recipe is gluten-free. All the ingredients, including shrimp, quinoa, and veggies, are free from gluten. Always check labels on canned items like black beans to ensure they are gluten-free. This makes it a great option for anyone with gluten sensitivities. To add extra heat, mix in diced jalapeños or a splash of hot sauce. You can also increase the chipotle chili powder in the marinade. For a smoky flavor, try adding smoked paprika. Adjust the spice level to suit your taste for a bold kick! This blog post provided a simple guide to making Chipotle Lime Shrimp Bowls. You learned the key ingredients, the preparation steps, and useful tips for cooking. Remember that marinating the shrimp enhances flavor, and cooking quinoa correctly gives the dish a great texture. Whether you prefer shrimp, chicken, or plant-based options, you can create a bowl that fits your taste. Enjoy experimenting with different flavors, and don’t forget to share your creations!

Chipotle Lime Shrimp Bowls Flavorful and Fresh Meal

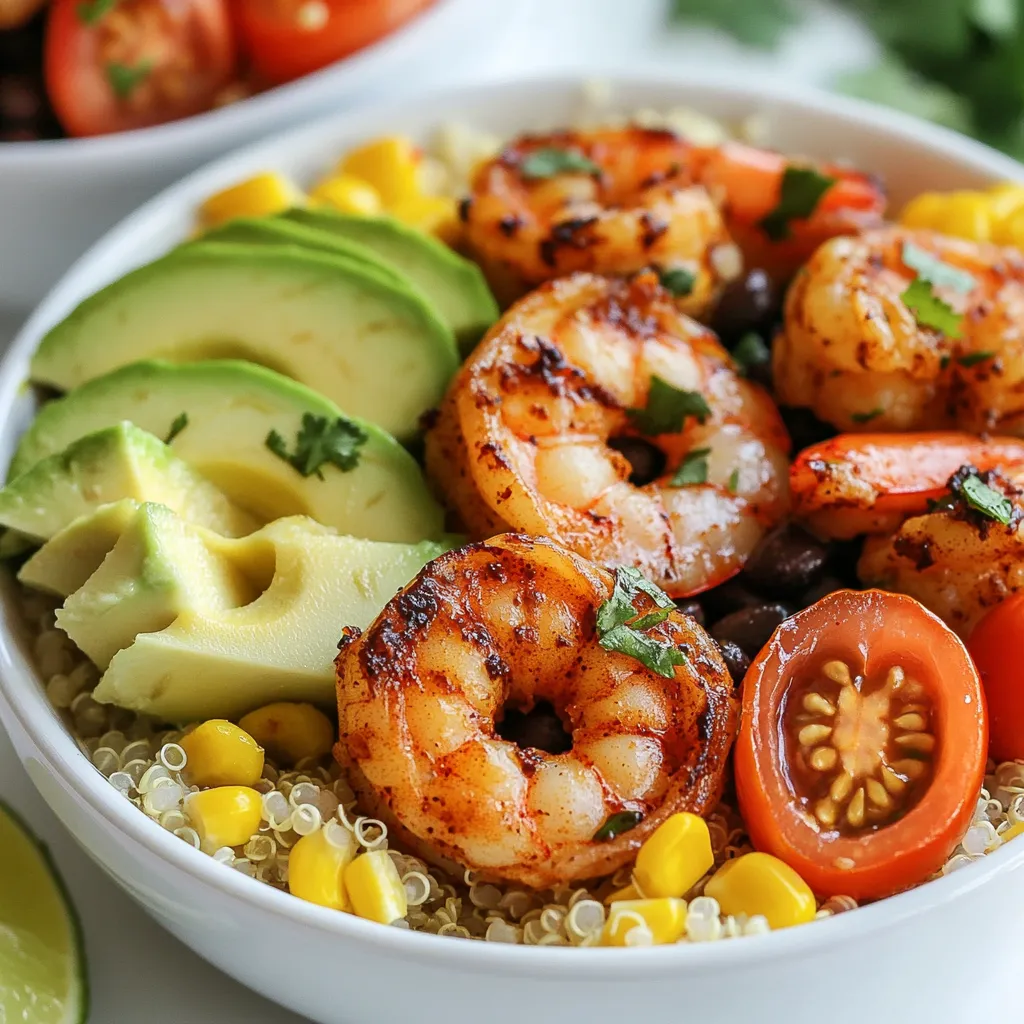
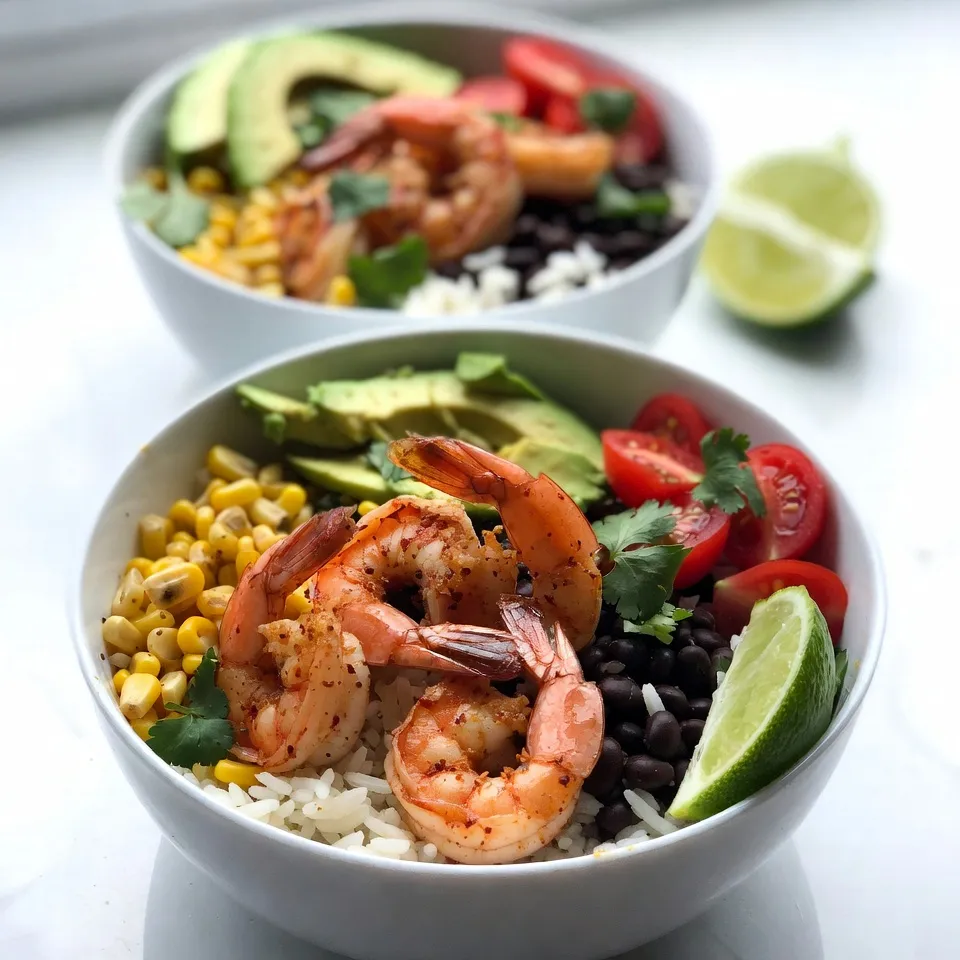
Looking for a fresh and tasty meal? Try my Chipotle Lime Shrimp Bowls! This dish brings together juicy shrimp marinated

- 2 ripe avocados - 4 large eggs - 1/4 cup cherry tomatoes, halved - 2 tablespoons fresh chives, finely chopped - Salt and black pepper, to taste - 1/2 teaspoon garlic powder - 1/4 teaspoon paprika - Optional: your favorite hot sauce for serving - Muffin tin - Spoon - Knife Gather these ingredients to create a tasty meal. The avocados bring creaminess and healthy fats. Eggs offer protein and make the dish filling. Cherry tomatoes add sweetness and color. Fresh chives give a nice oniony flavor. The seasonings, like garlic powder and paprika, add a spicy touch. You can use hot sauce for an extra kick if you love heat. You need a muffin tin to hold the avocados while baking. A spoon helps scoop the avocado flesh easily. A knife is key for cutting the avocados safely. With these simple tools and fresh ingredients, you can make a delicious breakfast that impresses! {{ingredient_image_2}} 1. Preheat the oven: Start by setting your oven to 375°F (190°C). This lets it reach the right heat for baking. 2. Cut and pit the avocados: Take your ripe avocados and slice them in half lengthwise. Carefully remove the pits. Use a spoon to scoop out a small amount of the flesh. This makes enough space for the egg. 1. Scooping out avocado flesh: Make sure to scoop just enough so the egg fits snugly. You want the avocado to hold its shape. 2. Cracking eggs into the avocados: Crack one egg into each avocado half. Try to keep the egg inside the avocado. Spilling the whites can make a mess. 3. Seasoning and adding toppings: Sprinkle garlic powder and paprika on the eggs. Add salt and black pepper to taste. Top with halved cherry tomatoes and chopped chives for extra flavor and color. 1. Support options for avocado halves: Place the avocado halves in a muffin tin. This keeps them stable while they bake. If they wobble, use small balls of aluminum foil for support. 2. Baking time and checking for doneness: Bake the avocado cups for about 15-20 minutes. Check if the egg whites are set. If you like runny yolks, take them out sooner. For firmer yolks, leave them in a bit longer. Enjoying your avocado egg breakfast cups is just a few steps away! To get the yolk just right, watch the baking time. For a runny yolk, bake for about 15 minutes. If you like it firmer, aim for 20 minutes. You can also crack the egg carefully. This helps keep the yolk intact. Always check the whites; they should be set. For a pretty plate, use fresh chives and fruit. Sprinkle extra chives on top of each egg cup. They add color and flavor. A side of berries or sliced oranges makes it bright. The mix of colors will impress anyone you serve. Avocados are rich in healthy fats and fiber. They help you feel full and nourish your body. Eggs provide protein and vitamins. They are great for your muscles and brain. Together, they make a balanced meal. Enjoy the good taste and the health boost! Pro Tips Use Fresh Eggs: Fresh eggs will help achieve a better texture and taste. Look for eggs with a recent sell-by date for optimal freshness. Choose Ripe Avocados: Make sure your avocados are ripe but not overripe. They should yield slightly to gentle pressure for the best results. Experiment with Toppings: Feel free to customize your avocado egg cups with different toppings such as cheese, herbs, or spices to suit your taste. Check for Doneness: Keep an eye on the eggs towards the end of baking; the perfect egg should have set whites and slightly runny yolks, depending on your preference. {{image_4}} You can change up the veggies in your avocado egg cups. Try adding spinach, bell peppers, or even mushrooms. These choices add flavor and nutrients. You can also mix in some cheese, like feta or goat cheese, for a creamy texture. For spices, consider adding cumin or chili powder. These spices can bring a warm kick to your dish. If you need a dairy-free option, skip the cheese or use a plant-based alternative. You can still enjoy great taste without dairy. For those who follow a gluten-free diet, this recipe is naturally gluten-free. Just make sure any extra toppings, like sauces, are also gluten-free. To spice things up, add hot sauce or your favorite salsa on top. A drizzle of sriracha can give it a nice heat. You can also try fresh salsa made with onions, cilantro, and lime for a fresh twist. These flavors can take your breakfast to new heights! To keep your avocado egg breakfast cups fresh, store them in the fridge. Place any leftovers in an airtight container. They will stay good for about 2 days. If you want to freeze them, do so before baking. Wrap each avocado half tightly in plastic wrap. Then, place them in a freezer bag. This way, you can enjoy them later. For the best taste, reheat your avocado egg cups in the oven. Preheat the oven to 350°F (175°C). Place the cups on a baking sheet and heat for about 10 minutes. This method warms them evenly without losing flavor. You can also use a microwave if you’re short on time. Just heat them for 30 seconds at a time, checking frequently. Yes, you can prepare these cups in advance. Here are some tips for meal prep: - Prep the Avocados: Cut and pit the avocados, then scoop out a bit of flesh. - Store: Place the avocado halves in an airtight container. Add lemon juice to prevent browning. - Chill: Keep them in the fridge for up to 24 hours. - Add Eggs Later: Crack the eggs in just before baking for the best taste and texture. Pair these cups with some tasty side dishes. Here are my favorites: - Fresh Fruit: Berries or sliced oranges add sweetness and color. - Whole Grain Toast: A slice of toast complements the creamy avocado. - Salad: A light green salad with a lemon vinaigrette adds freshness. - Yogurt: A small bowl of yogurt can provide some tangy contrast. Check these signs to tell if your eggs are done: - No More Liquid Whites: The egg whites should be firm and not runny. - Yolk Consistency: If you like runny yolks, they should jiggle gently. - Firm Yolk: For firmer yolks, bake a few minutes longer. These tips help ensure your Avocado Egg Breakfast Cups turn out perfect every time! This recipe for Avocado Egg Breakfast Cups combines simple ingredients like avocados, eggs, and cherry tomatoes. You prepare them easily with basic tools and clear steps. I shared tips on baking, perfecting egg texture, and how to enhance flavors. You can modify it to fit dietary needs and store leftovers well. Try this tasty meal for breakfast or brunch. It's healthy, fun, and sure to impress! Enjoy your cooking and start creating something special today.

Avocado Egg Breakfast Cups Flavorful and Nutritious Dish

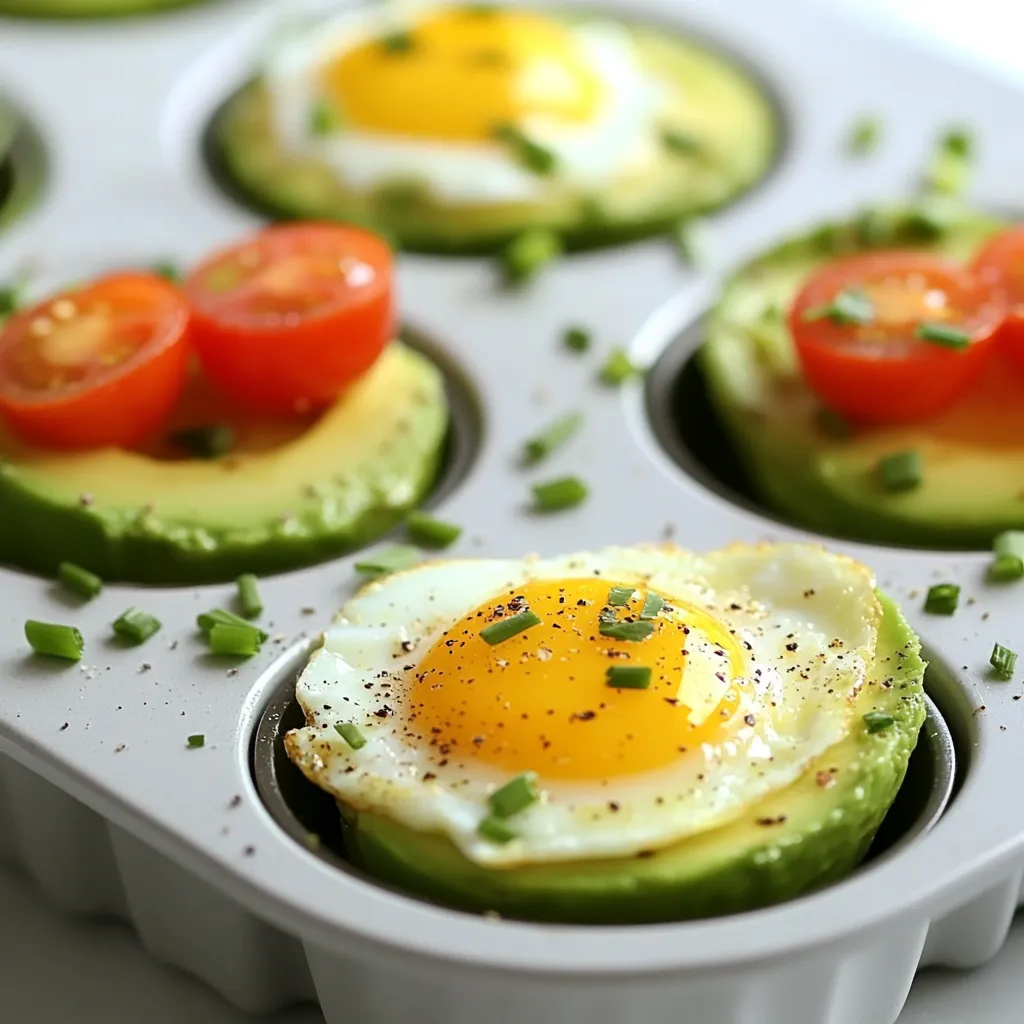
Looking for a quick, tasty breakfast that packs a nutritious punch? Avocado Egg Breakfast Cups are the perfect solution! Combining

- 2 flatbreads (store-bought or homemade for a personal touch) - 1 cup cooked chicken, shredded (rotisserie chicken works great) - 1/2 cup BBQ sauce (your favorite flavor) - 1 cup shredded mozzarella cheese (or a blend of cheeses for extra taste) - 1/2 cup red onion, thinly sliced (for a sweet crunch) - 1/4 cup fresh cilantro, chopped (adds a burst of freshness) - 1/2 cup corn kernels (freshly cooked or drained canned corn) - 1/2 teaspoon garlic powder (for a hint of savory depth) - Salt and pepper to taste When making BBQ chicken flatbread, you want the best mix of flavors. Start with flatbreads. You can buy them or make your own. Homemade flatbreads add a personal touch. Next, grab some cooked chicken. Rotisserie chicken is easy and tasty. Then, choose a BBQ sauce you love. Try sweet, smoky, or spicy sauces. For cheese, I recommend mozzarella. A blend of cheeses can add more flavor. Don't forget the extras! Thinly sliced red onions give a sweet crunch. Fresh cilantro adds a burst of flavor. Corn kernels make it colorful and fun. Finally, add garlic powder for depth. Season with salt and pepper. With these ingredients, you will create a fun and tasty BBQ chicken flatbread that everyone will love! {{ingredient_image_2}} 1. Preheat the Oven: Start by preheating your oven to 425°F (220°C). This high heat helps the flatbread get nice and crispy. 2. Prepare the Chicken Mixture: In a medium bowl, mix 1 cup of shredded chicken with 1/2 cup of BBQ sauce and 1/2 teaspoon of garlic powder. Stir well until the chicken is fully coated. Taste it and add salt and pepper as needed. 1. Arrange the Flatbreads: Grab a baking sheet and line it with parchment paper. Place your flatbreads on the sheet, leaving space between each one. 2. Distribute the Chicken Mixture: Spoon the BBQ chicken mixture evenly over each flatbread. Make sure every part is covered for the best flavor. 3. Add Cheese and Toppings: Sprinkle 1 cup of shredded mozzarella cheese over the chicken. Then add 1/2 cup of thinly sliced red onions and 1/2 cup of corn kernels. This will add some nice crunch and color. 1. Bake to Perfection: Slide the baking sheet into your preheated oven. Bake for about 10 to 12 minutes. You want the edges to be crispy and the cheese to be bubbly. 2. Cool and Garnish: After baking, carefully take the flatbreads out of the oven. Let them cool for a few minutes on a wire rack. Before serving, sprinkle fresh cilantro on top for a pop of color and flavor. 3. Slice and Serve: Cut the flatbreads into triangles for easy eating. Enjoy your delicious BBQ chicken flatbread! To get crispy flatbreads, preheat your oven to 425°F (220°C). This high heat helps cook the flatbreads quickly, creating a nice crunch. Place the flatbreads on a lined baking sheet with space between them. This allows hot air to circulate around each flatbread. To avoid soggy flatbreads, do not overload them with toppings. Spread the BBQ chicken mixture evenly, but don’t make it too thick. Use less BBQ sauce if it seems too saucy. If you want to try something different than BBQ sauce, consider using pesto or a spicy tomato sauce. These alternatives can change the flavor profile and add a new twist. You can also add spices or herbs to boost flavor. Try adding paprika, cumin, or even chili powder for a kick. Fresh herbs like basil or parsley can also enhance the taste and aroma. For a fun presentation at gatherings, serve the flatbreads on a wooden board. Slice them into triangles for easy sharing. You can add a small bowl of extra BBQ sauce on the side for dipping, making it more inviting. When pairing, consider serving the flatbreads with a fresh salad or coleslaw. They work well with drinks like iced tea or lemonade, adding a refreshing touch to your meal. Pro Tips Use Fresh Ingredients: Opt for fresh cilantro and corn for a more vibrant flavor and texture. Fresh ingredients elevate the dish significantly! Customize Your Toppings: Feel free to add other toppings like jalapeños or bell peppers for an extra kick. Personalizing your flatbread makes it unique! Experiment with BBQ Sauces: Different BBQ sauces can drastically change the flavor profile. Try a smoky or spicy variety for a new twist! Keep an Eye on Baking Time: Ovens vary in temperature, so keep an eye on your flatbreads to prevent burning and achieve that perfect golden color. {{image_4}} You can get creative with proteins. Instead of chicken, try using pulled pork or tofu. Pulled pork adds a smoky taste, while tofu offers a nice plant-based option. Both choices work well with BBQ sauce. For cheese, mozzarella is great, but you might want to switch it up. Try gouda or cheddar for a stronger flavor. You can also use a dairy-free cheese if you prefer. If you need a gluten-free option, look for gluten-free flatbreads. Many stores offer them now, making it easy to enjoy this dish. Just check the label to ensure it meets your needs. For vegan options, replace chicken with jackfruit or chickpeas. These provide a hearty texture. Use a plant-based BBQ sauce and skip the cheese or use a vegan cheese instead. You can mix things up with flavors. Try adding honey or brown sugar to your BBQ sauce for a sweet twist. A dash of hot sauce can spice things up too. Don’t stop at just chicken and corn! Add toppings like bell peppers, jalapeños, or pineapple. These additions can elevate your flatbread and make it unique. To keep your BBQ chicken flatbread fresh, store it properly. First, let it cool to room temperature. Then, wrap each flatbread in plastic wrap or foil. You can also place it in an airtight container. This helps keep it from drying out. Your flatbread will last in the fridge for about 3 to 4 days. If you notice any strange smells or colors, toss it out. It's always better to be safe. When it's time to enjoy your leftovers, reheating is key. The best way to reheat flatbread is in the oven. Preheat your oven to 350°F (175°C). Place the flatbread on a baking sheet and heat for about 10 minutes. This keeps the edges crispy and the cheese melty. If you use a microwave, be aware it can make the flatbread soggy. For the microwave, heat it for 30 seconds to 1 minute. Check if it's warm enough. If not, heat in short bursts. Enjoy your tasty flatbread! How do I make homemade flatbread? To make homemade flatbread, mix flour, salt, water, and a little oil. Knead the dough until smooth. Let it rest for 30 minutes. Roll it out thin and cook on a hot skillet for about 2-3 minutes on each side. Can I freeze BBQ chicken flatbread leftovers? Yes, you can freeze BBQ chicken flatbread leftovers. Wrap them tightly in foil or plastic wrap. Store them in an airtight container. They can last up to three months in the freezer. What's the best BBQ sauce for chicken flatbread? The best BBQ sauce varies by taste. I love a sweet and tangy sauce. Look for sauces with a balance of sweetness and spice. Brands like Sweet Baby Ray’s or homemade sauces work well. How do I know when the flatbread is done baking? Your flatbread is done when the edges are golden brown. The cheese should be melted and bubbling. If you see these signs, it’s ready to take out. Can I use grilled chicken instead of shredded? Yes, you can use grilled chicken. Just chop it into small pieces. Make sure to coat it well with BBQ sauce for flavor. Can I add additional toppings to my flatbread? Absolutely! You can add toppings like bell peppers, jalapeños, or even pineapple. Get creative to suit your taste! What drinks pair well with BBQ chicken flatbread? Drinks like iced tea, lemonade, or craft beer pair great with this dish. You can also try a fruity soda for a fun twist! How do I serve flatbread for a large group? To serve flatbread for a large group, cut it into smaller pieces. Place it on a wooden board for a rustic look. Add extra BBQ sauce for dipping on the side. This article covered what you need for perfect BBQ chicken flatbread. We discussed essential ingredients, like flatbreads and chicken, plus tips for baking. You learned how to assemble and bake your flatbreads for the best results. Don't hesitate to get creative with toppings and flavors. Whether you stick to the basics or try new ideas, enjoy every bite. It's all about making your meal fun and tasty!

BBQ Chicken Flatbread Quick and Delicious Recipe

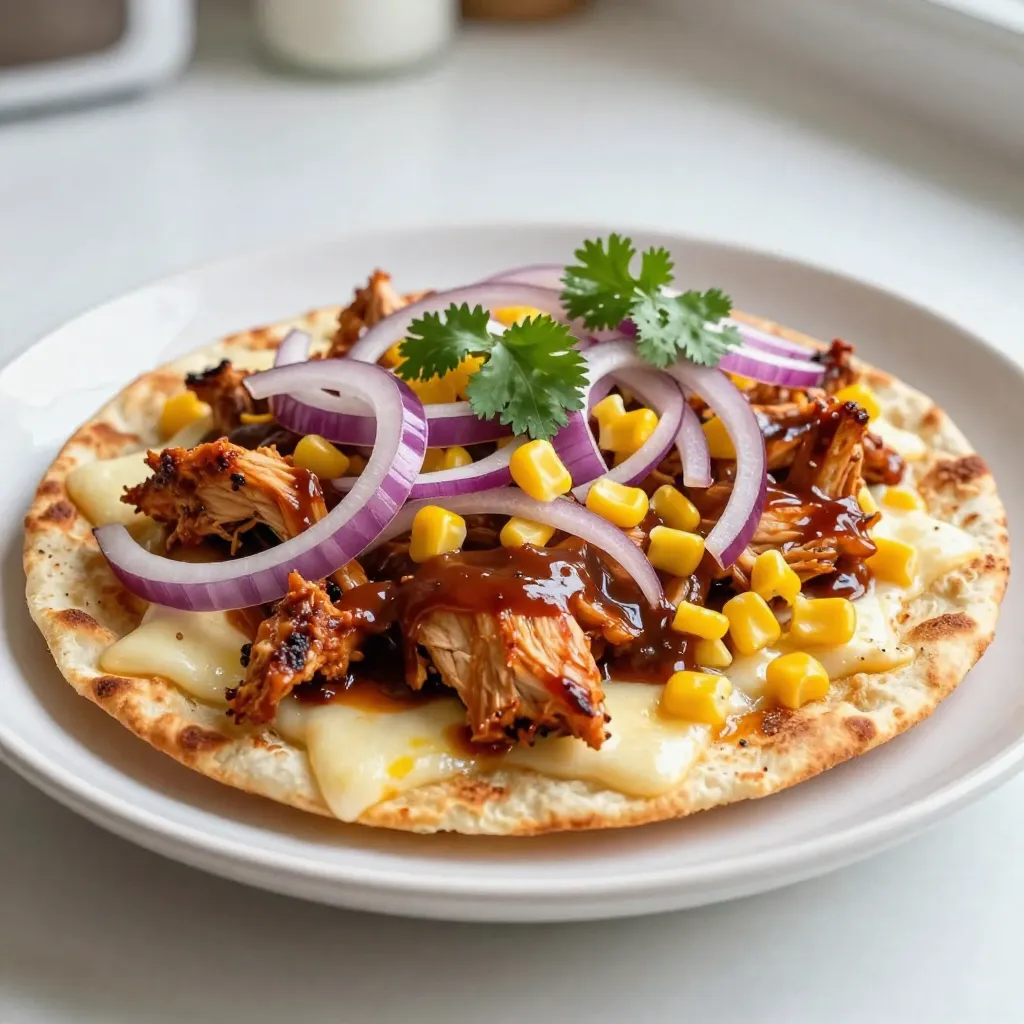
If you’re looking for a quick and tasty meal, this BBQ Chicken Flatbread is it! You can whip it up

To make Peanut Butter Banana Overnight Oats, you need simple and tasty ingredients. Here’s what you’ll need: - 1 cup rolled oats - 2 tablespoons creamy or crunchy peanut butter - 1 ripe banana, sliced - 1 tablespoon chia seeds - 2 cups almond milk (or your favorite milk) - 1 tablespoon honey or maple syrup (optional) - 1/2 teaspoon ground cinnamon - Pinch of sea salt - Optional toppings: additional banana slices, chopped nuts (like walnuts or almonds), and/or coconut flakes These ingredients create a creamy and delicious mix. The rolled oats provide fiber, while the peanut butter adds protein. The ripe banana gives a natural sweetness that balances the flavors. You can choose between creamy or crunchy peanut butter based on your taste. If you like a bit of crunch, go for the crunchy option. Chia seeds bring extra nutrition and help thicken the mixture. Almond milk or any milk alternative keeps it light and creamy. If you enjoy sweetness, honey or maple syrup can enhance the taste. The ground cinnamon adds warmth and depth. Don’t forget the pinch of sea salt; it brightens all the flavors. You can customize your oats with toppings. Sliced bananas, nuts, or coconut flakes add texture and make your dish look pretty. Enjoy every bite of this easy and tasty breakfast! {{ingredient_image_2}} 1. Mixing dry ingredients In a medium bowl or mason jar, add 1 cup of rolled oats, 1 tablespoon of chia seeds, and 1/2 teaspoon of ground cinnamon. Stir them well to blend the dry mix. 2. Whisking wet ingredients In another bowl, pour in 2 cups of almond milk and 2 tablespoons of peanut butter. If you like it sweeter, add 1 tablespoon of honey or maple syrup. Mix until it is smooth. 3. Combining wet and dry components Now, pour the wet mix over the dry ingredients. Make sure all the oats get covered. Stir gently until everything is well combined. 4. Folding in banana slices Take 1 ripe banana and slice it. Fold these banana pieces into the mixture. Be careful not to mash them too much; keep some texture. 5. Overnight refrigeration process Cover your bowl with plastic wrap or seal the jar. Place it in the fridge overnight, or for at least 4 hours. This helps the oats soak up the liquids and become soft. - Serving in bowls vs. mason jars You can serve these oats in bowls or jars. Jars are great for a grab-and-go breakfast. Bowls let you add toppings easily. - Garnishing ideas Top your oats with extra banana slices, chopped nuts like walnuts or almonds, or coconut flakes. These add flavor and a nice crunch. To get the right texture in your oats, you can adjust the milk. If your oats feel too thick the next morning, just add a splash of almond milk. This helps you reach your desired creaminess. Each person likes their oats a bit different, so find what works for you. Using ripe bananas is key for sweetness. Choose bananas with brown spots. They are sweeter and mash better into the mix. This gives your oats a nice flavor boost. You can add spices to make your oats even tastier. A pinch of nutmeg or a drop of vanilla can work wonders. These little touches add depth and warmth to every bite. Pairing with other toppings can also enhance flavor. Consider adding extra banana slices or a sprinkle of chopped nuts. Walnuts or almonds add a nice crunch. Coconut flakes give a tropical twist. Try different combinations to find your favorite! Pro Tips Use Ripe Bananas: The riper the banana, the sweeter and creamier your oats will be. Look for bananas with brown spots for optimal flavor. Customize Your Milk: Experiment with different milk alternatives like oat milk or coconut milk to find the flavor that you enjoy the most. Add a Protein Boost: Consider mixing in protein powder or Greek yogurt for an extra protein kick, making this dish even more satisfying. Make It Ahead: You can prepare multiple servings in advance for busy mornings. Just store them in individual jars for a grab-and-go breakfast. {{image_4}} You can switch up the taste of your Peanut Butter Banana Overnight Oats easily. Here are two fun ideas: - Chocolate Peanut Butter Version: Mix in 1-2 tablespoons of unsweetened cocoa powder with your wet ingredients. This adds a rich, chocolatey flavor. You can also top it with dark chocolate chips for extra sweetness. - Berry-Infused Overnight Oats: Add a handful of fresh or frozen berries, like strawberries or blueberries, to the mix. You will get a burst of fruity flavor that pairs well with peanut butter. If you have special dietary needs, you can adapt this recipe. Here are some options: - Vegan Adaptations: Use maple syrup instead of honey for sweetness. Choose almond milk or any plant-based milk you prefer. This makes the recipe fully vegan-friendly. - Gluten-Free Options: Make sure to select certified gluten-free oats. This way, you can enjoy your oats without any gluten concerns. These variations and adjustments let you create a delicious breakfast just for you. Peanut Butter Banana Overnight Oats last in the fridge for up to five days. To keep them fresh, store the oats in an airtight container. This helps prevent them from absorbing odors from other foods. If you notice any liquid separation, just stir the mixture before enjoying. You can freeze portions for easy meal prep. Simply scoop the oats into freezer-safe containers. They will last about three months in the freezer. To thaw, move a portion to the fridge the night before you want to eat it. If you're in a hurry, you can thaw it in the microwave. Just use a low setting to avoid cooking the oats. Yes, you can use quick oats. They will cook faster. Quick oats make the mixture creamier but may lose some texture. To make it nut-free, swap peanut butter for sunflower seed butter. Use a milk alternative like oat milk, too. Soaking overnight is best for soft oats. It helps them absorb milk and flavors. If short on time, soak for at least 4 hours. Great toppings include: - Additional banana slices - Chopped nuts like walnuts or almonds - Coconut flakes - A drizzle of honey or maple syrup Yes, you can meal prep! Store individual servings in jars. They last up to five days in the fridge. This blog post covered how to make Peanut Butter Banana Overnight Oats. We explored the best ingredients, preparation steps, and storage tips. You learned how to perfect texture and flavor, plus variations to make it your own. These oats are easy to prepare and great for any diet. Enjoy this tasty and healthy meal anytime. With a few simple adjustments, you can create endless options. Now it’s time to whip up your first batch and savor the deliciousness!

Peanut Butter Banana Overnight Oats Quick and Tasty

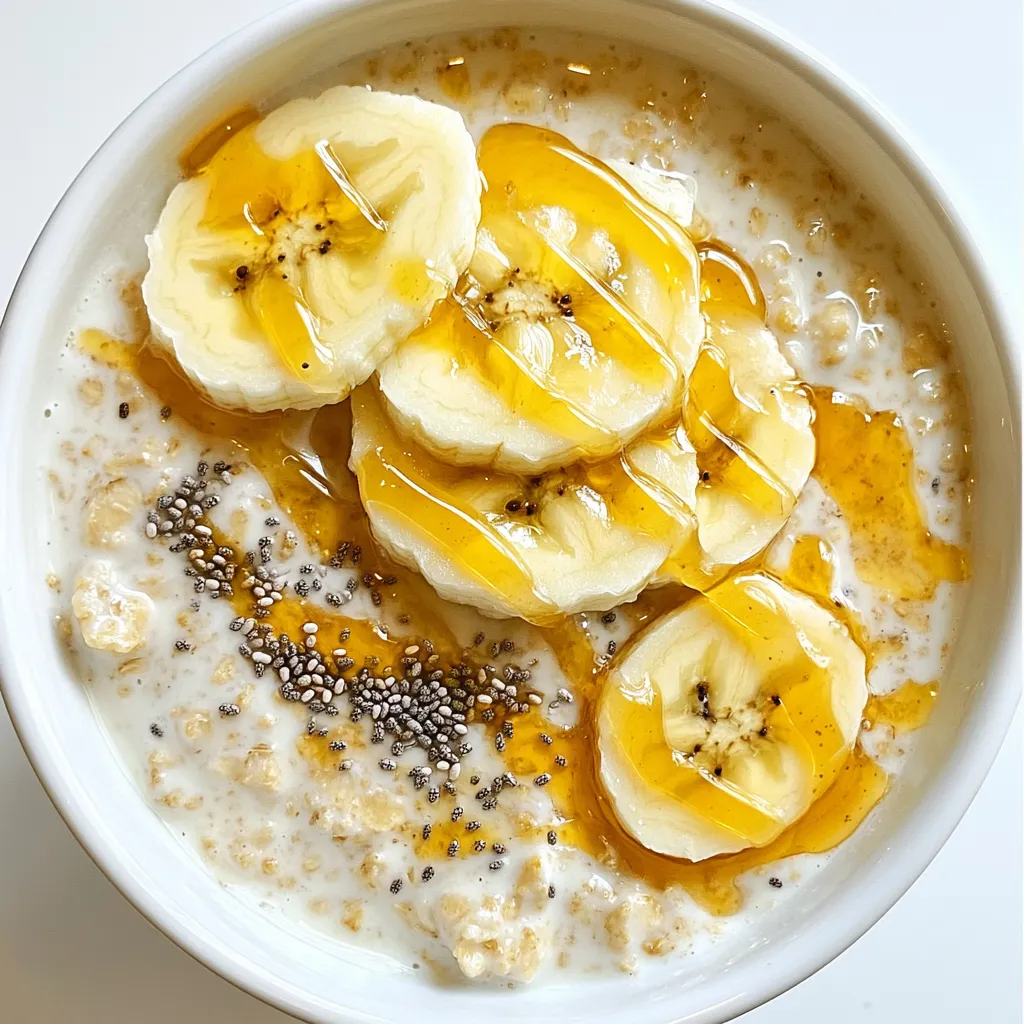
Looking for a quick and tasty breakfast? You’ll love these Peanut Butter Banana Overnight Oats! Packed with flavor and nutrition,

To make these tasty cookies, gather these main ingredients: - 2 ripe bananas, thoroughly mashed - 1 cup all-purpose flour - 1/2 cup packed brown sugar - 1/4 cup granulated sugar - 1/2 teaspoon baking soda - 1/2 teaspoon baking powder - 1/4 teaspoon fine sea salt - 1/2 cup unsalted butter, softened to room temperature - 1 teaspoon pure vanilla extract - 1/2 teaspoon ground cinnamon - 1 cup semi-sweet chocolate chips These ingredients create a soft and chewy cookie. The ripe bananas add natural sweetness and moisture. The combination of brown and granulated sugar gives a rich flavor. If you want to enhance your cookies, consider these optional add-ins: - 1/2 cup chopped walnuts (optional) - 1/2 cup chopped pecans - 1/2 cup dried cranberries Adding nuts gives a nice crunch. Dried fruits add a chewy texture and tartness. You can mix and match to find your favorite flavors. Accurate measurements matter in baking. Here are some tips to help you: - Use a kitchen scale for precise measurements. - Spoon flour into the measuring cup and level it off. - Pack brown sugar firmly into the measuring cup. - Always use room temperature butter for better mixing. These tips ensure your cookies turn out perfect every time. Accurate measuring leads to consistent results, so do not skip this step! {{ingredient_image_2}} First, set your oven to 350°F (175°C). This warm heat will help the cookies rise and bake evenly. While the oven heats, grab a baking sheet. Line it with parchment paper. This keeps the cookies from sticking and makes cleanup easy. In a large bowl, add 1/2 cup of softened unsalted butter. Mix it with 1/2 cup of packed brown sugar and 1/4 cup of granulated sugar. Use a hand mixer or a sturdy spoon. Beat the mix until it looks light and fluffy. This should take about 3-4 minutes. This step helps add air to the mix, making your cookies soft. Next, take 2 ripe bananas and mash them well. Add the mashed bananas and 1 teaspoon of pure vanilla extract to the butter-sugar mix. Stir until everything blends together smoothly. In a separate bowl, mix 1 cup of all-purpose flour, 1/2 teaspoon of baking soda, 1/2 teaspoon of baking powder, 1/4 teaspoon of fine sea salt, and 1/2 teaspoon of ground cinnamon. Whisk this dry mix until even. Now, slowly add the dry ingredients to the wet mix. Stir gently until just combined. Be careful not to over mix; this keeps the cookies tender. Then, fold in 1 cup of semi-sweet chocolate chips and 1/2 cup of chopped walnuts if you want extra crunch. Use a tablespoon or cookie scoop to drop spoonfuls of dough onto your baking sheet. Place them about 2 inches apart. This space helps them spread while baking. Bake in your preheated oven for 10-12 minutes. Look for lightly golden edges and a set center. Once done, let the cookies sit on the sheet for about 5 minutes. This helps them firm up a bit. After that, move them to a wire rack to cool completely. For serving, place your cookies on a colorful plate. Drizzle some melted chocolate on top for a fun touch. Enjoy these sweet delights with a cold glass of milk! When baking cookies, small errors can lead to big issues. Here are some mistakes to watch out for: - Using unripe bananas: Always use ripe bananas. They add sweetness and moisture. - Overmixing the dough: Mix just until combined. Overmixing can make cookies tough. - Not measuring ingredients properly: Use a kitchen scale or proper measuring cups. This ensures a perfect dough. - Skipping the cooling time: Let cookies cool on the sheet first. This helps them firm up before moving. The texture of your cookies can change based on a few tweaks: - For chewier cookies: Use more brown sugar than white sugar. Brown sugar has more moisture. - Add an extra egg yolk: This adds richness and chewiness. - For crispier cookies: Increase the baking time slightly. Watch closely to avoid burning. - Use less flour: A slight reduction in flour can create a crisper texture. Storing cookies properly keeps them fresh and tasty. Here’s how to do it: - Room temperature storage: Keep cookies in an airtight container. This helps them stay soft. - Use parchment paper: Layer cookies with parchment paper to avoid sticking. - Refrigerate for longer life: If you need to keep them longer, refrigerate them. Just bring them to room temp before serving. - Freeze for future treats: Wrap cookies tightly in plastic wrap. Place them in a freezer-safe bag for up to three months. Pro Tips Use Overripe Bananas: The riper the bananas, the sweeter and more flavorful your cookies will be. Look for bananas with lots of brown spots for best results. Chill the Dough: For thicker cookies, consider chilling the dough for 30 minutes before baking. This helps prevent spreading and results in a chewier texture. Experiment with Add-Ins: Feel free to swap out walnuts for other nuts or dried fruits like cranberries or coconut flakes for a unique twist on the classic cookie. Check for Doneness: Cookies may appear slightly underbaked in the center when you take them out. They will continue to firm up as they cool on the baking sheet. {{image_4}} You can change the chocolate in these cookies. Try dark chocolate chips for a richer taste. You can also use milk chocolate for a sweeter bite. If you want a fun twist, mix in white chocolate chips or even peanut butter chips. Each type adds a unique flavor. This makes the cookies fun and exciting. Nuts can add crunch to your cookies. If you like walnuts, they fit well here. But you can swap them for pecans or almonds. You might also try adding dried fruits like raisins or cranberries. They add sweetness and chewiness. Coconut flakes can give a tropical feel. Mix and match to find your favorite combination! If you love banana bread, you can use this cookie recipe to make bread or muffins. Just pour the dough into a loaf pan or muffin tin instead. Adjust the baking time: bake the bread for about 50-60 minutes. For muffins, bake them for 18-22 minutes. Check for a golden top and a toothpick coming out clean. Enjoy these variations as a new way to savor your favorite flavors! To keep your cookies fresh, store them in an airtight container. You can use a cookie jar or a sealed plastic bag. This helps maintain their soft texture. Place a slice of bread in the container. It adds moisture and keeps the cookies from drying out. Store them at room temperature for up to five days. Freezing cookies is a great option for later treats. Allow the cookies to cool completely. Then, place them in a single layer on a baking sheet. Freeze them for about an hour. Once frozen, transfer the cookies to a freezer bag. Remove as much air as possible before sealing. They can last in the freezer for up to three months. If your cookies become stale, don’t worry. You can easily bring them back to life. Preheat your oven to 300°F (150°C). Place the cookies on a baking sheet. Heat them for about five minutes. This warmth will help restore their softness. Enjoy your revived cookies with a glass of cold milk! Yes, you can use frozen bananas! Just thaw them first. The moisture from thawed bananas keeps the cookies moist and sweet. Make sure to drain any excess liquid before mashing them. This will help the dough stay thick. If you need ripe bananas fast, place them in a paper bag. Add an apple or a tomato to speed up the process. The ethylene gas they release helps bananas ripen faster. Check them every few hours until they reach the right softness. Look for a light golden edge. The center should look set, not wet. If you poke one, it should spring back. Set a timer for 10-12 minutes. Remember, they will continue to cook a bit after you take them out. You can use oil or margarine, but the cookies may taste different. Butter adds a rich flavor and better texture. If you use oil, choose a light one like canola or vegetable oil. Use the same amount as the butter in the recipe. You now have all you need to make chocolate chip banana bread cookies. We covered the main ingredients, optional add-ins, and how to measure correctly. I shared step-by-step baking tips and ways to avoid common mistakes. You can even change the recipe for variety, like adding nuts or turning it into bread. Remember to store your cookies well to keep them fresh. Enjoy your baking adventure and impress your friends with your tasty treats!

Chocolate Chip Banana Bread Cookies Sweet Delight

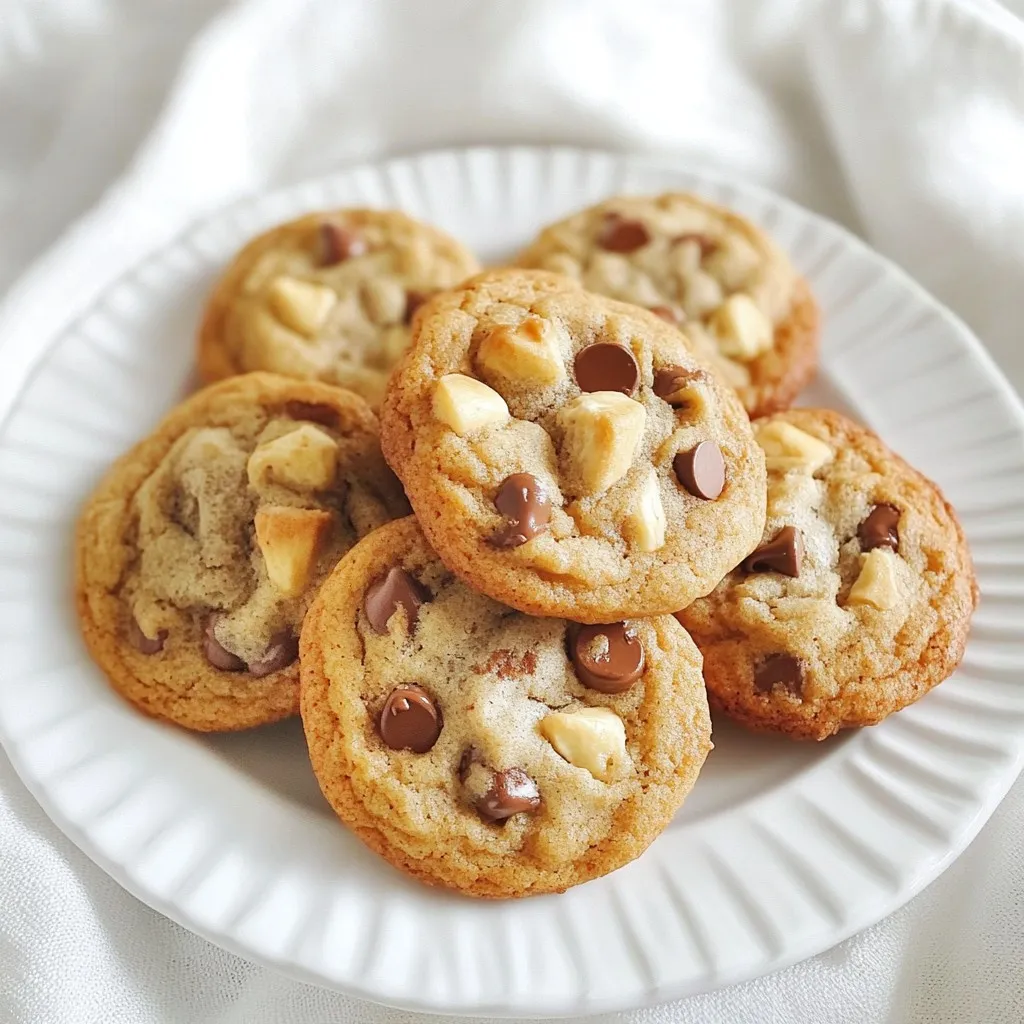
Welcome to your new favorite treat: Chocolate Chip Banana Bread Cookies! If you love soft, chewy cookies packed with flavor,

To make this Instant Pot Chicken Enchilada Soup, gather these items: - 1 lb boneless, skinless chicken breasts - 1 medium onion, diced - 3 cloves garlic, minced - 1 can (15 oz) black beans, rinsed and drained - 1 can (15 oz) corn, drained - 1 can (10 oz) diced tomatoes with green chilies - 4 cups chicken broth - 1 tablespoon chili powder - 1 teaspoon cumin - ½ teaspoon smoked paprika - 1 teaspoon oregano - Salt and pepper to taste - 1 cup shredded cheese (cheddar or Mexican blend) You can make your soup even better with these toppings: - Fresh cilantro, chopped - Avocado, diced - Lime wedges If you cannot find an ingredient, here are some ideas: - Use chicken thighs instead of breasts for more flavor. - Swap black beans for pinto beans if you prefer. - Use vegetable broth to make it vegetarian. - For a thicker soup, add extra cheese or use less broth. - If you want a milder taste, choose mild diced tomatoes. These options let you customize the soup to your liking! {{ingredient_image_2}} To make this soup, gather your ingredients first. You will need chicken, beans, corn, tomatoes, onion, and spices. This makes the cooking process smooth and easy. 1. Start by turning on your Instant Pot and selecting the Sauté function. 2. When the pot is hot, add a splash of water or a little oil. This keeps the onion from sticking. 3. Sauté the diced onion for about 3-4 minutes until it looks clear. Stir it often to avoid burning. 4. Add the minced garlic and cook for another 30 seconds. It should smell great! 5. Place the chicken breasts in the pot. Sprinkle them with chili powder, cumin, smoked paprika, oregano, salt, and pepper. Coat all sides well. 6. Pour in the chicken broth, then add the diced tomatoes with green chilies, black beans, and corn. Stir to mix everything well. 7. Close the lid tightly, making sure the vent is sealed. Set your Instant Pot to Manual cooking on high pressure for 10 minutes. 8. When the timer goes off, let the pot sit for about 10 minutes for a natural pressure release. Then, do a quick release to let out any remaining steam. 1. Carefully take the chicken breasts out of the pot. Use two forks to shred the chicken into bite-sized pieces. 2. Put the shredded chicken back in the pot and stir to mix it into the soup. 3. Taste the soup and adjust the seasoning if needed. If you want, add the shredded cheese now. It will melt into the soup and make it creamy. 4. Serve the soup hot. Garnish with fresh chopped cilantro, diced avocado, and lime wedges on the side. 5. For a great look, ladle the soup into nice bowls. Sprinkle with cilantro and arrange the avocado pieces nicely. To adjust the heat, add more or less chili powder. You can also mix in diced jalapeños. For less spice, use mild diced tomatoes without green chilies. Another option is to add a dollop of sour cream. This cools the heat and adds creaminess. Start with the right balance. Use salt and pepper to taste. Always taste the soup before serving. If it lacks flavor, add more spices bit by bit. Fresh herbs like cilantro can enhance the taste. They offer brightness and freshness to the soup. For chicken thighs, increase the cooking time to 12 minutes. Bone-in chicken may need up to 15 minutes. Always check that the chicken is cooked through. The internal temperature should reach 165°F. Adjust the pressure release method based on the cut. Thighs and bone-in chicken benefit from natural release for juiciness. Pro Tips Use Fresh Ingredients: Always opt for the freshest vegetables and spices to enhance the flavor of your soup. Fresh ingredients can make a significant difference in the overall taste. Adjust the Spice Level: If you prefer a milder soup, reduce the amount of chili powder or use mild diced tomatoes. You can always add more spice later if desired. Make it Creamy: For a richer texture, consider stirring in a dollop of sour cream or Greek yogurt right before serving. This adds creaminess and a tangy flavor. Store Leftovers Properly: Store any leftovers in an airtight container in the fridge for up to 3 days. Reheat gently on the stove to preserve the flavors and texture. {{image_4}} You can easily make this soup vegetarian or vegan. Start by swapping the chicken for one can of chickpeas or a mix of lentils. This keeps the soup hearty and full of protein. Use vegetable broth instead of chicken broth for a rich flavor. You can also add more veggies like zucchini or bell peppers to boost nutrition. If you prefer turkey or beef, feel free to switch the chicken. Use one pound of ground turkey or beef. Brown the meat in the pot before adding the veggies and seasonings. Follow the same steps to build flavor. Each protein will add its own twist to the soup, keeping it exciting. You can change the flavor by swapping a few ingredients. Try using white beans instead of black beans for a creamier texture. You can also replace diced tomatoes with fire-roasted tomatoes for a smoky taste. Add a splash of lime juice or a dash of hot sauce for some zing. Experimenting with spices, like adding chipotle powder, gives it a nice kick, too. Store any leftover soup in an airtight container. Let it cool before sealing. This helps keep it fresh. The soup stays good in the fridge for up to four days. When you want to eat it, just give it a good stir. If you want to save the soup for later, freezing is a great choice. Use freezer-safe containers or bags. Make sure to leave some space at the top, as the soup will expand when frozen. It will keep well for about three months. To enjoy it later, just thaw it in the fridge overnight. When it's time to reheat, you have a few options. You can use the microwave or stovetop. If using the stovetop, heat the soup in a pot over medium heat. Stir it often to avoid burning. If it's too thick, add a splash of chicken broth. This helps keep the flavor and texture just right. You can pair your Chicken Enchilada Soup with several tasty sides. Here are some ideas: - Cornbread: Its sweetness balances the soup's spice. - Tortilla chips: Crunchy chips add a fun texture. - Rice: A scoop of rice makes the meal heartier. - Salad: A fresh green salad adds crunch and color. - Sour cream: A dollop cools the soup's heat. These options create a great meal and make it feel special! If your soup is too thin, there are easy ways to thicken it. Try these methods: - Cornstarch slurry: Mix equal parts cornstarch and water, then stir it in. - Mashed beans: Blend some beans from the soup, then add them back in. - Extra cheese: Stir in more cheese to create a rich texture. These tips help adjust the soup to your liking! Yes, you can make Chicken Enchilada Soup in a slow cooker! Here’s how: 1. Sauté the onion and garlic in a pan first. 2. Add all ingredients to the slow cooker, including the sautéed mix. 3. Cook on low for 6-8 hours or high for 3-4 hours. 4. Shred the chicken and mix it back in before serving. This method allows for easy prep while you go about your day! This blog post walked you through making Chicken Enchilada Soup. We explored ingredients, cooking steps, and tips to enhance flavors. You learned how to adjust seasoning and switch ingredients to fit your diet. I shared storage tips to keep your soup fresh and answered common questions. Now, you have the tools to make a tasty soup that suits your taste. Enjoy cooking and sharing this easy recipe with others!

Instant Pot Chicken Enchilada Soup Hearty and Simple

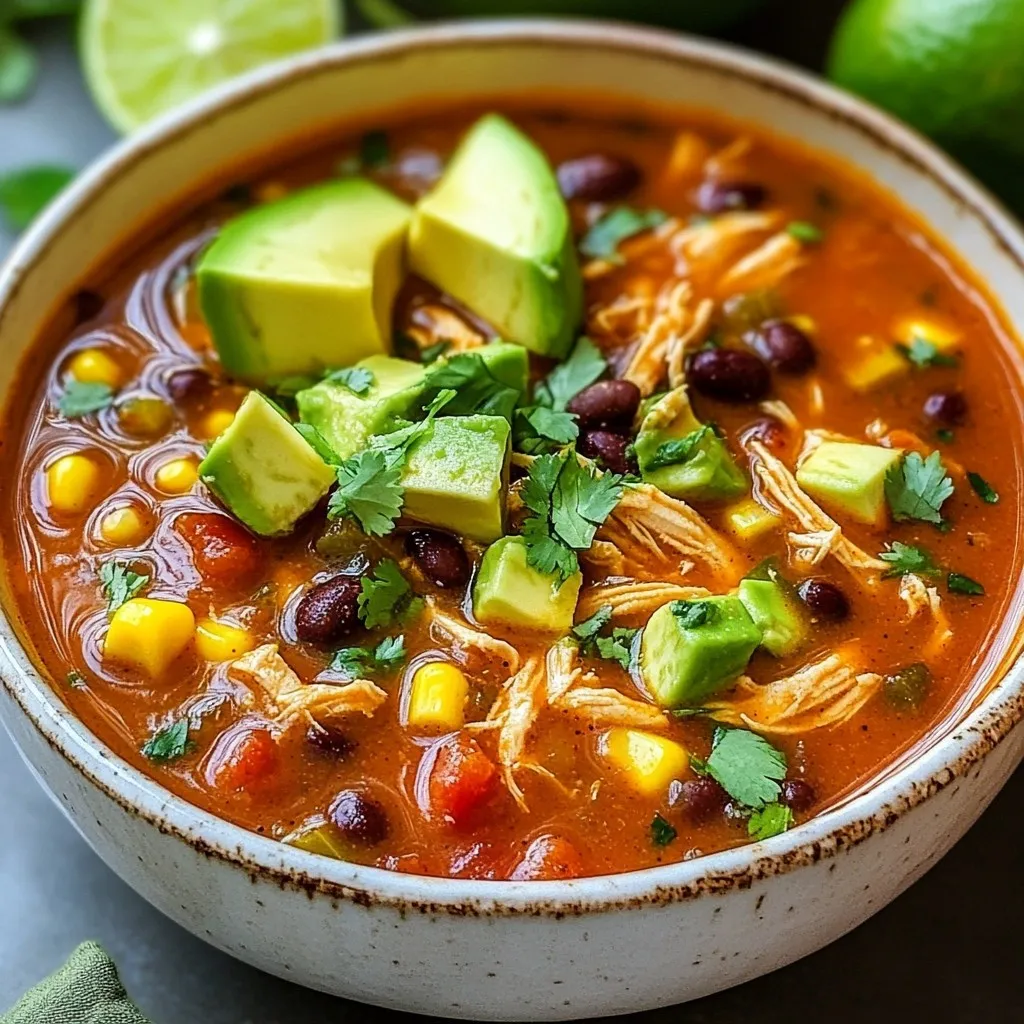
Looking for a warm and tasty dish that’s easy to make? You’ll love my Instant Pot Chicken Enchilada Soup! This

- 1 lb shrimp, peeled and deveined - 2 tablespoons olive oil - 1 teaspoon chili powder - 1 teaspoon ground cumin - 1/2 teaspoon smoked paprika - 1/4 teaspoon cayenne pepper (adjust based on desired spice level) - Salt and freshly ground black pepper to taste - 1 cup jasmine rice - 2 cups vegetable broth or water - 1 can black beans, thoroughly rinsed and drained - 1 cup corn kernels (fresh or frozen) - 1 ripe avocado, carefully sliced - 1 cup cherry tomatoes, halved - 1/4 cup fresh cilantro, finely chopped - Juice of 1 lime - 1/2 cup sour cream or Greek yogurt for topping (optional) This dish starts with shrimp, which is the star of the show. You need a pound of shrimp that is peeled and deveined. Next, you add olive oil and a blend of spices to bring heat and flavor. The spices include chili powder, ground cumin, smoked paprika, and cayenne pepper. You can adjust the cayenne to match how spicy you like it. Salt and black pepper add seasoning. For the base, jasmine rice gives a lovely texture. You cook it in vegetable broth or water, which adds richness. Black beans and corn add fiber and color. Avocado and cherry tomatoes add creaminess and freshness. Fresh cilantro brightens the dish, and lime juice gives it a zesty kick. You can top your bowl with sour cream or Greek yogurt, if you like. Each ingredient plays a role in creating a tasty and balanced meal. You can mix and match as needed. Enjoy the cooking process! {{ingredient_image_2}} 1. First, rinse the jasmine rice. Place it under cold water until it runs clear. This step helps remove extra starch. 2. In a medium pot, mix the rinsed rice with 2 cups of vegetable broth or water. 3. Bring the mixture to a boil over medium-high heat. 4. Once boiling, lower the heat. Cover the pot tightly and let it simmer for 15 minutes. 5. When done, fluff the rice with a fork and set it aside. 1. In a large bowl, add 1 pound of peeled and deveined shrimp. 2. Drizzle 2 tablespoons of olive oil over the shrimp. 3. Sprinkle in 1 teaspoon of chili powder, 1 teaspoon of ground cumin, 1/2 teaspoon of smoked paprika, and 1/4 teaspoon of cayenne pepper for heat. 4. Add salt and freshly ground black pepper to taste. 5. Toss the shrimp until they are coated well with the spices. 6. Heat a non-stick skillet over medium-high heat. 7. Add the seasoned shrimp to the skillet. Cook for 3-5 minutes, flipping halfway through. 8. The shrimp should turn pink and opaque when done. Remove the skillet from heat. 1. Start with a bowl. Add a generous layer of cooked jasmine rice at the bottom. 2. Top the rice with equal parts of black beans and corn kernels. 3. Place the spicy shrimp on top of the beans and corn. 4. Add slices of avocado and halved cherry tomatoes for freshness. 5. Sprinkle fresh cilantro over each bowl for added color and flavor. 6. Squeeze lime juice over the top for a bright taste. 7. If you like, add a dollop of sour cream or Greek yogurt for creaminess. How to tell when shrimp are cooked? Cooked shrimp turn pink and opaque. They curl into a C shape. If they look gray or rubbery, they need more time. Aim for 3-5 minutes over medium-high heat. This method ensures they stay juicy. Adjusting spice levels Spice levels are easy to tweak. If you want it milder, reduce the cayenne pepper. For more heat, add extra cayenne or chili powder. Taste as you go. This helps you find the perfect balance for your taste buds. Best practices for fluffier rice To make your rice fluffy, rinse it under cold water. This removes extra starch. Use the right water-to-rice ratio. One cup of rice needs two cups of vegetable broth or water. After cooking, fluff it with a fork. Alternatives to jasmine rice Jasmine rice is great, but you can try other grains. Quinoa adds protein and a nutty flavor. Brown rice has a chewy texture and is more filling. Cauliflower rice is a low-carb option that works well too. Accompaniments to enhance the dish Serve tortilla chips on the side for extra crunch. Lime wedges add a zesty kick. Fresh cilantro brightens the flavors. Consider adding pickled onions or jalapeños for more depth. Pairing beverages with shrimp taco bowls Light drinks pair best with spicy shrimp. Try a crisp lager or a fruity white wine. For non-alcoholic options, serve lemonade or a refreshing iced tea. These drinks complement the flavors and keep the meal balanced. Pro Tips Fresh Shrimp Matters: Always choose fresh or properly frozen shrimp for the best flavor and texture. Avoid shrimp that smells overly fishy. Customize Your Spice: Adjust the cayenne pepper to suit your heat preference. Start with less if you're unsure, as you can always add more later. Perfectly Cooked Rice: Rinse jasmine rice thoroughly to remove excess starch, which helps keep the rice fluffy and prevents it from becoming sticky. Garnish for Flavor: Don't skip the lime juice and cilantro! These fresh ingredients brighten the dish and enhance the overall flavor. {{image_4}} You can easily make this dish vegetarian. Swap out shrimp for a plant-based protein. Tofu or tempeh works great. Just cut them into small cubes. Marinate them with the same spices. This keeps the flavor strong and tasty. When you cook the tofu or tempeh, use the same method as shrimp. Sauté it in the skillet until golden. Adjust the cooking time as needed. You want it crispy on the outside but tender inside. This change adds a new texture to your bowl. Jasmine rice is wonderful, but you can try other grains. Quinoa is a great choice for a nutty flavor. It’s also high in protein. Cauliflower rice is low in carbs and adds a fresh taste. Brown rice gives you a hearty texture. Each option changes the bowl's feel and taste. To cook quinoa, rinse it first, then boil it in water. For cauliflower rice, pulse fresh cauliflower florets in a food processor. Lightly sauté it for a few minutes until tender. Each grain option brings something unique to your meal. Toppings can make your spicy shrimp taco bowls even better. Consider adding sliced radishes for crunch. Pickled jalapeños can boost the heat. Crumbled queso fresco adds creaminess. Fresh lime wedges give a zesty kick. You can also add fresh greens like arugula or spinach for extra color. Each topping adds different tastes and textures. Feel free to mix and match to create your perfect bowl! To keep your taco bowls fresh, store them in airtight containers. Layer the ingredients to avoid sogginess. Place rice at the bottom, followed by beans and corn. Add shrimp last to keep them from drying out. Store in the fridge for up to three days. When you’re ready to enjoy your leftovers, reheat them carefully. Use a microwave-safe bowl. Heat in 30-second intervals, stirring in between. Check that the shrimp is hot all the way through. You can also reheat in a skillet over medium heat for a few minutes. Just add a splash of water to keep it moist. If you want to freeze your taco bowls, it's best to freeze the components separately. Cooked shrimp can freeze well for up to three months. Place them in freezer bags, removing as much air as possible. Rice and beans also freeze nicely. Thaw overnight in the fridge before reheating. Avoid freezing avocado and sour cream, as they don't maintain texture. Yes, you can use frozen shrimp. Just remember to thaw them first. Place the shrimp in a bowl of cold water for about 15-20 minutes. Once thawed, pat them dry with a paper towel. This helps the seasoning stick better. When cooking, the timing may be the same, about 3-5 minutes. If you don’t have black beans, try using pinto beans or chickpeas. Both give a nice texture. You can also use corn or lentils for a different flavor. Just make sure to rinse any canned beans well. This keeps your taco bowls fresh and tasty. To add more heat, use more cayenne pepper. You can also add diced jalapeños or hot sauce. If you like smoky flavors, consider smoked chipotle powder. Mix these spices into the shrimp for a bold kick. Just be careful not to overpower the dish. Adjust the spice level to match your taste. In this blog post, we explored how to make delicious shrimp taco bowls. We covered the essential ingredients, like shrimp and rice, and provided clear step-by-step instructions for cooking and assembling. I shared tips on perfecting the shrimp and rice, along with serving suggestions to enhance your meal. Remember, you can switch up the recipe for vegetarian options or different grains. With proper storage tips, your leftovers will stay fresh. Enjoy customizing this dish to fit your taste, and happy cooking!

Spicy Shrimp Taco Bowls Flavorful and Simple Meal

Are you ready to spice up your dinner routine? My Spicy Shrimp Taco Bowls are both flavorful and simple to

- 1 cup unsalted butter, softened to room temperature - 1 cup powdered sugar, plus extra for dusting - 2 ½ cups all-purpose flour, sifted - ½ teaspoon salt - 2 teaspoons pure vanilla extract - 1 teaspoon peppermint extract - 1 cup crushed candy canes - 24 Hershey's Kisses (regular or peppermint) These ingredients create a rich, buttery base for your cookies. The unsalted butter adds creaminess, while the powdered sugar gives sweetness. The sifted flour helps the cookies have a nice texture. Salt balances the sweetness, enhancing the flavors. Flavorings like vanilla and peppermint extracts add that festive touch. Candy canes give a crunch and visual appeal. Finally, Hershey's Kisses melt perfectly into the cookies, creating a delightful center. - Different decorations or toppings like sprinkles or chocolate drizzle - Serving suggestions for festive occasions such as cookie platters or gifts You can customize these cookies for any event. Try adding colorful sprinkles for kids’ parties or drizzling melted chocolate for a gourmet touch. They make great gifts or a centerpiece for holiday gatherings. Experiment with different toppings to make them your own! {{ingredient_image_2}} First, preheat your oven to 350°F (175°C). This ensures your cookies bake evenly. Next, line two baking sheets with parchment paper to keep the cookies from sticking. This simple step makes cleanup easy. In a large bowl, combine 1 cup of softened unsalted butter and 1 cup of powdered sugar. Use an electric mixer to beat them together. Mix until the mixture is light and fluffy, about 3 to 4 minutes. Now, pour in 2 teaspoons of vanilla extract and 1 teaspoon of peppermint extract. Mix again until everything blends well. In another bowl, whisk together 2 ½ cups of sifted all-purpose flour and ½ teaspoon of salt. This helps the salt spread evenly. Gradually add this mix to your wet ingredients, mixing on low speed. Stop mixing as soon as it comes together to avoid overmixing. Next, gently fold in 1 cup of crushed candy canes. Make sure to save a few for later. This adds fun flavor and crunch to your cookies. Now, take a tablespoon of dough and roll it into a ball. Place the balls on your prepared baking sheets, spaced about 2 inches apart. This helps them bake evenly. Bake the cookies for 10 to 12 minutes. Look for light golden edges as a sign they're ready. Once baked, remove the cookies from the oven. Press a Hershey's Kiss into the center of each warm cookie. Let them cool on the baking sheet for about 5 minutes. This helps the Kisses set. Then, transfer the cookies to wire racks to cool completely. When they are cool, dust them with extra powdered sugar and sprinkle the reserved crushed candy canes on top for a festive look. To get cookies that bake evenly, space them well on the sheet. Place them about 2 inches apart. This gap helps hot air circulate around each cookie. Check the cookies after 10 minutes. They should look light golden at the edges. If they are too soft in the center, give them a couple more minutes. To keep Candy Cane Kiss Cookies soft, store them in an airtight container. You can layer parchment paper between the cookies to prevent sticking. If you want extra softness, add a slice of bread to the container. The bread will help keep the cookies fresh and chewy. To make your cookies look festive, dust them with powdered sugar. You can also sprinkle more crushed candy canes on top. For a fun twist, melt some white chocolate. Drizzle it over the cookies for an extra touch. You could also use different candies instead of Kisses, like chocolate stars or seasonal M&Ms. Pro Tips Chill the Dough: If the dough feels too soft to handle, refrigerate it for 15-30 minutes. This will help the cookies retain their shape while baking. Use Fresh Candy Canes: For the best flavor and vibrant color, use fresh candy canes. Old candy canes can lose their flavor and become stale. Experiment with Flavors: Try adding a touch of almond extract or orange zest for a unique twist on the classic peppermint flavor. Store Properly: Keep the cookies in an airtight container to maintain their freshness. They can last up to a week at room temperature. {{image_4}} You can try different flavors for your cookies. Use white chocolate instead of Hershey's Kisses. For a twist, swap candy canes with crushed peppermint candies. You can also use crushed nuts like almonds or pecans for added crunch. If you want a fruity taste, consider adding dried cranberries. This gives a nice color and flavor. For gluten-free options, use a 1-to-1 gluten-free flour blend instead of all-purpose flour. Make sure it has xanthan gum for proper texture. If you want vegan cookies, replace the butter with coconut oil and use a plant-based egg substitute. A mix of flaxseed and water works great. For sugar, you can use coconut sugar to keep it vegan. You can adapt this recipe for other holidays. For Valentine’s Day, use heart-shaped sprinkles and strawberry-flavored Kisses. At Easter, swap candy canes for pastel-colored candies like M&M's. For Halloween, use orange and black sprinkles with pumpkin spice flavoring. These easy swaps keep your festive treats fresh and fun! Store your Candy Cane Kiss Cookies at room temperature. Place them in an airtight container. They stay fresh for about a week. For longer shelf life, you can store them in the fridge. This keeps them soft and adds a cool taste. To freeze your cookies, first cool them completely. Place them in a single layer on a baking sheet. Freeze until solid, then transfer them to a freezer bag. This way, they won’t stick together. When you want one, take it out and let it defrost at room temperature. Enjoy your tasty treat anytime! Yes, you can use regular chocolate Kisses. They will change the flavor a bit. The chocolate will mix well with the sweet peppermint taste of the cookie. Many people enjoy this twist on the cookie. To make your cookies softer or chewier, try using less flour. You can also bake them for a shorter time. Pull them out when they are still soft in the center. Let them cool on the baking sheet before moving them to a wire rack. The best way to crush candy canes is to place them in a zip-top bag. Use a rolling pin to crush them into small pieces. Make sure you crush them to the size you want. This way, you will have nice candy cane bits for your cookies. Yes, you can double the recipe! Just make sure to use a bigger mixing bowl. You may need to bake the cookies in batches. Keep an eye on the baking time since it might vary. These cookies can last about a week at room temperature. Store them in an airtight container. If you want them to last longer, you can freeze them for up to three months. Just make sure to wrap them well. This blog post covered every step to make delicious Candy Cane Kiss Cookies. We explored essential ingredients and optional variations. I shared tips for perfect baking and storing to keep your cookies fresh. You can adapt this recipe for any holiday or dietary need. Now, it’s your turn to bake. Try these cookies for your next festive gathering. You’ll impress your friends and family with your tasty treats. Happy baking and enjoy every bite!

Candy Cane Kiss Cookies Festive and Tasty Treats

Get ready to impress your friends and family with these Candy Cane Kiss Cookies! Perfect for the holidays, these sweet

Older posts
Newer posts
← Previous Page1 … Page117 Page118 Page119 Page120 Next →

dsad

© 2026 recipetorch • Built with GeneratePress

Our Policies

  • Copyright Policy
  • Cookie Policy
  • GDPR Policy
  • Privacy Policy
  • Disclaimer
  • Terms Of Use

More Information

  • Home
  • About
  • Contact
  • Appetizers
  • Dessert
  • Dinner
  • Drinks
©2026, recipetorch About Back To Top