Skip to content
DisclaimerTerms Of UseGDPR PolicyCookie Policy

recipetorch

  • Home
  • Drinks
  • Appetizers
  • Dinner
  • Dessert
  • About
  • Contact
  • Privacy Policy
DisclaimerTerms Of UseGDPR PolicyCookie Policy

Nicole

To make these tasty butterscotch pecan cookies, you will need: - 1 cup unsalted butter, softened - 3/4 cup packed brown sugar - 1/4 cup granulated sugar - 1 teaspoon pure vanilla extract - 2 large eggs, at room temperature - 2 cups all-purpose flour - 1 teaspoon baking soda - 1/2 teaspoon fine sea salt - 1 cup butterscotch chips - 1 cup pecans, coarsely chopped Using high-quality ingredients makes a big difference. Choose fresh, unsalted butter for rich flavor. Fresh eggs will help the dough rise well. Look for good-quality brown sugar, as it adds moisture and depth. For the best taste, use pure vanilla extract, not imitation. The butterscotch chips should be smooth, and the pecans should be fresh and crunchy. Good ingredients lead to great cookies. You can make these cookies even if you lack some ingredients. For example, you can use salted butter instead of unsalted. Just skip the added salt in the recipe. If you need a sugar swap, coconut sugar works well instead of brown sugar. You can try using chopped walnuts or almonds in place of pecans. For a gluten-free option, use a gluten-free flour blend. These swaps can still yield delicious results! {{ingredient_image_2}} First, set your oven to 350°F (175°C). This temperature helps the cookies bake evenly. While the oven heats, line a baking sheet with parchment paper or a silicone mat. This will keep the cookies from sticking and make cleanup easy. Next, take a large mixing bowl. Add 1 cup of softened butter, 3/4 cup of brown sugar, and 1/4 cup of granulated sugar. Use a hand mixer or stand mixer to beat these together. Mix until the blend is light and fluffy, about 3 to 4 minutes. This step makes the cookies soft. Now, add 2 large eggs, one at a time. Mix well after each egg to combine fully. Then, pour in 1 teaspoon of pure vanilla extract. Continue mixing until everything is well blended. The eggs and vanilla add moisture and flavor. In a separate bowl, whisk together 2 cups of all-purpose flour, 1 teaspoon of baking soda, and 1/2 teaspoon of fine sea salt. Make sure these dry ingredients are evenly mixed. Gradually add this blend to the wet mix. Stir gently until just combined. Be careful not to overmix, as this keeps the cookies tender. Now, it’s time for the fun part! Fold in 1 cup of butterscotch chips and 1 cup of coarsely chopped pecans. Use a spatula to ensure they spread evenly throughout the dough. This step adds yummy flavors and crunch. Using a tablespoon or cookie scoop, place rounded portions of dough onto your prepared baking sheet. Leave about 2 inches of space between each scoop. This spacing allows the cookies to spread without touching. Bake in the preheated oven for 10 to 12 minutes. Look for lightly golden edges and soft centers. Keep a close eye on them to avoid overbaking. After baking, let the cookies cool on the sheet for 5 minutes before moving them to a wire rack to cool completely. To keep your butterscotch pecan cookies soft, focus on two key things: baking time and cooling. Bake your cookies until the edges are just golden, but the center is still soft. This ensures they stay chewy. After baking, let them cool on the sheet for five minutes. This softens them even more before moving them to a wire rack. Overmixing can lead to hard cookies. When you add the dry ingredients, mix just until you can no longer see the flour. It’s okay if some flour remains visible. Gently fold in the butterscotch chips and pecans, ensuring they are spread throughout without overworking the dough. Follow these simple tips for perfect cookies every time: - Preheat your oven to 350°F (175°C) for even baking. - Use parchment paper or a silicone mat on your baking sheet. This helps prevent sticking. - Space the dough balls at least 2 inches apart. This allows room for spreading. - Check your cookies at the 10-minute mark. They may need just a bit longer, but don’t let them get too brown. These tips will help you create soft and chewy butterscotch pecan cookies that everyone will love! Pro Tips Butter Temperature: Ensure your butter is softened to room temperature for easier creaming with sugars, which will help achieve a light and fluffy texture. Mixing Technique: When combining dry ingredients with wet, mix gently to avoid overworking the dough, which can lead to tough cookies. Cookie Spacing: Leave enough space between cookie dough balls on the baking sheet to allow for spreading during baking, ensuring they don't merge into one another. Cooling Time: Don't skip the cooling step on the baking sheet before transferring to a wire rack; this helps the cookies set and maintain their shape. {{image_4}} You can change up your butterscotch pecan cookies with different mix-ins. Try adding chocolate chips for a sweet twist. Dark chocolate pairs nicely with the butterscotch flavor. You can also use white chocolate chips for a creamy contrast. If you like nuts, swap pecans for walnuts or almonds. Both add a nice crunch and flavor. To elevate your cookies, consider adding spices or extracts. A pinch of cinnamon or nutmeg can enhance the warmth of the butterscotch. You can also add a splash of almond extract for a unique twist. Another option is to use maple extract instead of vanilla, giving a deeper flavor to your cookies. If you need a gluten-free option, you can substitute the all-purpose flour. Use a gluten-free flour blend that measures cup for cup like regular flour. Make sure it contains xanthan gum for the right texture. This way, everyone can enjoy these soft and chewy delights! To keep your butterscotch pecan cookies fresh, place them in an airtight container. Layer parchment paper between cookies to prevent sticking. Store them at room temperature for up to one week. This simple step keeps them soft and chewy, just like when they came out of the oven. Freezing these cookies is easy and effective. First, let them cool completely. Then, place the cookies in a single layer on a baking sheet. Freeze for about an hour until firm. Once frozen, transfer the cookies to a freezer-safe bag. They can last for up to three months in the freezer. When you're ready to enjoy them, just thaw them at room temperature. Reheating your cookies is simple. Preheat your oven to 300°F (150°C). Place the cookies on a baking sheet and heat for about 5-10 minutes. This warms them up without drying them out. If you prefer, you can also use a microwave. Heat each cookie for about 10-15 seconds for a warm, gooey treat. Enjoy that soft and chewy texture again! Yes, you can use brown sugar instead of granulated sugar. Brown sugar adds more moisture and a deeper flavor. This change will make your cookies soft and chewy. Just remember, it’s best to keep some granulated sugar for balance. Look for the edges to turn light golden brown. The centers should still look soft. You can gently press the cookie with your finger. If it springs back, it’s done. If it stays indented, bake for another minute. If your dough feels too sticky, add a bit more flour. Start with one tablespoon at a time. Mix gently until the dough is easier to handle. Avoid adding too much flour, which can make your cookies tough. To make chewier cookies, use more brown sugar than white sugar. You can also chill the dough for at least 30 minutes before baking. This helps the cookies hold their shape and stay soft inside. Chilling the dough is not required, but it helps improve texture. Cold dough spreads less, resulting in thicker cookies. If you have time, chilling helps enhance the flavor too. If you're in a hurry, you can skip this step. In this post, we covered key ingredients and their quality for the best cookies. I shared step-by-step baking instructions to guide you. You learned tips for keeping cookies soft and avoiding overmixing. We also explored fun variations and smart storage methods. Remember, great cookies come from quality ingredients and care in baking. Enjoy your baking journey, and let your creativity shine!

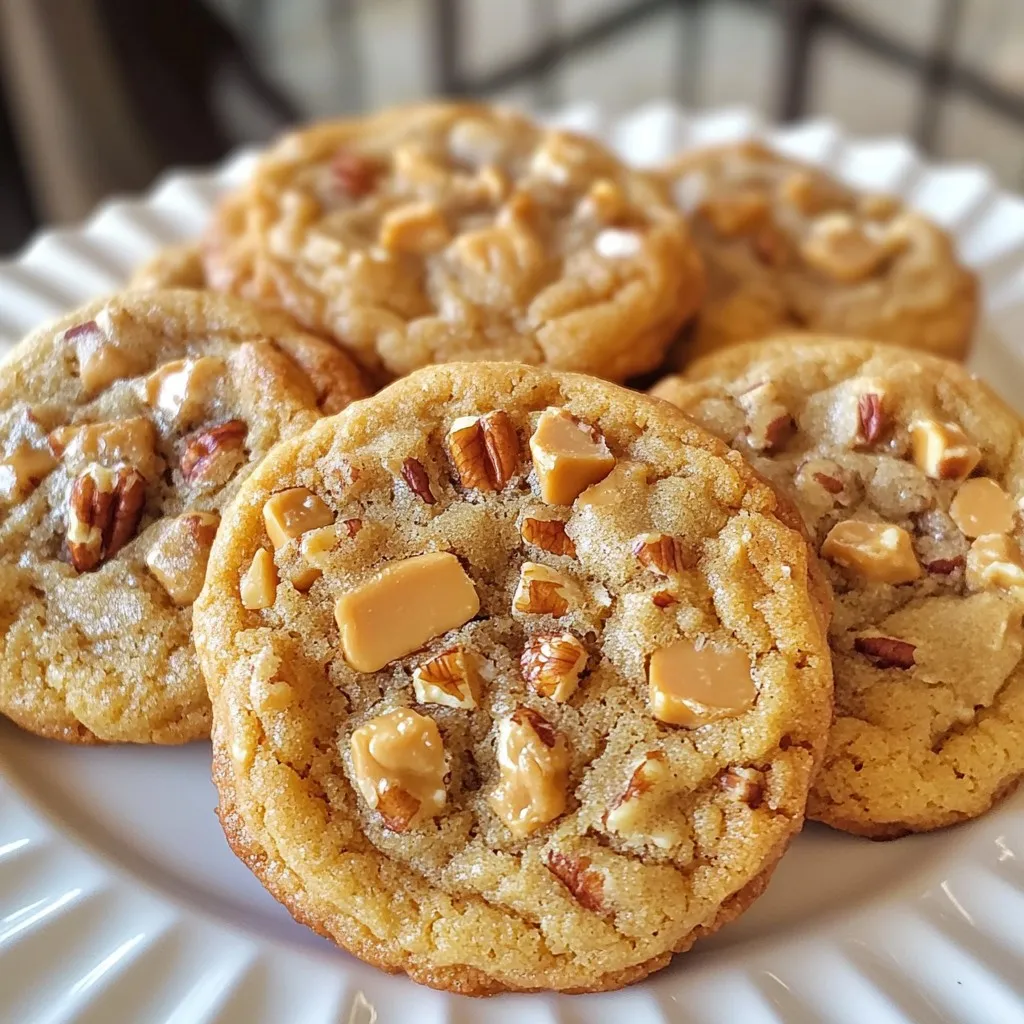
Butterscotch Pecan Cookies Soft and Chewy Delight

Craving a sweet treat that’s soft, chewy, and oh-so-delicious? Butterscotch Pecan Cookies are here to satisfy your sweet tooth! In

For Greek Lemon Roasted Potatoes, you need these key ingredients: - 2 lbs baby potatoes, halved - 1/4 cup high-quality olive oil - 3 tablespoons freshly squeezed lemon juice - Zest of 1 medium lemon - 4 cloves garlic, finely minced The baby potatoes are perfect for this dish. Their small size cooks evenly and gives a nice texture. Using high-quality olive oil enhances the flavor. Fresh lemon juice and zest add a bright, zesty note that makes these potatoes pop. The seasonings are simple yet mighty. You will need: - 1 teaspoon dried oregano - 1 teaspoon fresh thyme leaves, finely chopped - Salt and freshly ground black pepper, to taste Dried oregano gives an earthy taste, while fresh thyme adds a hint of brightness. Salt and pepper boost all the flavors. Together, they create a savory blend that complements the lemon. For a lovely finish, consider these garnishes: - Fresh parsley, chopped, for garnish Chopped parsley not only adds color but also brings a fresh taste. If you want more zing, serve lemon wedges on the side. This allows everyone to enjoy even more lemon flavor. {{ingredient_image_2}} First, preheat your oven to 400°F (200°C). This helps the potatoes roast evenly. While the oven warms up, gather your ingredients. You need baby potatoes, olive oil, lemon juice, lemon zest, garlic, dried oregano, fresh thyme, salt, and pepper. Make sure to have everything ready. This makes the cooking process smooth. In a large bowl, add the halved baby potatoes. Pour in the olive oil and lemon juice. Then, add the lemon zest and minced garlic. Sprinkle in the dried oregano and fresh thyme. Add a good amount of salt and pepper. Mix everything well using your hands or a spatula. Each potato should be nicely coated with this zesty blend. This step builds the strong flavors that make these potatoes special. Next, line a baking sheet with parchment paper. This keeps the potatoes from sticking and helps them brown better. Spread the seasoned potatoes on the sheet in a single layer. Make sure they are not crowded. This helps them roast evenly. Place the baking sheet in the oven. Roast the potatoes for 40-45 minutes. Halfway through, flip them over gently for even browning. Once they are golden and tender, take them out and let them cool slightly. Enjoy the wonderful aroma filling your kitchen! To get those crispy edges, you need to use high heat. Roasting at 400°F (200°C) helps achieve that. Use baby potatoes for the best texture. Halve them and coat well with olive oil. Spread the potatoes on the baking sheet in a single layer. This way, they don’t steam. Flip them halfway through cooking for even crispiness. Fresh herbs bring life to Greek lemon roasted potatoes. Use thyme and oregano for a classic taste. Chop them finely to release their oils. Mix them in with the potatoes before roasting. A sprinkle of fresh parsley at the end adds color and flavor. You can also try adding rosemary or dill for a twist. Roasting in a single layer is key for great results. When potatoes are crowded, they steam instead of roast. This prevents that nice golden color and crispy texture. Use a large baking sheet or two if needed. Space them out to ensure they cook evenly. This small step makes a big difference in the final dish. Pro Tips Choose the Right Potatoes: Opt for waxy baby potatoes for a creamy texture and better flavor absorption from the marinade. Let Them Marinate: For even more flavor, let the potatoes sit in the olive oil and lemon mixture for at least 30 minutes before roasting. Check for Doneness: Use a fork to test if the potatoes are tender; they should easily pierce through without falling apart. Enhance the Flavor: Add a sprinkle of feta cheese or olives just before serving for an extra burst of Mediterranean flavor. {{image_4}} You can change the flavor by adding different herbs. Try using rosemary for a strong taste. Basil gives a fresh twist, while dill adds a nice touch. Mix and match these herbs to find your favorite flavor. Fresh herbs can bring out the lemon's brightness. Dried herbs work too, but fresh ones are best. Feel free to add other vegetables to your dish. Carrots, bell peppers, or zucchini work well. Cut them into similar sizes as the potatoes for even cooking. This not only adds color but also boosts nutrition. You can make it a full meal with just one pan! Spices can transform your Greek Lemon Roasted Potatoes. For warmth, add paprika or cumin. If you like heat, sprinkle in some cayenne pepper. Cinnamon can give a surprising depth, pairing well with lemon. Experiment with these spices to create your unique flavor profile. To keep your Greek lemon roasted potatoes fresh, let them cool first. Store them in an airtight container. They will stay good for about 3-5 days in the fridge. Make sure to keep them away from strong-smelling foods. If you want to avoid sogginess, place a paper towel in the container to absorb moisture. Reheating is easy and quick. Preheat your oven to 350°F (175°C). Spread the potatoes on a baking tray. Heat them for about 15-20 minutes. This helps keep them crispy. You can also use a microwave. Heat in 30-second intervals until warm. However, this method may make them soft. You can freeze Greek lemon roasted potatoes, but they may change in texture. Let the potatoes cool completely before freezing. Place them in a freezer-safe bag. Remove as much air as possible. They can last up to 2 months. To use, thaw in the fridge overnight. Reheat in the oven for the best results. Yes, you can use other potatoes. Yukon Gold and red potatoes work well. They have a creamy texture and hold flavor nicely. Just make sure to cut them into even pieces. This helps them cook evenly and brown well. To make these potatoes vegan, simply use vegetable oil instead of olive oil. You can also add more herbs for flavor. The lemon juice and zest already give a zesty taste that shines through. These potatoes pair well with many dishes. They complement grilled chicken, lamb, or fish beautifully. You can also serve them with a fresh salad or roasted vegetables. For a complete meal, try them with a tzatziki sauce for dipping. In this blog post, I covered how to make Greek Lemon Roasted Potatoes. We discussed the key ingredients, including the main components and optional garnishes. I shared step-by-step instructions, tips for crispy edges, and variations to personalize the dish. Proper storage and reheating methods ensure your leftovers taste great. Try these techniques to make tasty potatoes that everyone loves. Enjoy cooking and experimenting with flavors!

Greek Lemon Roasted Potatoes Flavorful Side Dish

Looking for a side dish that bursts with flavor? Greek Lemon Roasted Potatoes are your answer! Simple yet delicious, these

To make my Chocolate Dipped Peppermint Pretzels, you will need a few simple items. Each ingredient adds a special touch to this treat. Here’s what you will need: - 2 cups pretzel rods - 1 cup semi-sweet chocolate chips - 1 tablespoon coconut oil - ½ cup crushed peppermint candies - Sea salt for sprinkling - Optional: ½ teaspoon peppermint extract These ingredients blend together to create a sweet and salty snack that is perfect for any occasion. The pretzel rods give a nice crunch, while the chocolate and peppermint create a holiday flavor. The coconut oil helps the chocolate melt smoothly, making it easy to dip the pretzels. Adding a sprinkle of sea salt on top brings out the sweet taste even more. If you want a stronger mint flavor, the peppermint extract is a great option. Gather these ingredients, and get ready for a fun cooking adventure! {{ingredient_image_2}} Start by lining a baking sheet with parchment paper. This helps the pretzels not stick. It also makes clean-up easy. You want this area ready for dipping. In a microwave-safe bowl, combine 1 cup of semi-sweet chocolate chips and 1 tablespoon of coconut oil. Heat this mixture in the microwave. Do it in 30-second bursts. Stir after each time until the chocolate is smooth. If you want a minty flavor, add ½ teaspoon of peppermint extract too. This gives the chocolate a nice touch. Grab a pretzel rod by one end. Dip it into the melted chocolate, covering about two-thirds of the rod. Let any extra chocolate drip back into the bowl. This step keeps the coating even and avoids clumps. While the chocolate is still wet, sprinkle crushed peppermint candies over the coated pretzel. Use ½ cup of crushed peppermint candies for this. Be generous! The more you add, the more minty flavor you get. Carefully place each dipped pretzel on the parchment-lined baking sheet. Repeat this until all pretzels are coated. Make sure they are spaced out. This helps them cool evenly. Put the baking sheet in the fridge for about 30 minutes. This allows the chocolate to harden fully. Just before the chocolate sets, sprinkle a little sea salt over the pretzels. This adds a nice flavor contrast and makes them even tastier. Using coconut oil is key for great chocolate. It helps the chocolate melt smoothly. This oil keeps the chocolate from being too thick. It gives a nice shine, making your pretzels look fancy. Mix one tablespoon of coconut oil with your chocolate chips. This simple step makes a big difference in your treat. Get creative with toppings! You can add sprinkles, mini chocolate chips, or extra crushed peppermint. Drizzling melted chocolate on top adds flair and taste. Choose bright colors for a fun look. The more toppings, the merrier! Let your imagination run wild when decorating your pretzels. These treats shine at parties and gatherings. Serve them on a nice platter for a festive touch. You can also package them in clear bags as gifts. They are perfect for sharing with friends and family. Enjoy them during holidays, movie nights, or whenever you crave a sweet snack! Pro Tips Use High-Quality Chocolate: Opt for good quality chocolate chips for a richer taste. The better the chocolate, the more delicious your pretzels will be! Crush Peppermint Candies Properly: Ensure your peppermint candies are crushed finely, as larger pieces can fall off the pretzels and create a mess. Experiment with Toppings: Feel free to add other toppings like sprinkles, nuts, or even a drizzle of white chocolate for added flavor and presentation. Store for Freshness: Keep the pretzels in an airtight container at room temperature for up to two weeks to maintain their crunchiness. {{image_4}} You can use different pretzel shapes for your treats. Pretzel rods are great for dipping. They hold chocolate well and look nice on a plate. You can also use pretzel twists. Twists add fun shapes and texture. Just make sure to coat them evenly with chocolate. Both options will taste amazing! If you want to change the flavor, there are other options besides peppermint extract. Try using vanilla extract for a warm taste. Almond extract can add a nice nutty note. You can even add a splash of orange zest for a fresh twist. These flavors blend well with chocolate. Experiment to find your favorite! Make your pretzels fit the season with some fun decorations. During the holidays, use festive colors. You can drizzle white chocolate on top for a snowy effect. Add sprinkles in red and green for a cheerful look. For Halloween, use orange and black sprinkles. You can even package them in themed bags for gifts. The options are endless! To keep your chocolate dipped peppermint pretzels fresh, use airtight containers. Glass or plastic containers work well. Place parchment paper between layers if stacking them. This prevents sticking. Always ensure the container is sealed tight. It keeps the pretzels crispy and the chocolate intact. At room temperature, these treats last about five days. Keep them in a cool, dry place. If you refrigerate them, they can last up to two weeks. The cold helps the chocolate stay firm. However, the pretzels may lose some crunchiness in the fridge. Freezing is a great option if you want to save some for later. Wrap each pretzel in plastic wrap or foil. Place them in a freezer-safe bag or container. This keeps them fresh. When ready to enjoy, take them out and let them thaw at room temperature. Avoid microwaving, as this can melt the chocolate. Enjoy your sweet treats whenever you like! Chocolate dipped peppermint pretzels can last about two weeks at room temperature. To keep them fresh, place them in an airtight container. If you want to store them longer, you can refrigerate them for about a month. Just remember, the cool air may change their texture slightly. Yes, you can use white chocolate! It will change the flavor, making it sweeter and creamier. If you like white chocolate, try it with peppermint. Just melt it like you would semi-sweet chocolate. The fun part is mixing and matching flavors, so feel free to experiment. To balance the sweetness, you can add a pinch of salt. Salt enhances the flavor and cuts down on sweetness. You might also try using dark chocolate instead of semi-sweet. Dark chocolate has a richer taste and is less sweet. Adding more crushed peppermint will also give a refreshing kick that distracts from the sweetness. You can create delightful chocolate-dipped peppermint pretzels by following this simple guide. We covered the key ingredients, like chocolate, peppermint, and coconut oil. Each step helps you achieve the perfect snack, from melting chocolate to adding festive touches. Remember, there are many ways to make these treats unique. Store them properly for the best taste later. Enjoy your crunchy, sweet creations and feel free to share them with friends!

Chocolate Dipped Peppermint Pretzels Irresistible Treat

Are you ready to whip up a treat that combines chocolate, peppermint, and crunch? Chocolate Dipped Peppermint Pretzels are the

For this eggnog cheesecake, you will need: - 1 ½ cups graham cracker crumbs - ½ cup unsalted butter, melted - 2 tablespoons granulated sugar - 3 packages (8 ounces each) cream cheese, softened - 1 cup granulated sugar - 3 large eggs, at room temperature - 1 teaspoon pure vanilla extract - 1 teaspoon ground nutmeg - 1 teaspoon ground cinnamon - 1 cup eggnog (store-bought or homemade) - Whipped cream for topping (optional) - Freshly grated nutmeg for garnish (optional) You can switch out some ingredients if needed: - Use cookie crumbs instead of graham cracker crumbs for a different crust flavor. - Coconut oil can replace unsalted butter for a dairy-free option. - If you want a lighter cheesecake, low-fat cream cheese works well. - Almond milk or soy milk can replace eggnog for a non-dairy cheesecake. Choosing fresh ingredients is key for great taste. Here are some tips: - Cream Cheese: Look for blocks of cream cheese instead of spreads. They will give you the best texture. - Eggnog: Check the expiration date on store-bought eggnog. If you make your own, use fresh eggs and whole milk for rich flavor. - Spices: Buy whole spices and grind them fresh for the best flavor. Whole nutmeg is nice and fragrant. - Butter: Choose high-quality unsalted butter for a rich taste. It makes a big difference in your crust. By focusing on fresh, quality ingredients, your eggnog cheesecake will shine! {{ingredient_image_2}} First, we need to preheat your oven to 325°F (160°C). This step is key to getting the right texture for your cheesecake. While the oven heats, grab a 9-inch springform pan. Grease it with butter or cooking spray. This helps the cheesecake come out easily later on. In a medium bowl, mix together 1 ½ cups of graham cracker crumbs, ½ cup of melted unsalted butter, and 2 tablespoons of granulated sugar. Stir everything until it looks moist. Next, firmly press this mixture into the bottom of your springform pan. This forms a solid base. Bake the crust for 10 minutes in your preheated oven. Once done, take it out and let it cool completely in the pan. Now it’s time to make the delicious filling! In a large mixing bowl, use an electric mixer to beat 3 packages of softened cream cheese on medium speed. This should become smooth and creamy. Gradually add in 1 cup of granulated sugar. Mix until it is all combined. Then, add 3 large eggs one at a time. Make sure to mix well after each egg. Next, stir in 1 teaspoon of pure vanilla extract, 1 teaspoon of ground nutmeg, 1 teaspoon of ground cinnamon, and 1 cup of eggnog. Mix gently until just combined. Be careful not to overmix! Carefully pour the cheesecake filling over the cooled crust. Use a spatula to spread it evenly. Place the cheesecake in the oven and bake for 55-60 minutes. The edges should be set, while the center has a slight jiggle. It will firm up as it cools. After baking, turn off the oven. Leave the cheesecake inside with the door slightly ajar for 1 hour. This helps prevent cracks. Once cooled, take it out and let it cool at room temperature. Transfer it to the fridge and chill for at least 4 hours. For the best taste, chill it overnight. Enjoy your festive treat! To get a smooth and creamy cheesecake, start with room temperature cream cheese. Cold cream cheese can create lumps. When mixing, beat on medium speed until the mixture is silky. Add the eggs one by one, mixing after each one. This helps the batter blend well. Be careful not to overmix after adding the eggnog and spices. Overmixing can cause air bubbles, which may lead to cracks. One common mistake is not letting the cheesecake cool slowly. After baking, leave it in the oven with the door ajar. This helps prevent cracks. Another mistake is skipping the chilling time. Chilling for at least four hours, or overnight, is crucial. This allows the flavors to meld and the texture to set. Don’t rush this step; it makes a big difference! Eggnog is festive, but spices can make it even better. Ground nutmeg and cinnamon add warmth and depth. You can also try adding a pinch of ground cloves for a unique twist. If you want more spice, mix in some ginger or allspice. These flavors bring out the holiday spirit in every slice! Pro Tips Use Room Temperature Ingredients: Make sure your cream cheese and eggs are at room temperature for a smoother batter, which helps prevent lumps and ensures even baking. Prevent Cracks: Cooling the cheesecake in the oven with the door ajar helps to prevent cracks on the surface by allowing it to set gradually. Chill Overnight: For the best flavor and texture, allow the cheesecake to chill overnight before serving, as this helps all the flavors meld together beautifully. Garnish Wisely: Freshly grated nutmeg not only adds a festive touch but also enhances the eggnog flavor—use it generously for a delightful finish. {{image_4}} You can change the taste of your eggnog cheesecake by adding different flavorings. Try using almond extract instead of vanilla for a nutty twist. You can also add a splash of rum extract for a more traditional eggnog flavor. Want something unique? Add a bit of orange zest to brighten up the taste. Mixing in chocolate chips can give it a sweet surprise. Experiment and find your favorite combo! If you need a gluten-free version, use gluten-free graham crackers for the crust. You can also make this dessert dairy-free. Substitute cream cheese with a dairy-free cream cheese. Use a non-dairy butter for the crust, and choose a dairy-free eggnog. These swaps keep the flavor without the dairy. Serving your cheesecake can be fun. Top it with whipped cream for a creamy touch. A sprinkle of freshly grated nutmeg adds a nice finish. You can also serve it with a side of warm caramel sauce or chocolate sauce. A scoop of vanilla ice cream pairs well, too. Each bite of this cheesecake can be a new experience! To keep your eggnog cheesecake fresh, store it in the fridge. Place it in an airtight container or cover it tightly with plastic wrap. This helps prevent it from drying out or absorbing other smells. Leftover cheesecake can last for about five days in the refrigerator. If you want to keep it longer, consider freezing it. You can freeze your eggnog cheesecake for up to three months. First, let the cheesecake cool completely. Then, wrap it tightly in plastic wrap. After that, wrap it in aluminum foil for extra protection. Label it with the date to track freshness. When you are ready to enjoy it, thaw it overnight in the refrigerator. You don’t need to reheat cheesecake as it tastes best cold. However, if you prefer it warm, place a slice in the microwave for about 10-15 seconds. Check it often to avoid overheating. You can also let it sit at room temperature for about 30 minutes before serving. This way, it softens slightly and enhances the flavor. Yes, you can use low-fat cream cheese. However, the texture may change. Low-fat cream cheese can make the cheesecake less rich and creamy. I recommend full-fat cream cheese for the best flavor and texture. If you choose low-fat, be aware that the cheesecake may not set as well. To prevent cracks, cool the cheesecake slowly. After baking, turn off the oven and leave the door open for an hour. This step allows the temperature to drop gradually. Also, avoid overmixing the batter. Overmixing can introduce more air, leading to cracks. Yes, you can make this cheesecake a day or two ahead. It actually tastes better when chilled overnight. Just cover it well with plastic wrap or foil. Keep it in the fridge until you’re ready to serve. This makes it a great choice for holiday gatherings! This blog post covers all you need for a great cheesecake. We explored ingredients, substitutions, and how to choose fresh options. I detailed step-by-step instructions, so you can bake with ease. We discussed tips to achieve the right texture and avoid common mistakes. Variations let you personalize flavors and adjust for diets. Finally, you learned about storage and reheating. Enjoy making your cheesecake masterpiece! Trust the process, and have fun along the way!

Eggnog Cheesecake Delightful Holiday Dessert Recipe

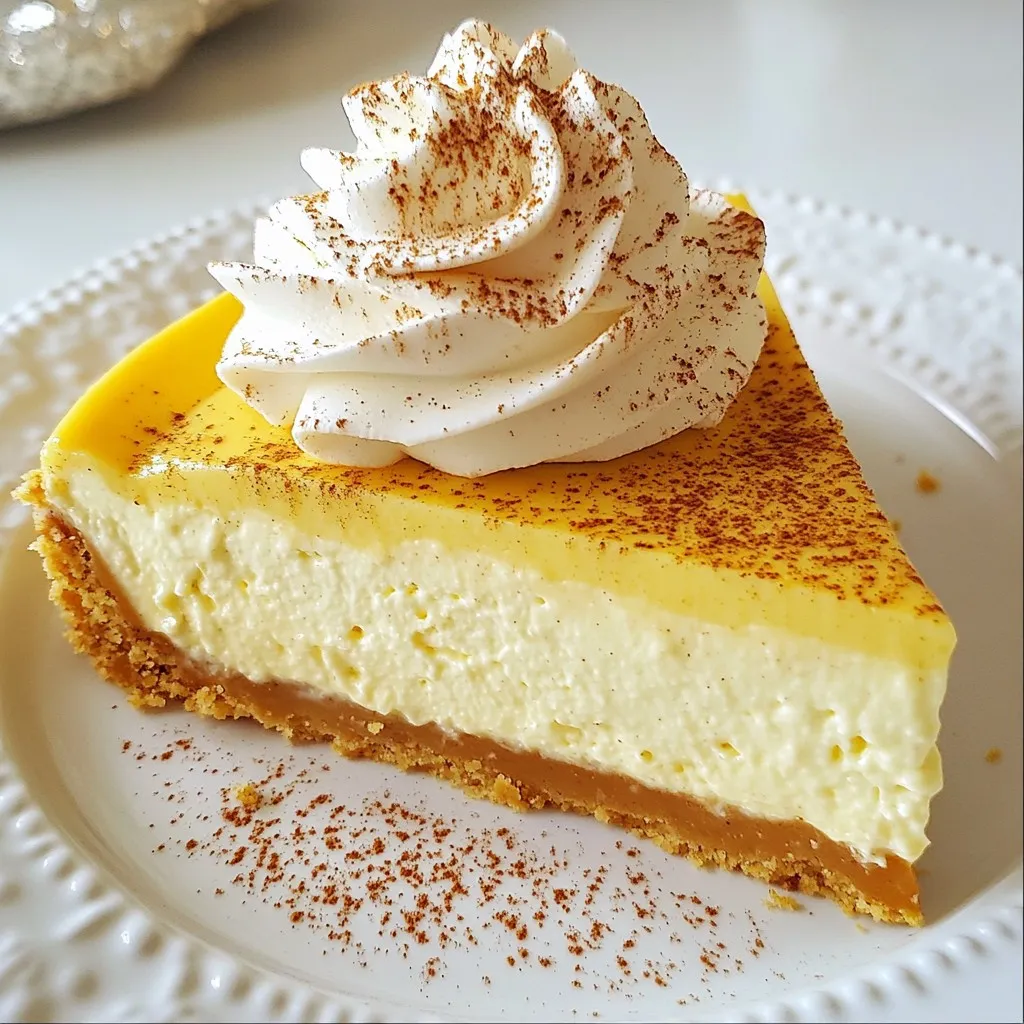
Looking for a festive treat that will wow your guests? Try my Eggnog Cheesecake! This delightful holiday dessert combines smooth

- 4 large russet potatoes, washed and cut into thin fry shapes - 3 tablespoons extra virgin olive oil - 4 cloves fresh garlic, finely minced - 1 teaspoon garlic powder - ½ teaspoon sweet paprika - Salt and freshly ground black pepper to taste - ½ cup freshly grated Parmesan cheese - Fresh parsley, finely chopped (for garnishing) To make these fries, start with the potatoes. Wash them well to remove dirt. Then, cut them into thin fry shapes. The thinner the fry, the crunchier it will be. Soaking the cut fries in cold water for 30 minutes is key. This step helps remove excess starch. After soaking, drain and dry the fries. Use a towel to pat them dry. This helps the fries crisp up in the air fryer. Using fresh ingredients is very important. Fresh garlic adds a strong flavor. High-quality Parmesan cheese gives a rich taste. Good olive oil helps the fries become crisp. When you use fresh and high-quality items, your fries will taste much better. Always choose the best ingredients you can find. This choice makes a big difference in your final dish. {{ingredient_image_2}} Start by washing four russet potatoes. Cut them into thin fry shapes. This step is key. Thin fries cook better and get crispier. Place the cut fries in a large bowl of cold water. Soak them for 30 minutes. This helps remove extra starch. Less starch means crispier fries when they cook. After soaking, drain the fries well. Pat them dry with a clean towel. Moisture is the enemy of crispiness. In a bowl, mix the fries with olive oil, minced garlic, garlic powder, sweet paprika, salt, and pepper. Toss until each fry gets coated. Next, carefully place the fries in the air fryer basket. Spread them out in one layer. Don’t overcrowd. This allows hot air to circulate and cook the fries evenly. Preheat your air fryer to 380°F (190°C). Once hot, air fry the fries for 15 to 20 minutes. Shake the basket halfway through. This ensures they brown perfectly on all sides. When the fries are golden and crispy, transfer them to a bowl. While hot, sprinkle freshly grated Parmesan cheese over them. Toss gently, so the cheese sticks well. Serve them warm for the best taste! To get your fries super crispy, soak them first. Soaking removes extra starch. This helps fries become crunchy when cooked. Aim for at least 30 minutes in cold water. After soaking, dry them well. A clean towel or paper towel works great. The drier the fries, the crispier they will be. Air circulation is key in the air fryer. Arrange fries in a single layer. This allows hot air to reach all sides of the fries. If you stack them, they will not cook evenly. Fry in smaller batches if needed. This simple step makes a big difference in texture. Preheat your air fryer before adding fries. A hot fryer cooks them faster and better. During cooking, shake the basket halfway through. This helps fries brown evenly. Keep an eye on them toward the end. They can go from perfect to overcooked quickly. Enjoy your crispy fries while they are hot! Pro Tips Soaking is Essential: Soaking the fries in cold water for 30 minutes helps to remove excess starch, resulting in crispier fries. Dry Thoroughly: Make sure to pat the fries dry with a towel after soaking. Removing moisture is crucial for achieving that perfect crunch. Avoid Overcrowding: Arrange the fries in a single layer in the air fryer basket. Overcrowding can inhibit air circulation and lead to uneven cooking. Cheese While Hot: Sprinkle the Parmesan cheese over the fries immediately after removing them from the air fryer for better adherence and flavor. {{image_4}} You can switch up the spices to match your taste. Try adding chili powder for heat. A pinch of cumin gives a warm, earthy flavor. For a fresh twist, mix in fresh herbs like rosemary or thyme. You can even use lemon zest for a zesty kick. Don't be afraid to experiment. The right blend can make your fries unique. Parmesan is a classic, but there are many options. Cheddar cheese melts nicely and gives a rich flavor. For a bold taste, try blue cheese or feta. You can even use a blend of cheeses for depth. Sprinkle some mozzarella on top for extra gooeyness. Each cheese brings its own character and taste to your fries. Russet potatoes shine in this recipe, but don’t stop there. Sweet potatoes add a natural sweetness and color. Yukon Golds offer a creamy texture and buttery taste. Even frozen fries can work in a pinch. Just adjust the cooking time as needed. Each type of potato gives a different experience, so choose what you love. After enjoying your Garlic Parmesan Air Fryer Fries, let any leftovers cool. Place them in an airtight container. This keeps them fresh for about three days in the fridge. If you leave them out, they will get soggy quickly. So, always store them in the fridge! To bring back the fries' crunch, use the air fryer again. Preheat it to 350°F (175°C). Arrange the fries in a single layer. Heat for about 5 to 7 minutes. This will make them crispy again without drying them out. You can also use the oven, but the air fryer works best. If you want to save some fries for later, freezing is a good option. Let the fries cool completely. Spread them on a baking sheet in a single layer. Freeze for about two hours until they are firm. Once frozen, transfer them to a freezer bag. You can keep them for up to three months. When you’re ready to eat, cook them straight from frozen in the air fryer. Adjust the cooking time since they will take a bit longer. Yes, you can use frozen fries. They will not need soaking. Just toss them in oil and seasonings. Air fry them for about 10 to 15 minutes. Check for doneness and adjust time if needed. These fries pair well with many dishes. Serve them with burgers or grilled chicken. They also go great with dips like ranch or garlic aioli. Add a fresh salad for a complete meal. To make these fries healthier, reduce the oil. You can use less than three tablespoons. You can also use a cooking spray instead. This keeps the flavor while cutting calories. Try adding herbs instead of salt for flavor. If you need a substitute, try nutritional yeast. It adds a cheesy flavor without dairy. You can also use pecorino cheese or a vegan cheese option. Just keep in mind that the taste will slightly change. Yes, you can use an oven. Preheat it to 425°F (220°C). Spread the fries on a baking sheet in a single layer. Bake for about 25 to 30 minutes. Flip them halfway for even cooking and crispiness. You now have all you need to make perfect Garlic Parmesan Air Fryer Fries. We covered ingredients, prep work, and the importance of quality. I shared step-by-step instructions for crispy fries, plus tips and tricks for the best results. Don’t forget the fun variations to explore. Try different seasonings or potato types for new flavors. With these easy steps, you will impress everyone. Enjoy your homemade fries today!

Garlic Parmesan Air Fryer Fries Crunchy and Tasty Snack

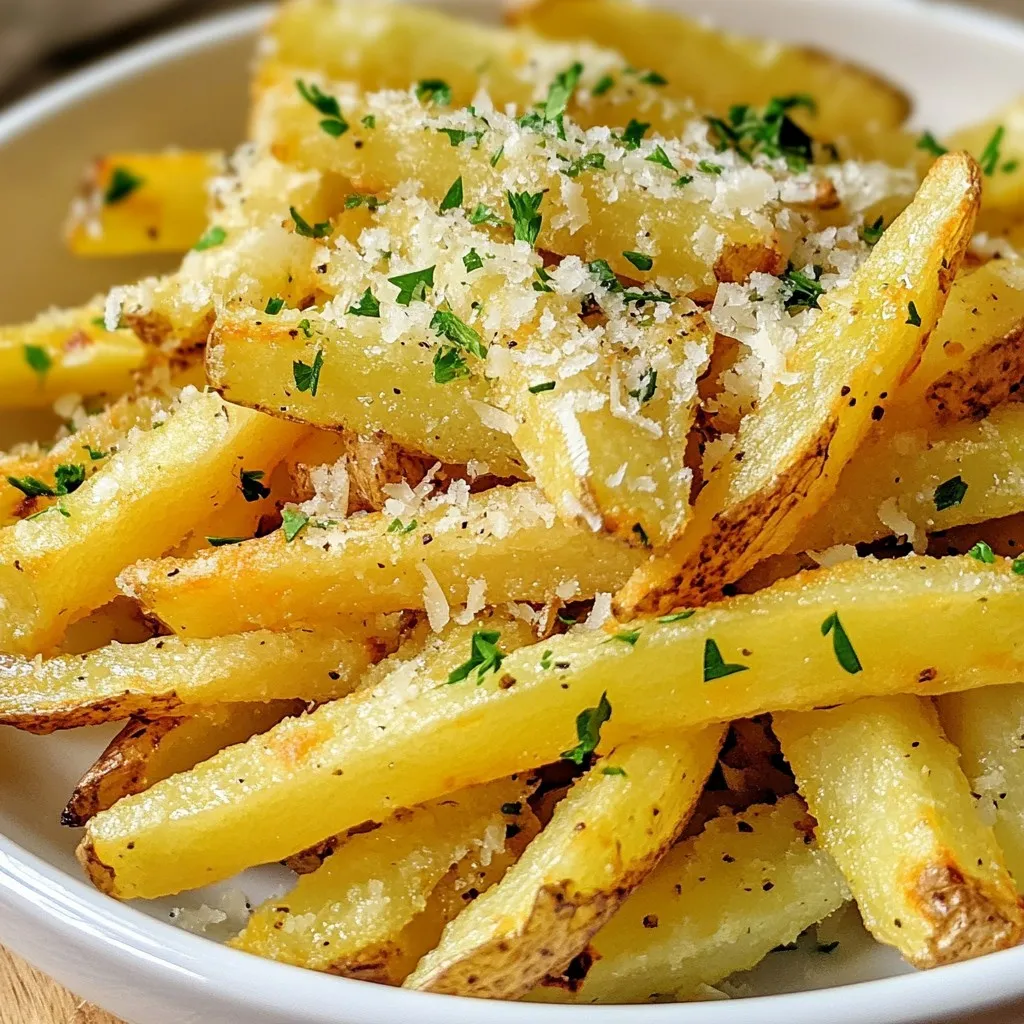
If you crave a tasty snack that’s easy to make, you’ll love Garlic Parmesan Air Fryer Fries! These fries are

To make honey mustard chicken thighs, you will need the following ingredients: - 4 bone-in chicken thighs, skin-on - 1/4 cup honey - 1/4 cup Dijon mustard - 2 tablespoons olive oil - 2 cloves garlic, minced - 1 teaspoon fresh thyme leaves (or 1/2 teaspoon dried thyme) - Salt and black pepper, to taste - Fresh parsley, chopped (for garnish) These simple ingredients create a rich and tangy flavor. The honey adds sweetness, while the Dijon mustard gives a nice kick. You can elevate your dish with these optional enhancements: - Citrus Zest: Add lemon or orange zest for a fresh twist. - Hot Sauce: Mix in a few drops for some heat. - Brown Sugar: A teaspoon can enhance the sweetness. - Other Herbs: Consider rosemary or oregano for different flavor notes. These tweaks can personalize your chicken thighs to match your taste. Gather these tools to make cooking easier: - Baking dish - Medium mixing bowl - Whisk or fork - Measuring cups and spoons - Paper towels - Oven mitts Having the right tools helps streamline the cooking process. You’ll enjoy making this dish even more! {{ingredient_image_2}} First, heat your oven to 400°F (200°C). This step is key for crispy skin. While the oven warms up, grab your chicken thighs. Use paper towels to dry them well. This helps the skin get nice and crispy when cooking. Place the thighs in a baking dish in one layer. In a medium bowl, combine 1/4 cup honey and 1/4 cup Dijon mustard. Adding 2 tablespoons of olive oil will make it smooth. Next, add 2 minced garlic cloves and 1 teaspoon of fresh thyme leaves. Season with salt and black pepper to taste. Whisk everything together until it blends well. Pour the honey mustard marinade over the chicken thighs. Make sure each piece gets a good coating. For the best flavor, cover the dish and place it in the fridge. Marinate for at least 30 minutes. If you have time, let it sit overnight for a richer taste. Once marinated, take the baking dish out of the fridge. Place the dish in the preheated oven. Bake for 35-40 minutes. You want the chicken skin to be golden brown. Use a meat thermometer to check. The chicken should reach 165°F (75°C) to be safe to eat. About halfway through baking, open the oven. Carefully baste the chicken with the sauce in the dish. This adds extra juiciness and flavor to the chicken. After baking, let the chicken rest for 5 minutes. This allows the juices to spread throughout the meat. Just before serving, sprinkle chopped fresh parsley on top. It adds a nice color and fresh taste. For a great meal, serve the chicken on a wooden platter with seasonal roasted vegetables. To get that perfect crispy chicken skin, start with dry thighs. Pat them down with paper towels before you marinate. This removes extra moisture that can make the skin soggy. Use a hot oven set to 400°F (200°C). High heat helps crisp the skin quickly. Basting halfway through with the marinade also adds flavor and keeps the skin from drying out. For the best flavor, marinate the chicken thighs for at least 30 minutes. If you can, let them soak overnight. This allows the honey and Dijon mustard to soak into the meat. Make sure to coat each thigh well with the marinade. Consider using a zip-top bag for easy mixing and marinating. Just toss the chicken in, seal, and give it a good shake. It’s key to cook your chicken to the right temperature. Use a meat thermometer to check. The internal temperature should reach 165°F (75°C) for safe eating. Insert the thermometer into the thickest part of the thigh, avoiding the bone. Let the chicken rest for about 5 minutes after baking. This helps the juices stay inside, making your chicken juicy and tender. Pro Tips Pat Dry for Crispiness: Make sure to thoroughly pat the chicken thighs dry with paper towels before marinating. This helps to achieve a crispy skin when baked. Marinate Longer for Flavor: For the best flavor, marinate the chicken thighs for longer, ideally overnight. This allows the honey mustard to penetrate the meat for a more intense taste. Use a Meat Thermometer: To ensure perfectly cooked chicken, use an instant-read meat thermometer. The internal temperature should reach 165°F (75°C). Baste for Juiciness: Basting the chicken halfway through the cooking process with the marinade keeps the meat juicy and enhances the flavor. {{image_4}} You can switch up the sweetener in this recipe. Instead of honey, try maple syrup or agave nectar. Each sweetener adds a distinct taste. Maple syrup brings a rich, earthy flavor. Agave nectar is lighter and less intense. You can even use brown sugar for a caramelized touch. Just mix it with the mustard and other ingredients like usual. Adjust the amount to suit your taste. Adding herbs can make a big difference. Fresh herbs like rosemary or basil can elevate your dish. You can replace thyme with these herbs for a new twist. For a spicier kick, add crushed red pepper flakes or fresh chili. Even a little smoked paprika can add depth. Experiment with what you like best. This way, you can enjoy honey mustard chicken in new ways. You can cook honey mustard chicken thighs in the oven or on the grill. Baking gives a nice, even cook. It keeps the chicken juicy and tender. When grilling, you get great char and flavor. Just watch the temperature so it cooks through. Both methods work well, so choose what suits your taste. Each method offers a unique flavor, making your meal exciting every time. To store leftover chicken thighs, let them cool first. Place the thighs in an airtight container. You can keep them in the fridge for up to 3 days. Make sure they are covered well to prevent drying out. If you plan to eat them later, consider slicing them for easier use. When you want to reheat, preheat your oven to 350°F (175°C). Place the chicken thighs in an oven-safe dish. Add a splash of chicken broth or water to keep them moist. Cover with foil to trap the heat. Heat for about 20 minutes, or until they reach 165°F (75°C). This helps keep the chicken juicy and tasty. If you want to freeze honey mustard chicken, wrap each thigh tightly in plastic wrap. Then, place them in a freezer bag. Remove as much air as possible to avoid freezer burn. You can freeze them for up to 3 months. When ready to eat, thaw in the fridge overnight before reheating. This keeps the flavor and texture intact. Yes, you can use boneless chicken thighs. They will cook faster than bone-in thighs. Just keep an eye on the time. Bake boneless thighs for about 25 to 30 minutes, or until they reach 165°F. This will help you serve juicy and tender chicken. I recommend marinating the chicken for at least 30 minutes. For more flavor, marinate it overnight. This gives the honey mustard mix time to soak into the meat. The longer it sits, the tastier it gets! Here are some great sides to serve with your chicken: - Roasted vegetables - Mashed potatoes - Steamed green beans - Quinoa salad These sides will balance the flavors of the dish and make your meal complete. Absolutely! Making honey mustard sauce is easy. Mix equal parts honey and Dijon mustard in a bowl. Adjust the amount to suit your taste. You can add a splash of vinegar for a tangy kick. This homemade sauce is great for dipping or drizzling! Honey mustard chicken thighs are easy and fun to make. We covered the key ingredients, optional enhancements, and all the tools you need. The step-by-step process ensures you bake the chicken to a perfect taste and texture. I shared tips for crispy skin, great marinating, and cooking temperature. Remember, you can mix in your favorite herbs or use grilling methods for a twist. Store leftovers properly, and enjoy them later with simple reheating. With this guide, you can create a delicious meal the whole family will love. Happy cooking!

Honey Mustard Chicken Thighs Flavorful and Easy Recipe

Looking for a tasty dish that’s quick and easy? You’ve come to the right place. My Honey Mustard Chicken Thighs

For a great raspberry lemonade sorbet, you need some fresh items. Here’s what you need: - 2 cups fresh raspberries - 1 cup freshly squeezed lemon juice (about 4-6 medium lemons) - 1 tablespoon freshly grated lemon zest These fresh ingredients give your sorbet a bright and vibrant taste. The raspberries add a sweet-tart flavor. Fresh lemon juice brings in a zesty kick. Zest enhances this flavor and makes it more fragrant. You will need some sugar and water to make the sorbet nice and sweet. Here are the essentials: - 1 cup granulated sugar - 1 cup water The sugar helps balance the tartness of the lemons and raspberries. It dissolves in water to create a simple syrup. This syrup is key for a smooth texture in the sorbet. To make your sorbet look even better, consider these garnishes: - Fresh mint leaves for garnish Mint adds a pop of color and a fresh taste. You can sprinkle a few whole raspberries on top too. These little touches make your dessert not just tasty but also lovely to serve. {{ingredient_image_2}} Start by making the simple syrup. In a medium saucepan, mix 1 cup of sugar and 1 cup of water. Heat this on medium. Stir until the sugar dissolves completely. This should only take a few minutes. Once it’s clear, remove it from heat. Let it cool to room temperature. While the syrup cools, grab a blender. Add 2 cups of fresh raspberries, 1 cup of lemon juice, and 1 tablespoon of lemon zest. Pour in your cooled syrup next. Blend all these together on high speed. Aim for a smooth and creamy texture. This step mixes all the lovely flavors. After blending, it’s time to strain the mixture. Take a fine mesh strainer and place it over a large bowl. Pour your blended raspberry mixture into the strainer. This will help remove the seeds. Use a spatula to press the mixture through. Get as much juice as you can. This ensures a smooth sorbet. Now that you have your juice, cover the bowl. You can use plastic wrap or a lid. Place it in the fridge for about an hour. Chilling enhances the flavors and cools the mixture. This step is key for a refreshing sorbet. After chilling, it’s time to churn. Pour the mixture into your ice cream maker. Follow the instructions for your machine. Usually, this takes about 20-25 minutes. You want the mixture to reach a soft-serve consistency. This gives the sorbet its light and airy texture. Once you finish churning, transfer the sorbet to a lidded container. Make sure it’s airtight. Freeze the sorbet for at least 4 hours. This step ensures your sorbet is firm and ready to serve. Before serving, let it sit out for a few minutes. This makes it easier to scoop. Enjoy your refreshing treat! To get the best texture for your sorbet, follow these steps. First, always start with chilled ingredients. They mix better and freeze faster. Use a fine mesh strainer to remove seeds. This step keeps your sorbet smooth. After churning, let it freeze until firm. If it's too hard, let it sit out for a few minutes before serving. Want to boost the flavor? Try these ideas. Add a bit of fresh mint to the blender for a cool twist. You can also mix in a splash of sparkling water. This adds fizz and makes it more refreshing. If you love tartness, use more lemon juice. For sweetness, adjust sugar to your taste. Each tweak can make your sorbet unique. Serve your sorbet in pretty bowls for a nice touch. Garnish with fresh mint leaves and whole raspberries. This adds color and makes each dish pop. You can also pair it with a slice of lemon. It creates a lovely contrast on the plate. Enjoy your treat on a hot day. It’s perfect for cooling off! Pro Tips Choose Ripe Raspberries: Make sure to select bright red, plump raspberries for the best flavor. Overripe or mushy berries may result in a less vibrant sorbet. Fresh Lemon Juice is Key: Always use freshly squeezed lemon juice for a brighter, more refreshing taste compared to bottled juice. Chill Your Mixture: Allowing the blended raspberry mixture to chill in the fridge enhances the flavors and ensures a smoother sorbet texture when churning. Serve at the Right Temperature: Let the sorbet sit out for a few minutes before serving. This softens it just enough to scoop easily without losing its shape. {{image_4}} You can make your sorbet even more fun by adding other fruits. Consider mixing in strawberries, blueberries, or even peaches. Each fruit brings its own taste. For instance, strawberries add sweetness, while blueberries add a hint of tartness. Just keep the same ratio of fruit to liquid for the best results. Blend the other fruits with the raspberries for a new flavor twist! If you want a healthier option, try using honey or agave syrup instead of sugar. These sweeteners add a unique flavor. They can make your sorbet feel more gourmet. You can also use stevia for a low-calorie choice. Just remember to adjust the amounts since these sweeteners can be sweeter than regular sugar. This sorbet is already vegan, which is great! You can keep it dairy-free by sticking to the recipe as it is. If you want to add creaminess, consider using coconut milk. It will give your sorbet a rich texture without dairy. Just blend the coconut milk with the raspberries and lemon juice for a tropical vibe! To freeze your raspberry lemonade sorbet, use a clean, airtight container. Glass or plastic containers work well. Make sure to leave some space at the top. The sorbet expands as it freezes. For best results, freeze it as soon as it reaches soft-serve consistency. This helps maintain its smooth texture. If you have leftovers, cover the container tightly. You can also wrap it in plastic wrap before sealing. This prevents ice crystals from forming. When you want to enjoy it again, simply scoop out what you need. Return the rest to the freezer right away to keep it fresh. Properly stored, your raspberry lemonade sorbet lasts about two weeks in the freezer. After that, it may lose some flavor and texture. For the best taste, try to enjoy it within the first week. This way, you get the most vibrant berry flavor. Yes, you can use frozen raspberries. They work well and still taste great. Just let them thaw a bit before blending. This helps the raspberries mix better with the other ingredients. You can make this sorbet without an ice cream maker. After blending, pour the mixture into a shallow dish. Freeze it, and stir every 30 minutes. This breaks up ice crystals and makes the sorbet smooth. If you don't have lemon juice, you can use lime juice. Lime will give your sorbet a different flavor but still taste refreshing. You can also use a mix of lemon and lime for a unique taste. The sorbet is ready when it is firm but not rock hard. If it’s too hard, let it sit at room temperature for a few minutes. This softens it, making it easier to scoop. Enjoy your treat! This blog post covered how to make delicious raspberry lemonade sorbet. We discussed necessary ingredients, step-by-step instructions, and helpful tips. You learned how to achieve the right texture and flavor. We explored variations for your taste and storage tips for leftovers. Making sorbet is fun and rewarding. Enjoy your tasty treat, and share it with friends and family!

Raspberry Lemonade Sorbet Refreshing Summer Treat

Looking for a cool treat to beat the summer heat? Look no further! This Raspberry Lemonade Sorbet is a burst

- 1 lb boneless, skinless chicken breasts - 8 cups chicken broth - 1 cup orzo pasta - 2 medium carrots, diced - 2 stalks celery, diced - 1 medium onion, finely chopped - 3 cloves garlic, minced - 2 large eggs - 1/2 cup fresh lemon juice - Zest of 1 lemon - 1/4 cup fresh dill, chopped - Salt and pepper to taste - 2 tablespoons olive oil - Parmesan cheese for serving - Crusty bread for pairing - You can use alternative grains instead of orzo, like rice or quinoa. - If you do not have fresh herbs, you can substitute with dried ones. Use less, as dried herbs are stronger. Each ingredient plays a key role in making this soup tasty and comforting. The chicken provides protein, while the broth adds depth. The orzo gives a nice texture, and the lemon juice brings brightness. Fresh dill enhances the flavors and gives it a fresh twist. Feel free to adjust these ingredients to suit your taste. Cooking is about making it your own! {{ingredient_image_2}} First, gather all your ingredients. You need chicken, broth, orzo, and veggies. - Dice 2 medium carrots and 2 stalks of celery. - Finely chop 1 medium onion and mince 3 cloves of garlic. - Set these aside to add later. Next, cook the chicken. Place 1 lb of boneless, skinless chicken breasts on a cutting board. After the soup is ready, shred the chicken into bite-sized pieces. Use two forks or your hands to do this. Now, heat 2 tablespoons of olive oil in a large pot over medium heat. When the oil shimmers, add the onion, carrots, and celery. Sauté these for 5-7 minutes. Stir occasionally until the veggies soften. The onion should look translucent. Add the minced garlic and cook for another 1-2 minutes. Be careful not to let the garlic brown; we want it fragrant but not burnt. Pour in 8 cups of chicken broth. Bring this to a rolling boil. Once boiling, add the chicken breasts to the pot. Lower the heat and let it simmer for 15-20 minutes. The chicken should be cooked through and no longer pink. Remove it from the pot and cool it on a cutting board. While the chicken cooks, add 1 cup of orzo pasta to the pot. Cook it for about 8-10 minutes until al dente. Once the chicken cools, shred it into small pieces. In a medium bowl, whisk together 2 large eggs, 1/2 cup of fresh lemon juice, and the zest of 1 lemon. To avoid curdling, temper the egg mixture. Take a ladle of hot broth and slowly whisk it into the egg mixture. Then, pour this tempered mixture back into the soup pot while stirring continuously. This will give the soup a creamy texture. Add the shredded chicken back into the pot. Stir in 1/4 cup of chopped fresh dill. Season with salt and pepper to taste. Heat the soup for an additional 2-3 minutes. Serve it hot in warmed bowls. For a lovely touch, garnish with fresh dill and a lemon wedge on the side. Enjoy your Greek Lemon Chicken Soup! To get the best broth, simmer it gently. Avoid boiling too hard. This keeps the flavors bright. Add your orzo pasta in the last 10 minutes. It cooks fast and keeps a nice bite. Stir often to prevent sticking. Serve the soup hot in warm bowls. A sprinkle of fresh dill on top adds color and taste. You can also add a lemon wedge on the side. It gives a fresh kick to every spoonful. A slice of crusty bread pairs well too. Do not overcook the chicken. It can become dry and tough. Cook it until no longer pink, about 15-20 minutes. Also, be careful when adding the egg mixture. Whisk it with hot broth first. This step stops the eggs from curdling in the soup. Pro Tips Use Fresh Ingredients: Always opt for fresh lemons and dill to enhance the flavor of your soup. Fresh herbs and citrus can make a significant difference in the overall taste. Perfectly Temper the Eggs: When adding the egg mixture to the soup, be sure to temper the eggs with hot broth first. This prevents curdling and ensures a smooth, creamy texture. Customize Your Vegetables: Feel free to add other vegetables like spinach or zucchini for added nutrition and flavor. Just make sure they are diced small enough to cook through in the soup. Store Properly: If you have leftovers, store the soup in an airtight container in the fridge. However, it's best to add the orzo just before serving to prevent it from absorbing too much broth. {{image_4}} You can make Greek lemon chicken soup healthier with a few easy swaps. First, use low-sodium chicken broth. This change keeps the soup tasty while cutting back on salt. Next, add more vegetables. Try including spinach, zucchini, or bell peppers. These veggies boost nutrients and add color to your bowl. If you want to try something different, consider vegetarian Greek lemon soup. Replace chicken with chickpeas or lentils. Use vegetable broth instead of chicken broth for depth. This option is warm and filling without meat. Another fun twist is spicy Greek lemon chicken soup. Add red pepper flakes or diced jalapeños to bring heat. This version adds a kick that spice lovers will enjoy. For a family-friendly version, make kid-friendly ingredient swaps. Use small pasta shapes instead of orzo. Kids often find fun shapes more appealing. You can also reduce the lemon juice a bit. This makes the soup less tangy for young taste buds. Finally, get the kids involved by letting them help add toppings, like fresh dill or lemon wedges. To keep your Greek lemon chicken soup fresh, store it in an airtight container. Place it in the fridge. It can last for about 3 to 4 days. Make sure the soup cools down to room temperature before sealing the container. This helps prevent moisture build-up, which can lead to spoilage. If you want to freeze the soup, it’s best to do so without the added eggs. Freeze the cooled soup in a freezer-safe container. Leave some space at the top for expansion. It can last in the freezer for about 3 months. When ready to use, thaw it in the fridge overnight. When reheating, do it gently to keep the texture. You can use the stove or microwave. If using a pot, heat on low and stir often. Avoid boiling, as it can curdle the eggs. If you find the soup thick after freezing, add a splash of broth or water. Enjoy your warm, comforting soup! Greek Lemon Chicken Soup, also known as Avgolemono, has a rich history. It comes from Greece and has roots in ancient cooking. This soup symbolizes warmth and comfort for many families. It blends tender chicken, bright lemon, and creamy eggs. The dish is often served during special occasions and holidays. Its vibrant flavors make it a favorite all year round. To make this soup gluten-free, swap orzo for gluten-free pasta or rice. Many brands offer gluten-free options that work well. For the broth, choose a gluten-free chicken broth. Always check labels to ensure they are safe. These small changes keep the soup tasty and safe for everyone. Yes, you can prepare Greek Lemon Chicken Soup ahead of time. Cook the soup and let it cool before storing. Keep it in an airtight container in the fridge for up to three days. If you want to freeze it, leave out the egg mixture. Add it when you reheat the soup for the best texture. When ready, heat the soup gently on the stove and stir in the egg mixture. This tip keeps the soup creamy and delicious. This blog post covered how to make Greek Lemon Chicken Soup with a clear list of ingredients and steps. You learned about tips for perfecting the soup and how to avoid mistakes. We explored variations and healthy options, inviting you to adapt the recipe to your taste. Storage and reheating tips ensure your leftovers stay delicious. Enjoy this comforting dish with family and friends, knowing you can customize it to suit any palate. With these simple steps, you can create a flavorful experience that everyone will love.

Greek Lemon Chicken Soup Flavorful and Nourishing Dish

If you’re craving a warm bowl of comfort, Greek Lemon Chicken Soup is the answer. This flavorful dish combines tender

To make delicious Chili Lime Grilled Corn, you need the following fresh ingredients: - Fresh corn (4 ears, husked and cleaned) - Creamy mayonnaise (1/4 cup) - Tangy sour cream (1/4 cup) - Fresh lime juice (1 tablespoon) - Fresh lime zest (1 teaspoon) - Chili powder (1 teaspoon) - Smoked paprika (1/2 teaspoon) - Garlic powder (1/2 teaspoon) - Salt (to taste) - Optional toppings: crumbled feta cheese, fresh cilantro These ingredients come together to create a zesty and creamy flavor that will impress your family and friends. Fresh corn is key for the best taste. The creamy mayonnaise and sour cream blend create a rich sauce that pairs perfectly with the lime and spices. The optional toppings add an extra layer of flavor and color. Enjoy your grilling! {{ingredient_image_2}} Set your grill to medium-high heat. This is about 400°F. You want it hot enough to cook the corn well. To check if it's ready, hold your hand above the grill. If you can keep it there for only 3-4 seconds, it's ready. In a bowl, mix these ingredients: - 1/4 cup creamy mayonnaise - 1/4 cup tangy sour cream - 1 tablespoon freshly squeezed lime juice - 1 teaspoon fresh lime zest - 1 teaspoon chili powder - 1/2 teaspoon smoked paprika - 1/2 teaspoon garlic powder - Salt, to taste Stir everything until smooth. The sauce should be thick but spreadable. Set it aside for later. Take your husked corn and place it on the hot grill. Grill for about 10-12 minutes. Make sure to turn the corn every few minutes. This will help it cook evenly. You want to see nice char marks and feel the corn get tender. After grilling, use tongs to take the corn off the grill. Quickly brush the chili-lime cream over each ear of corn. Make sure to cover all sides. This ensures every bite is full of flavor. While the corn is still warm, sprinkle crumbled feta cheese on top. This adds a creamy and salty touch. Then, finish by adding chopped cilantro for a fresh look. Serve it right away for the best taste. To get the best grilled corn, avoid these common mistakes: - Don’t skip preheating your grill. A hot grill prevents sticking and helps form nice char marks. - Turn the corn often. This ensures even cooking and a great char on all sides. - Watch the time. Grill for about 10-12 minutes. Overcooking makes the corn tough. If you don’t have a grill, you can also cook corn in the oven or on the stovetop. For the oven, wrap the corn in foil and bake at 400°F for 25 minutes. On the stovetop, boil the corn in salted water for about 5-7 minutes, then finish with the cream sauce after. You can prep the chili-lime cream sauce ahead. Mix the mayo, sour cream, lime juice, lime zest, chili powder, smoked paprika, garlic powder, and salt. Store it in the fridge for up to three days. This gives the flavors time to blend well. For extra flavor, try adding a pinch of cumin or a splash of hot sauce to the mix. These will add depth and a bit of heat. To kick up the flavor, consider these spices and additions: - Cumin adds a warm, earthy note. - Cayenne pepper gives a spicy kick. - Chopped jalapeños can add fresh heat. If you like it hot, top the corn with chopped spicy peppers or sprinkle extra chili powder on top. Experimenting with different spices makes this dish fun and unique! Pro Tips Choose Fresh Corn: The best flavor comes from fresh corn. Look for ears with bright green husks and plump, moist kernels for the sweetest taste. Don’t Overcook: Keep an eye on your corn while grilling. Overcooking can lead to tough and chewy kernels; aim for a tender bite with nice char marks. Customize Your Spice Level: Adjust the amount of chili powder to suit your taste. For a milder version, use less, or substitute with paprika for flavor without the heat. Serve Immediately: Grilled corn is best enjoyed fresh off the grill. The flavors of the chili-lime cream are at their peak when served hot! {{image_4}} You can make this dish even better with some simple swaps. Use vegan mayonnaise and plant-based sour cream to keep it vegetarian. This keeps the flavors rich, while meeting dietary needs. Instead of corn, try using zucchini or bell peppers. Both grill well and absorb flavors beautifully. Want to spice things up? Add cumin or paprika to the sauce for a different taste. You can also mix in fresh herbs like basil or parsley. These will bring a fresh twist to your corn. For toppings, think outside the box! Try sliced jalapeños for heat or avocado for creaminess. Crushed nuts can add a nice crunch too. Chili lime grilled corn pairs well with many dishes. Serve it alongside grilled chicken or fish for a tasty meal. It also works great at barbecues or picnics. This corn shines as a side dish during summer gatherings. Add it to your taco night for an extra kick! To keep your chili lime grilled corn fresh, follow these steps: - Refrigeration: Wrap leftover corn in plastic wrap or place it in an airtight container. Store it in the fridge. This helps maintain its flavor and moisture for up to three days. - Reheating Tips: When you're ready to enjoy the leftovers, heat the corn in a skillet over medium heat. This method helps keep the corn juicy and enhances the flavors. You can also use a microwave, but be careful not to overcook it. If you want to save your grilled corn for later, freezing is a great option. - Preparation for Freezing: Allow the corn to cool completely. Then, cut the kernels off the cob. Place the kernels in a freezer-safe bag or container. Make sure to squeeze out any air to prevent freezer burn. - Thawing and Reheating Instructions: When you’re ready to use the frozen corn, take it out and let it thaw in the fridge overnight. To reheat, use a skillet on medium heat or microwave it. For extra flavor, add a bit of butter or a sprinkle of lime juice. To make this recipe vegan, swap out the mayo and sour cream. - Use vegan mayonnaise. - Try coconut yogurt for a creamy texture. - Add lime juice and zest to keep the flavor bright. These plant-based swaps keep the dish tasty and fresh. Yes, you can use frozen corn. - Frozen corn can taste good but may be less sweet. - It might not have the same crunch as fresh corn. If using frozen corn, grill it for a shorter time, around 8-10 minutes. You can try many spices for a fun twist. - Add cumin for a warm, earthy taste. - Use paprika for extra smokiness. - Try cayenne pepper for some heat. Fresh herbs like parsley or basil can also add a nice touch. In this blog post, we explored a vibrant recipe for chili-lime grilled corn. We detailed key ingredients like fresh corn and creamy sauces, then walked through easy grilling steps. I shared tips for perfect cooking and flavor boosts. We also covered variations to suit different tastes. Overall, this dish is not just tasty but fun to make. Enjoy experimenting with flavors and serving it at your next gathering. Happy grilling!

Chili Lime Grilled Corn Flavorful Side Dish Recipe

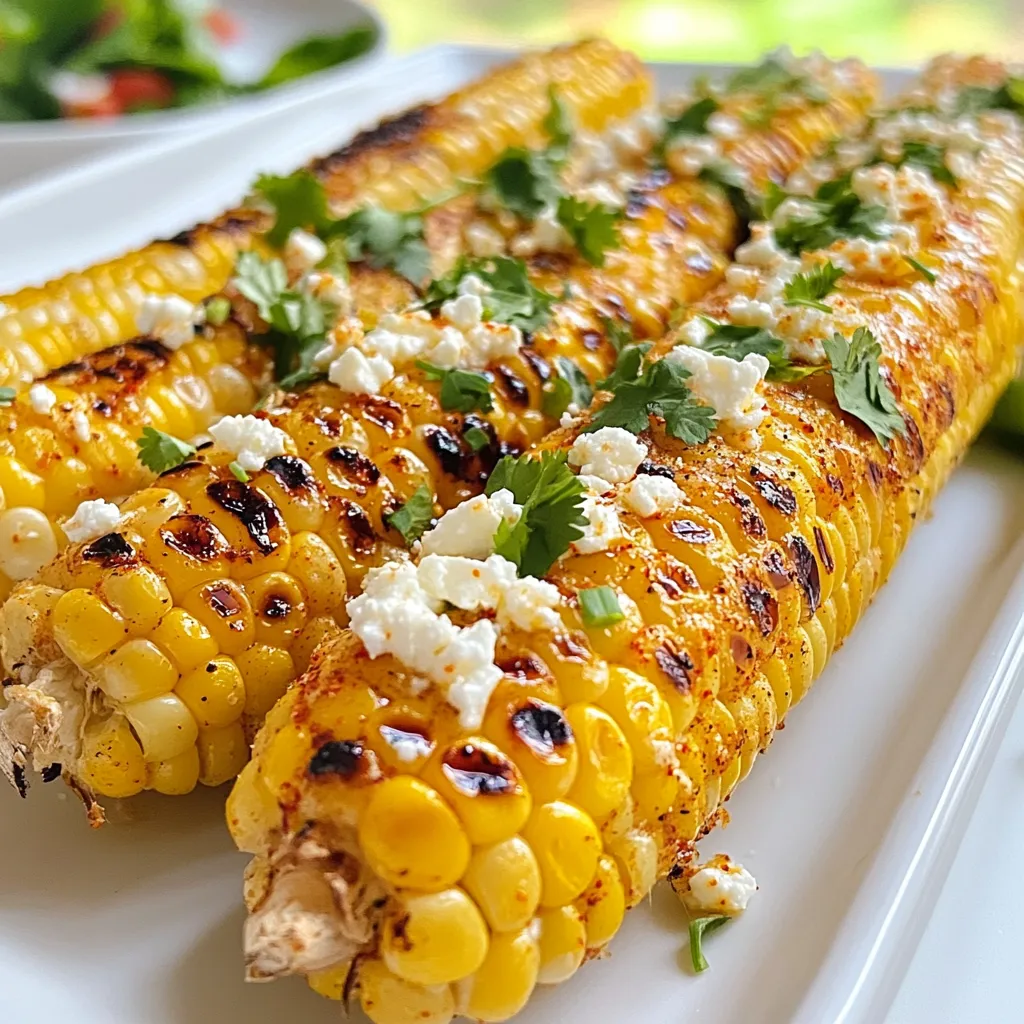
Looking for a bold and zesty side dish? Chili Lime Grilled Corn is your ticket! This easy recipe combines fresh

Chia seeds Chia seeds are tiny but mighty. They soak up liquid and turn creamy. You need 1/2 cup for this pudding. They are full of fiber and omega-3 fatty acids. Almond milk or plant-based milk options You can use 2 cups of almond milk. If you prefer other plant milks, go for it! Coconut or oat milk works well too. Choose what you like best. Vanilla bean and alternative options A real vanilla bean makes this pudding special. Use one bean, split it open, and scrape the seeds. You can also use 1 teaspoon of vanilla extract if you don’t have a bean. Maple syrup and non-vegan alternatives For sweetness, add 2 tablespoons of maple syrup. If you want a non-vegan option, honey works too. The sweetener balances the flavors. Salt and its importance in flavor A pinch of fine sea salt is key. It enhances the sweetness and brings out the vanilla flavor. Don’t skip this step! Fresh seasonal berries Top your pudding with fresh berries like strawberries or blueberries. They add color and taste. Berries are healthy and full of vitamins. Bananas and granola Sliced ripe bananas add creaminess. Crunchy granola gives texture and extra flavor. This combo makes the pudding even better. Coconut flakes and other toppings Lightly toasted coconut flakes add a tropical twist. You can also try nuts or seeds for added crunch. Mix and match toppings to suit your taste! {{ingredient_image_2}} Start by taking a big bowl. In it, combine 1/2 cup chia seeds with 2 cups almond milk. If you have a vanilla bean, split it and scrape the seeds into the bowl. You can also use 1 teaspoon vanilla extract instead. This adds rich flavor to the pudding. Next, pour in 2 tablespoons maple syrup and a pinch of fine sea salt. The salt will enhance the sweetness. Now, whisk your mixture well. This step is key to avoid clumps of chia seeds. Make sure everything blends smoothly. Once mixed, cover the bowl with plastic wrap or a lid. Place it in the fridge for at least 4 hours. For the best results, let it sit overnight. This waiting time helps the chia absorb the milk and become creamy. After chilling, take the pudding out. Give it a good stir to mix any settled chia seeds. If it feels too thick, add a splash of almond milk. This will make it creamier. Now, scoop the pudding into bowls or jars. Aim for generous portions. Top with fresh berries, banana slices, granola, or coconut flakes. Enjoy this tasty and nutritious treat! To get the best texture for your vanilla bean chia pudding, let it sit overnight. This time helps the chia seeds absorb the almond milk fully. If you skip this step, your pudding might be too watery. After chilling, if you find the pudding too thick, add a splash of almond milk. Stir it well to get the right consistency. You can play with flavors in your chia pudding. Try different extracts like almond or coconut for a fun twist. You can also switch sweeteners. Use honey or agave syrup instead of maple syrup. Toppings can change the game too. Add fresh berries, sliced bananas, or crunchy granola for exciting textures. Toasted coconut flakes also give a nice crunch. Many people forget to whisk the mixture enough. This mistake can lead to clumps in your pudding. Make sure to whisk until the seeds are evenly distributed. Also, do not skip the chilling time. If you pull it out too soon, the texture won’t be creamy. Give it time in the fridge for the best results. Pro Tips Soak Chia Seeds: For an even creamier texture, soak the chia seeds in almond milk for a few minutes before mixing with the other ingredients. This helps them hydrate faster. Experiment with Sweeteners: While maple syrup is delicious, feel free to experiment with other natural sweeteners like agave nectar or date syrup for a different flavor profile. Chill for Longer: For the best texture, letting the pudding chill overnight allows the chia seeds to fully expand and create a more luscious consistency. Make it a Meal: To transform this pudding into a meal, add a scoop of protein powder or nut butter for an extra boost of nutrition and flavor. {{image_4}} You can easily make this pudding dairy-free and vegan. Start by using any plant-based milk you love. Almond milk works great, but coconut, soy, or oat milk are also good choices. For sweeteners, maple syrup is a fantastic vegan option. If you want a non-vegan choice, honey is an alternative. Just pick what suits your diet best. Make your chia pudding fun and fresh by adding seasonal fruits. In summer, try strawberries or peaches. In fall, consider apples or pears. For winter, citrus fruits like oranges or grapefruits add zest. You can also create themed toppings for special occasions. Think red and green berries for Christmas or pastel fruits for springtime. Boost the nutrition of your chia pudding with superfoods. Flaxseeds are a great choice; they add fiber and omega-3s. You can also mix in nuts for crunch and protein. If you want an extra protein punch, add a scoop of protein powder. This makes your pudding not just a treat but also a healthy snack. To keep your chia pudding fresh, store it in the fridge. This way, it stays creamy and delicious. Use airtight containers to avoid any odors from your fridge. Glass jars work well since they do not stain or hold smells. Plastic containers are lighter but may not keep the flavor as well. Chia pudding can last up to five days in the fridge. Make sure to check for any change in smell or appearance. If you see any mold or sour smell, it’s time to toss it. Always trust your senses; they guide you well. If you have leftover pudding, get creative! You can blend it into smoothies for extra fiber and nutrients. Pour it over yogurt for a parfait that packs a punch. Try using it in overnight oats for a tasty twist. The options are endless, and you can enjoy your pudding in new ways! Chia seeds are tiny powerhouses. They pack a lot of nutrients. Each ounce has about 140 calories, 5 grams of protein, and 11 grams of fiber. They also contain omega-3 fatty acids, which are great for heart health. Plus, they are rich in minerals like calcium, magnesium, and phosphorus. In a balanced diet, chia seeds can help with digestion. They absorb water and expand in your stomach, making you feel full. This can help with weight management. Their high fiber content supports gut health, keeping your system running smoothly. Yes, you can use regular dairy milk. It gives a creamier taste and texture. However, almond milk is lighter and has a nutty flavor. If you want a dairy-free option, almond milk is a great choice. Using dairy milk will not change the nutrition too much. But it can add some extra calories and fat. The flavor may also shift a bit. Almond milk brings a subtle sweetness, while dairy milk can be richer. To make this recipe nut-free, simply swap almond milk for oat or coconut milk. Both will keep the pudding creamy. You can also use rice milk if you prefer something lighter. For flavor and texture without nuts, try adding seeds like pumpkin or sunflower seeds on top. These give a nice crunch and add nutrients. You can also use fresh fruit or granola for extra flavor and texture. Vanilla bean chia pudding is a simple, healthy treat. We combined chia seeds, almond milk, and vanilla for a creamy base. Sweeteners like maple syrup enhance the flavor, while fresh toppings add fun and nutrition. Remember to whisk well and chill overnight for the best texture. In conclusion, this pudding is versatile and easy to customize. With a few tips, you can create endless flavors. Enjoy experimenting and making this delightful dish fit your taste!

Vanilla Bean Chia Pudding Creamy and Delicious Treat

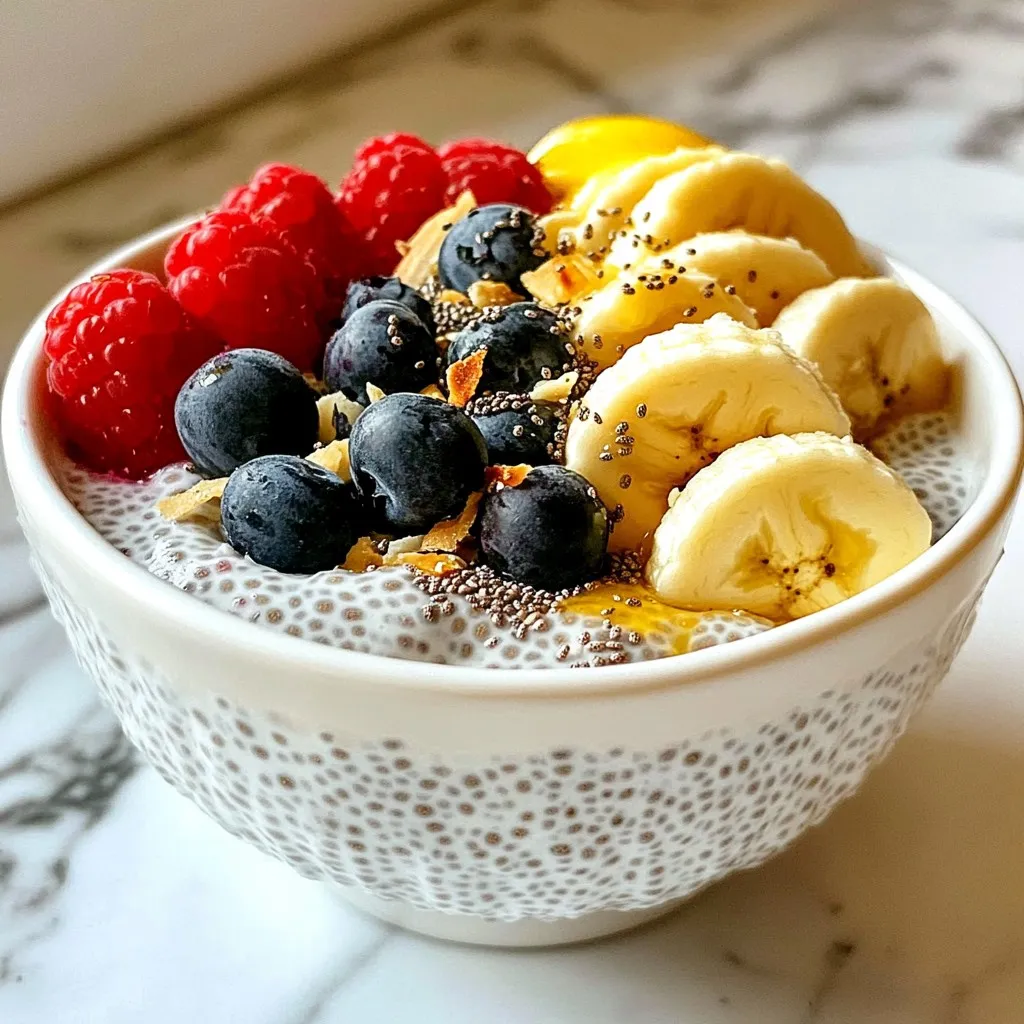
Looking for a creamy, delicious treat that checks all the boxes? Let me introduce you to Vanilla Bean Chia Pudding!

Older posts
Newer posts
← Previous Page1 … Page116 Page117 Page118 … Page120 Next →

dsad

© 2026 recipetorch • Built with GeneratePress

Our Policies

  • Copyright Policy
  • Cookie Policy
  • GDPR Policy
  • Privacy Policy
  • Disclaimer
  • Terms Of Use

More Information

  • Home
  • About
  • Contact
  • Appetizers
  • Dessert
  • Dinner
  • Drinks
©2026, recipetorch About Back To Top