Skip to content
DisclaimerTerms Of UseGDPR PolicyCookie Policy

recipetorch

  • Home
  • Drinks
  • Appetizers
  • Dinner
  • Dessert
  • About
  • Contact
  • Privacy Policy
DisclaimerTerms Of UseGDPR PolicyCookie Policy

Nicole

- 2 ripe bananas - 1 cup dark chocolate chips - 1 tablespoon coconut oil To make chocolate covered banana bites, you need just three main ingredients. First, choose two ripe bananas. They should have a few brown spots for sweetness. Next, grab one cup of dark chocolate chips. Dark chocolate gives a rich flavor. Finally, use one tablespoon of coconut oil. This oil helps the chocolate melt smoothly. - Crushed nuts (almonds or walnuts) - Shredded coconut - Colorful sprinkles You can add fun toppings to your banana bites. Crushed nuts like almonds or walnuts add crunch. Shredded coconut gives a tropical twist. Colorful sprinkles can make them look festive. These toppings are not just tasty; they also make your treats more exciting! {{ingredient_image_2}} Start by peeling the bananas. Use ripe bananas for the best flavor. Next, slice them into thick rounds, about 1 inch wide. This size helps keep them sturdy when you dip them. Lay the banana slices on a baking sheet lined with parchment paper. Make sure they do not touch each other. This will keep them from sticking together. Now, put the baking sheet in the freezer. Let the banana slices freeze for about 30 minutes. They should feel firm when you touch them. While the bananas freeze, it’s time to melt the chocolate. You can use a double boiler. To do this, fill a pot with water and bring it to a gentle simmer. Place a heatproof bowl on top, making sure it doesn’t touch the water. Add the dark chocolate chips and coconut oil to the bowl. Stir until the mixture is smooth and glossy. If you prefer, you can melt the chocolate in the microwave. Heat it in short 30-second bursts. Keep stirring until it is fully melted. Once the banana slices are frozen, take them out of the freezer. Dip each slice into the melted chocolate. Make sure the chocolate covers each piece fully. This makes for a rich flavor. Place the chocolate-covered slices back on the parchment-lined baking sheet. Leave some space between them. While the chocolate is still wet, sprinkle a pinch of sea salt on each slice. You can also add toppings like crushed nuts, shredded coconut, or colorful sprinkles. These add fun flavors and textures. Return the baking sheet to the freezer for another 15-20 minutes. This will help the chocolate set firm around each slice. To get your chocolate coating just right, start with melting the chocolate. Use a double boiler or microwave. If using a microwave, heat the chocolate chips in 30-second bursts. Stir after each burst. This keeps the chocolate smooth and avoids burning. Next, add a tablespoon of coconut oil to the chocolate. This makes the chocolate shiny and helps it coat better. The coconut oil also adds a nice flavor. When you dip the frozen banana slices, make sure they are fully covered. This ensures each bite has a good chocolate taste. After dipping, place them back on the lined baking sheet. Now for freezing! Freeze the banana bites for at least 15-20 minutes after coating. This helps the chocolate set firm. If they are not fully frozen, they may get messy when you serve them. Serving chocolate-covered banana bites can be fun! You can place them in a colorful bowl or on a bright plate. This makes them look more inviting. For added flair, sprinkle some extra toppings on top. You could use crushed nuts, shredded coconut, or colorful sprinkles. They not only taste great but also look pretty! If you want to impress your guests, dust a little cocoa powder over them. This adds a professional touch. Enjoy these treats as a fun snack or a dessert! Pro Tips Choose the Right Bananas: Select ripe bananas that are firm but not overly soft; they will hold their shape better during freezing and coating. Use Quality Chocolate: Opt for high-quality dark chocolate for a richer flavor; chocolate with a high cocoa content will provide a more decadent taste. Experiment with Toppings: Get creative with toppings! Try adding different nuts, seeds, or even a drizzle of caramel for an extra layer of flavor. Storage Tips: Store any leftover bites in an airtight container in the freezer to maintain freshness and prevent freezer burn. {{image_4}} You can use different types of chocolate for your banana bites. Milk chocolate gives a sweet taste. It melts easily and coats the bananas well. Dark chocolate is richer and has a deep flavor. It pairs nicely with the bananas’ sweetness. If you want something unique, try white chocolate. It adds a creamy, sweet touch. Each chocolate type creates a different taste and look, so feel free to mix and match. To make your banana bites even more exciting, try adding spices or extracts. A pinch of cinnamon gives a warm flavor. Vanilla extract adds a nice touch, too. You can even add a dash of chili powder for a spicy kick! Don't forget about toppings! You can sprinkle crushed nuts on top for crunch. Shredded coconut adds a tropical feel. Colorful sprinkles can make them fun for kids. Experiment with different flavors to find your favorite combination! To store leftover chocolate-covered banana bites, place them in an airtight container. Layer pieces with parchment paper to avoid sticking. This keeps them fresh and easy to grab. For freezer storage, use a freezer-safe bag or container. Remove as much air as possible. This helps prevent freezer burn and keeps the bites tasty. To maintain texture in the freezer, ensure the bites are fully frozen before storing. This prevents them from becoming mushy when thawed. When frozen, chocolate-covered banana bites can last up to two months. Just remember to check the container for tight sealing. Signs of quality deterioration include ice crystals on the chocolate. If the chocolate looks gray or dry, it may not taste as good. Also, check the banana bites for any unusual smells. You can use frozen bananas, but they will change the texture. Fresh bananas give a nice bite. Frozen bananas may become mushy once thawed. If you want to use them, make sure to slice and freeze them first. This helps them keep their shape when coated with chocolate. You can use butter or ghee instead of coconut oil. Both will work well for melting chocolate. If you're looking for a dairy-free option, try using vegetable oil or shortening. Just keep in mind that these oils may change the flavor a bit. The chocolate should be smooth and shiny. If it looks thick or clumpy, it is not melted well. Stir it gently while melting. If you use the microwave, heat it in short bursts of 30 seconds. This method helps avoid burning the chocolate. Once it’s smooth, it’s ready for dipping! This blog post covered how to make delicious chocolate-covered bananas. You'll need ripe bananas, dark chocolate chips, and coconut oil. I shared step-by-step instructions, tips for perfect coating, and ideas for tasty toppings. You can customize these treats with different chocolates and flavors. Remember to store them right to keep that great taste. I hope you’re excited to try this easy and fun recipe!

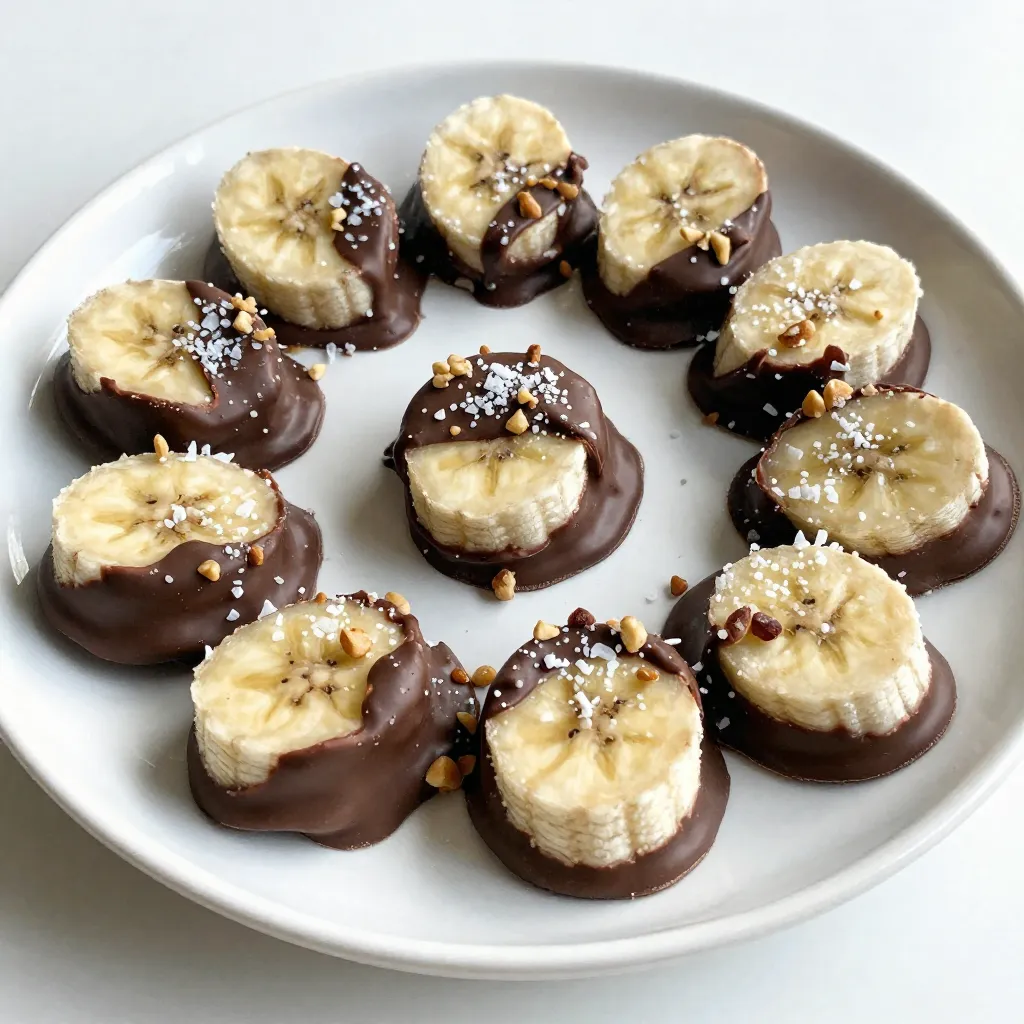
Chocolate Covered Banana Bites Easy and Delicious Treat

Are you ready for a sweet treat that’s both easy and delicious? Chocolate Covered Banana Bites are the perfect snack

- 1 cup unsalted butter, softened - 1 cup granulated sugar - 1 cup packed light brown sugar - 2 large eggs, at room temperature - 1 teaspoon pure vanilla extract - 3 cups all-purpose flour - 1 teaspoon baking soda - 1/2 teaspoon fine sea salt - 1 cup rainbow sprinkles (plus extra for topping) - 1/2 cup white chocolate chips These ingredients come together to create the best Funfetti Birthday Cake Cookies. The butter gives a rich flavor. The mix of granulated and brown sugar makes them sweet and chewy. Room temperature eggs blend well, helping the dough form smoothly. I love using pure vanilla extract. It adds a lovely aroma and taste. The flour forms the base, while baking soda helps the cookies rise. Sea salt balances the sweetness. Rainbow sprinkles bring joy and color, making them perfect for any celebration. White chocolate chips add a creamy touch that pairs well with the sprinkles. You can add more sprinkles on top for extra fun. This combination makes these cookies a treat for kids and adults alike. With this list, you're ready to bake a batch of joy! {{ingredient_image_2}} - Preheat oven to 350°F (175°C). - Line a baking sheet with parchment paper. - In a bowl, mix softened butter with granulated and brown sugars. - Add two large eggs and one teaspoon of vanilla extract. Mix until smooth. - In another bowl, whisk three cups of flour, one teaspoon of baking soda, and half a teaspoon of salt. - Gradually add this dry mixture to the wet ingredients. Mix until no flour pockets remain. - Gently fold in one cup of rainbow sprinkles and half a cup of white chocolate chips. - Use a cookie scoop to portion dough onto the baking sheet, leaving space between each. - Bake for 10-12 minutes until edges turn golden brown. - Cool cookies on the baking sheet for five minutes, then transfer to a wire rack. To get the best texture, avoid over-mixing the dough. When you add the dry ingredients, mix just until no flour pockets are left. This keeps the cookies soft and tender. If you mix too much, the cookies can turn out tough. For chewy cookies, watch the baking time closely. Bake them for 10-12 minutes. The edges should be lightly golden, while the centers remain soft. If you like them a bit gooey, take them out a minute early. You can add fun toppings to make these cookies even better. Try using extra rainbow sprinkles on top before baking. For a twist, add mini chocolate chips or crushed nuts. These additions bring new flavors and textures. For presentation, serve the cookies on a bright plate. You can also stack them in a clear jar and tie it with a ribbon. This makes them look festive and ready for a party. Pro Tips Butter Temperature: Make sure your butter is softened to room temperature for optimal creaming, which helps achieve a light and fluffy cookie texture. Don’t Overmix: When combining dry and wet ingredients, mix just until combined. Overmixing can lead to tough cookies. Chill the Dough: For thicker cookies, chill the dough for at least 30 minutes before baking. This helps prevent excessive spreading. Use Fresh Sprinkles: Ensure your rainbow sprinkles are fresh for the best color and texture. Old sprinkles may lose their vibrancy and crunch. {{image_4}} You can change up your Funfetti birthday cake cookies by adding fun mix-ins. Here are some ideas: - Different types of chocolate chips: Instead of white chocolate chips, try dark or milk chocolate chips. You can also use mini chips for a fun twist. - Nuts or dried fruits: Chopped nuts like walnuts or pecans add crunch. Dried fruits like cranberries or cherries give a nice sweetness. These add-ins make your cookies unique and fun. You can mix and match to find your favorite combo! Want to change the flavor of your cookies? Here are some great ideas: - Adding citrus zest or extracts: Mix in lemon or orange zest for a fresh twist. You can also use lemon or almond extract for a new taste. - Contrasting sprinkle colors for different themes: Use red and green sprinkles for holidays or pastel colors for baby showers. This adds a festive look to your cookies. These flavor combinations make your Funfetti cookies special for any occasion. Enjoy experimenting! To keep your Funfetti Birthday Cake Cookies fresh, store them in an airtight container. This helps prevent them from drying out. Place a piece of parchment paper between layers of cookies to keep them from sticking together. If you have a cookie jar, that works great too! For short-term storage, keep the cookies at room temperature. They will stay fresh for about 5-7 days. If you want to store them longer, consider freezing. To freeze raw cookie dough, scoop dough balls onto a baking sheet. Place them in the freezer until firm, about 1-2 hours. Once frozen, transfer the balls to a zip-top bag. Remove excess air and seal tightly. You can freeze the dough for up to 3 months. For baked cookies, let them cool completely first. Place them in a single layer in an airtight container or a zip-top bag. They can last in the freezer for up to 3 months as well. When you are ready to enjoy, thaw the dough in the fridge overnight. For baked cookies, leave them at room temperature for about 30 minutes. Enjoy your tasty treats! Can I use margarine instead of butter? Yes, you can use margarine. It will change the flavor a bit. Butter adds richness that margarine lacks. If you choose margarine, pick a stick form for best results. How do I make these cookies gluten-free? You can substitute all-purpose flour with a gluten-free blend. Make sure it has xanthan gum for structure. This will help keep your cookies soft and chewy. How long do these cookies stay fresh? These cookies stay fresh for about 5 days at room temperature. Store them in an airtight container. For longer freshness, keep them in the fridge. Why are my cookies spread too much? Cookies spread too much if the butter is too warm. Make sure your butter is softened, not melted. Also, check that you are using the right flour amount. What to do if the dough is too sticky? If your dough is sticky, add more flour, one tablespoon at a time. Chill the dough for 30 minutes. This makes it easier to scoop and shape. How can I make these cookies more festive? Add more sprinkles or use themed sprinkles for holidays. You can also drizzle melted chocolate on top. This adds color and more flavor. You now have a simple guide to make funfetti birthday cake cookies. We covered the ingredients, step-by-step instructions, and helpful tips. You learned how to tweak flavors and store your cookies. Baking these cookies is fun and easy. They add joy to any celebration. Keep this recipe close to make sweet memories. Enjoy your baking and share these treats with loved ones!

Funfetti Birthday Cake Cookies Sweet and Simple Treat

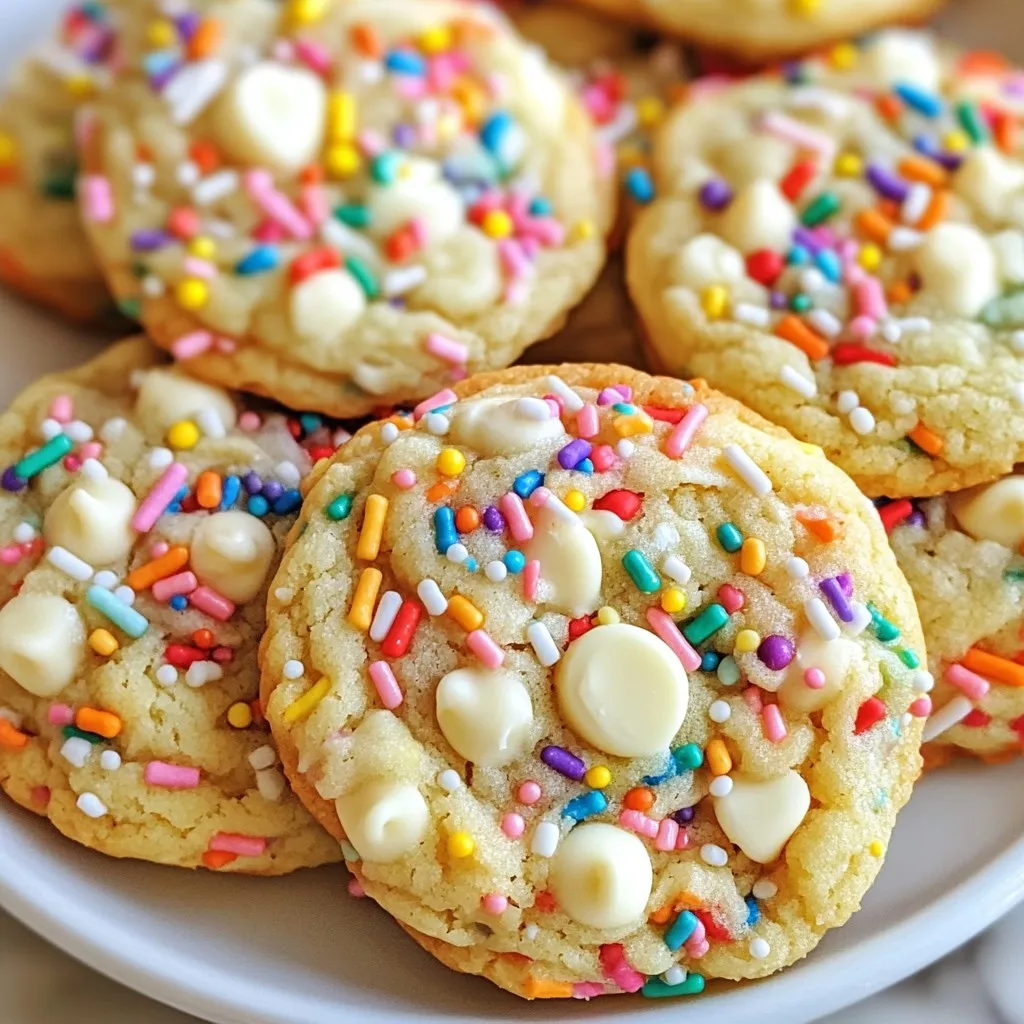
Do you love birthday cake flavor? Then you’ll adore these Funfetti Birthday Cake Cookies! With their sweet, soft texture and

- 4 boneless, skinless chicken breasts - 1 cup shredded pepper jack cheese - 1/2 cup cream cheese, softened - 1/2 cup roasted red peppers, finely chopped - 2 cloves garlic, minced - 1 teaspoon smoked paprika - Salt and freshly ground black pepper, to taste - 2 tablespoons olive oil - Fresh cilantro, chopped, for garnish (optional) Using fresh peppers gives a brighter flavor. Roasted red peppers add sweetness and depth. If you use canned peppers, rinse them first to remove excess brine. For cheese, pepper jack adds spice, but you can also use Monterey Jack or mild cheddar for a different taste. Serve your stuffed chicken with a light salad to balance the richness. Steamed rice works well, too, soaking up any tasty juices. Roasted veggies are a great option for added flavor and color on the plate. {{ingredient_image_2}} Start by preheating your oven to 375°F (190°C). This step is important because it ensures that your chicken cooks evenly. While the oven heats, grab an oven-safe skillet. You will use this skillet for searing the chicken and then moving it to the oven. In a large mixing bowl, combine the following ingredients: - 1 cup shredded pepper jack cheese - 1/2 cup cream cheese, softened - 1/2 cup roasted red peppers, finely chopped - 2 cloves garlic, minced - 1 teaspoon smoked paprika - Salt and freshly ground black pepper, to taste Mix these ingredients until you have a creamy filling. Make sure all the flavors blend well together. Next, take your chicken breasts and carefully slice a pocket into each one. Use a sharp knife to cut horizontally, but do not cut all the way through. This helps keep the stuffing inside. Now, take a spoon and fill each pocket with the cheese mixture. Press gently to keep the filling from spilling out. If needed, use toothpicks to secure the openings. In your skillet, heat 2 tablespoons of olive oil over medium heat. Wait until the oil shimmers but does not smoke. Place the stuffed chicken breasts in the skillet and sear them for about 4-5 minutes on each side. You want them to turn golden brown. This step adds great flavor. After browning, transfer the skillet to your preheated oven. Bake for 20-25 minutes. The chicken is done when it reaches an internal temperature of 165°F (75°C) and the juices run clear. Once baked, remove the skillet from the oven and let the chicken rest for 5 minutes. This helps the juices stay inside the meat. Before serving, take out any toothpicks. For a nice presentation, slice the stuffed chicken and place it on a serving platter. If you like, garnish with freshly chopped cilantro for added color and flavor. Enjoy your flavorful dinner delight! To keep your chicken moist, start with fresh, high-quality breasts. You can brine them in a saltwater mix for 30 minutes before cooking. This simple step helps lock in moisture. Also, cook the chicken to the right temperature. Aim for an internal temperature of 165°F (75°C). Overcooking will dry it out. Lastly, let the chicken rest for five minutes after baking. This step helps the juices redistribute, making each bite tender and juicy. You can easily boost the flavor of your stuffed chicken. Adding spices like cumin or chili powder can give it a nice kick. Fresh herbs like cilantro or parsley can brighten up the dish. Consider using Italian herbs like basil or oregano for a different twist. Smoked paprika adds depth, but you can swap it for regular paprika if you prefer. Mixing in some lime juice can also add a fresh flavor profile. Using the right tools makes the cooking process smoother. Toothpicks help hold the chicken closed, so the filling stays inside. An oven-safe skillet is ideal for searing and baking in one pan. This saves time and reduces cleanup. A sharp knife is essential for cutting the pockets in the chicken. A meat thermometer ensures perfect cooking every time. These simple tools can elevate your cooking experience and help you create a delicious meal. Pro Tips Use Fresh Ingredients: Fresh roasted red peppers and high-quality cheeses enhance the flavor and texture of the dish, making it more vibrant and delicious. Don’t Overstuff: While it’s tempting to add more filling, overstuffing can cause the chicken to burst during cooking. Aim for a generous amount that will stay contained. Let It Rest: Allowing the chicken to rest for a few minutes after baking helps the juices redistribute, resulting in a juicier and more flavorful bite. Experiment with Spices: Feel free to add your favorite spices or herbs to the cheese mixture to customize the flavor profile. Cumin or chili powder can add a nice kick! {{image_4}} You can switch up the cheese in this dish. Monterey Jack adds a mild flavor and melts well. It creates a creamy texture. Cheddar gives a sharp taste that contrasts nicely with the filling. Both cheeses can work well with the other ingredients. Feel free to mix and match to find your favorite! You can get creative with the stuffing. Spinach adds a healthy green touch and pairs well with cheese. Jalapeños bring heat and excitement to each bite. If you love bacon, try adding crispy bits for a smoky flavor. Mix and match these options for a unique twist on the classic recipe. You don't have to bake this chicken. Grilling gives it a nice char and smoky flavor. Just preheat your grill and cook the stuffed chicken until done. Air frying is another option. It cooks quickly and makes the chicken crispy on the outside. Choose the method that fits your kitchen and taste! After you enjoy your Pepper Jack stuffed chicken, store any leftovers quickly. Place the chicken in an airtight container. This keeps moisture in and prevents drying out. You can store it in the fridge for up to three days. If you want to keep it longer, freezing is a great option. When reheating, you want to keep the chicken juicy. Preheat your oven to 350°F (175°C). Place the chicken on a baking dish, cover it with foil, and heat for about 15-20 minutes. This method helps keep the chicken moist and the cheese creamy. If you prefer the microwave, use a low power setting and cover the chicken to avoid drying it out. To freeze, wrap each piece of stuffed chicken tightly in plastic wrap. Then place them in a freezer-safe bag. This helps prevent freezer burn. You can keep it in the freezer for up to three months. When you're ready to eat, thaw the chicken in the fridge overnight. This slow thawing keeps the texture nice. After thawing, reheat using the tips above for best results. To check if your chicken is done, use a meat thermometer. The safe internal temperature should reach 165°F (75°C). You can also slice the chicken to see if the juices run clear. If you see any pink, it needs more time. Remember to let it rest for five minutes after baking. This helps keep the chicken juicy. Yes, you can prepare the stuffed chicken ahead of time. Stuff the chicken and cover it well. Store it in the fridge for up to 24 hours before cooking. When you're ready to cook, just sear and bake as directed. This makes dinner easy on busy nights! This dish pairs well with many sides. A light salad adds freshness. Steamed rice or quinoa helps soak up the tasty juices. Roasted veggies also make a great choice. Feel free to mix and match to suit your taste! Yes, you can use bone-in chicken. Just remember to adjust the cooking time. Bone-in chicken takes longer to cook. Make sure the internal temperature still reaches 165°F (75°C). Also, you might need to make a bigger pocket for the stuffing. Enjoy the extra flavor the bone adds! In this blog post, we explored the ingredients for Pepper Jack Stuffed Chicken and some options for sides. I shared step-by-step instructions to help you prepare the dish. You learned tips to keep the chicken moist and flavorful. We also discussed variations to suit your taste and storage info for leftovers. Remember, cooking is fun and allows you to try new things. With these tips, you can create a delicious meal everyone will enjoy. Happy cooking!

Pepper Jack Stuffed Chicken Flavorful Dinner Delight

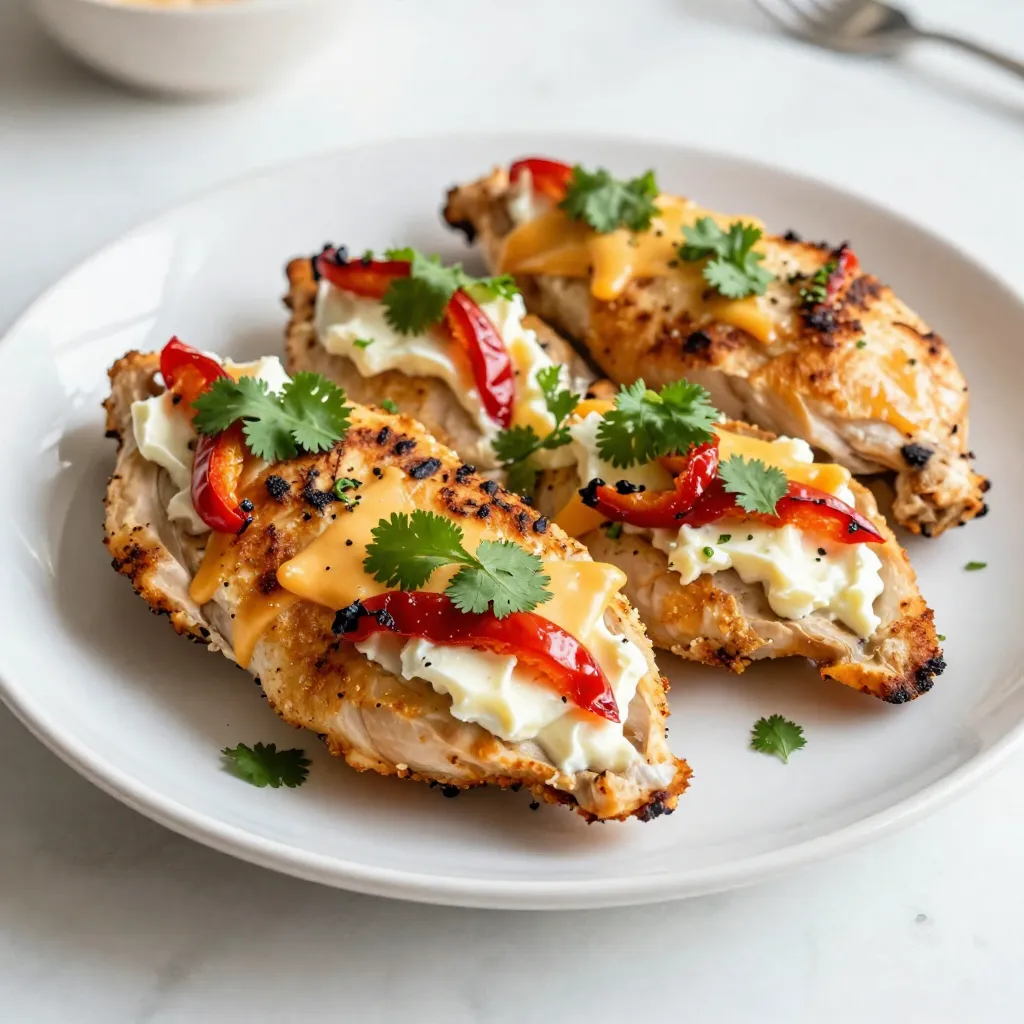
If you’re craving a dinner that bursts with flavor, look no further than Pepper Jack Stuffed Chicken. Juicy chicken breasts

- 1 lb ground chicken - 1 tablespoon vegetable oil - 2 cloves garlic, minced - 1 tablespoon fresh ginger, finely grated - 1 red bell pepper, finely diced - 1 medium carrot, grated - 1/2 cup green onions, finely chopped - 1/4 cup unsweetened creamy peanut butter - 2 tablespoons soy sauce (or tamari) - 1 tablespoon fresh lime juice - 1 tablespoon honey or maple syrup - 1 teaspoon sriracha - Salt and pepper to taste - 1 head of Bibb or iceberg lettuce - Fresh lime wedges - Additional sriracha - Chopped green onions To make these spicy peanut chicken lettuce wraps, you need some fresh and tasty ingredients. Ground chicken gives you a great base for protein. The garlic and ginger add a nice kick. You can’t forget the red bell pepper and carrot for crunch and color. Green onions bring a fresh flavor that ties it all together. The creamy peanut butter is the star. It adds richness and depth. Soy sauce or tamari brings a salty element. Lime juice brightens the mix, while honey or maple syrup adds a hint of sweetness. Lastly, sriracha gives it that spicy punch. You can also top your wraps with lime wedges and extra sriracha. Chopped green onions make for a lovely garnish. Each ingredient works together to create a flavorful and satisfying dish. {{ingredient_image_2}} 1. In a large skillet, heat 1 tablespoon of vegetable oil over medium heat. 2. Add 2 cloves of minced garlic and 1 tablespoon of grated fresh ginger. Sauté for about 30 seconds until they smell great. 3. Next, add 1 lb of ground chicken. Use a spatula to break it apart. Cook for 5-7 minutes until it turns brown and is cooked through. 4. Stir in 1 diced red bell pepper and 1 grated medium carrot. Cook for an extra 3-4 minutes until the veggies are tender but still crunchy. 1. In a separate bowl, whisk together 1/4 cup of creamy peanut butter, 2 tablespoons of soy sauce, and 1 tablespoon of fresh lime juice. 2. Add 1 tablespoon of honey and 1 teaspoon of sriracha to the bowl. Mix until everything is smooth. 1. Pour the peanut sauce over the chicken and veggies in the skillet. Stir well to coat all the ingredients. 2. Season with salt and pepper to taste. 3. Remove from heat and gently fold in 1/2 cup of chopped green onions for a fresh kick. 4. To serve, spoon the mix into the lettuce leaves. Fold them around the filling and enjoy your tasty wraps! To ensure your chicken is cooked thoroughly, break it apart while it cooks. This helps it brown evenly. Use a meat thermometer to check that it reaches 165°F. When sautéing vegetables, keep them on medium heat. This helps them soften without losing their crunch. Stir frequently to prevent burning. To assemble your lettuce wraps, take a leaf from the Bibb or iceberg lettuce. Spoon a generous amount of the spicy chicken mixture into the center. Fold the sides over the filling and then roll it up. For presentation, arrange the wraps on a colorful platter. Add fresh lime wedges and extra sriracha on the side for guests who love heat. You can adjust the sriracha to suit your taste. Start with a small amount and add more if you want extra heat. If you want a different kick, try using crushed red pepper or chili paste. These can add a unique flavor while keeping the dish spicy. Pro Tips Use Fresh Ingredients: Fresh vegetables and herbs enhance the flavor and texture of your wraps, making them more enjoyable. Adjust Spice Level: Modify the amount of sriracha to suit your taste. Start with a small amount and add more as needed for heat. Make It Ahead: Prepare the chicken mixture in advance and store it in the refrigerator. Assemble the wraps just before serving for best results. Experiment with Fillings: Feel free to add other ingredients like shredded cabbage, diced cucumbers, or even chopped nuts for added texture and flavor. {{image_4}} You can swap ground chicken for turkey or tofu. Turkey gives a leaner taste, while tofu suits vegans. Both options keep the wraps tasty and satisfying. You can also switch veggies in the mix. Try using zucchini, mushrooms, or snap peas. Each offers unique flavors and crunch. Feel free to play with nut butters. Almond or cashew butter can add new tastes. For a vegan twist, use tahini or sun butter. These options keep the wraps creamy while staying plant-based. Just remember to adjust seasonings to match your choice of nut butter. If you want a fun twist, turn wraps into bowls. Just layer the chicken mix over rice or quinoa. This style makes it easy to eat and enjoy. You can also fill lettuce leaves with grains for added texture. Each bite becomes a crunchy delight you can’t resist! To store your spicy peanut chicken lettuce wraps, place them in an airtight container. This keeps them fresh and prevents strong odors from other foods in the fridge. You can enjoy the wraps for up to three days. However, the lettuce may lose its crispness over time. So, it’s best to separate the filling and the lettuce if you plan to keep them longer. You can freeze the chicken mixture for later use. Let it cool completely before packing it into a freezer-safe bag. Remove air to prevent freezer burn. This mixture can be frozen for up to three months. When you’re ready to eat, thaw it in the fridge overnight. For quicker thawing, you can use the microwave on low heat. To reheat your spicy peanut chicken, use a skillet on medium heat. This method helps keep the chicken juicy. Stir occasionally until it's hot. You can also use a microwave, but be sure to cover it to keep moisture in. If you notice it’s dry, add a splash of water or soy sauce. Enjoy your wraps fresh and tasty! Yes, you can prep these wraps ahead of time. To make meal prep easy, cook the chicken mixture and store it in an airtight container. You can keep it in the fridge for up to three days. When you're ready to serve, just reheat the mixture on the stove. This keeps the flavors fresh. Prepare the lettuce leaves right before serving. This way, they stay crisp and crunchy. These lettuce wraps pair well with many side dishes. Consider serving them with: - Jasmine rice or brown rice for a hearty touch - A side of fresh cucumber salad for a cool crunch - Edamame for a protein boost - Pickled vegetables for a tangy contrast These sides will enhance the flavors of the wraps and create a balanced meal. Absolutely! This recipe is quite flexible. To make it gluten-free, simply use tamari instead of soy sauce. For a vegan option, swap the ground chicken for crumbled tofu or tempeh. You can also replace honey with maple syrup for sweetness. Feel free to get creative with vegetables, too! Use any mix of your favorite veggies to suit your taste. This blog post walked you through making tasty Spicy Peanut Chicken Lettuce Wraps. We looked at the main ingredients, like ground chicken and peanut butter. You learned step-by-step how to cook the chicken and make the sauce. I shared tips for serving and storing leftovers, too. These wraps offer flavor and fun. You can adjust the spice, try different meats, or even go plant-based. Enjoy experimenting with this recipe. It’s a great way to get dinner on the table quickly and deliciously.

Spicy Peanut Chicken Lettuce Wraps Crunchy Delight

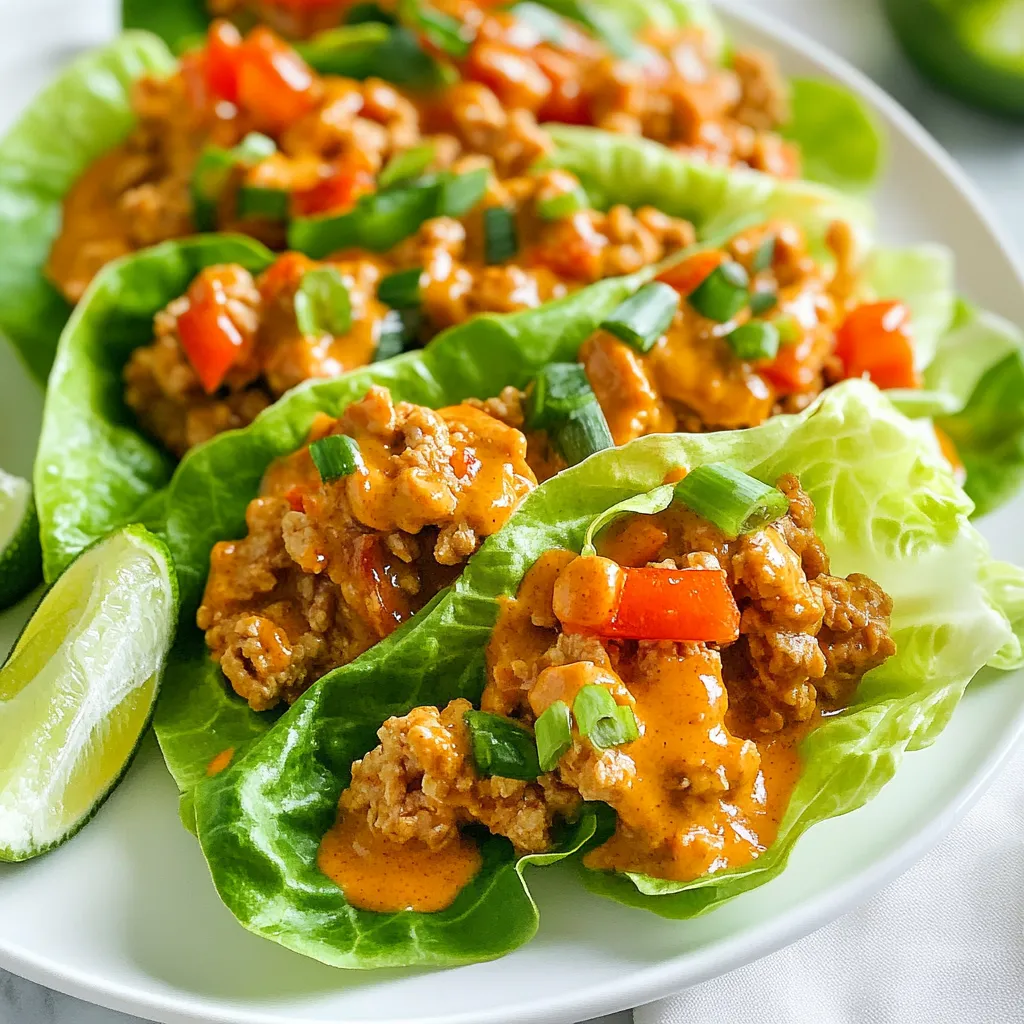
If you’re craving a dish that bursts with flavor and crunch, you’ve come to the right place! My Spicy Peanut

- 2 ripe bananas, peeled and broken into chunks - 2 tablespoons creamy peanut butter - 1 cup almond milk (or your preferred milk) For this smoothie, start with ripe bananas. Their sweetness makes the drink perfect. Next, use creamy peanut butter for a rich flavor. It adds protein too. Finally, pour in almond milk for a smooth texture. You can swap it for any milk you like. - 1 tablespoon honey or maple syrup (optional, for added sweetness) - 1/2 teaspoon ground cinnamon - 1 tablespoon chia seeds (optional, for extra nutrition and texture) You can add honey or maple syrup for sweetness. Ground cinnamon brings warmth and spice to the smoothie. Chia seeds boost nutrition and add a little crunch. They are great for health! - 1/4 cup rolled oats - Ice cubes (to taste) Rolled oats can make your smoothie filling. They add fiber and a nice texture. Ice cubes help chill the drink, making it refreshing. You can adjust how much ice you use based on your taste. Feel free to mix and match these ingredients to create your perfect Peanut Butter Banana Smoothie! {{ingredient_image_2}} - Peeling and Prepping Bananas: Start by peeling two ripe bananas. Break them into chunks and place the pieces in your blender. This step is key to making your smoothie smooth and creamy. - Blending Ingredients Together: Next, add two tablespoons of creamy peanut butter to the blender. Pour in one cup of almond milk. If you want it sweeter, add one tablespoon of honey or maple syrup, along with half a teaspoon of vanilla extract and ground cinnamon. Toss in a quarter cup of rolled oats and a tablespoon of chia seeds if you like. Blend this mixture on high until it is smooth and creamy. - Adding Almond Milk or Ice Cubes: If you find the smoothie too thick, add a little more almond milk. You can also toss in some ice cubes for a colder drink. Blend again until you reach your desired consistency. - Taste Testing for Sweetness: Take a moment to taste your smoothie. If it needs more sweetness, add more honey or maple syrup. Blend again to mix in the sweetness evenly. - Pouring and Serving: Once everything is blended well, pour the smoothie into tall glasses. This recipe serves two, so get ready to share! - Presentation Tips: To make your smoothie look even better, sprinkle a bit of ground cinnamon on top. You can also add a slice of banana on the rim of the glass. Serve with straws or spoons, and enjoy your delicious drink! - Adjusting Sweetness Levels: You can change the sweetness of your smoothie. If you like it sweeter, add more honey or maple syrup. Start with one tablespoon and taste. Adjust until it’s just right for you. - Using Different Milk Alternatives: You can swap almond milk for other milks. Try oat milk, coconut milk, or regular dairy milk to find your favorite flavor and texture. - Adding Protein Powder: Want a protein boost? Add a scoop of your favorite protein powder. This adds nutrition and keeps you full longer. - Using flavored nut butters: Instead of plain peanut butter, try flavored nut butters. Chocolate or cinnamon peanut butter can give the smoothie a unique twist. - Thicker vs. Thinner Smoothies: The thickness of your smoothie is up to you. For a thicker smoothie, use less almond milk or add more ice. For a thinner one, add more milk until you reach your desired consistency. - Best Practices for Blending: Always start blending on low speed. Gradually increase to high speed for a smooth texture. If your blender struggles, stop to scrape down the sides. This ensures everything mixes well. Pro Tips Choose Ripe Bananas: The riper the bananas, the sweeter and creamier your smoothie will be. Look for bananas with brown spots for optimal flavor. Peanut Butter Variations: Experiment with different types of peanut butter, such as crunchy or flavored varieties, to add a unique twist to your smoothie. Add Protein: For an extra protein boost, consider adding a scoop of protein powder or Greek yogurt to your smoothie. Make it Ahead: Prepare your smoothie the night before and store it in the fridge. Just give it a quick stir or blend in the morning for a quick, nutritious breakfast. {{image_4}} You can easily boost your smoothie with more fruit. Adding berries gives a fresh taste. Strawberries, blueberries, or raspberries work well. Just toss in about half a cup of your choice before blending. You can also add spinach for extra nutrition. It blends in smoothly and adds vitamins without changing the taste. If you want to switch up the main fruit, try peaches or mangoes. These fruits add a tropical twist. Use about one cup of these fruits, just like you would with bananas. Get creative with flavors! A chocolate peanut butter banana smoothie is a favorite. Just add two tablespoons of cocoa powder to the mix. This gives a rich, chocolatey taste. You can also try nut and seed variations. Instead of peanut butter, use almond or cashew butter. You can even add a tablespoon of hemp seeds for more protein. If you need vegan options, use plant-based milk. Almond, soy, or oat milk work well. You can also skip honey and use maple syrup instead. It keeps the smoothie sweet and vegan-friendly. To make this smoothie gluten-free, swap rolled oats with gluten-free oats. Just check the label to be sure. This way, you can enjoy a tasty treat that fits your diet. To keep your peanut butter banana smoothie fresh, use an airtight container. Glass jars or plastic containers with tight lids work best. Store it in the fridge right after making it. You should drink it within 24 hours for the best taste and texture. If you want to save your smoothie for later, you can freeze it. Pour the smoothie into ice cube trays or freezer-safe containers. This way, you can take out just what you need. When you want to enjoy it again, let it thaw in the fridge overnight. You can also blend it again with a bit of milk for the best texture. To keep your smoothie fresh, store it in a cool place and avoid direct sunlight. Always check for signs of spoilage. If the smoothie smells off or has changed color, it's best to throw it away. Fresh ingredients make the best smoothies, so use ripe bananas and fresh peanut butter. Yes, you can make this smoothie in advance. Store it in an airtight container in the fridge. It will stay fresh for up to 24 hours. To reblend later, just give it a good shake. If it seems too thick, add a splash of almond milk and blend again. This way, you keep the taste and texture. This smoothie is packed with nutrients. Here’s a quick look at its main ingredients: - Bananas: They provide potassium and fiber. They help with digestion and keep your heart healthy. - Peanut Butter: This adds protein and healthy fats. It keeps you feeling full longer. - Almond Milk: It's low in calories and offers calcium. Great for bone health. - Chia Seeds: These tiny seeds are full of omega-3s. They add fiber and protein too. - Rolled Oats: They provide energy and help with digestion. They are a great source of whole grains. Overall, this smoothie offers a balanced mix of carbs, protein, and healthy fats. Yes, you can substitute peanut butter. If you have nut allergies, try sunflower seed butter or soy nut butter. These options are tasty and safe. You can also go for seed butters like pumpkin seed butter. They add unique flavors and nutrients while keeping it nut-free. You learned how to create a delicious smoothie with ripe bananas, peanut butter, and almond milk. You can customize it with options like honey, cinnamon, or oats. Don't forget to adjust the sweetness and try different fruits for variety. Storing your smoothies properly keeps them fresh for longer. Remember, this smoothie is not just tasty; it brings health benefits too. Explore all your options and find what works best for you. Enjoy making your perfect smoothie today!

Peanut Butter Banana Smoothie Healthy and Tasty Recipe

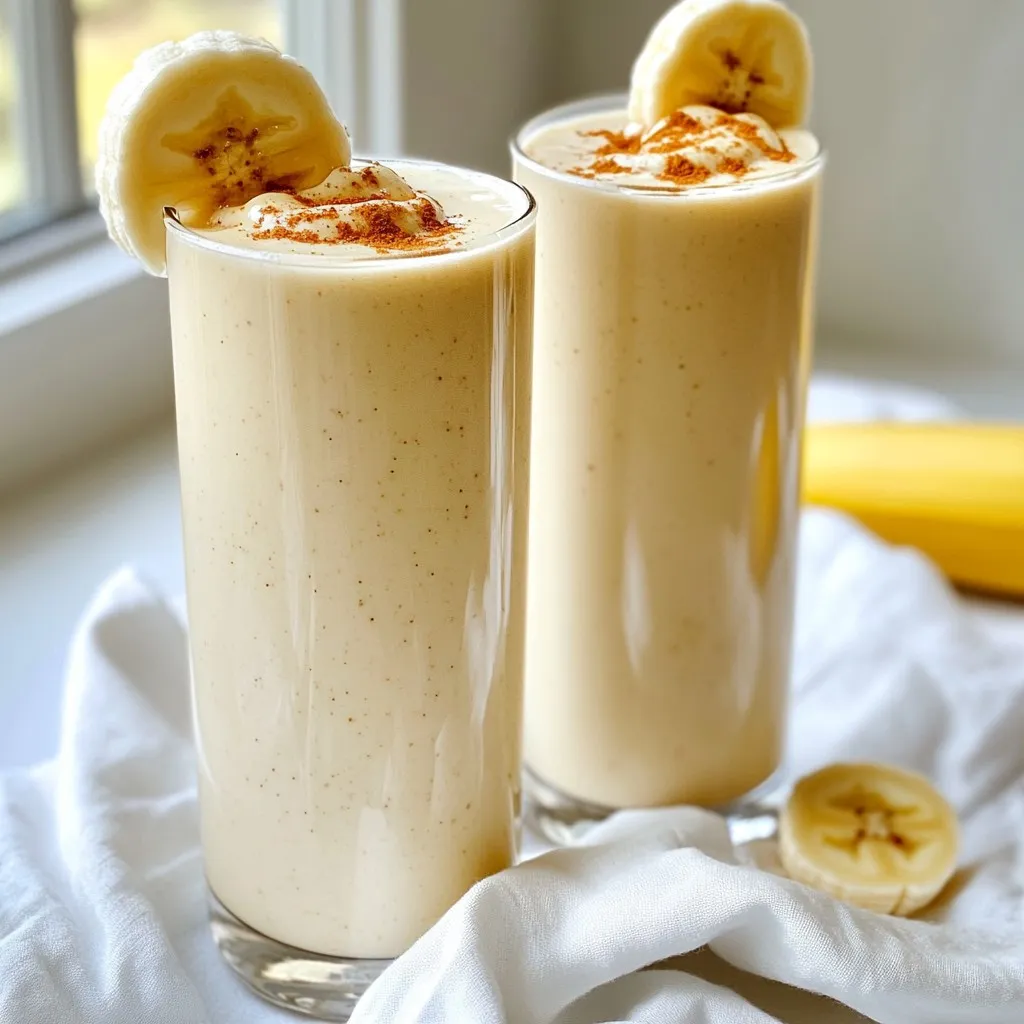
Looking for a quick and delicious way to fuel your day? This Peanut Butter Banana Smoothie is both healthy and

- 1 cup rolled oats - 1 cup unsweetened almond milk - 1 medium apple, diced - 1 tablespoon pure maple syrup - 1 teaspoon ground cinnamon - 1/2 teaspoon vanilla extract - 1 tablespoon chia seeds - 1/4 cup Greek yogurt (optional) - Chopped walnuts or pecans for topping - Extra apple slices for garnish To make Apple Pie Overnight Oats, gather these simple and healthy ingredients. Start with rolled oats, which will be the base. They soak up the milk and soften overnight. Use unsweetened almond milk for a nutty flavor. You can also switch it out for any milk you like. Next, dice a medium apple. This adds a fresh crunch. The apple flavor makes the oats taste like a delicious pie. You will also need pure maple syrup. It adds sweetness without being too heavy. Ground cinnamon gives that warm, cozy taste. Add a touch of vanilla extract for depth. Chia seeds help thicken the oats and add nutrition. If you like creaminess, Greek yogurt is a great option. For toppings, use chopped walnuts or pecans for a nice crunch. Extra apple slices make a fun garnish. These ingredients work together to create a tasty and filling breakfast that you can enjoy any day. {{ingredient_image_2}} To start, grab a medium mixing bowl or a jar with a secure lid. - Combine the rolled oats, almond milk, maple syrup, cinnamon, vanilla, and chia seeds. - Stir well until everything mixes perfectly. The oats should be coated nicely. - Next, fold in the diced apple. This will add a sweet, crunchy flavor to your oats. - If you love creamy oats, gently mix in Greek yogurt. This makes your dish rich and tasty. Now it’s time to store your oat mixture. - Use a ladle to divide the mixture into serving jars or containers. - Seal the jars tightly to keep everything fresh. - Place the jars in the fridge. Let them chill overnight or for at least 4 hours. - This soaking time helps the oats soften and flavors blend well. When you’re ready to eat, take the jars out of the fridge. - Stir the oats well to mix everything again. - If they look too thick, add a splash of your favorite milk for a smoother texture. - Top with chopped walnuts or pecans for crunch. Add extra apple slices for a pretty look. To make the best apple pie overnight oats, choose sweet apples. Honeycrisp, Fuji, or Gala work well. Their sweetness enhances the dish. Soaking time is key. Let the oats sit overnight. This allows flavors to blend and oats to soften. You can switch up sweeteners. Try honey or agave syrup. Different types of milk also change the taste. Use coconut or oat milk for a new flavor. For added warmth, sprinkle in nutmeg or ginger. These spices can elevate the apple pie taste. Want more protein? Add Greek yogurt or protein powder. This makes your oats more filling. You can also toss in extra fruits like bananas or berries. Chia seeds add fiber and healthy fats. They also thicken the mix nicely. Pro Tips Use Fresh Apples: Choose a variety of apples that are firm and crisp, such as Granny Smith or Honeycrisp, for the best flavor and texture. Customize Sweetness: Adjust the amount of maple syrup according to your taste preferences or substitute with honey or agave for a different flavor. Make Ahead: Prepare a larger batch and store it in the refrigerator for up to 5 days for quick breakfasts throughout the week. Experiment with Toppings: Try adding different nuts, seeds, or even a dollop of nut butter on top for added nutrition and flavor. {{image_4}} You can change your apple pie overnight oats with seasonal fruits. For fall, add sliced pears or figs. In summer, mix in peaches or berries. These fruits bring new flavors to your oats. Incorporating holiday spices also makes a fun twist. Try adding nutmeg or allspice for a warm feel. You can even use pumpkin pie spice for a cozy autumn vibe. If you want vegan options, simply skip the Greek yogurt. Use a plant-based yogurt instead. Almond milk is already vegan, so you’re good there. For gluten-free alternatives, make sure your oats are certified gluten-free. You can use coconut milk for a rich flavor too. Crunchy toppings can make your oats even better. Chopped walnuts or pecans add a nice crunch. You can also try adding pumpkin seeds or granola for variety. Mixing in other grains or seeds helps add nutrition. Quinoa or millet can be fun to try. You can also add extra chia seeds for more texture. To keep your apple pie overnight oats fresh, use airtight containers. Glass jars work great. They seal well and let you see the oats inside. Plastic containers are also fine, as long as they close tightly. Store your oats in the fridge. They stay good for about five days. After that, they may lose taste or texture. You can enjoy your oats cold or warm. If you like them cold, just take them from the fridge and dig in! For warm oats, place them in a bowl. Heat in the microwave for 30 seconds. Stir well and check the warmth. If they need more heat, go for another 15 seconds. To keep the texture nice, add a splash of milk if they seem dry. If you want more servings, you can double the recipe easily. Just keep the same ratios for each ingredient. If you want to make less, halve the amounts. Making multiple servings at once saves time. You can prepare a whole week’s worth in one go! Just store them in separate containers for easy grab-and-go meals. Overnight oats stay good in the fridge for about 3 to 5 days. Store them in airtight containers. This helps keep them fresh. You can enjoy them throughout the week. Just make sure to check for any changes in smell or texture. Yes, you can use quick oats if you want. They will soak up the liquid faster. This may change the texture a bit. Rolled oats give a heartier bite, while quick oats make the dish creamier. Choose based on your texture preference. Absolutely! You can skip the yogurt if you prefer. The oats will still taste great without it. The yogurt adds creaminess, but it is not necessary. You can also use more almond milk for a similar texture. If you don’t have almond milk, use any milk you like. Options include cow's milk, soy milk, or oat milk. Each type of milk adds its own flavor. Choose what fits your taste and dietary needs. Yes, you can freeze them! Just make sure to use freezer-safe containers. They can last for about 3 months in the freezer. When ready to eat, thaw them in the fridge overnight. You may need to add a little milk to adjust the texture. In this blog post, I covered how to make delicious overnight oats. We explored the key ingredients, such as rolled oats and diced apples. I provided simple steps for preparing and storing your oats for a tasty breakfast. You learned tips for customizing flavors and adding nutrition. Finally, I shared variations and storage advice to keep your mornings easy. Now, you have the tools to create your own perfect overnight oats. Enjoy the process and make it yours!

Apple Pie Overnight Oats Delicious and Easy Recipe

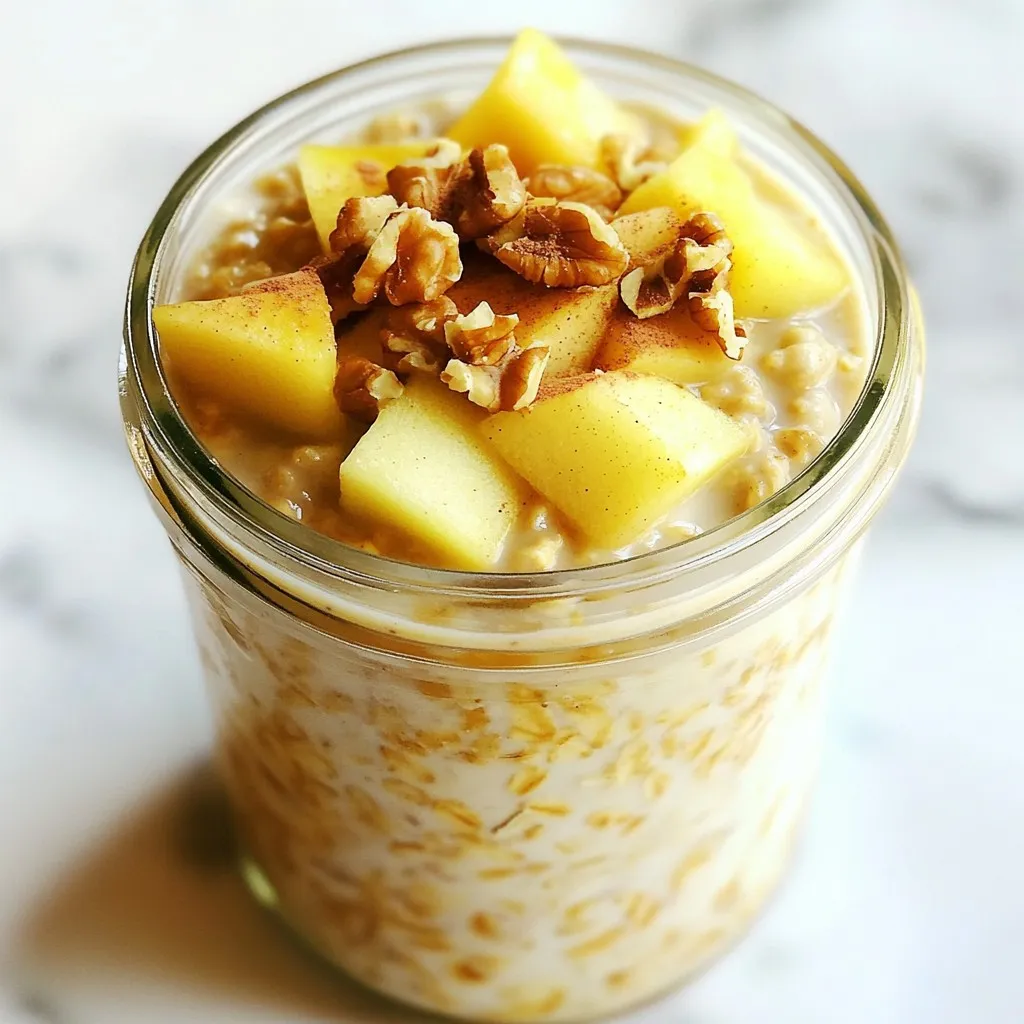
Looking for a hearty breakfast that tastes like dessert? You’ll love these Apple Pie Overnight Oats! Packed with rolled oats,

- 1 cup frozen pineapple chunks - 1 ripe banana - 1/2 cup coconut milk (or other milk of your choice) - 1/2 cup Greek yogurt (or dairy-free yogurt for a vegan alternative) - 1 tablespoon honey or agave syrup (optional for sweetness) For this delightful smoothie bowl, frozen pineapple chunks are key. They give a sweet, tropical taste and a creamy texture when blended. A ripe banana adds natural sweetness and creaminess, making each bite smooth. Coconut milk adds richness, but feel free to use almond or oat milk if you prefer. Greek yogurt boosts creaminess and protein, but you can swap it for dairy-free yogurt to keep it vegan. If you like it sweeter, honey or agave syrup is an easy option. - Freshly sliced fruits (such as kiwi, strawberries, and banana) - Crunchy granola - Chia seeds for added nutrition - Shredded coconut for a tropical flair - Fresh mint leaves for garnish Toppings make your smoothie bowl fun and tasty. You can slice fresh fruits like kiwi, strawberries, and banana for color and flavor. Crunchy granola adds a nice texture and fills you up. Chia seeds pack in extra nutrition and are great for your health. Shredded coconut gives a tropical vibe, while mint leaves add a fresh touch. Use your favorite toppings to make your smoothie bowl your own! {{ingredient_image_2}} To make the perfect smoothie base, start by adding the frozen pineapple chunks, ripe banana, coconut milk, Greek yogurt, and honey or agave syrup to a high-speed blender. Blend on high speed. You want it smooth and creamy. If the texture feels too thick, add more coconut milk gradually. This helps adjust the consistency. Scrape down the sides of the blender as needed. Now for the fun part! Pour your smoothie mixture into a bowl. Make sure you create a thick base. For toppings, get creative! Arrange sliced fresh fruits like kiwi and strawberries. Add a sprinkle of crunchy granola and a dash of chia seeds. Don’t forget the shredded coconut for that tropical flair. Serve your smoothie bowl right away. This keeps it fresh and maintains the best texture. Using a decorative bowl can make it look even better. Enjoy it with a colorful spoon for a delightful meal! To make the perfect smoothie bowl, you can adjust the sweetness. I suggest using honey or agave syrup. These sweeteners blend well and add a nice touch to your bowl. Start with one tablespoon and taste it. If you want it sweeter, add a bit more. Achieving the right thickness is key. You want a creamy and thick base. If your mix is too thick, add more coconut milk. Blend until smooth and creamy. If it's too thin, you can add more frozen pineapple. This helps keep it cold and thick. Choosing a decorative bowl makes a big difference. A bright or fun bowl adds joy to your meal. Pair it with a colorful spoon for an extra fun touch. The best time to enjoy your smoothie bowl is in the morning or as a snack. It is refreshing and energizing. You can also share it with friends. Smoothie bowls are a great way to start the day or cool off in the afternoon. Enjoy! Pro Tips Use Frozen Fruits: Frozen pineapple and banana not only enhance the creaminess but also keep your smoothie bowl chilled and refreshing. Adjust Sweetness: Taste the smoothie before serving; you can always add more honey or agave syrup if you prefer a sweeter flavor. Experiment with Toppings: Don’t be afraid to mix and match different fruits, nuts, or seeds to create a unique flavor profile that suits your taste! Serve Immediately: For the best texture and taste, enjoy your smoothie bowl right after preparation to prevent it from becoming too runny. {{image_4}} To make a vegan tropical pineapple smoothie bowl, simply substitute Greek yogurt with dairy-free yogurt. This keeps the creamy texture while making it vegan. You can find many options like almond, coconut, or cashew yogurt. Each type adds its own flavor to the bowl. If you want more dairy alternatives, try using almond milk or oat milk as a base. Both options blend well with pineapple and banana. They offer a light flavor and creamy consistency without dairy. You can also use coconut yogurt for a richer taste. If you want to boost your smoothie bowl with protein, adding protein powder is a great choice. Choose a flavor that works well with pineapple, like vanilla or unflavored. This way, you keep the tropical taste while gaining extra nutrition. Another way to add protein is through nut butter. Almond butter or peanut butter mixes well with the smoothie base. Just one tablespoon makes your bowl richer and more filling. Nut butter will also add healthy fats, enhancing the flavor and texture. If you have leftover smoothie mixture, you can store it in a sealed container. It will stay fresh in the fridge for up to two days. To keep it nice and thick, stir it well before serving. You can also freeze the smoothie mixture. Pour it into ice cube trays or freezer bags. This way, you can use it later in smoothies or bowls. Just blend it again when you want to enjoy it. To keep fruits fresh, store them in the fridge. Bananas can ripen quickly, so keep them on the counter. Pineapple chunks should be in an airtight container in the fridge if they are fresh. Coconut milk should also be stored in the fridge. Once opened, use it within a week. If you buy frozen produce, check for a strong seal. Always choose bags without ice crystals for the best quality. To make your smoothie bowl thicker, follow these tips: - Use more frozen fruits. Frozen pineapple and banana work great. - Blend less. This helps keep some texture. - Add chia seeds. They expand when wet and thicken your bowl. - Use less liquid. Start with a small amount of coconut milk. If it's still too thin, add more frozen fruit and blend again. Yes, you can use fresh pineapple, but it will change the texture. Frozen pineapple gives a creamier, colder feel. Fresh pineapple adds brightness and flavor. If you use fresh, add ice cubes. This keeps your bowl chilled and thick. You can try these milk options: - Almond milk: It’s light and has a mild taste. - Oat milk: Creamy and works well for smoothies. - Soy milk: Offers protein and a thicker texture. - Cashew milk: Rich and smooth, perfect for a creamy bowl. Choose based on your taste and dietary needs. This blog post covered how to make a tasty tropical pineapple smoothie bowl. We discussed main ingredients, like frozen pineapple and ripe bananas, and how to blend them for a smooth base. I shared tips on choosing toppings and presenting your bowl. You learned easy variations for vegan needs and protein boosts. Finally, we explored storage tips to keep your ingredients fresh. Enjoying this bowl boosts your mood and makes healthy eating fun. Dive in and create your own unique smoothie bowl!

Tropical Pineapple Smoothie Bowl Fresh and Healthy Treat

Are you ready to whip up a Tropical Pineapple Smoothie Bowl that’s fresh and healthy? I’m excited to share this

For these tasty tacos, you need: - 1 lb boneless, skinless chicken breast - 8 small corn tortillas - 1 ripe avocado, thinly sliced - 1 cup red cabbage, finely shredded - Fresh cilantro, roughly chopped, for garnish - 2 limes (1 for juice, 1 cut into wedges for serving) These main ingredients create a strong base for the dish. The chicken gives protein and flavor, while the tortillas hold everything together. You will also need: - 2 tablespoons chili powder - 1 teaspoon ground cumin - 1 teaspoon smoky paprika - 3 tablespoons extra virgin olive oil - 1 teaspoon garlic powder - Salt and freshly cracked black pepper, to taste These seasonings add depth and heat to the chicken. The olive oil helps the spices stick and keeps the meat juicy. For a perfect taco, gather: - Fresh lime wedges for serving - Your favorite salsa for dipping The lime juice brightens the dish. Salsa adds an extra layer of flavor and pairs well with the grilled chicken. With these ingredients, you set the stage for a delicious taco experience that bursts with flavor and freshness. {{ingredient_image_2}} To start, you need to make a tasty marinade. In a medium bowl, mix together 2 tablespoons of chili powder, 1 teaspoon of ground cumin, 1 teaspoon of smoky paprika, and 1 teaspoon of garlic powder. Squeeze the juice from one lime into the bowl. Add 3 tablespoons of olive oil and a pinch of salt and pepper. Whisk this all together until it blends well. Now, take your 1 pound of chicken breast and place it in the bowl. Use your hands or a spoon to coat the chicken fully in the marinade. Cover the bowl with plastic wrap and put it in the fridge. Let it sit for at least 30 minutes. If you have time, marinate it for up to 2 hours. This makes the chicken even tastier. When you are ready to grill, preheat your grill to medium-high heat. Make sure the grates are clean and lightly oiled, so the chicken does not stick. Take the chicken out of the marinade and place it directly onto the hot grill. Be sure to throw away any leftover marinade. Grill the chicken for about 5 to 7 minutes on each side. You want the internal temperature to reach 165°F (75°C). Look for nice grill marks on the chicken. After grilling, move the chicken to a cutting board and let it rest for 5 minutes. This resting time helps keep the juices inside. Then, slice the chicken into thin strips. While the chicken is resting, warm the corn tortillas on the grill. Place them for about 30 seconds on each side. You want them warm with slight char marks. Now, it’s time to assemble your tacos. Take a warmed tortilla and lay a few strips of grilled chicken on top. Add a handful of shredded red cabbage and a few slices of avocado. Finish with a sprinkle of freshly chopped cilantro. Serve your tacos with lime wedges for squeezing and a bowl of your favorite salsa for dipping. Enjoy the burst of flavors in every bite! Grilling chicken can be fun and easy. First, make sure your grill is clean. A clean grill helps the chicken not stick. Preheat the grill to medium-high heat. This gets the grill hot enough for good sear marks. Place the chicken on the grill for 5 to 7 minutes per side. Use a food thermometer to check for doneness. The chicken should reach 165°F (75°C). Let the chicken rest for 5 minutes after grilling. This keeps the juices inside, making it more tender. Marinading the chicken is key for flavor. You can let it sit for as little as 30 minutes. But if you have time, try to marinate it for 2 hours. The longer the chicken sits in the marinade, the more flavor it absorbs. Use a mix of chili powder, cumin, and lime juice for a punchy taste. Make sure to coat the chicken well. This ensures every bite is packed with flavor. Presentation makes food more appealing. For tacos, use a bright platter. Arrange the tacos neatly, with extra cilantro on top. Add lime wedges for a pop of color. Serve with a colorful salsa on the side. It makes the dish look fun and inviting. Warm the corn tortillas on the grill for better taste. This adds a nice char and makes them easier to fold. A great presentation makes everyone excited to dig in! Pro Tips Marinate Longer for Flavor: For the best flavor, marinate the chicken for at least 2 hours, or even overnight, to allow the spices to fully penetrate the meat. Check Grill Temperature: Ensure your grill is preheated to medium-high heat. This helps achieve those beautiful grill marks and prevents the chicken from sticking. Rest the Chicken: Allowing the grilled chicken to rest for 5 minutes before slicing helps retain its juices, resulting in a more succulent taco filling. Customize Your Toppings: Feel free to add additional toppings like diced tomatoes, jalapeños, or a drizzle of creamy chipotle sauce for extra flavor and texture. {{image_4}} If you need to swap ingredients, here are some easy ideas: - Chicken: Use boneless thighs for a juicier option. - Spices: If you lack chili powder, try taco seasoning instead. - Olive Oil: You can use avocado oil for a different taste. - Tortillas: Flour tortillas work well if you prefer them over corn. Tacos are fun because you can add many toppings. Here are some tasty picks: - Cheese: Crumbled feta or shredded cheddar add creaminess. - Greens: Use arugula or spinach for a fresh crunch. - Salsa: Fresh pico de gallo or mango salsa can brighten each bite. - Sour Cream: A dollop can balance the heat from the chili. You can still enjoy these tacos even without a grill. Here's how: - Oven: Preheat to 400°F (200°C). Place marinated chicken on a baking sheet. Bake for 20-25 minutes until cooked through. - Stovetop: Heat a skillet over medium heat. Add olive oil, then cook chicken for about 6-7 minutes per side. These methods give you flexibility while keeping the flavor strong. Enjoy the process of making these tacos your own! To keep leftover chicken fresh, let it cool first. Place it in an airtight container. Seal it tightly and store it in the fridge. You can keep it for up to three days. When reheating, use low heat. This helps keep the chicken juicy and tasty. For meal prep, store the chicken and taco fillings separately. Wrap tortillas in plastic wrap or foil. Keep them in the fridge for up to two days. When ready to eat, warm the tortillas on a grill or skillet. This makes them soft and easy to fill. You can freeze leftover grilled chicken too! Cool the chicken, then slice it. Place it in freezer bags. Squeeze out as much air as possible and seal. It can last up to three months. For tortillas, wrap them in foil and freeze. You can also freeze shredded cabbage and avocado slices. Just remember, avocado may brown, so use it quickly once thawed. To keep your grilled chicken juicy, marinate it well. Use a mix of lime juice, olive oil, and spices. The acid in lime helps tenderize the meat. Let the chicken sit in the marinade for at least 30 minutes. For better results, marinate for up to 2 hours. Grill the chicken over medium-high heat. Cooking it too long makes it dry. Always check the internal temperature; it should reach 165°F (75°C). Let the chicken rest for 5 minutes after grilling. This step keeps the juices inside. Yes, you can use other proteins for these tacos. Chicken is a favorite, but many options work well. Try shrimp for a seafood twist. Pork or beef also adds great flavor. Just adjust the cooking time based on the protein you choose. For example, shrimp cooks faster than chicken. Tofu is a nice option for a plant-based taco. The key is to season it well, just like the chicken. Great sides for grilled chicken tacos include rice and beans. They complement the flavors nicely. A fresh salad adds crunch and color. Consider a corn salad or a simple green salad. Chips with salsa or guacamole are also popular. These sides make the meal more filling and fun. You can also serve grilled vegetables for extra nutrition. In this blog post, we explored how to make delicious chili lime grilled chicken tacos. We covered the main ingredients, marinade tips, grilling steps, and perfect taco assembly. I shared ways to enhance taste, suggested variations, and provided storage tips for leftovers. Remember, juicy chicken comes from proper marination and grilling techniques. Get creative with toppings and cooking methods. Enjoy your yummy tacos and impress everyone with your skills!

Chili Lime Grilled Chicken Tacos Flavorful and Fun

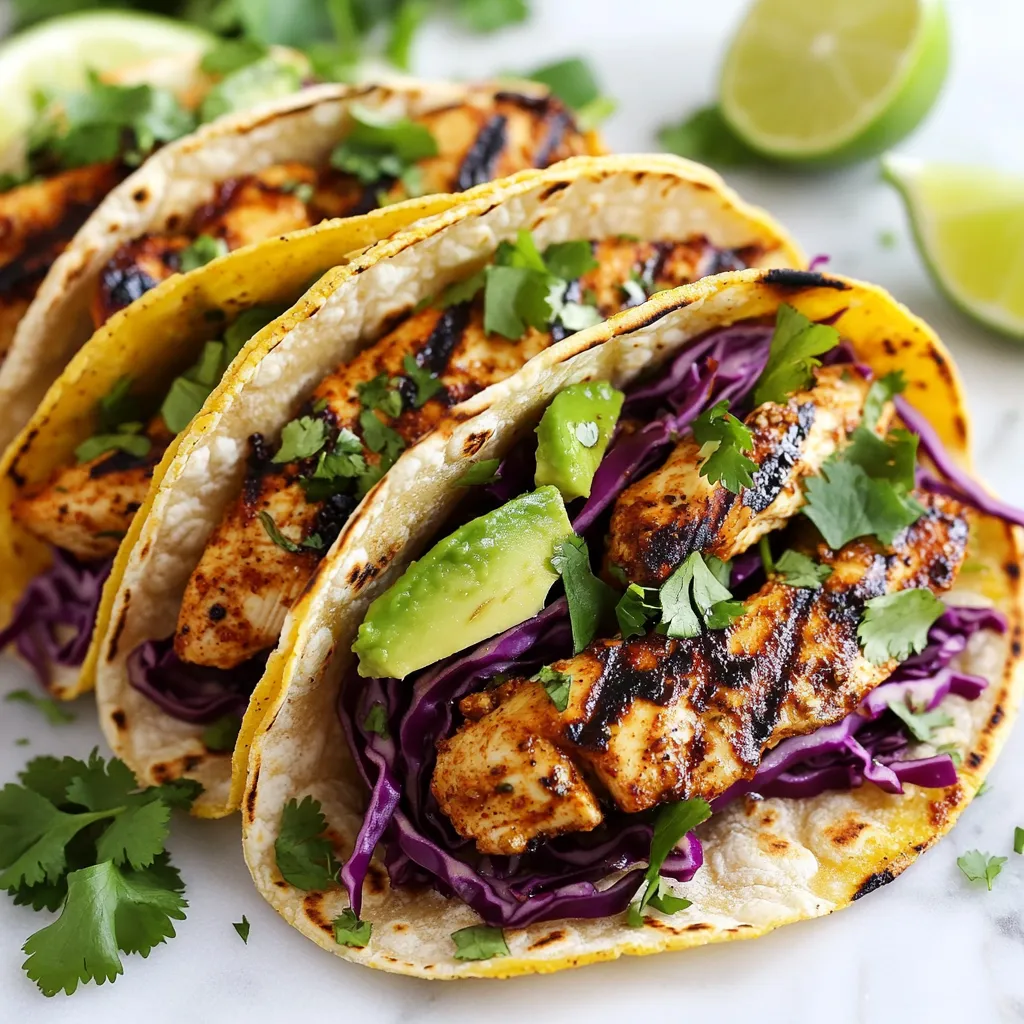
If you’re craving something fresh and exciting, look no further! These Chili Lime Grilled Chicken Tacos pack a punch of

- 1 whole turkey (12-14 pounds), fully thawed - 1 cup unsalted butter, softened to room temperature - 1 tablespoon fresh rosemary, finely chopped - 1 tablespoon fresh thyme, finely chopped - 1 tablespoon fresh sage, finely chopped - 2 cups low-sodium chicken broth - 1 onion, cut into quarters - 1 lemon, cut into quarters - 2 carrots, peeled and roughly chopped - 2 celery stalks, roughly chopped For the turkey, choose a size between 12 and 14 pounds. A whole turkey is best for roasting. The unsalted butter adds richness. Fresh herbs like rosemary, thyme, and sage bring great flavor. Use low-sodium chicken broth to keep it moist. The onion and lemon add a nice aroma. Carrots and celery add sweetness and depth. - 4 cloves garlic, finely minced - 2 teaspoons lemon zest - Salt and freshly ground black pepper, to taste Garlic adds a strong, savory taste. Mince it finely so it blends well. Lemon zest brings bright flavor. It enhances the butter and turkey. Use salt and pepper generously. They help to bring out all the flavors in the turkey. This blend of fresh herbs and spices creates a savory experience. Each bite will burst with flavor, making it a special meal. {{ingredient_image_2}} 1. Preheating the oven: First, set your oven to 325°F (165°C). This temperature is perfect for roasting and helps cook the turkey evenly. 2. Making the herb butter: In a medium bowl, mix 1 cup of softened butter, 4 cloves of minced garlic, and 1 tablespoon each of chopped rosemary, thyme, and sage. Add 2 teaspoons of lemon zest and a pinch of salt and pepper. Stir well to blend all the flavors. 1. Cleaning and drying the turkey: Remove the giblets and neck from the turkey cavity. Pat the turkey dry with paper towels, both inside and out. This step helps the skin get crispy. 2. Applying herb butter under the skin: Gently slide your fingers under the skin, especially around the breasts and thighs. Spoon half of the herb butter mixture under the skin. Spread it evenly for great flavor. 1. Stuffing the turkey for flavor: Fill the cavity with quartered onion, lemon, carrots, and celery. This adds moisture and flavor while roasting. 2. Cooking times and temperature guidelines: Place the turkey on a rack in a roasting pan. Pour 2 cups of low-sodium chicken broth into the pan to keep the turkey moist. Cover it loosely with foil and roast for about 2 to 2.5 hours. Use a meat thermometer to check that the thickest part of the thigh reaches 165°F (74°C). During the last 30 minutes, remove the foil to crisp the skin. Baste with pan juices every 15 minutes for added flavor. - Use low-sodium chicken broth. Pour it into the roasting pan. This keeps the turkey moist while it cooks. - Baste the turkey every 15 minutes. Use the pan juices to add flavor and moisture. This simple step works wonders for taste. - Remove the foil during the last 30 minutes. This helps the skin become golden and crispy. - Keep an eye on the turkey as it roasts. Adjust the oven temperature if needed for perfect browning. - Rest the turkey for at least 30 minutes before carving. This lets the juices spread throughout the meat. You will enjoy moist, tender slices. - Present the turkey on a large platter. Surround it with roasted veggies and fresh herbs for a stunning display. A side of cranberry sauce adds a pop of color and flavor. Pro Tips Resting is Key: Allow the turkey to rest for at least 30 minutes after roasting. This helps the juices redistribute, ensuring each slice is moist and flavorful. Use a Meat Thermometer: For perfectly cooked turkey, use a meat thermometer to check that the thickest part of the thigh reaches 165°F (74°C). This guarantees safety and optimal juiciness. Flavorful Broth: Instead of plain water, use low-sodium chicken broth in the roasting pan. This will enhance the turkey's flavor and keep it moist during cooking. Herb Butter Variations: Experiment with different herbs in the butter. Fresh herbs like tarragon or parsley can add unique flavors to your turkey, making it a signature dish. {{image_4}} You can change up the herbs in this recipe to fit your taste. If you want a different flavor, try using: - Thyme for a sweet, earthy taste - Oregano for a hint of Mediterranean flair - Basil for a fresh, bright twist You can also add fruits or nuts to the mix. For fruit, think about using: - Dried cranberries for a sweet touch - Chopped apples for a crisp texture For nuts, consider adding: - Chopped pecans for a rich flavor - Walnuts for a slight bitterness These tweaks can make your turkey unique and exciting. You don’t have to stick with just roasting. You can try deep frying for a different result. Deep frying gives you a crispy skin and juicy meat. Just remember to cook it safely. You can also use a slow cooker. This method keeps the turkey very moist. It takes longer, but the flavors deepen as it cooks. Just set it on low for 6 to 8 hours. Choose the method that suits your style and enjoy your meal! To keep your turkey fresh after the feast, refrigerate it in an airtight container. Cut the turkey into smaller pieces to cool faster. Store leftover turkey within two hours of cooking. This helps to prevent bacteria. Use your turkey within three to four days for the best taste. If you want to save it for longer, freezing is a great option. Wrap the turkey tightly in plastic wrap, then place it in a freezer bag. Try to remove as much air as possible. This helps to avoid freezer burn. Frozen turkey can last up to six months. Label the bag with the date. When you reheat turkey, you want to keep it moist. One good method is to use the oven. Preheat your oven to 325°F (165°C). Place the turkey in a baking dish and add a bit of broth or water. Cover it with foil to trap steam. Heat for about 20 minutes per pound. You can also use the microwave for quick reheating. Slice the turkey into thin pieces for even heating. Place it on a microwave-safe plate with a splash of broth. Cover it loosely with a microwave-safe lid or paper towel. Heat in short bursts, checking every minute. Both methods will help make sure your turkey stays juicy and tasty. Enjoy your delicious leftovers! A turkey takes about 13 to 15 minutes per pound to cook. For example, a 12-pound turkey needs around 2.5 to 3 hours at 325°F. Use a meat thermometer to check the thickest part of the thigh. It should read 165°F for safe eating. Always let the turkey rest after cooking. This helps keep it juicy and flavorful. If your turkey is still frozen, do not cook it. You can thaw it in cold water. Submerge the turkey in its packaging. Change the water every 30 minutes. It takes about 30 minutes per pound to thaw this way. If you need to cook it frozen, add another 50% to your cooking time. Just make sure it reaches 165°F. Yes, you can make herb butter days in advance. Mix your ingredients and store in an airtight container. Keep it in the fridge for up to a week. For longer storage, freeze it in small portions. This way, you can just grab what you need later. Classic sides work great with herb butter roasted turkey. Consider serving: - Mashed potatoes - Green bean casserole - Cranberry sauce - Stuffing - Roasted vegetables These dishes complement the turkey's rich flavor. They also make your meal look colorful and inviting. You learned how to prepare a delicious turkey step-by-step. We covered key ingredients like whole turkey, herb butter, and important seasonings. I shared tips for keeping it moist and achieving crispy skin, plus how to carve and serve effectively. With various cooking methods and flavor substitutions, you can customize your turkey to suit any taste. Remember to store leftovers properly and reheat for the best experience. Enjoy your turkey with confidence this holiday season!

Herb Butter Roasted Turkey Flavorful and Juicy Delight

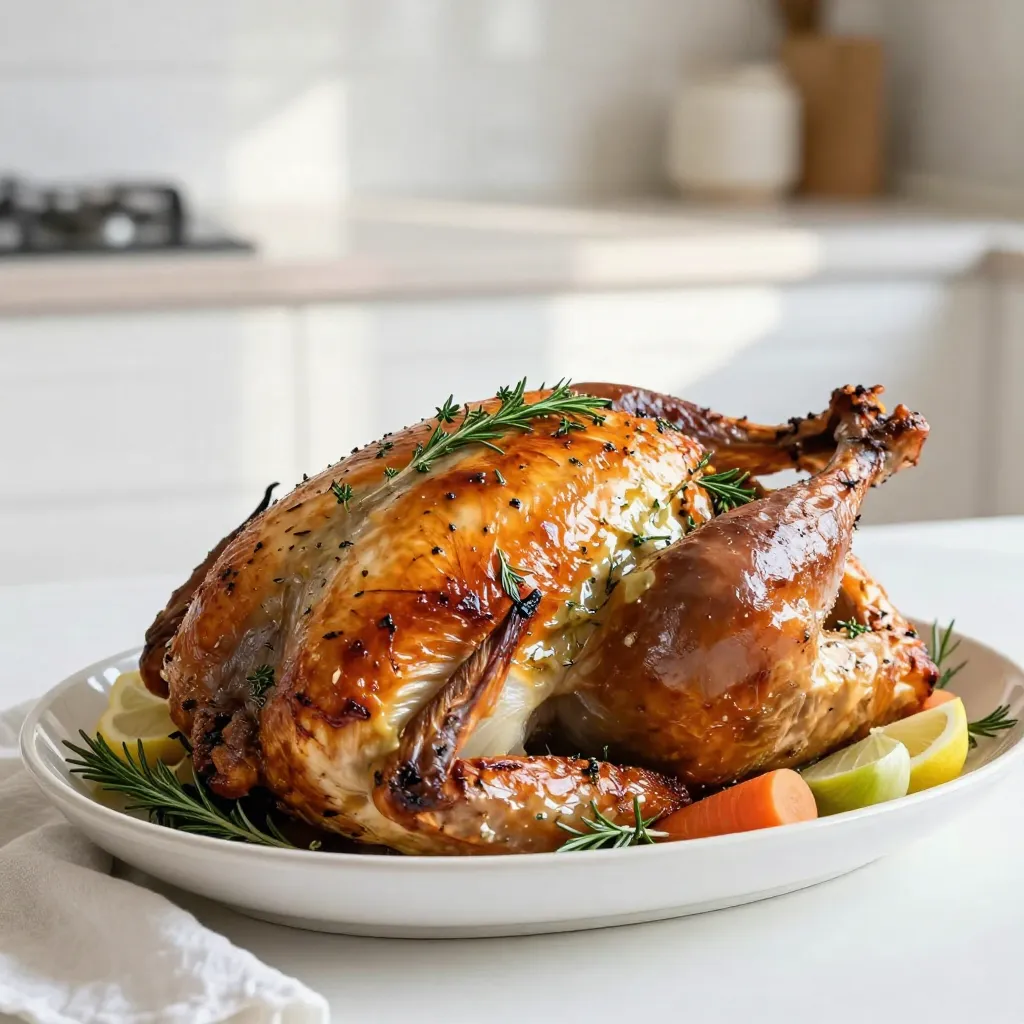
Are you ready to impress your family and friends with a flavorful Herb Butter Roasted Turkey? This dish combines juicy

- 1 cup cooked jasmine rice - 2 boneless, skinless chicken breasts - 3 tablespoons honey - 3 cloves garlic - 1 tablespoon soy sauce - 1 tablespoon sesame oil - 1 cup mixed vegetables (like carrots, peas, and corn) - 2 green onions - Sesame seeds - Salt and pepper The main ingredients create the heart of this dish. Cooked jasmine rice gives a fluffy texture. Chicken breasts add protein and a nice bite. Honey and garlic combine for a sweet and savory flavor that makes each bite special. For a tasty twist, I add soy sauce and sesame oil. These add depth and richness. Mixed vegetables bring color and crunch, making every forkful exciting. I love finishing with garnishes like green onions and sesame seeds. They not only add a pop of color but also enhance the taste. A sprinkle of salt and pepper is key to perfecting the dish. This mix of ingredients results in a well-balanced meal that is sure to please. {{ingredient_image_2}} Start by heating your skillet over medium-high heat. I like using sesame oil for its rich flavor. Once the oil is hot, add the diced chicken. Season it with salt and pepper to taste. Sauté the chicken for about 5 to 7 minutes. You want it to be golden brown and cooked all the way through. Make sure no pink remains in the center. This step ensures your chicken is juicy and flavorful. Next, add minced garlic and honey to the skillet. Stir well to coat the chicken pieces. The honey brings a lovely sweetness, while the garlic adds depth. Cook this mixture for about 2 minutes. You will know it’s ready when the garlic smells fragrant, and the honey begins to caramelize. Once done, remove the chicken from the skillet and set it aside. In the same skillet, toss in your mixed vegetables. This could be a blend of carrots, peas, and sweet corn. Sauté them for about 3 to 4 minutes. You want them to be bright and tender, not mushy. After that, push the veggies to one side of the skillet. On the empty side, pour in the beaten eggs. Stir and scramble the eggs until they are fully cooked, then mix them with the veggies. Now, add the cooked jasmine rice to the skillet. Pour in the soy sauce as well. Using a spatula, gently stir everything together. Make sure to break up any clumps of rice for an even texture. This step helps each grain absorb the flavors. Finally, return the honey garlic chicken to the skillet. Mix it well with the rice and vegetables. Taste your dish. Adjust the seasoning if needed with more salt or pepper. Once everything is heated through, add chopped green onions. Give it one last mix. Now, you can remove the skillet from the heat. Serve your honey garlic chicken fried rice hot. Don’t forget to sprinkle sesame seeds on top for some crunch and a nice visual touch. Enjoy your meal! Using day-old rice is key for great fried rice. Freshly cooked rice is moist and sticky. It clumps together and doesn't fry well. Day-old rice dries out a bit in the fridge. This gives it a firmer texture. It separates easily when you stir-fry. This helps each grain get coated in flavors. When you sauté, heat the skillet well first. A hot skillet gives you that ideal sear. It helps lock in moisture. Make sure to spread the food evenly in the pan. This ensures even cooking. Stir only as needed to let the chicken brown. This technique also works for veggies, making them bright and crisp. You can adjust the sweetness and saltiness to fit your taste. Want more sweetness? Add a bit more honey. If you love salt, a splash of soy sauce can help. Taste as you go to find your perfect balance. Each bite should be a mix of sweet and savory. This makes your fried rice truly delicious! Pro Tips Use Day-Old Rice: Using day-old jasmine rice will ensure a better texture and prevent the rice from becoming mushy during cooking. Control the Heat: Make sure to cook the chicken over medium-high heat to achieve that perfect golden brown color without overcooking it. Customize Your Veggies: Feel free to swap in your favorite vegetables or whatever you have on hand; bell peppers, broccoli, or snap peas work great! Garnish for Appeal: Adding a sprinkle of fresh herbs like cilantro or basil not only enhances the flavor but also adds a beautiful finish to your dish. {{image_4}} You can switch the chicken for tofu or shrimp. Tofu adds a nice, chewy texture. Choose firm tofu and press it to remove extra water. Cut it into cubes and sauté it like you would chicken. Shrimp cooks quickly and brings a sweet taste. Just sauté the shrimp until pink and cooked through. Feel free to mix in seasonal vegetables. You can use bell peppers, zucchini, or broccoli. Fresh veggies not only add color but also vitamins. Just chop them into small pieces and sauté until tender. You can also use frozen veggies if fresh ones aren’t available. If you like some heat, add chili flakes or hot sauce. Sprinkle chili flakes while cooking the vegetables. This will give your dish a nice kick. If you prefer sauce, drizzle it in when you mix in the rice. Adjust the amount based on your spice level. To store leftovers, let the honey garlic chicken fried rice cool down first. Transfer it to an airtight container. Place it in the fridge. This helps keep the flavors fresh. Use the fried rice within three days for the best taste. The best methods to reheat this dish are on the stove or in the microwave. For the stove, heat a skillet over medium heat. Add a splash of water or oil to prevent sticking. Stir the rice until it's heated through. In the microwave, place the rice in a bowl. Cover it with a damp paper towel. Heat in 30-second intervals, stirring in between, until hot. To freeze the fried rice, let it cool completely first. Portion it into freezer-safe containers or bags. Remove as much air as possible to prevent freezer burn. Label the bags with the date. This dish lasts up to three months in the freezer. When ready to eat, defrost it overnight in the fridge. Reheat it in a skillet or microwave for best results. Yes, you can use brown rice. Brown rice is more nutritious. It has more fiber and nutrients than white rice. However, it takes longer to cook. You should cook brown rice for about 45 minutes. Jasmine rice cooks in 15 minutes. If you use brown rice, adjust your cooking time. To make this dish vegetarian, swap chicken for tofu. Firm tofu works best. Dice it into small pieces and sauté it the same way as chicken. You can also skip the eggs. For protein, add more vegetables or use chickpeas. This keeps the dish hearty and satisfying. Many sides pair well with fried rice. Here are some ideas: - Steamed broccoli for crunch. - A fresh cucumber salad for a refreshing bite. - Egg rolls for extra flavor. - Sweet and sour sauce for dipping. These sides will balance the meal and add variety. Enjoy! You now have all the tools to make a tasty honey garlic chicken fried rice. We covered the key ingredients such as jasmine rice, chicken, honey, and garlic. You learned how to cook chicken and infuse flavors, along with tips for sautéing and enhancing taste. Remember, you can switch up proteins and vegetables based on what you like. Don’t forget to store leftovers correctly. Enjoy this dish anytime, and make it your own!

Honey Garlic Chicken Fried Rice Flavorful Dinner Idea

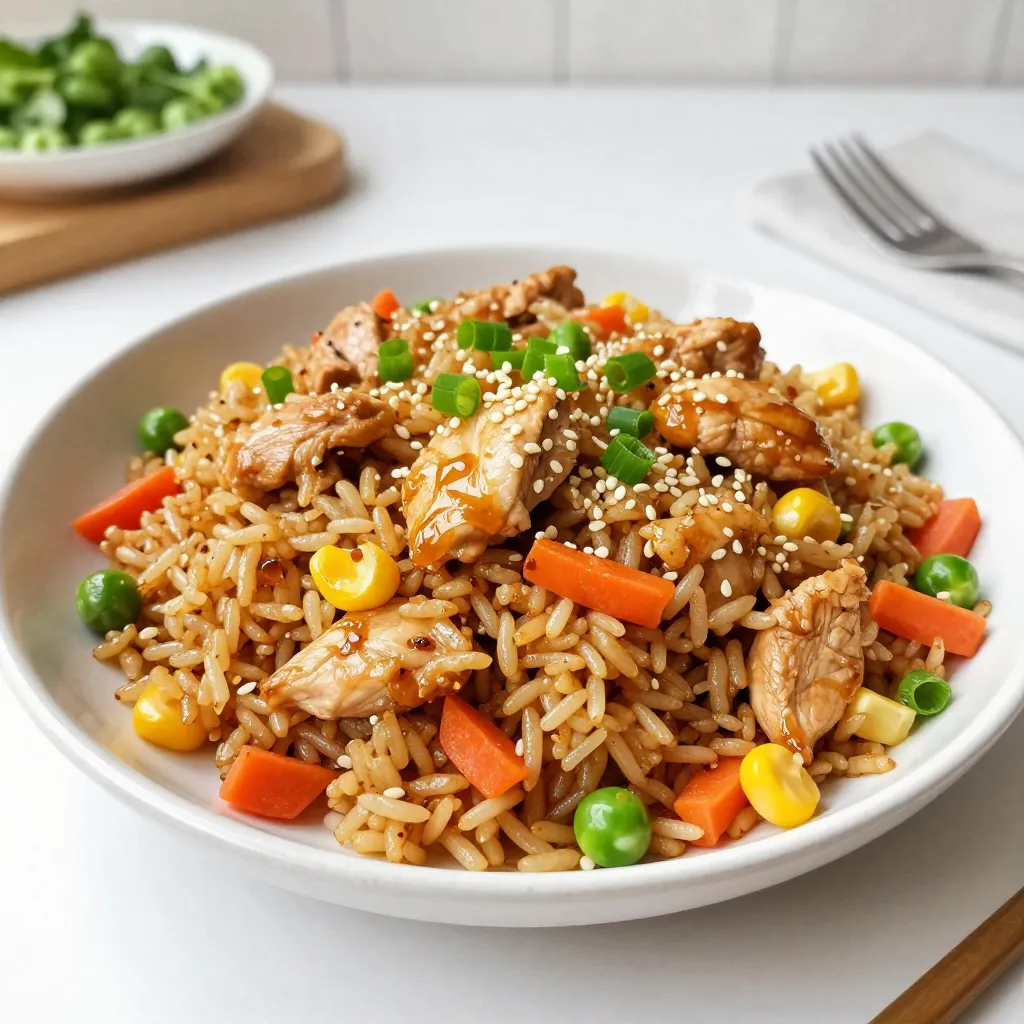
Looking for a tasty dinner idea that’s quick and easy? Honey Garlic Chicken Fried Rice is the answer! This dish

Older posts
Newer posts
← Previous Page1 … Page114 Page115 Page116 … Page120 Next →

dsad

© 2026 recipetorch • Built with GeneratePress

Our Policies

  • Copyright Policy
  • Cookie Policy
  • GDPR Policy
  • Privacy Policy
  • Disclaimer
  • Terms Of Use

More Information

  • Home
  • About
  • Contact
  • Appetizers
  • Dessert
  • Dinner
  • Drinks
©2026, recipetorch About Back To Top