Skip to content
DisclaimerTerms Of UseGDPR PolicyCookie Policy

recipetorch

  • Home
  • Drinks
  • Appetizers
  • Dinner
  • Dessert
  • About
  • Contact
  • Privacy Policy
DisclaimerTerms Of UseGDPR PolicyCookie Policy

Nicole

- 8 oz cream cheese, softened to room temperature - 1/2 cup powdered sugar - 1 teaspoon pure vanilla extract - 1 cup plain Greek yogurt - 1/2 cup caramel sauce, plus an extra drizzle for garnish - 1 medium apple, diced (Granny Smith or Honeycrisp recommended for tartness) - 1/2 teaspoon ground cinnamon - 1/4 cup chopped walnuts or pecans (optional, for added crunch) - Sliced apples and graham crackers for serving If you want to switch things up, here are some ideas: - Use mascarpone cheese instead of cream cheese for a richer taste. - Swap powdered sugar with maple syrup for a natural sweetener. - Try flavored Greek yogurt, like vanilla or caramel, for added depth. - Substitute caramel sauce with chocolate sauce for a different flavor. - Choose nut butter for a creamy, nutty twist instead of walnuts or pecans. Using high-quality ingredients makes a big difference: - Select fresh cream cheese for the best texture and flavor. - Choose organic apples for better taste and fewer pesticides. - Use pure vanilla extract instead of imitation for a richer flavor profile. - Freshly made caramel sauce adds a homemade touch and deep flavor. - Opt for raw or lightly roasted nuts for added crunch and nutrition. This blend of ingredients creates a rich and creamy dip that's perfect for sharing. {{ingredient_image_2}} Start with 8 ounces of cream cheese. Make sure it is soft. Place it in a large bowl. Use a hand mixer to beat the cream cheese. Mix until it’s smooth and creamy. You want to get rid of all lumps. Next, add in 1/2 cup of powdered sugar. Pour in 1 teaspoon of pure vanilla extract. Mix again until these ingredients are well combined. The dip should be light and fluffy at this point. Now, gently fold in 1 cup of plain Greek yogurt. Make sure it blends well with the cream cheese. Avoid lumps for a smooth dip. Then, stir in 1/2 cup of caramel sauce. Mix until the caramel is evenly spread throughout the mixture. This adds a sweet flavor that pairs well with the cream cheese. Next, add in 1 medium diced apple. I suggest using Granny Smith or Honeycrisp for tartness. Add 1/2 teaspoon of ground cinnamon too. Fold these in gently to keep the apple pieces intact. If you like crunch, mix in 1/4 cup of chopped walnuts or pecans. Once everything is well combined, transfer the dip to a serving bowl. For a nice touch, drizzle more caramel sauce on top. This adds both flavor and a pretty look. Serve the dip right away with sliced apples and graham crackers. This mix of flavors and textures makes for a truly delightful treat! To get the best creamy texture, use softened cream cheese. This step is key. Beat it with a hand mixer until smooth. Mixing in powdered sugar and vanilla helps, too. When you add Greek yogurt, fold it in gently. This keeps your dip silky and smooth. Avoid lumps by mixing well at each step. Choose a tart apple like Granny Smith or Honeycrisp. These apples add a nice zing. Wash the apple first for freshness. Slice it in half, then remove the core. Cut the apple into quarters and then dice. Aim for uniform pieces. This ensures even flavor in the dip and makes it look great. For a richer flavor, add a sprinkle of ground cinnamon. It boosts the overall taste. If you like crunch, toss in chopped walnuts or pecans. They add texture and a nice nutty flavor. For extra sweetness, drizzle more caramel on top before serving. These simple steps make your dip shine even more! Pro Tips Choose the Right Apples: Use tart apples like Granny Smith or Honeycrisp to balance the sweetness of the dip and add a refreshing crunch. Make It Ahead: Prepare the dip a few hours in advance and store it in the refrigerator. This allows the flavors to meld together beautifully. Add a Twist: Experiment with different flavored yogurt, such as vanilla or cinnamon, for an extra layer of flavor in your dip. Garnish for Presentation: Drizzle additional caramel sauce and sprinkle some cinnamon on top before serving to enhance the visual appeal of the dip. {{image_4}} You can change the flavor of this dip easily. Try adding peanut butter for a nutty twist. Swap in chocolate syrup instead of caramel for a sweeter treat. For a spicy kick, mix in a pinch of cayenne or chili powder. You can also use different fruits like pears or berries. Each option gives a new taste to enjoy. To make this dip gluten-free, use gluten-free graham crackers. For a vegan version, replace cream cheese with a plant-based cream cheese. Use maple syrup as a sweetener instead of powdered sugar. Swap Greek yogurt for a non-dairy yogurt to keep it creamy. These changes make it friendly for many diets. If you need to serve more people, you can double the recipe. Just keep the same steps to mix the ingredients. For smaller gatherings, cut the amounts in half. This dip is easy to scale up or down based on your needs. Adjust the serving snacks too, using more or fewer apple slices and crackers. To keep your Caramel Apple Cheesecake Dip fresh, place it in an airtight container. Make sure to seal it well. Store it in the fridge for up to three days. If you have extra caramel, keep it in a separate container for easy drizzling later. This dip is best served cold. However, if you want it warm, you can gently heat it. Use a microwave-safe bowl and warm it in short bursts. Stir after each burst to avoid hot spots. Be careful not to overheat it, as this can change the texture. Freezing this dip is not recommended. The cream cheese and yogurt may change texture when thawed. If you must freeze it, place it in an airtight container. Use it within one month. When ready to eat, thaw it in the fridge overnight. Stir well before serving to restore its creamy texture. Yes, you can make this dip ahead of time. It tastes great when chilled. Prepare it and store it in the fridge for up to two days. Just cover it well to keep it fresh. Before serving, stir it gently to restore its creamy texture. This way, you save time during your gathering. Granny Smith or Honeycrisp apples are the best choices. Granny Smith adds a nice tartness, while Honeycrisp brings sweetness and crunch. Both types hold their shape well in the dip. You can even mix both for a fun flavor twist. You can serve this dip with sliced apples and graham crackers. The apples add freshness, while the crackers give a nice crunch. If you're feeling adventurous, try pretzel sticks or vanilla wafers too. They all pair well with the creamy dip and sweet caramel. This blog post covered all the key points for making a great Caramel Apple Cheesecake Dip. You learned about the essential ingredients, how to prepare them, and tips for achieving the perfect texture. We explored variations to suit your taste and dietary needs, plus how to store any leftovers. Remember, making this dip is fun and easy. Get creative with flavors and enjoy it with friends. Your next get-together will impress everyone with this delicious treat!

Caramel Apple Cheesecake Dip Delightful and Easy Treat

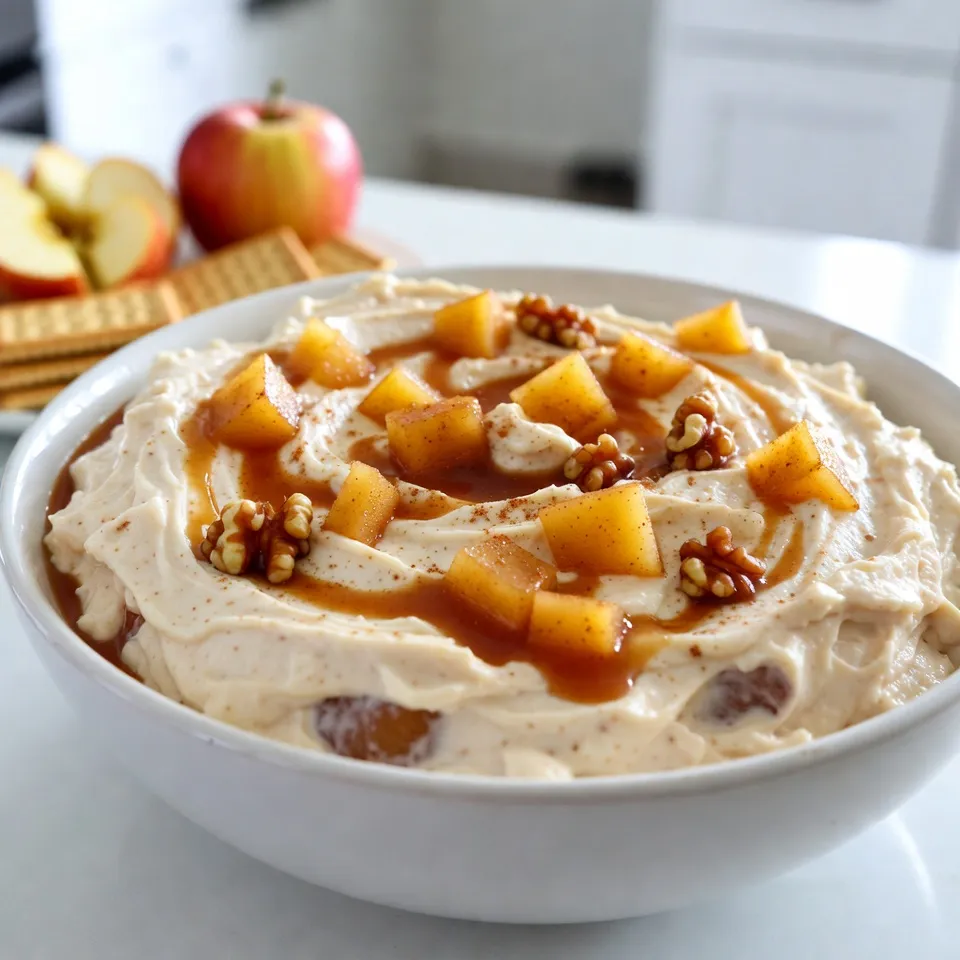
Are you ready to impress your guests with a delicious and easy dessert? Caramel Apple Cheesecake Dip is the treat

To make Cilantro Lime Shrimp Skewers, gather these fresh ingredients: - 1 pound large shrimp, peeled and deveined - 1/4 cup fresh cilantro, finely chopped - Zest and juice of 2 limes - 2 tablespoons extra virgin olive oil - 2 cloves garlic, minced - 1 teaspoon ground cumin - 1/2 teaspoon red pepper flakes (optional, for a hint of heat) - Salt and freshly ground black pepper to taste - Skewers (wooden or metal) If you need to swap any ingredients, here are some easy options: - Shrimp: Use chicken or firm fish like swordfish. - Cilantro: Parsley or basil work well in place of cilantro. - Lime: Lemon juice can replace lime juice if needed. - Olive oil: Any neutral oil, like avocado or canola oil, is fine. Want to add more flavor? Consider these optional ingredients: - Bell peppers or onions for added crunch and color. - Pineapple chunks for a sweet twist. - A splash of soy sauce for an umami kick. These tweaks can make your skewers even more exciting! {{ingredient_image_2}} To start, choose your skewers. If you use wooden skewers, soak them in water for at least 30 minutes. This step helps prevent burning on the grill. For metal skewers, you can skip this part. After soaking, dry them off. Next, grab a medium mixing bowl. Add 1/4 cup of finely chopped cilantro, the zest and juice of 2 limes, and 2 tablespoons of extra virgin olive oil. Then, add 2 cloves of minced garlic, 1 teaspoon of ground cumin, and 1/2 teaspoon of red pepper flakes if you want a bit of heat. Sprinkle in salt and black pepper to taste. Whisk all the ingredients together until they blend well and smell amazing. Now it's time to grill! First, preheat your grill or grill pan to medium-high heat. This helps the shrimp cook evenly. Carefully thread the marinated shrimp onto your skewers, leaving small gaps between them. This space allows heat to circulate. Place the skewers on the grill and cook for about 2-3 minutes on each side. Watch them closely. When they turn opaque and firm, they are done. Overcooking can make them rubbery. After grilling, let the skewers rest for one minute off the heat. This keeps them juicy. Serve them warm with lime wedges and extra cilantro on the side for garnish. To cook shrimp just right, watch the color change. Raw shrimp is gray. When cooked, it turns pink and opaque. This takes about 2-3 minutes per side. Don't overcook! Overcooked shrimp gets tough. It should feel firm but springy when done. For best flavor, marinate the shrimp for at least 15-30 minutes. If you have time, go for a full hour. This lets the flavors soak in deeply. If you marinate too long, the shrimp can get mushy. Always marinate in the fridge to keep it safe. Serve your skewers on a nice platter. Add lime wedges for extra zest. Garnish with fresh cilantro for a pop of color. You can even sprinkle some lime zest on top. This makes your dish look and taste fresh. Always serve warm for the best experience! Pro Tips Soak Wooden Skewers: Always soak wooden skewers in water for at least 30 minutes before grilling to prevent them from burning. Marination Time: For the best flavor, allow the shrimp to marinate for at least 30 minutes, but no more than 1 hour to prevent them from becoming mushy. Grill Temperature: Make sure your grill is preheated to medium-high heat before adding the skewers. This will help achieve a nice sear on the shrimp. Resting Time: Let the skewers rest for a minute after grilling to allow the juices to redistribute, ensuring moist and flavorful shrimp. {{image_4}} You can switch out shrimp for other proteins. Chicken works great. Use chicken breast cut into cubes. For a plant-based option, try firm tofu. Slice it into cubes and marinate just like the shrimp. You can also use fish like salmon or swordfish. Cut them into chunks for skewering. Adding veggies is fun too! Bell peppers, zucchini, and cherry tomatoes all make great choices. Cut them into bite-sized pieces. Mix them in with your shrimp or protein for a colorful dish. Want to kick up the flavor? Add spices! A dash of smoked paprika gives a nice twist. You can also add fresh herbs like parsley or mint. These herbs brighten the dish. For a tangy taste, add a splash of orange juice to the marinade. If you love heat, increase the red pepper flakes. Or try a bit of hot sauce in the marinade. This gives extra kick to your skewers. Grilling is popular, but you can cook these skewers in other ways too. If you don’t have a grill, use your oven. Preheat it to 400°F (200°C). Place the skewers on a baking sheet. Bake for about 8-10 minutes. Flip halfway through to cook evenly. Another option is the stovetop. Use a grill pan on medium-high heat. Cook the skewers for about 2-3 minutes on each side. Both methods keep the shrimp juicy and full of flavor. To store leftover cilantro lime shrimp skewers, let them cool first. Place them in an airtight container. You can keep them in the fridge for up to three days. If you want to have them later, this is a great way to keep them fresh. You can freeze these skewers too. Just make sure they are fully cooled. Wrap each skewer in plastic wrap. Then, put them in a freezer-safe bag or container. This way, they can last for up to three months in the freezer. When you want to eat them, just thaw in the fridge overnight. To reheat, take the skewers out of the fridge or freezer. If frozen, let them thaw first. You can heat them in the oven at 350°F for about 10 minutes. You can also use the microwave for quick reheating. Just warm them for about 30 seconds, checking often. Enjoy your tasty leftovers! You should marinate shrimp for at least 15 to 30 minutes. This time allows the shrimp to soak up the flavors of the cilantro, lime, and spices. If you have more time, you can marinate them for up to 2 hours in the fridge. Just remember, longer marinating can make shrimp taste even better! Yes, you can prepare these skewers in advance! You can marinate the shrimp and assemble the skewers up to a few hours before grilling. Just keep them in the fridge until you are ready to grill. This makes it easy to serve them at a party or family meal. Several sides work well with cilantro lime shrimp skewers. Here are some tasty options: - Coconut rice - Grilled vegetables - Corn on the cob - A fresh green salad - Quinoa with lime and herbs These sides can enhance your meal and make it even more enjoyable! This guide covers all you need for delicious cilantro lime shrimp skewers. From the right ingredients to effective grilling techniques, you now have the keys to success. Remember, marinating shrimp enhances flavor and tenderness. Experiment with different add-ins, proteins, and cooking methods to make it your own. Store leftovers safely for later enjoyment. With these tips, you can impress anyone with your cooking. Enjoy your culinary journey and happy grilling!

Cilantro Lime Shrimp Skewers Fresh and Tasty Recipe

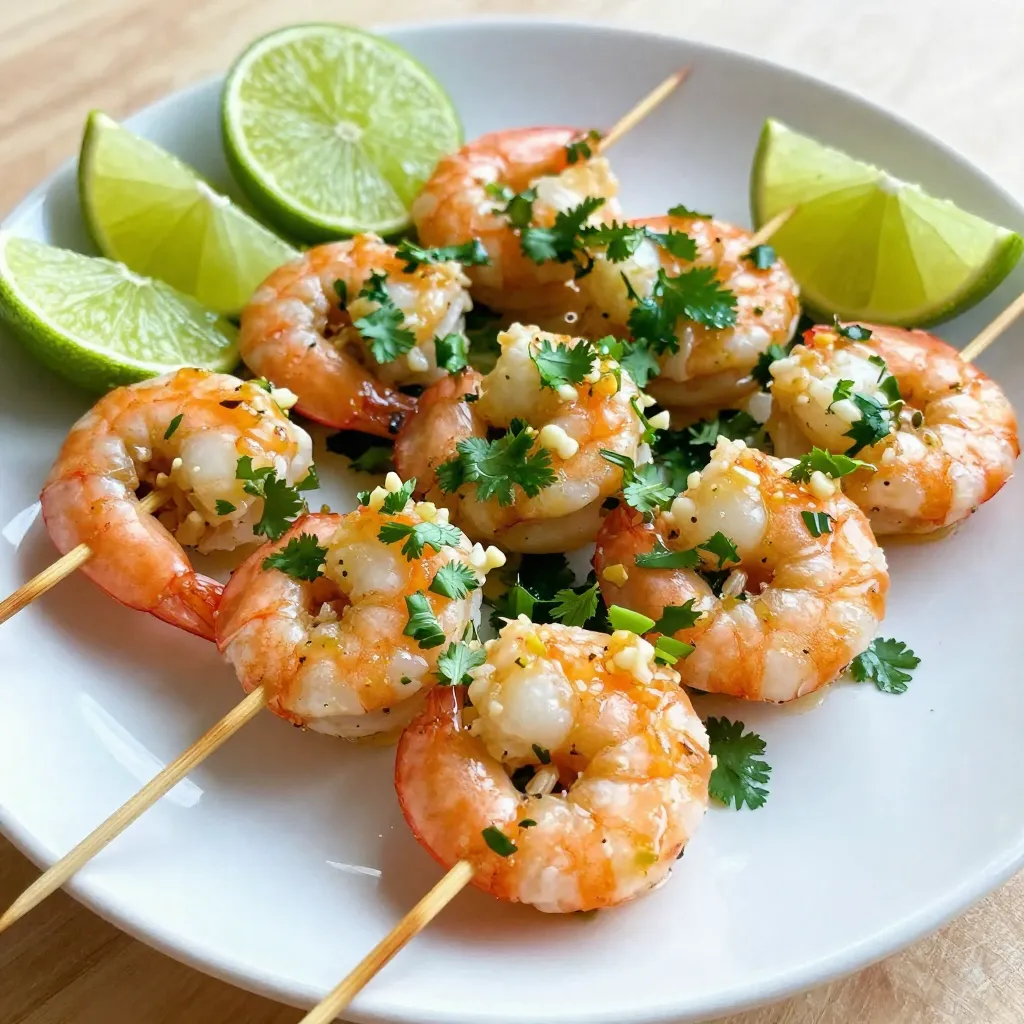
Looking for a fresh and tasty meal that impresses? Try my Cilantro Lime Shrimp Skewers! This easy recipe brings zesty

- 2 cups cooked chicken, shredded - 1 cup salsa verde (store-bought or homemade) - 1 cup black beans, drained and rinsed - 1 cup corn (frozen or canned) - 1 teaspoon ground cumin - 1 teaspoon garlic powder - 8 small corn tortillas - 1 cup shredded cheese (cheddar or Monterey Jack) - ¼ cup fresh cilantro, chopped - 1 tablespoon olive oil - Salt and pepper to taste - Optional for serving: Sour cream and slices of avocado When I make salsa verde chicken enchiladas, I start with fresh, quality ingredients. The chicken gives the dish protein, while the black beans and corn add texture. I love the zing from salsa verde; it brings everything together. The spices like cumin and garlic powder boost the flavors. I choose corn tortillas for their soft bite. The cheese binds the enchiladas and makes them creamy. A sprinkle of cilantro brings a fresh finish that I adore. To elevate your enchiladas, consider these garnishes: - Chopped fresh cilantro - Slices of avocado - A dollop of sour cream - Lime wedges for a zesty touch These garnishes add color and flavor to the dish. I like to add creamy avocado and a squeeze of lime. It brightens each bite and enhances the salsa verde’s flavors. For the best flavor, I recommend: - Cheddar cheese - Monterey Jack cheese - A blend of both Cheddar adds a sharp taste, while Monterey Jack melts beautifully. Mixing both gives a great balance. Feel free to get creative! Try adding pepper jack for some heat or a sprinkle of queso fresco for a fresh twist. {{ingredient_image_2}} Set your oven to 375°F (190°C). This helps the enchiladas bake evenly. Preheating is key for a perfect dish. In a large bowl, mix the shredded chicken, black beans, and corn. Add ground cumin, garlic powder, half the salsa verde, and half the cheese. Season with salt and pepper. Stir it all together well. This filling packs flavor and texture. Heat olive oil in a skillet over medium heat. Fry each corn tortilla for about 10-15 seconds on each side. Look for them to become soft and flexible. Transfer them to paper towels to drain extra oil. Soft tortillas make rolling easier. Take one tortilla and add 2-3 tablespoons of the chicken filling in the center. Roll it tightly around the filling. Place it seam-side down in a greased 9x13 inch baking dish. Repeat for all tortillas. This assembly creates the base of your enchiladas. Pour the remaining salsa verde evenly over the rolled tortillas. Make sure they are well coated. Next, sprinkle the rest of the shredded cheese on top. Cover the dish with aluminum foil. Bake for 20 minutes. Remove the foil and bake for another 10 minutes. Look for melted cheese and a golden hue. Once out of the oven, let the enchiladas cool for a few minutes. Before serving, sprinkle chopped cilantro on top. This adds freshness and color. Serve with optional sour cream and avocado for extra creaminess. Enjoy your flavorful meal! To make soft tortillas, you need to heat them right. I use a skillet for this. Heat a bit of olive oil over medium heat. Fry each tortilla for about 10-15 seconds on both sides. This step is key to keeping them pliable. After frying, place them on paper towels to soak up any extra oil. This method keeps them soft and ready to roll. Shredding chicken can be easy if you know how. I suggest using two forks. Hold one fork in each hand. Grab the chicken and pull it apart with the forks. This method works well for warm or cold chicken. You can also use a stand mixer with a paddle attachment for quick shredding. Just mix on low speed for about 30 seconds. Both methods give you nice, even shreds for your enchiladas. You can change the filling to match your taste. Adding different spices can give your dish a new twist. Try adding smoked paprika for a smoky flavor. For some heat, add diced jalapeños or a pinch of chili powder. You can also swap black beans for pinto or add diced bell peppers for extra crunch. Mixing in fresh herbs like oregano or thyme can also boost the flavor. Experiment and find the perfect blend for you. Pro Tips Warm Tortillas: Warming the tortillas makes them more pliable and easier to roll without tearing. Customize Your Fillings: Feel free to add other vegetables like bell peppers or zucchini for extra flavor and nutrition. Cheese Variations: Mix different types of cheese, such as pepper jack for a spicy kick or mozzarella for a gooey texture. Make Ahead: Assemble the enchiladas in advance and refrigerate them. Just add a few extra minutes to the baking time when ready to serve. {{image_4}} You can easily make a vegetarian version of these enchiladas. Swap out the chicken for 2 cups of cooked quinoa or lentils. This keeps the dish filling and tasty. Add black beans and corn just like in the original recipe. You can also add diced bell peppers or spinach for extra flavor and nutrients. If you like heat, try spicy salsa verde chicken enchiladas. Use a zesty salsa verde with jalapeños or add diced fresh jalapeños to the filling. You can also sprinkle some crushed red pepper flakes on top before baking. This adds a nice kick that spice lovers will enjoy. There are many protein options for these enchiladas. You can use shredded turkey or even ground beef. For a seafood twist, try crab or shrimp. Just make sure to season nicely to enhance the flavor. This allows you to customize the dish to fit your tastes and dietary needs. Store leftover enchiladas in an airtight container. Make sure to let them cool first. Keep them in the fridge for up to three days. You can also cover them with plastic wrap if you prefer. To reheat, preheat your oven to 350°F (175°C). Place the enchiladas in a baking dish. Add a splash of salsa verde or water to keep them moist. Cover with foil and bake for about 15-20 minutes. Check if they are heated through before serving. You can freeze enchiladas for a quick meal later. Wrap each enchilada in foil or plastic wrap. Place them in a freezer-safe bag. They will stay good for up to three months. To reheat, thaw in the fridge overnight. Then, bake at 350°F (175°C) until hot. Yes, you can use flour tortillas. They will be softer and easier to roll. However, corn tortillas add a nice texture and flavor. If you prefer a gluten-free option, stick with corn. To make Salsa Verde, blend together tomatillos, garlic, jalapeños, lime juice, and cilantro. Add salt to taste. Roast the tomatillos for a smokier flavor. This fresh salsa enhances your enchiladas. Some great sides are Mexican rice, refried beans, or a fresh salad. You can also serve with tortilla chips and guacamole. These options balance the flavors and add more fun to your meal. Leftovers can last up to three days in the fridge. Store them in an airtight container to keep them fresh. Reheat in the oven or microwave for best results. Yes, you can prepare them a day ahead! Assemble the enchiladas and cover them tightly. Store in the fridge. Bake them right before serving for a warm, delicious meal. This article covered all you need to know about making delicious enchiladas. We explored key ingredients and garnishes, ensuring tasty fillings and cheese options. You learned simple steps for prepping and baking. Tips helped create soft tortillas and tasty flavors. Variations offer choices for everyone, while storage tips keep leftovers fresh. Embrace these ideas and make your next meal a hit! Enjoy the process and share your dishes with friends and family.

Salsa Verde Chicken Enchiladas Flavorful and Easy Meal

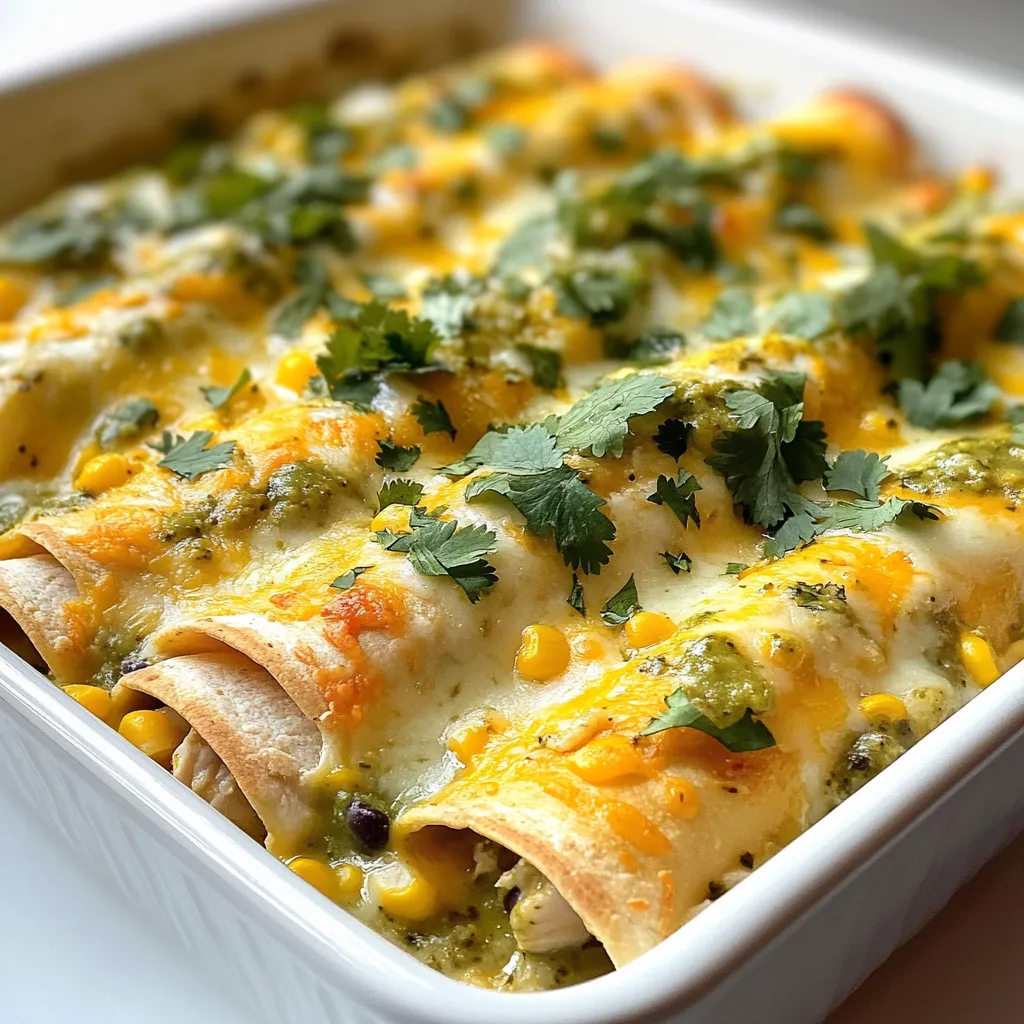
Looking for a quick and tasty dinner? You’ve found it with Salsa Verde Chicken Enchiladas! This dish packs bold flavors

- 1 whole head of garlic - 12 ounces fettuccine pasta - 1 cup heavy cream - 2 tablespoons unsalted butter - Salt and freshly ground black pepper - Fresh parsley, finely chopped - 2 tablespoons olive oil - Grated Parmesan cheese When I make Creamy Roasted Garlic Alfredo, I love using fresh ingredients. The garlic brings a sweet and rich flavor. Roasting it adds depth that makes this dish shine. Fettuccine pasta is my go-to choice because it holds the sauce well. The heavy cream creates a smooth and rich base. I always use unsalted butter for a clean taste. Salt and black pepper enhance the flavors. Fresh parsley adds a pop of color and freshness. The olive oil is essential for roasting the garlic. Finally, grated Parmesan cheese ties everything together. It adds umami and creaminess. Each ingredient contributes to the dish's richness and flavor. Keep them fresh for the best results. Enjoy the process of cooking this delightful meal! {{ingredient_image_2}} First, preheat your oven to 400°F (200°C). This step is key for roasting garlic. Next, take a whole head of garlic. Carefully slice off the top to reveal the cloves. Drizzle 2 tablespoons of olive oil over the exposed cloves. Wrap the garlic in aluminum foil. This keeps it from burning while roasting. While the garlic roasts, fill a large pot with water. Add a generous pinch of salt and bring it to a boil. Once boiling, add 12 ounces of fettuccine pasta. Cook it until it is al dente, which means firm to the bite. Before draining, reserve 1 cup of the starchy pasta water. Then, drain the pasta in a colander. Roasting garlic is simple. Place the wrapped garlic in the preheated oven. Roast it for about 30 to 35 minutes. The cloves should feel soft and caramelized. When done, take it out and let it cool for a few minutes. Cooling makes it easier to squeeze the roasted garlic from its skin. In a large skillet, melt 2 tablespoons of unsalted butter over medium heat. Once melted, squeeze the roasted garlic cloves into the skillet. Discard the skins. Use a fork to mash the garlic into a paste. This paste adds great flavor to the sauce. Gradually pour in 1 cup of heavy cream. Stir well to mix it with the garlic. Bring this mixture to a gentle simmer. Then, slowly whisk in 1 cup of grated Parmesan cheese. Stir until it melts and the sauce is smooth. If the sauce is too thick, add some reserved pasta water. Do this a little at a time until you reach the right creamy consistency. Now it's time to combine everything. Add the cooked fettuccine to the skillet with the sauce. Toss the pasta gently but thoroughly. Make sure each strand is coated in that rich, creamy sauce. Taste your sauce and add salt and freshly ground black pepper as needed. For a finishing touch, sprinkle finely chopped fresh parsley on top. This adds color and a hint of freshness. Serve your Creamy Roasted Garlic Alfredo right away for the best taste. You can use homemade stock to deepen the taste. Stock adds a rich layer that store-bought broth may lack. Try vegetable or chicken stock for a unique twist. For cheese, consider alternatives like Pecorino Romano or Asiago. These cheeses provide different flavors that can make your dish stand out. You can mix and match cheeses for even more fun. To adjust the thickness of your sauce, use the reserved pasta water. This starchy water helps thin the sauce without losing flavor. Add a little at a time until you reach your desired creaminess. Avoid lumps in your cheese sauce by whisking constantly as you add the cheese. This keeps the sauce smooth and silky. If lumps form, keep whisking vigorously until they disappear. When plating, twirl the fettuccine into nests. This creates a beautiful presentation. Top with a sprinkle of fresh parsley for color and freshness. For wine pairings, a crisp white like Sauvignon Blanc works well. It balances the rich flavors of the sauce. You can also serve it with a side salad or garlic bread for a complete meal. Pro Tips Use Fresh Garlic: Fresh garlic will provide a more robust flavor compared to pre-minced varieties. Roasting it enhances its sweetness and mellows the sharpness. Adjust the Creaminess: If the sauce is too thick, gradually add the reserved pasta water until you reach your desired consistency, ensuring a silky texture. Mix Cheese Types: For a more complex flavor, consider mixing Parmesan with other cheeses like Pecorino Romano or Asiago. Garnish with Citrus: A squeeze of lemon juice or a sprinkle of lemon zest before serving can brighten the flavors and add a refreshing contrast to the rich sauce. {{image_4}} You can easily change the pasta for this dish. If you prefer gluten-free options, try rice or chickpea pasta. Both work well in this recipe. You can also add vegetables for extra flavor and nutrition. Spinach and mushrooms are great choices. They pair nicely with the creamy sauce and roasted garlic. To make your Alfredo unique, think about adding herbs or spices. Fresh basil or thyme can add a fresh twist. You can also include proteins like chicken or shrimp. These additions make the dish heartier and more satisfying. Just cook the protein separately and mix it in with the pasta. You can create a white wine Alfredo by adding a splash of white wine while making the sauce. This addition gives a nice depth of flavor. If you want to try alternatives, consider using a mix of ricotta cheese and cream. This option can lighten the dish while keeping it creamy and delicious. To store leftover Alfredo, let it cool to room temperature first. Then, place it in an airtight container. This helps keep it fresh. I recommend using glass containers or plastic ones that seal tightly. These containers prevent air exposure and keep the sauce creamy. To reheat without losing creaminess, use the stove. Heat over low heat, stirring often. This gentle method warms the sauce evenly. If it seems too thick, add a splash of milk or reserved pasta water. This helps restore its smooth texture. You can freeze Alfredo sauce, but it may change in texture. To freeze, cool the sauce completely. Then, pour it into freezer-safe bags or containers. Leave some space for expansion. When ready to use, thaw it in the fridge overnight. Reheat gently on the stove, adding a bit of cream or water to help it blend smoothly again. Fettuccine is the classic choice for Alfredo. Its flat shape holds the sauce well. However, you can use other types of pasta like penne or rigatoni. These shapes also work great and add a fun twist to the dish. Using light cream will change the flavor and texture. The sauce may be less rich and creamy. Heavy cream gives a smooth, luxurious feel. If you want a lighter sauce, consider mixing light cream with a bit of butter for added richness. Creamy Roasted Garlic Alfredo lasts about three to four days in the fridge. Look for signs of spoilage, like changes in smell or texture. If you see any mold, it's best to toss it. Store it in an airtight container for the best results. Yes, you can make the sauce ahead of time. Just store it in the fridge after cooling. When you're ready to eat, reheat it gently on the stove. Add a splash of reserved pasta water to help restore its creamy texture. This blog post shared a simple recipe for Creamy Roasted Garlic Alfredo. We covered key ingredients, preparation steps, and tips for perfecting the sauce. Remember to roast garlic for flavor and use reserved pasta water for texture. Variations and storage tips make this dish flexible. Try different cheeses or proteins for a twist. You can enjoy this dish now or save it for later. Making Alfredo should be easy and fun. Happy cooking!

Creamy Roasted Garlic Alfredo Rich and Savory Dish

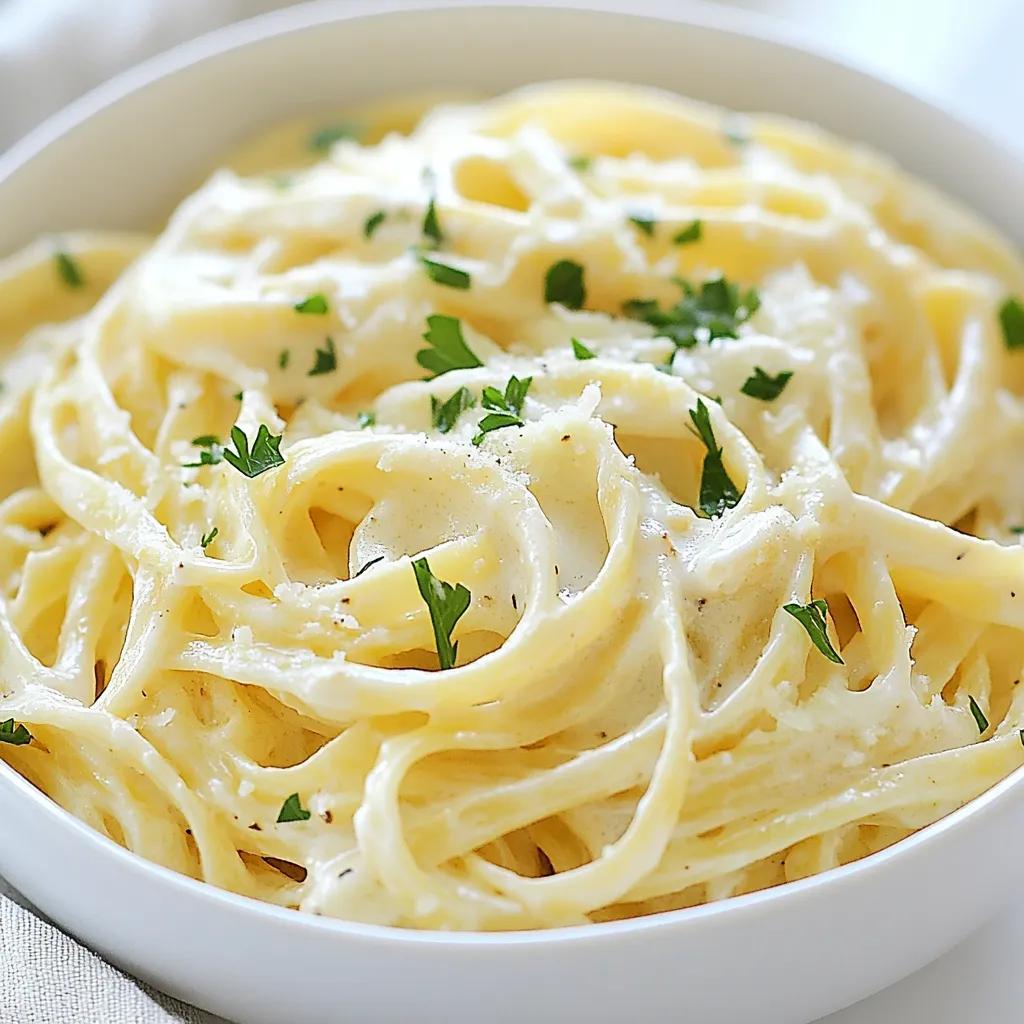
Are you ready to dive into a dish that wraps you in comfort? Creamy Roasted Garlic Alfredo is not just

- 1 ½ cups chocolate chip cookie crumbs - ½ cup unsalted butter, melted - 2 cups cream cheese, softened at room temperature - 1 cup granulated sugar - 1 teaspoon pure vanilla extract - 3 large eggs, at room temperature - 1 cup sour cream - ½ cup all-purpose flour, sifted - Pinch of salt To make the chocolate chip cookie cheesecake, you need some key ingredients. First, gather chocolate chip cookie crumbs for the crust. You can crush your favorite cookies or buy pre-made crumbs. Next, use unsalted butter to help bind the crumbs together. For the filling, cream cheese is essential. It gives the cheesecake its rich, smooth texture. Make sure it is softened for easy mixing. You'll also need granulated sugar to sweeten the filling and pure vanilla extract for flavor. Three large eggs help set the cheesecake and add richness. The sour cream gives a nice tang and creaminess. Don't forget the all-purpose flour; it helps firm up the cheesecake. A pinch of salt balances the sweetness. With these ingredients, you can create a delicious and creamy dessert that everyone will love. {{ingredient_image_2}} - Preheat your oven to 325°F (163°C). - In a medium bowl, mix 1 ½ cups of chocolate chip cookie crumbs with ½ cup of melted unsalted butter. Use a fork to blend well. - Firmly press the crumb mixture into the bottom of a 9-inch springform pan. Make sure it forms an even layer. - Bake the crust for 10 minutes. After baking, allow it to cool completely. - In a large bowl, beat 2 cups of softened cream cheese with 1 cup of granulated sugar. Use an electric mixer on medium speed until smooth and creamy, about 2-3 minutes. - Add 1 teaspoon of pure vanilla extract and mix until fully combined. - With the mixer on low speed, add 3 large eggs one at a time. Mix briefly after each egg until blended. - Gently fold in 1 cup of sour cream using a spatula until it's well incorporated. - Sift ½ cup of all-purpose flour and a pinch of salt over the mixture. Fold gently until just combined. - Carefully stir in mini chocolate chips to the batter. This helps to evenly distribute them throughout. - Pour the cheesecake filling over the cooled crust in the springform pan. Use a spatula to spread it evenly. - Bake for 50-60 minutes. The edges should be set while the center is slightly jiggly. - After baking, turn off the oven. Crack the oven door open and let the cheesecake cool inside for 1 hour. Chilling the cheesecake overnight will help it set perfectly, making each bite an irresistible delight. - Overmixing the batter: This can make the cheesecake dense. Mix just until smooth. - Not chilling the cheesecake long enough: It needs time to set. Chill for at least four hours. - Room temperature ingredients: Use cream cheese and eggs at room temp. This helps them blend better. - Cooling techniques: Let the cheesecake cool in the oven. This reduces the chance of cracks. - Additional flavoring options: Try adding almond extract for a twist. It pairs well with chocolate. - Alternative sweeteners: You can use honey or maple syrup instead of sugar. This adds unique flavors. Pro Tips Use Room Temperature Ingredients: Ensure your cream cheese and eggs are at room temperature for a smoother batter, which helps achieve a creamier cheesecake texture. Prevent Cracks: To avoid cracks on the surface of your cheesecake, bake it in a water bath. Place the springform pan in a larger pan filled with hot water during baking. Cool Gradually: After baking, let the cheesecake cool in the oven with the door slightly open. This gradual cooling helps prevent sudden temperature changes that can cause cracks. Chill Overnight: For the best flavor and texture, refrigerate the cheesecake overnight. This allows the flavors to meld and ensures it sets perfectly. {{image_4}} You can easily change the flavor of your cheesecake. Try adding different extracts like almond or coconut. A small amount can really enhance the taste. You can also use flavored cream cheese. Options like chocolate or vanilla can add a nice twist to your dessert. This gives you a chance to get creative and find your favorite flavor mix! If you need to make this cheesecake fit specific diets, don’t worry! You can make a gluten-free version. Just substitute regular cookie crumbs with gluten-free ones. For a sugar-free option, use a sugar substitute in place of granulated sugar. Both changes keep the cheesecake tasty while meeting dietary needs. How you serve your cheesecake can make it even more special. Consider adding garnishes like whipped cream or extra mini chocolate chips on top. You can also drizzle chocolate syrup for a rich finish. Pair your cheesecake with fresh fruits like strawberries or cherries. The bright colors and flavors will brighten your plate! To keep your chocolate chip cookie cheesecake fresh, store leftovers in the fridge. Wrap the cheesecake tightly with plastic wrap. This prevents it from drying out and absorbing other smells. Place it in an airtight container if you have one. It’s best to enjoy it within a week. Freezing your cheesecake is an option if you want to save some for later. First, let the cheesecake cool completely. Then, slice it into individual pieces. Wrap each slice in plastic wrap. After that, place the wrapped slices in a freezer bag or container. This keeps them safe from freezer burn. You can freeze them for up to three months. In the fridge, your cheesecake will last about 5 to 7 days. If you freeze it, it can stay good for about three months. However, for the best taste and texture, try to eat it sooner. Enjoying it fresh will always give you the best flavor! To prevent cracks, here are some tips: - Use room temperature cream cheese. Cold cream cheese can mix unevenly. - Avoid overmixing the batter. Mix just until blended. - Bake at a low temperature. This helps the cheesecake cook evenly. - Cool slowly. After baking, leave it in the oven with the door ajar for an hour. Yes, you can make this cheesecake ahead of time. I suggest preparing it a day before serving. This gives it time to chill and set well. The flavors also deepen when it sits in the fridge. Look for these signs of doneness: - The edges should be set. - The center should jiggle slightly when you shake the pan. - It will firm up as it cools. You can use a regular cake pan, but I recommend a springform pan. It makes removal easier. If you use a regular pan, line it with parchment paper to help lift out the cheesecake. You can find Chocolate Chip Cookie Cheesecake at: - Local bakeries that specialize in cheesecakes. - Grocery stores with a bakery section. - Online shops that offer dessert delivery. This blog post covered how to make a chocolate chip cookie cheesecake. We went through all the ingredients and the step-by-step process to perfect the dish. I shared tips to avoid common mistakes and ways to add your own twist. You learned how to store leftovers and answered frequently asked questions. I hope you feel excited to create this delicious dessert at home. Enjoy every bite, and don't forget to share your results!

Chocolate Chip Cookie Cheesecake Irresistible Delight

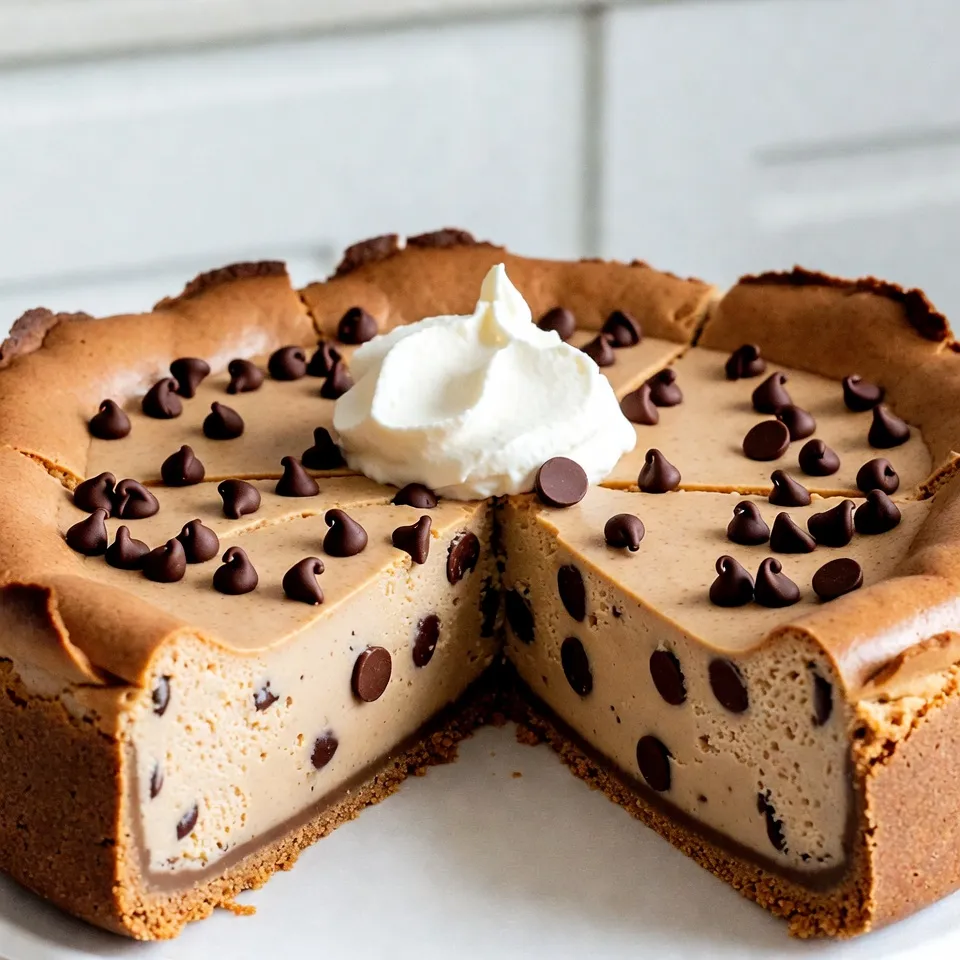
Craving a sweet treat that combines creamy cheesecake with delicious chocolate chip cookies? You’re in for a real treat! This

To make Vanilla Almond Granola, you need simple and tasty ingredients. Each one adds flavor and nutrition. Here’s what you’ll need: - 3 cups rolled oats - 1 cup sliced almonds - 1/2 cup unsweetened shredded coconut - 1/2 cup pure maple syrup - 1/4 cup coconut oil, melted - 2 teaspoons pure vanilla extract - 1/2 teaspoon ground cinnamon - 1/4 teaspoon salt - 1/2 cup dried cranberries or raisins (optional) What do these ingredients do? Rolled oats form the base. They give the granola its crunch. Sliced almonds add a nutty taste and healthy fats. Unsweetened shredded coconut gives a hint of sweetness and chewiness. Pure maple syrup acts as a natural sweetener. It binds everything together and brings depth to the flavor. Coconut oil adds richness and helps with baking. Pure vanilla extract gives a warm aroma that makes your kitchen smell great. Ground cinnamon adds a cozy spice. Salt enhances all the flavors, making them pop. Finally, if you want extra sweetness, add dried cranberries or raisins. They give your granola a fruity twist. Why choose these ingredients? They are nutritious and delicious. Together, they create a healthy and satisfying snack. You can enjoy this granola on yogurt, milk, or by the handful. It's a good way to start your day or satisfy your snack cravings. {{ingredient_image_2}} Start by preheating your oven to 350°F (175°C). This helps the granola bake evenly. Line a large baking sheet with parchment paper. This makes cleanup easy and prevents sticking. In a big mixing bowl, mix the rolled oats, sliced almonds, shredded coconut, ground cinnamon, and salt. Use a wooden spoon or spatula to combine everything well. This step is key for flavor. In a separate bowl, whisk together the melted coconut oil, pure maple syrup, and vanilla extract. Make sure the mixture is smooth. This blend gives your granola sweetness and rich taste. Pour the wet mixture over the dry ingredients. Stir thoroughly so that the oats and almonds get coated. This helps form clumps while baking, making your granola crunchy. Transfer the granola mixture to the prepared baking sheet. Use a spatula to spread it out evenly. Press it down gently to help it stick together. Place the baking sheet into the preheated oven. Bake for 25-30 minutes. Stir the granola every 10 minutes. Look for a golden-brown color to know it’s crispy and ready. Once baked, remove the sheet from the oven. Let the granola cool completely on the baking sheet. This cooling step makes it extra crunchy. If you want to add dried cranberries or raisins, do it now. Gently fold them into the cooled granola. This adds sweetness and chewy texture. Store your granola in an airtight container. Keep it at room temperature. It will stay fresh for up to two weeks. Enjoy it for snacks or breakfast! To achieve the ideal crunch in your granola, focus on ingredient ratios. The oats and almonds should be in perfect balance. I use three cups of rolled oats and one cup of sliced almonds. This mix gives you a great base. The coconut adds flavor and texture, so include half a cup of shredded coconut. Baking granola can be tricky. To get an even bake, spread the mixture in a thin layer on your baking sheet. Use a spatula to press it down gently. This helps form clumps. Stir the granola every ten minutes while baking. This step ensures that all parts bake evenly. Look for a golden-brown color. This shows that your granola is ready. Each ingredient in granola brings health benefits. Rolled oats are full of fiber, which helps digestion. Almonds provide healthy fats and protein. Shredded coconut adds healthy medium-chain fats. Maple syrup gives natural sweetness without refined sugars. Cinnamon can help control blood sugar levels. Adding dried fruits like cranberries gives you antioxidants. This makes your granola both tasty and nutritious! Pro Tips Use Fresh Ingredients: Ensuring your oats, nuts, and spices are fresh will enhance the flavor of your granola significantly. Customize Your Sweetness: Adjust the amount of maple syrup according to your taste preference; you can also substitute with agave or honey. Mix In Extras: Feel free to add other nuts, seeds, or even chocolate chips for a personalized touch to your granola. Store Properly: Keep your granola in an airtight container in a cool, dry place to maintain its crunch and freshness longer. {{image_4}} If you want to skip nuts, you can still enjoy this granola. Use seeds like pumpkin seeds or sunflower seeds instead. They add crunch and healthy fats. You can also increase the coconut to give more texture and flavor. Just make sure to keep the same ratios. This way, your granola will still be tasty and satisfying. To make this granola gluten-free, use certified gluten-free oats. Many brands offer gluten-free oats that are safe for those with gluten sensitivities. This small change allows everyone to enjoy this crunchy treat. You can also check the labels of your other ingredients to ensure they are gluten-free. You can easily add more flavor to your granola. Try mixing in spices like nutmeg or ginger for warmth. You can also use almond extract if you want a stronger almond taste. Another fun idea is to add a pinch of cocoa powder for a hint of chocolate. These tweaks will keep your granola exciting and full of surprises. To keep your granola fresh, use an airtight container. This helps maintain its crunchiness. Glass jars or plastic containers work well. Place the container in a cool, dry area, away from sunlight. Avoid storing it near heat sources, which can make it stale. Homemade granola lasts about two weeks at room temperature. If stored correctly, it stays fresh and tasty. You can also check for signs of spoilage, like an off smell or changes in texture. If it feels soft or chewy, it may need to be tossed. You can freeze granola to extend its life. Place it in a freezer-safe bag or container. Make sure to remove as much air as possible. Frozen granola can last up to three months. When you're ready to eat it, just thaw it at room temperature. It will taste great, just like fresh! You can use honey as a sweet swap. It gives a nice flavor. Agave syrup is another option if you want a vegan choice. You can also try brown sugar mixed with water for a simple syrup. Homemade granola lasts up to two weeks in an airtight container. Keep it at room temperature. It stays fresh and tasty for breakfast or snacks during that time. Yes, you can customize your granola! Add your favorite nuts, seeds, or dried fruits. If you like chocolate, toss in some dark chocolate chips. This way, you can create a mix that fits your taste perfectly. Granola can be gluten-free if you use certified gluten-free oats. Always check labels to ensure all ingredients are safe for a gluten-free diet. With the right oats, you can enjoy granola without worry. To keep your granola crunchy, let it cool completely after baking. Store it in an airtight container. Avoid adding wet fruits until you are ready to eat. This way, it stays crisp and delicious. This blog post covered everything you need to know to make tasty granola. We talked about the key ingredients like oats and almonds, plus helpful steps to mix and bake your batch. You learned tips for the best texture and health perks of each ingredient. I shared fun ways to change up the recipe and details on how to keep granola fresh. Now, you can enjoy homemade granola anytime. Get creative and make it yours!

Vanilla Almond Granola Crunchy and Healthy Delight

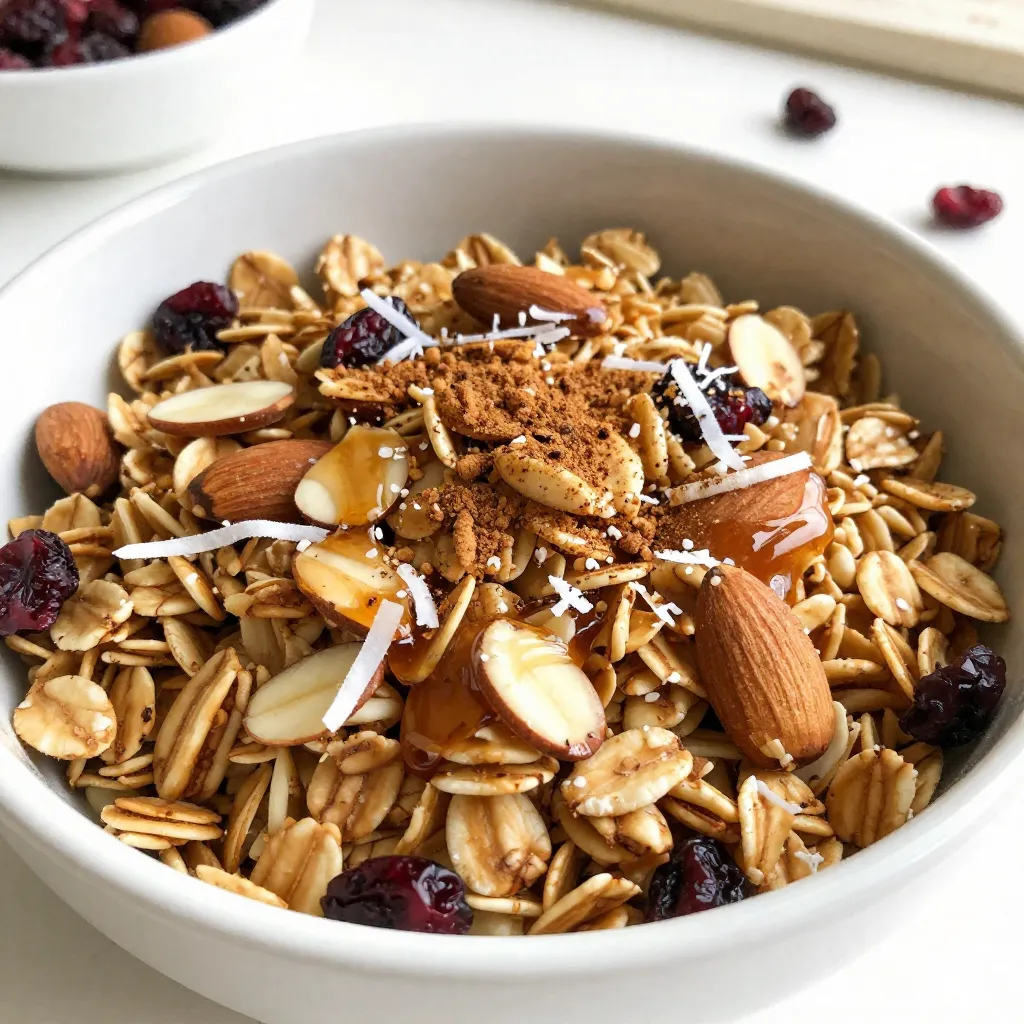
Are you ready to dive into a crunchy, healthy delight? My Vanilla Almond Granola is packed with wholesome ingredients like

- Flour, Eggs, and Olive Oil You need 2 cups of all-purpose flour. This gives the dough its structure. Next, crack in 3 large eggs. The eggs add richness and help bind the dough. One tablespoon of extra virgin olive oil adds flavor and keeps the dough smooth. Don't forget 1 teaspoon of fine sea salt for taste. - Mushrooms and Garlic Use 1 cup of finely minced mushrooms, like cremini or button. They provide a deep, earthy flavor. One clove of garlic, finely chopped, adds a nice kick. Sautéing them together creates a fragrant filling. - Cheeses and Spices For cheese, mix 1/2 cup of creamy ricotta and 1/4 cup of grated Parmesan. Ricotta gives it creaminess, while Parmesan adds sharpness. Add 1/4 teaspoon of freshly grated nutmeg and 1/4 teaspoon of cracked black pepper for extra depth of flavor. - Heavy Cream and Butter You will need 1/2 cup of heavy whipping cream to make a rich sauce. Two tablespoons of unsalted butter add richness to the sauce. This combination creates a smooth, creamy texture that coats the ravioli beautifully. Use these ingredients to create a comforting dish that impresses every time. {{ingredient_image_2}} Mixing Ingredients and Kneading To start, gather your flour and salt on a clean surface. Make a well in the center of the flour. Crack the eggs into the well, then add the olive oil. Use a fork to mix the flour into the eggs. Keep mixing until a shaggy dough forms. Next, knead the dough with your hands for about 5 to 7 minutes until smooth. Resting the Dough Once kneaded, wrap the dough in plastic wrap. Let it rest for 30 minutes at room temperature. This time helps the gluten relax, making it easier to roll out later. Sautéing the Mushrooms In a medium skillet, melt some butter over medium heat. Add the finely minced mushrooms and cook for 5 to 7 minutes. Stir often until the mushrooms lose their moisture and soften. Then, add the chopped garlic and cook for 1 more minute. Combining Cheese and Spices Transfer the mushroom mix to a bowl to cool a bit. Add ricotta, Parmesan, nutmeg, and black pepper to the mushrooms. Stir everything until it’s smooth and well mixed. Rolling Out the Dough After resting, divide the dough into 4 pieces. Roll each piece thinly using a pasta machine or rolling pin. Aim for about 1/16 inch thickness. Dust with flour as needed to prevent sticking. Filling and Sealing Each Ravioli On one sheet of pasta, place small teaspoonfuls of the filling. Leave about 1 inch between each mound. Lightly brush water around each filling to help seal. Place another sheet of pasta over the filled sheet and press down gently. Cut out individual ravioli using a knife or pasta cutter. Repeat with the remaining dough and filling. Boiling the Ravioli Fill a large pot with salted water and bring it to a rolling boil. Carefully add the ravioli without overcrowding the pot. Cook for 3 to 4 minutes, or until they float to the top. Removing and Draining Use a slotted spoon to remove the ravioli from the pot. Place them on a plate lined with paper towels to drain excess water. Melting Butter and Adding Cream In the same skillet used for the mushrooms, melt the last tablespoon of butter over medium heat. Pour in the heavy cream and bring it to a simmer while stirring. Simmering and Thickening Let the cream simmer for 2 to 3 minutes. Stir constantly until it thickens slightly. Tossing Ravioli in Cream Sauce Add the cooked ravioli to the skillet with the cream sauce. Gently toss them to coat evenly. Final Heating Steps Allow the ravioli to heat through for about 1 minute in the sauce. Then, serve hot with a sprinkle of chopped parsley on top. Enjoy your meal! Resting the dough is key. It helps the gluten relax. This makes rolling easier. Aim to rest the dough for at least 30 minutes. You can cover it with plastic wrap. The type of flour you use matters. All-purpose flour works well for this recipe. If you want a chewier texture, try “00” flour. Each flour type gives a different bite. You want a smooth filling for your ravioli. Mix the mushroom, cheese, and spices well. This creates a nice texture. Avoid excess moisture in your filling. Sauté mushrooms until they are dry. This helps keep your ravioli from becoming soggy. You want rich flavor without the mess. Change up the sauce for different flavors. You can add garlic or shallots to the cream. For a tangy twist, add a splash of lemon juice. Fresh herbs elevate your sauce. Try adding basil or thyme. They give a fresh taste to each bite. Mix herbs in just before serving for the best flavor. Pro Tips Use Fresh Ingredients: Fresh mushrooms and quality cheeses will elevate the flavor of your ravioli significantly. Look for ingredients that are in season for the best taste. Don’t Overfill: When placing the filling on the pasta, make sure to keep the amount to a teaspoon per ravioli. This ensures they seal properly and cook evenly. Flour for Non-Stick: Dust your work surface and pasta sheets generously with flour while rolling out the dough. This prevents sticking and ensures a smooth assembly process. Rest the Dough: Allowing the pasta dough to rest for at least 30 minutes is crucial. This relaxes the gluten, making it easier to roll out and shape. {{image_4}} You can make a tasty vegan version of creamy mushroom ravioli. Start by using plant-based substitutes. Replace the eggs with a mix of water and flaxseed meal. Use 1 tablespoon of flaxseed meal mixed with 2.5 tablespoons of water for each egg. This helps bind the dough. For the filling, swap out the cheeses with cashew cheese or a tofu mix. Blend soaked cashews with garlic, lemon juice, and nutritional yeast for a creamy texture. Adjust the filling by adding spices like smoked paprika or herbs for a flavor boost. This makes the dish both vegan and delicious. If you need a gluten-free option, choose the right flour. Almond flour, rice flour, or a gluten-free blend work well. Just be sure to check the labels for safety. When making gluten-free ravioli, keep your ingredients safe. Use gluten-free pasta sheets or make your own dough with gluten-free flour. This way, everyone can enjoy the meal without worry. To enhance the taste, you can add spinach or other veggies. Chopped spinach adds color and nutrients. You can also try adding roasted red peppers or sun-dried tomatoes for extra flavor. Using different cheese varieties can change the whole dish. Try goat cheese for a tangy taste or a mix of mozzarella and ricotta. Each cheese brings its own unique flavor, making your creamy mushroom ravioli even more delightful. Refrigeration Tips You can keep uncooked ravioli in the fridge. Place them in a single layer on a baking sheet. Cover them lightly with plastic wrap. They stay fresh for up to two days. Freezing Guidance If you want to freeze uncooked ravioli, lay them on a baking sheet first. Freeze them until solid, then transfer the ravioli to a freezer bag. This helps keep them from sticking together. They last up to three months in the freezer. Best Practices for Keeping Freshness Store leftover cooked ravioli in an airtight container. You can add a little cream sauce to keep them moist. Make sure they cool down before sealing the container. They stay fresh in the fridge for about three days. Reheating Suggestions For reheating, you can use the microwave or stovetop. If using the microwave, cover them to keep moisture in. If on the stove, add a little cream or water to warm them up gently. How Long Ravioli Last in the Fridge Uncooked ravioli last about two days in the fridge. Cooked ravioli stay good for three days. Always check for freshness before eating. Signs of Spoilage Watch for changes in smell or texture. If the ravioli feels slimy or has a sour smell, it’s best to throw them away. Always trust your senses when it comes to food safety. To make ravioli, you need simple tools and steps. Basic Steps and Equipment Needed - Tools: Rolling pin or pasta machine, knife or pasta cutter, mixing bowls. - Steps: 1. Mix flour and salt in a bowl. 2. Create a well, add eggs and olive oil. 3. Knead until smooth. Rest for 30 minutes. 4. Roll out dough, cut into sheets. 5. Fill with your favorite mixture and seal. Yes, you can freeze them for later use. Best Practices for Freezing and Thawing - To Freeze: Place uncooked ravioli in a single layer on a baking sheet. - Once frozen, transfer to a freezer bag. - To Thaw: Leave in the fridge overnight before cooking. Cooking fresh ravioli is easy and quick. Techniques for Perfectly Cooked Ravioli - Boil salted water in a large pot. - Add ravioli gently, don’t overcrowd. - Cook until they float, about 3-4 minutes. - Use a slotted spoon to remove them. There are many ways to add flavor to your ravioli. Adding Extra Ingredients and Flavors - Toss in fresh herbs like basil or thyme. - Add a splash of lemon juice for brightness. - Mix in sautéed spinach or roasted veggies. - Experiment with different cheeses like goat cheese or feta. Making creamy mushroom ravioli involves simple ingredients and clear steps. You learned about the right flour, fresh mushrooms, and rich cream that create a delicious dish. I shared tips for perfect dough and how to avoid soggy filling. You can even try vegan or gluten-free options. In the end, ravioli is an easy and fun dish to make at home. You'll impress everyone with your skills and unique flavors. Enjoy creating and sharing this meal with friends and family!

Creamy Mushroom Ravioli Delightful Dinner Recipe

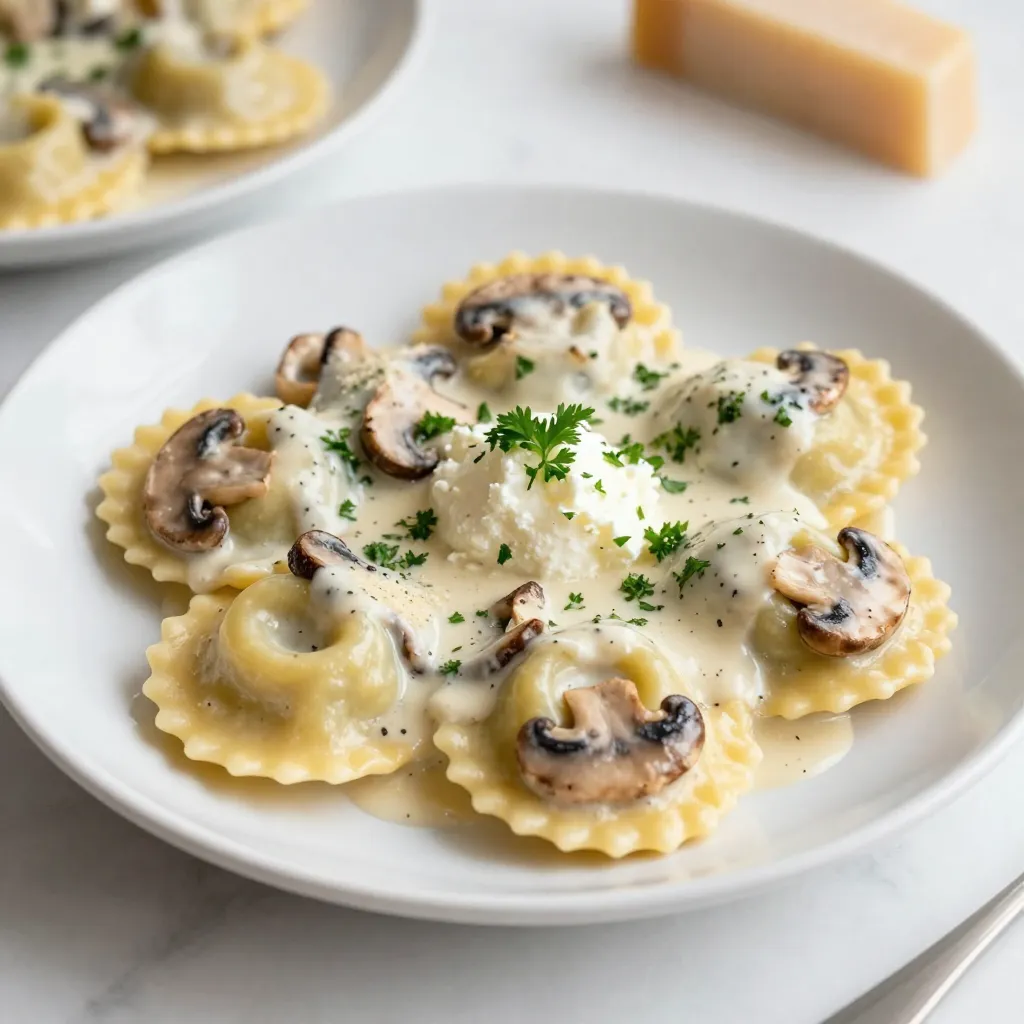
Craving a comforting dish that impresses? My Creamy Mushroom Ravioli is the answer! This delightful recipe combines fresh pasta with

When I make Lemon Poppy Seed Pancakes, I love gathering fresh ingredients. They really bring out the best flavors. Here’s what you will need: - 1 cup all-purpose flour - 2 tablespoons poppy seeds - 2 tablespoons granulated sugar - 1 tablespoon baking powder - 1/2 teaspoon salt - 1 cup buttermilk - 1 large egg - 2 tablespoons unsalted butter, melted - Zest of 1 lemon - 2 tablespoons freshly squeezed lemon juice - Optional: Maple syrup for serving Each ingredient plays a key role. The flour forms the base, while the poppy seeds add a fun crunch. Sugar gives just the right amount of sweetness. Baking powder makes the pancakes rise and stay fluffy. Salt balances the flavors. Buttermilk makes them tender and moist. The egg provides structure. Melted butter adds richness, and lemon zest and juice bring a bright, zesty kick. Using fresh ingredients makes a big difference in taste. I always recommend organic lemons for the zest and juice. They have a better flavor and aroma. If you like, keep some maple syrup handy for serving. It pairs so well with the lemon flavor! {{ingredient_image_2}} In a large bowl, combine: - 1 cup all-purpose flour - 2 tablespoons poppy seeds - 2 tablespoons granulated sugar - 1 tablespoon baking powder - 1/2 teaspoon salt Whisk them together until they blend well. This mix gives your pancakes a nice rise and flavor. In a separate bowl, whisk together: - 1 cup buttermilk - 1 large egg - 2 tablespoons unsalted butter, melted - Zest of 1 lemon - 2 tablespoons freshly squeezed lemon juice Mix until smooth. The buttermilk keeps pancakes soft and fluffy. Gently pour the wet mix into the dry mix. Use a spatula to fold them together. Be careful not to overmix. A few lumps are fine. This helps keep your pancakes light. First, preheat your skillet over medium heat. Lightly grease the surface with a bit of butter or cooking spray. This stops pancakes from sticking. For each pancake, pour 1/4 cup of batter onto the hot skillet. Cook until bubbles form and edges firm up, about 2 to 3 minutes. Flip the pancakes with a spatula and cook for another 2 to 3 minutes. They should be golden brown on both sides. Adjust the heat if they cook too fast. Keep cooking until all the batter is gone. Re-grease the skillet as needed for each batch. Enjoy your delicious pancakes! To make fluffy lemon poppy seed pancakes, do not overmix the batter. When you fold the wet and dry ingredients together, mix gently. A few lumps are fine. They help keep the pancakes light. Also, maintain the right cooking temperature. Heat your skillet to medium. If it’s too hot, the pancakes will burn. If it’s too cool, they won’t cook well. For a lovely presentation, stack the pancakes high on a plate. Drizzle maple syrup on top. Add fresh lemon slices for color. Sprinkle extra poppy seeds over the stack. This makes your pancakes look inviting and delicious. Lemon poppy seed pancakes pair well with fresh fruit, like berries or bananas. You can also serve them with yogurt for creaminess. For drinks, enjoy them with fresh-squeezed orange juice or a cup of tea. These pairings enhance the bright flavors of the pancakes. Pro Tips Use Fresh Ingredients: For the best flavor, use fresh lemon juice and zest. The brightness of fresh lemon will elevate the taste of your pancakes. Don’t Overmix: When combining the wet and dry ingredients, mix just until combined. Overmixing can lead to tough pancakes instead of fluffy ones. Adjust Heat as Needed: If your pancakes are browning too quickly, lower the heat slightly. This ensures they cook through without burning. Experiment with Toppings: Try adding fresh berries, whipped cream, or yogurt on top of your pancakes for added flavor and texture. {{image_4}} You can easily make these pancakes gluten-free. Just swap the all-purpose flour for gluten-free flour. Many brands work well, but check the label for a good substitute. This change keeps the pancakes fluffy and tasty. You can add fresh berries for a fruity twist. Blueberries pair nicely with the lemon. Chopped strawberries or raspberries also add a fun flavor. You can spice things up too! Try adding a dash of cinnamon or nutmeg to the batter. These spices add warmth and depth to the pancakes. If you want a lighter treat, reduce the sugar. You can also use natural sweeteners like honey or maple syrup. These options make the pancakes sweet without adding refined sugar. To store leftover pancakes, let them cool first. Place them in a single layer on a plate. If you have many pancakes, use parchment paper between layers to keep them from sticking. Cover the plate with plastic wrap. Store in the fridge for up to three days. For long-term storage, stack pancakes with parchment paper and place them in a zip-top bag. You can freeze them for up to two months. To reheat pancakes, use a microwave or skillet. For the microwave, place a pancake on a plate. Heat it for about 20 seconds. If frozen, heat it for about 40 seconds. For a skillet, warm a non-stick pan over low heat. Place the pancake in the pan and heat it for about one minute on each side. This method keeps the pancake soft and fluffy. Enjoy your pancakes warm, just like when you first made them! To make pancakes from scratch, follow these basic steps: - Mix Dry Ingredients: Start by whisking flour, sugar, baking powder, and salt in a bowl. - Combine Wet Ingredients: In another bowl, whisk buttermilk, egg, and melted butter. - Combine Both Mixtures: Pour the wet mix into the dry mix. Fold gently until just combined. - Preheat Skillet: Heat a non-stick skillet over medium heat. Grease lightly if needed. - Cook Pancakes: Pour batter onto the skillet. Cook until bubbles form, then flip and cook until golden. Yes, you can use milk instead of buttermilk. Here are some suggestions: - Add Vinegar or Lemon Juice: If you add 1 tablespoon of vinegar or lemon juice to 1 cup of milk, it will mimic buttermilk. - Use Yogurt: Plain yogurt can work too. Thin it with a bit of milk to reach the right consistency. - Milk Alone: You can use milk directly, but the pancakes may be less tangy and fluffy. Here are signs that pancakes are done: - Bubbles: Look for bubbles forming on the surface of the pancake. - Firm Edges: The edges should appear set and not wet. - Color: When you flip it, the pancake should be golden brown. - Touch Test: Gently press the center; it should spring back. If it leaves an indent, it needs more time. You can now make delicious Lemon Poppy Seed Pancakes using simple steps. We covered the ingredients, mixing instructions, tips for fluffiness, and storage options. Remember, less is more when mixing for best results. Feel free to try different flavors or go gluten-free. Enjoy your pancakes fresh or reheated, paired with your favorite toppings. With practice, you’ll impress everyone at the breakfast table. Happy cooking!

Lemon Poppy Seed Pancakes Fluffy Breakfast Delight

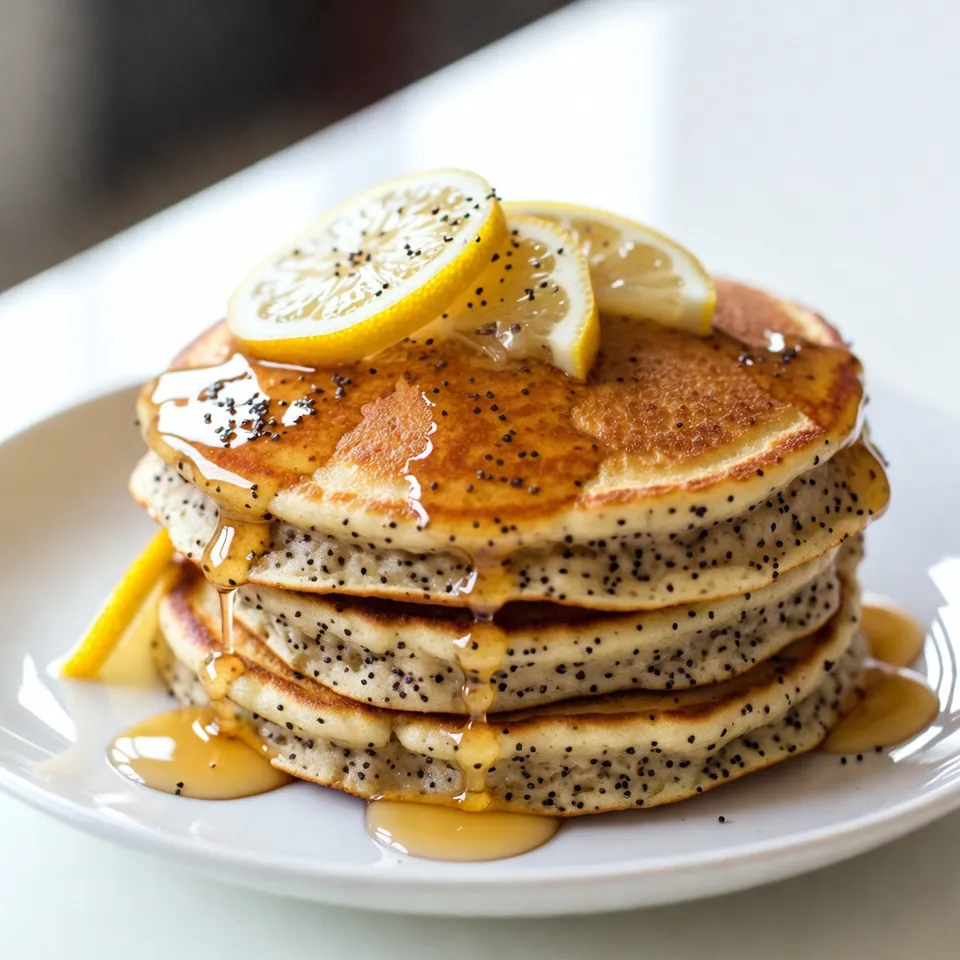
Wake up to a delightful breakfast with my Lemon Poppy Seed Pancakes! These pancakes are light, fluffy, and bursting with

- 1 medium pumpkin (approximately 3-4 pounds), halved with seeds removed - 2 tablespoons extra virgin olive oil - 1 medium onion, finely chopped - 3 cloves garlic, minced - 1 teaspoon ground cumin - 1 teaspoon ground cinnamon - 4 cups vegetable broth (low-sodium recommended) - 1 cup coconut milk (alternative: heavy cream for a richer flavor) - Salt and black pepper to taste - Fresh parsley and/or toasted pumpkin seeds for a delightful garnish The star of this soup is the pumpkin. Choose a medium pumpkin for the best flavor. Look for one that feels heavy for its size and has a smooth skin. The onion adds sweetness, while garlic gives a nice depth. Ground cumin and cinnamon add warmth and spice, making the flavor pop. For the broth, I suggest low-sodium vegetable broth. This way, you control the salt level. Coconut milk makes the soup creamy. If you prefer, use heavy cream for a richer taste. Fresh parsley or toasted pumpkin seeds make great toppings, adding color and crunch. If you're vegan or lactose intolerant, stick with coconut milk. If you cannot find pumpkin, butternut squash works well too. For gluten-free diets, ensure your vegetable broth is labeled gluten-free. If you dislike cumin, feel free to swap it for nutmeg or allspice. This recipe is flexible, so adjust it to fit your needs! {{ingredient_image_2}} Start by preheating your oven to 400°F (200°C). This heat is key for roasting. Cut your pumpkin in half and scoop out the seeds. Place the pumpkin halves cut-side down on a baking sheet lined with parchment paper. Roast them for about 40-50 minutes. The flesh should be soft and fork-tender. Once done, take them out and let them cool for a bit. In a large pot or Dutch oven, heat 2 tablespoons of extra virgin olive oil over medium heat. When the oil looks shiny, add 1 finely chopped medium onion. Sauté this for 5-7 minutes until it becomes soft and clear. Then, stir in 3 minced cloves of garlic, 1 teaspoon of ground cumin, and 1 teaspoon of ground cinnamon. Cook this mix for one more minute to release the scents. Next, scoop the soft pumpkin flesh from the skin and add it to the pot. Pour in 4 cups of low-sodium vegetable broth. Stir everything together and let it simmer gently for about 15 minutes. This allows all the flavors to come together nicely. After simmering, it’s time to blend. You can use an immersion blender to puree the soup until it's smooth. If you have a countertop blender, transfer the soup in batches, but be careful with the hot liquid. Once blended, mix in 1 cup of coconut milk or heavy cream for richness. Season with salt and black pepper to taste. Gently heat the soup until warm, but don’t let it boil. Now, your roasted pumpkin soup is ready to serve! Ladle it into bowls and add a sprinkle of fresh parsley or toasted pumpkin seeds for a nice touch. Enjoy this cozy, creamy delight! To roast pumpkin well, start with a fresh, firm pumpkin. Cut it in half and scoop out the seeds. I find using a sharp knife helps. Place the halves cut-side down on a lined baking sheet. This keeps the moisture in and helps the pumpkin cook evenly. Roast at 400°F (200°C) for 40-50 minutes. Check for tenderness with a fork. If it pierces easily, it’s done. To boost flavor, use spices like ground cumin and cinnamon. They add warmth and depth. I also like to sauté the onion and garlic before adding them. This makes the soup smell amazing and brings out their natural sweetness. Don't forget to taste as you go! Add salt and black pepper to suit your taste. Fresh herbs, like parsley, make great garnishes too. For that smooth, creamy texture, blend the soup well. An immersion blender works best, but a standard blender is fine too. If you want it extra creamy, add coconut milk or heavy cream. Start with one cup and adjust based on your preference. Heat it gently after blending, but don’t let it boil. This helps keep your soup silky and delicious. Pro Tips Choose the Right Pumpkin: Opt for sugar pumpkins or pie pumpkins for a sweeter, creamier soup. Their flesh is denser and more flavorful compared to larger carving pumpkins. Adjust the Seasoning: Feel free to play with spices! Adding a pinch of nutmeg or a dash of cayenne pepper can elevate the flavor profile and add warmth to your soup. Blend for Texture: For a chunkier texture, reserve some of the roasted pumpkin pieces before blending. Stir them back into the soup after blending for added dimension. Garnish Creatively: Beyond parsley and pumpkin seeds, consider topping your soup with a drizzle of balsamic reduction or a dollop of yogurt for an added flavor contrast. {{image_4}} To make a vegan version, simply swap the coconut milk for cashew cream. To make cashew cream, soak 1 cup of cashews in water for 4 hours. Drain and blend the cashews with 1 cup of water until smooth. This adds creaminess without dairy. You can also use almond milk for a lighter option. This soup is naturally gluten-free! Just ensure your vegetable broth is free from gluten. Check the label to be sure. You can enjoy this dish without any worries about gluten. For a spicy kick, add a pinch of cayenne pepper or red pepper flakes while cooking. This will bring warmth and depth to the soup. If you prefer herbal notes, try adding fresh thyme or rosemary during the simmering stage. These herbs enhance the soup's flavor and aroma, making it even more delightful. Adjust the spices based on your taste for a personalized touch. After enjoying your soup, let it cool to room temperature. Pour the soup into an airtight container. This helps keep the flavors fresh. You can store it in the fridge for up to five days. Make sure to seal the container well to avoid spills or odors. When you’re ready to enjoy your soup again, pour it into a pot. Heat it on low over the stove. Stir often to avoid burning. If the soup is too thick, add a bit of broth or water. Heat until it’s warm but not boiling. You can also use a microwave. Place the soup in a microwave-safe bowl and cover it loosely. Heat it for one to two minutes, stirring halfway through. To freeze your soup, let it cool completely first. Pour it into freezer-safe bags or containers. Leave some space at the top, as soup expands when frozen. Label the bags with the date. You can freeze the soup for up to three months. When ready to eat, thaw it in the fridge overnight or use the microwave. Reheat as mentioned before for a warm, creamy dish. You can swap coconut milk for heavy cream. This makes the soup rich and creamy. Another option is to use cashew cream. To make cashew cream, soak cashews in water for a few hours. Blend them with a bit of water until smooth. Add this to your soup for a creamy texture without coconut. Sugar pumpkins are the best choice for soup. They are sweeter and have a smooth texture. You can also use butternut squash or kabocha squash. Both provide a nice flavor and creamy consistency in your soup. Avoid using large pumpkins meant for carving, as they are watery and lack flavor. Yes, you can use canned pumpkin. It saves time and is very easy to use. Just make sure to use pure pumpkin and not pumpkin pie filling. For this recipe, use about 2 cups of canned pumpkin. Stir it in after cooking the onion and spices for a quick and tasty soup. You learned how to make delicious roasted pumpkin soup. We covered the ingredients, steps, and tips. You can adapt the recipe for different diets and tastes. Don't forget storage tips to keep leftovers fresh. This soup is simple and tasty, perfect for any meal. Enjoy making this warm dish, and share it with loved ones. Let this recipe be a staple in your kitchen. Happy cooking!

Roasted Pumpkin Soup Simple and Creamy Delight

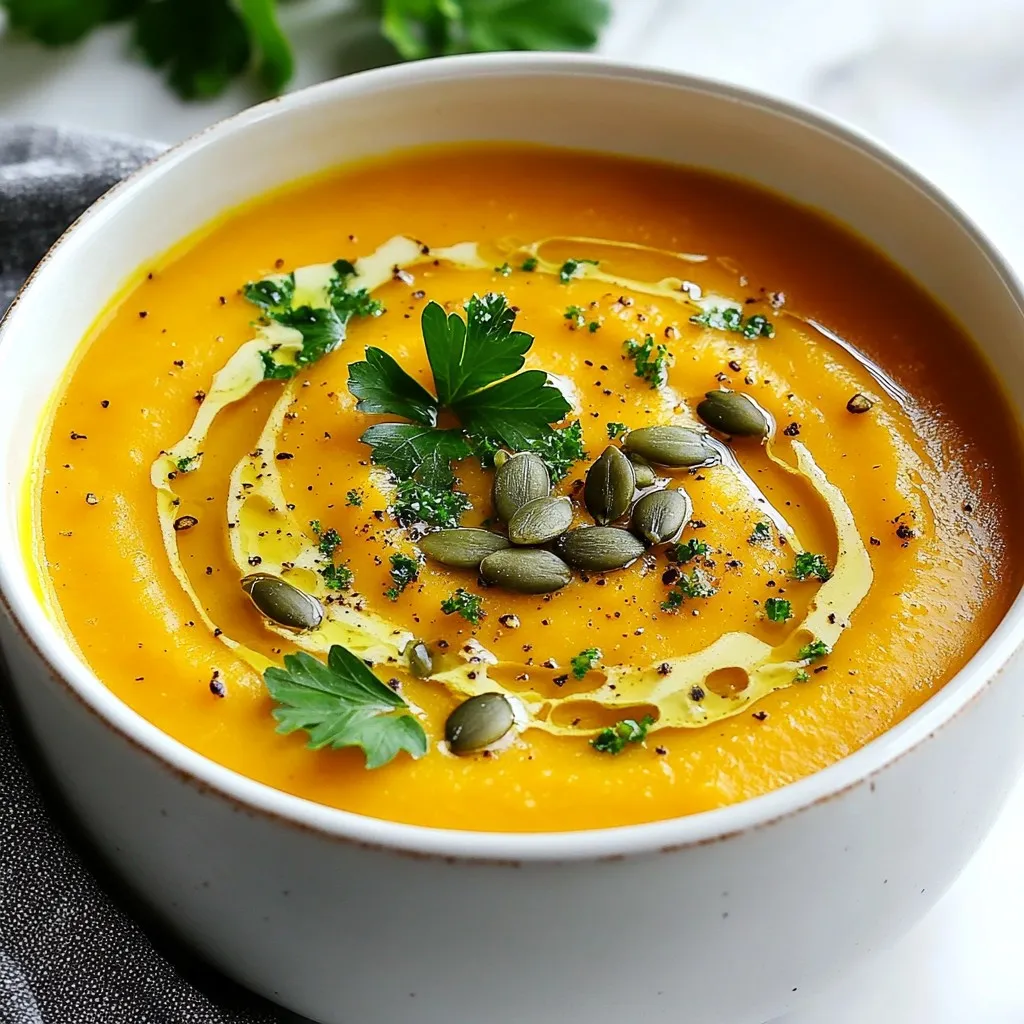
Welcome to my kitchen! Today, I’ll show you how to make a delicious, creamy Roasted Pumpkin Soup that’s easy for

- 1 lb ground beef or turkey - 8 oz spaghetti - 1 medium onion, diced finely - 2 cloves garlic, minced - 1 packet taco seasoning (about 1 oz) - 1 can (15 oz) black beans, rinsed and drained - 1 can (14 oz) diced tomatoes with green chilies - 2 cups beef or vegetable broth - 1 cup corn, frozen or canned - 1 cup shredded cheddar cheese - Fresh cilantro, chopped - Sliced jalapeños {{ingredient_image_2}} First, heat a large pot over medium heat. Add 1 pound of ground beef or turkey. Cook the meat for about 5-7 minutes, breaking it apart with a spatula. Make sure it’s browned and fully cooked. Next, add 1 medium onion, diced finely, and 2 cloves of minced garlic. Sauté them in the pot for about 3-4 minutes. The onion should turn soft and translucent. Stir occasionally to stop sticking. Now it’s time to add flavor! Mix in 1 packet of taco seasoning with the meat, onions, and garlic. Stir well and let it cook for about 1 minute. This helps the spices release their aroma. Pour in 1 can of diced tomatoes with green chilies, drained black beans, and 1 cup of corn. Stir everything well to combine. This mix adds great texture and taste. Add 8 ounces of spaghetti to the pot. If needed, break it in half to fit. Pour in 2 cups of beef or vegetable broth, making sure the spaghetti is covered. Bring the whole mix to a rolling boil. Once boiling, reduce the heat to low. Cover the pot with a lid and let it simmer for 12-15 minutes. Stir occasionally to ensure even cooking. The spaghetti should be al dente and most liquid absorbed. If there’s extra liquid, remove the lid and simmer for an extra 2-3 minutes. Stir gently to help evaporate the moisture. After cooking, sprinkle 1 cup of shredded cheddar cheese over the top. Cover the pot for a few minutes to let the cheese melt. Taste your dish and season with salt and pepper as needed. Serve your taco spaghetti hot, garnished with fresh cilantro and sliced jalapeños for extra spice! To make the best One Pot Taco Spaghetti, ensure your spaghetti is fully submerged in the broth. This helps it cook evenly. If you want a firmer bite, adjust the cooking time. Aim for al dente, which means the pasta is cooked but still has a slight chew. Do not be afraid to experiment with different cheeses. Cheddar is a classic, but try Monterey Jack or pepper jack for a fun twist. You can also add extra spices like cumin or chili powder to amp up the flavor. These little changes can make a big difference! For a great look, serve your taco spaghetti in deep bowls. Top each bowl with a dollop of sour cream or Greek yogurt. This adds creaminess and a nice contrast. Fresh cilantro makes a bright garnish, adding color and flavor. Sliced jalapeños can give a spicy kick if you enjoy heat! Pro Tips Cook Pasta Al Dente: Make sure not to overcook the spaghetti; it should be firm to the bite to hold up against the sauce. Use Fresh Ingredients: Opt for fresh garlic and onions to enhance the flavor of your dish, making it more aromatic and tasty. Customize Your Spice Level: Adjust the amount of taco seasoning or add fresh jalapeños according to your preference for heat. Save Some Cheese for Topping: Reserve a bit of shredded cheese to sprinkle on top before serving for an extra melty finish. {{image_4}} You can make this dish lighter by swapping ground beef for ground turkey. Turkey has less fat but still packs flavor. If you want to go even leaner, try a plant-based meat option. It tastes great and is kinder to the planet. Adding extra veggies can boost the nutrition too. Try some bell peppers, zucchini, or spinach. They add color and crunch, making your meal more vibrant. For a meatless meal, use lentils instead of ground meat. Lentils are rich in protein and fiber. They soak up the taco seasoning well, giving you that classic flavor. You can also explore other proteins, like chickpeas or black beans. These options are filling and add a nice texture to your dish. If you love heat, you can crank up the spice! Add hot sauce or more jalapeños to the mix. This will give your dish a nice kick. You can also choose a spicier taco seasoning. There are many brands out there, so pick one that suits your taste. This will make your One Pot Taco Spaghetti a real flavor explosion! To keep your One Pot Taco Spaghetti fresh, cool it quickly. Let it sit at room temperature for only 30 minutes. Once cool, transfer it to airtight containers. This helps keep out air and moisture. Use shallow containers to help it cool faster. If you want to save leftovers, freezing is a great option. First, allow the spaghetti to cool completely. Then, portion it into freezer-safe bags or containers. Make sure to remove as much air as possible. When you’re ready to eat, thaw it overnight in the fridge. To reheat, place the spaghetti in a pot with a splash of broth. Heat it on low, stirring often. This helps keep the pasta from sticking together. In the fridge, your taco spaghetti lasts about 3 to 4 days. If you freeze it, it can stay good for up to 3 months. Always check for signs of spoilage. Look for any off smells or changes in color. If it seems off, it’s best to toss it. To make One Pot Taco Spaghetti lighter, you can adjust a few ingredients. Start by using ground turkey instead of beef. Turkey has less fat and fewer calories. You can also add more vegetables, like bell peppers or zucchini. These add nutrients without many calories. Use low-sodium broth to reduce salt intake. Finally, consider using whole grain or gluten-free spaghetti for a healthier pasta option. Yes, you can prepare One Pot Taco Spaghetti in advance. Cook it as usual and let it cool. Then, store it in an airtight container in the fridge for up to three days. This makes it easy to grab for lunch or dinner. You can also freeze it for a month. Just make sure to thaw it in the fridge before reheating. The best way to reheat leftover Taco Spaghetti is on the stove. Place it in a pot over medium heat. Add a splash of broth or water to keep it moist. Stir it often to heat evenly. You can also use a microwave. Place it in a microwave-safe bowl and cover it. Heat it in short bursts, stirring in between, until it’s hot. This way, you keep the pasta’s texture nice! This blog post covered everything you need for One Pot Taco Spaghetti. We talked about ingredients like ground beef, spaghetti, and spices. I shared easy steps for cooking and tips to enhance flavor. You can also explore healthy swaps or spicy twists. Proper storage can keep your dish fresh for longer. Remember, this recipe is flexible and allows for creativity. Enjoy making your own tasty version!

One Pot Taco Spaghetti Flavorful and Quick Meal

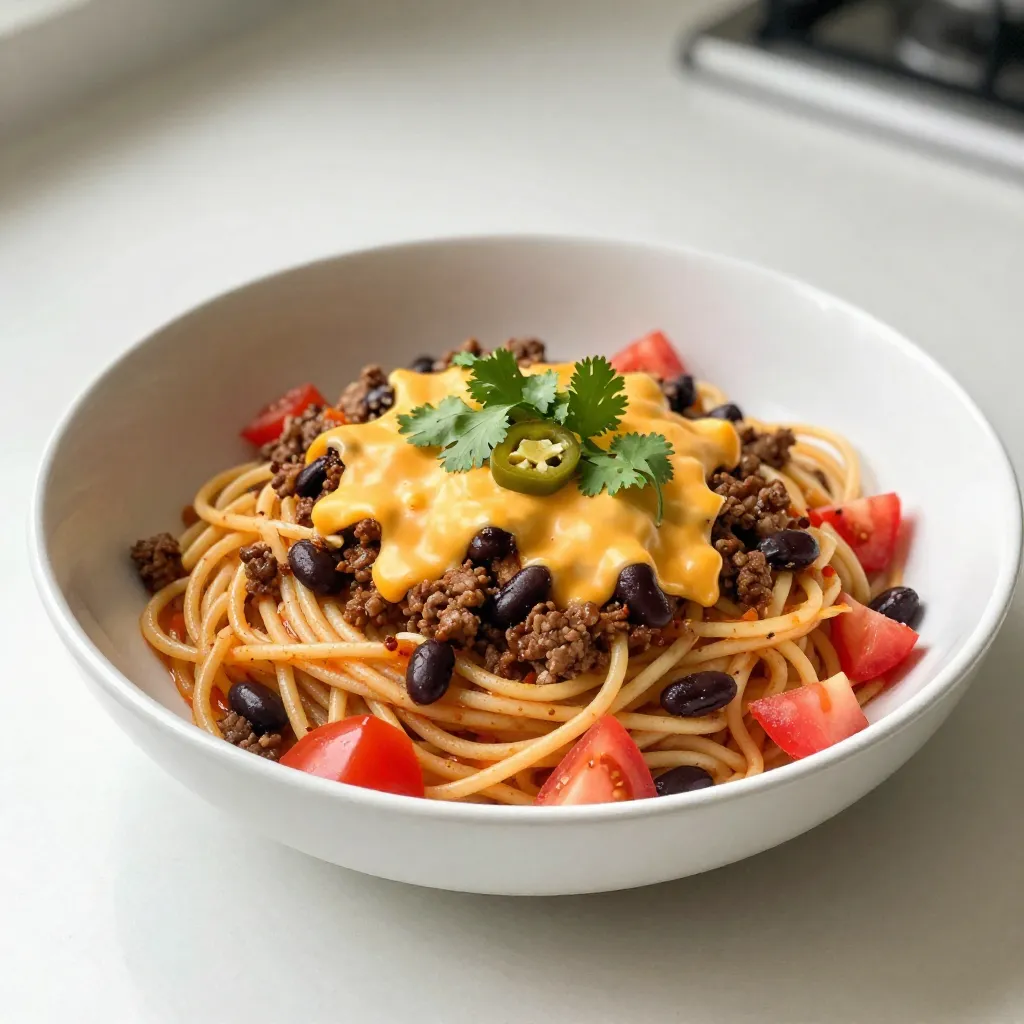
Looking for a quick and delicious meal? One Pot Taco Spaghetti is your answer! This easy recipe combines ground beef,

Older posts
Newer posts
← Previous Page1 … Page113 Page114 Page115 … Page120 Next →

dsad

© 2026 recipetorch • Built with GeneratePress

Our Policies

  • Copyright Policy
  • Cookie Policy
  • GDPR Policy
  • Privacy Policy
  • Disclaimer
  • Terms Of Use

More Information

  • Home
  • About
  • Contact
  • Appetizers
  • Dessert
  • Dinner
  • Drinks
©2026, recipetorch About Back To Top