Skip to content
DisclaimerTerms Of UseGDPR PolicyCookie Policy

recipetorch

  • Home
  • Drinks
  • Appetizers
  • Dinner
  • Dessert
  • About
  • Contact
  • Privacy Policy
DisclaimerTerms Of UseGDPR PolicyCookie Policy

Nicole

- 1 cup jasmine rice, cooked and cooled - 1 pound large shrimp, peeled and deveined - 2 tablespoons vegetable oil - 3 cloves garlic, minced - 1 small onion, finely chopped - 1 cup mixed bell peppers, diced (red, yellow, and green) - 1 cup frozen peas and carrots mix - 2 eggs, lightly beaten - 3 tablespoons soy sauce (preferably low sodium) - 2 tablespoons sriracha (adjust for heat preference) - Salt and black pepper, to taste - 2 green onions, chopped - Fresh cilantro, for garnish (optional) I love how simple yet flavorful this dish is. The jasmine rice adds a nice aroma and texture. Using large shrimp makes each bite satisfying. The garlic and onion create a great base flavor. I always add mixed bell peppers for color and crunch. The frozen peas and carrots bring sweetness and nutrition. For seasonings, soy sauce gives a savory touch. Sriracha adds a kick that you can adjust to your liking. Salt and black pepper enhance every bite. Don’t forget the garnishes! Chopped green onions add freshness. If you enjoy herbs, fresh cilantro is a great choice. It really brightens up the dish! {{ingredient_image_2}} To make spicy shrimp fried rice, start by cooking 1 cup of jasmine rice. Follow the package directions carefully. After cooking, spread the rice on a baking sheet. Let it cool completely. This is key to avoid sticky rice when frying. In a large skillet or wok, heat 1 tablespoon of vegetable oil over medium-high heat. Once the oil is hot, add 3 cloves of minced garlic and 1 small chopped onion. Sauté for 2-3 minutes. You want the garlic to smell great and the onion to turn clear. Next, raise the heat to high. Add 1 pound of peeled and deveined shrimp to the skillet. Season with salt and black pepper. Cook for about 2-3 minutes. Stir until the shrimp change to a pink color. Remove the shrimp from the skillet and set them aside. In the same skillet, add another tablespoon of vegetable oil. Toss in 1 cup of diced bell peppers and 1 cup of frozen peas and carrots. Stir-fry for about 3 minutes. Ensure the veggies are tender but still crisp and colorful. Push the vegetables to one side of the skillet. Pour in 2 lightly beaten eggs on the clear side. Scramble the eggs until they are fully cooked. Mix them with the vegetables after cooking. Lower the heat just a bit. Add the cooled jasmine rice into the skillet along with the cooked shrimp. Pour in 3 tablespoons of soy sauce and 2 tablespoons of sriracha. Stir-fry everything together for 3-4 minutes. Make sure the rice is hot and well mixed with the other flavors. Stir in 2 chopped green onions. Taste your fried rice. Adjust with more salt, pepper, or sriracha for extra heat if needed. Carefully transfer your spicy shrimp fried rice to a serving dish. For a nice finish, you can garnish with fresh cilantro if you like. Serve in bowls or on a platter. A wedge of lemon or lime on the side can make it look even better! To keep your fried rice from turning gummy, start with cooled jasmine rice. Cook the rice as the package says. After cooking, spread it on a baking sheet. Let it cool completely before using it in your dish. This helps each grain stay separate when frying. You can easily adjust the heat in your fried rice. Start with 2 tablespoons of sriracha. If you like it spicier, add more sriracha to taste. You can also serve extra sriracha on the side for anyone who wants more heat. To reduce spice, use less sriracha or add a bit more soy sauce. For the best shrimp, use large, fresh shrimp. Peel and devein them for a clean taste. When cooking, keep the heat high to cook them quickly. This keeps them juicy and tender. Avoid overcooking, as shrimp can become tough. Cook them just until they turn pink. Pro Tips Cooling the Rice: Allowing the jasmine rice to cool completely before frying helps to prevent it from becoming gummy and ensures a better texture in your fried rice. High Heat Cooking: Cooking on high heat when stir-frying is key. It helps to quickly sear the shrimp and vegetables, preserving their flavors and crispness. Adjusting Spice Levels: Feel free to adjust the amount of sriracha according to your heat preference. Start with less and add more as needed to find your perfect balance. Garnishing: Adding fresh cilantro and lime wedges not only enhances the presentation but also adds a refreshing flavor that complements the spiciness of the dish. {{image_4}} You can easily boost nutrition by adding extra vegetables. Try using: - Broccoli florets - Snap peas - Carrots - Zucchini These veggies add color and crunch to your fried rice. They also provide vitamins and minerals. Just make sure to chop them small, so they cook evenly. Stir-fry them with the bell peppers for the best results. If shrimp isn't your thing, you can swap it for other proteins. Chicken and tofu are great choices. - For chicken, use about 1 pound of diced breast. Cook it until golden brown. - For tofu, use firm or extra-firm tofu. Press it to remove water, then cube it. Sauté until crispy. Both options will pair well with the fried rice flavors. Adjust the cooking times to ensure everything is cooked perfectly. You can change the flavors by adding herbs and spices. Here are some ideas: - Fresh basil or cilantro will give a fresh taste. - Use ginger for a spicy kick. - Add lime juice for a zesty flavor. Feel free to experiment! Adjusting these ingredients can make this dish uniquely yours. Store your spicy shrimp fried rice in an airtight container. It stays fresh for up to three days in the fridge. Before sealing, let it cool to room temperature. This helps keep the rice from getting too mushy. When you’re ready to eat, just pull it out and let it warm up a bit. You can freeze this dish for longer storage. Use a freezer-safe container and pack it well. Make sure to leave some space for expansion. It can last for up to three months in the freezer. To thaw, place it in the fridge overnight before reheating. Reheat your fried rice in a skillet over medium heat. Add a splash of water or broth to keep it moist. Stir frequently to heat it evenly. You can also use the microwave. Heat in short bursts, stirring in between. This keeps the flavors bright and fresh. I recommend using jasmine rice. It has a nice aroma and a slightly sticky texture. This rice helps the dish taste great. Cook it ahead of time and let it cool. This step keeps the rice from getting mushy when frying. Yes, you can use frozen shrimp. Just make sure to thaw them first. You can place them in cold water for a quick thaw. Peeled and deveined shrimp work best. To reduce the heat, cut back on the sriracha. You can also skip it altogether. Instead, add a bit more soy sauce for flavor. Adding extra veggies can help balance the spice too. This dish pairs well with a light salad or steamed broccoli. You can also serve it with egg rolls or spring rolls. These sides will add a nice crunch and flavor. Absolutely! Spicy shrimp fried rice is perfect for meal prep. You can store it in airtight containers in the fridge. It stays fresh for up to 4 days. Reheat it in the microwave or on the stovetop. To sum up, we covered key steps to make spicy shrimp fried rice. You learned about essential ingredients, seasonings, and how to prepare the dish. I shared tips for cooking perfect rice and shrimp. You can explore variations with different proteins and veggies. Lastly, we discussed storage and reheating of leftovers. Now, you have all you need to make this tasty meal your own. Dive in and enjoy your cooking adventure!

Spicy Shrimp Fried Rice Flavorful and Quick Meal

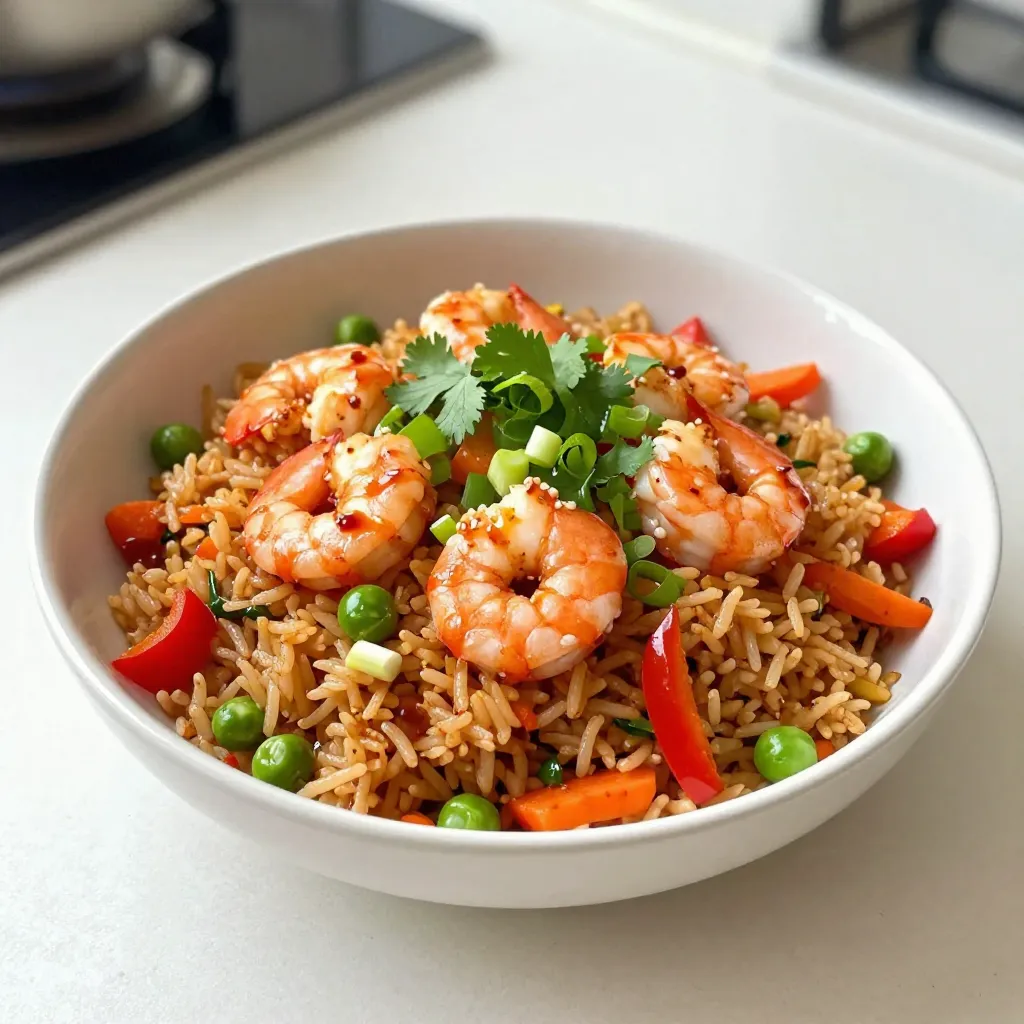
Looking for a quick meal that’s bursting with flavor? You’re in the right place! My Spicy Shrimp Fried Rice is

Here’s what you need to make these tasty strawberry shortcake cookies: - 1 cup all-purpose flour - 1/2 cup almond flour - 1/4 cup cornstarch - 1/2 teaspoon baking powder - 1/4 teaspoon baking soda - 1/4 teaspoon salt - 1/4 cup unsalted butter, softened at room temperature - 1/2 cup granulated sugar - 1 large egg, room temperature - 1 teaspoon pure vanilla extract - 1 cup fresh strawberries, hulled and chopped into small pieces - 1/2 cup whipped cream (for topping) - Additional fresh strawberries for garnish These ingredients create a cookie that’s soft, sweet, and full of strawberry flavor. The mix of all-purpose and almond flour gives a great texture. Cornstarch helps keep them tender. Butter adds a rich taste, while sugar sweetens the dough perfectly. Fresh strawberries bring a burst of fruity goodness. Topping with whipped cream makes them even better! When you gather these ingredients, make sure your strawberries are fresh and ripe. This will make your cookies even tastier. You can also prep everything before you start mixing. It makes the process smooth and easy! {{ingredient_image_2}} Start by preheating your oven to 350°F (175°C). This step is key for even baking. While the oven heats, grab a baking sheet and line it with parchment paper. This helps the cookies release easily. Next, combine your dry ingredients. In a medium bowl, mix together the all-purpose flour, almond flour, cornstarch, baking powder, baking soda, and salt. Whisk these together until they are well mixed. Set this bowl aside. Now it's time to cream the butter and sugar. In a large mixing bowl, add the softened butter and granulated sugar. Use an electric mixer on medium speed. Mix for about 3-4 minutes. The mixture should look light and fluffy. Add the large egg and pure vanilla extract to the butter and sugar mix. Blend until fully combined and smooth. This step adds richness to your cookies. Gradually add the dry ingredients to the wet ingredients. Use a spatula or wooden spoon to mix gently. Be careful not to overmix, as this can change the cookie's texture. Now, fold in the chopped fresh strawberries. Use a spatula to ensure they spread evenly throughout the dough. This will give your cookies a fresh fruit burst. Using a cookie scoop or tablespoon, drop the dough onto your prepared baking sheet. Space them about 2 inches apart. This allows room for spreading while baking. Place your baking sheet in the preheated oven. Bake the cookies for 12-15 minutes. Watch for the edges to turn lightly golden. Once baked, remove them from the oven. Let the cookies cool on the baking sheet for about 5 minutes. Then, transfer them to a wire rack to cool completely. Once the cookies are cool, it's time to add toppings. Spoon a generous dollop of whipped cream onto each cookie. For a beautiful finish, garnish with extra fresh strawberry slices on top. This not only looks good but adds more flavor too. - Avoiding cookie overmixing: When mixing your dough, stop as soon as it blends. Overmixing can make cookies tough. This happens when the gluten in flour develops too much. You want a tender cookie, so be gentle. - Achieving the perfect texture: For soft cookies, use room temperature butter. Cold butter makes cookies hard. When you cream butter and sugar, mix until fluffy. This adds air and makes cookies light. - Other options for toppings: While whipped cream is classic, you can try yogurt. Greek yogurt adds creaminess and a tangy taste. You can also drizzle chocolate or caramel sauce for a sweet twist. - Creative serving ideas: Serve cookies on a colorful plate. Add fresh mint leaves for a splash of color. You can stack them for a fun dessert tower. Pair with iced tea or lemonade for a refreshing treat. Pro Tips Use Fresh Strawberries: For the best flavor, always opt for fresh, ripe strawberries. They will enhance the taste of your cookies and provide a juicy burst in every bite. Don’t Overmix: When combining the wet and dry ingredients, mix just until incorporated. Overmixing can lead to tough cookies. Aim for a soft, slightly sticky dough. Chill the Dough: If time allows, chill the cookie dough for about 30 minutes before baking. This helps the cookies maintain their shape and enhances the flavors. Experiment with Flavors: Feel free to add a splash of lemon zest or almond extract for an extra layer of flavor. These additions can elevate your cookies to the next level. {{image_4}} For a gluten-free version, I recommend using gluten-free flour blends. Look for blends that include brown rice flour, potato starch, and tapioca flour. You can also try almond flour alone, but make sure to adjust the liquid in your recipe since it absorbs more moisture. Cornstarch works well too, so keep that as is. To make these cookies vegan, replace the egg with flaxseed meal or applesauce. For the butter, use coconut oil or vegan butter. Both options will give the cookies a nice texture without losing flavor. Just remember to cream the vegan butter and sugar together well for the best result. You can jazz up your strawberry shortcake cookies by adding nuts or chocolate chips. Chopped walnuts or pecans add a nice crunch. If you love chocolate, mix in some semi-sweet chocolate chips. Just fold them into your dough with the strawberries. You’ll have a burst of flavors in every bite! Store your strawberry shortcake cookies in an airtight container. This keeps them fresh for up to three days. Avoid direct sunlight or heat. A cool, dry place works best. If you want to keep them soft, place a slice of bread in the container. The cookies will stay moist and tasty. If you want to keep the cookies fresh longer, refrigerate them. Place them in an airtight container to avoid drying out. They can last up to a week in the fridge. Just remember to bring them to room temperature before serving. This helps regain their soft texture. Freezing these cookies is easy and a great way to save some for later. First, let the cookies cool completely. Then, place them in a single layer on a baking sheet. Freeze them for about an hour. Once frozen, move them to a freezer-safe bag or container. They can stay fresh for up to three months. When ready to eat, thaw them at room temperature for a few hours. Enjoy the delicious taste just like fresh cookies! How do I make the cookies softer? To make the cookies softer, try adding more butter. You can also use brown sugar instead of white sugar. Brown sugar adds moisture and a chewy texture. Can I use frozen strawberries? Yes, you can use frozen strawberries. Just make sure to thaw them first. Pat them dry with a paper towel to remove excess moisture, which helps keep the cookies from getting soggy. How long do the cookies last? These cookies last about 3 days at room temperature. For longer storage, keep them in an airtight container in the fridge for up to a week. What can I serve with strawberry shortcake cookies? These cookies pair well with whipped cream or ice cream. You can also serve them with fresh fruit or a sweet dip for added fun. Can I use coconut flour instead of almond flour? Coconut flour is not a direct substitute for almond flour. Use less coconut flour, as it absorbs more liquid. Start with 1/4 cup of coconut flour and adjust the liquid in the recipe. What is a suitable egg replacement? For an egg replacement, you can use 1/4 cup of unsweetened applesauce. This adds moisture and helps bind the cookies together. You can also use a flax egg, which is made from one tablespoon of ground flaxseed mixed with three tablespoons of water. In this post, we explored the key ingredients and simple steps to make delicious strawberry shortcake cookies. You learned how to mix, bake, and serve these treats. I shared tips for perfect texture and creative topping ideas. You also discovered variations for gluten-free and vegan options. These cookies are fun to make and enjoy. With fresh strawberries and whipped cream, they bring joy to any occasion. Now, gather your ingredients and start baking! You’ll love the results.

Strawberry Shortcake Cookies Easy and Tasty Delight

Looking for a sweet treat that’s both easy and delicious? You’re in the right place! In this article, I’ll share

- 1 cup rolled oats - 1 cup almond milk (or your choice of milk) - 1/2 cup Greek yogurt (plain or vanilla) - 1 tablespoon cream cheese, softened - 2 tablespoons honey or maple syrup (adjust to taste) - 1 teaspoon vanilla extract - 1/2 cup fresh strawberries, diced, plus extra for garnish - 2 tablespoons crushed graham crackers (for topping) - Optional: 1 tablespoon chia seeds The base of these Strawberry Cheesecake Overnight Oats is simple yet delicious. The rolled oats soak up the almond milk, making them soft and creamy. Greek yogurt adds a nice tang. Cream cheese enhances the cheesecake flavor, while honey or maple syrup brings sweetness. Each serving has about 300-350 calories. The oats provide fiber, which is good for digestion. Greek yogurt gives protein, which helps you feel full. Strawberries add vitamins and antioxidants, making this dish a healthy choice. The oats and yogurt contribute to a balanced meal, keeping you energized. Using almond milk keeps it lighter, and crushed graham crackers add a fun crunch. You can even add chia seeds for extra nutrition and texture. This meal is not just tasty; it’s a smart choice for breakfast or a snack! {{ingredient_image_2}} 1. First, grab a medium-sized mixing bowl. Add 1 cup of rolled oats and 1 cup of almond milk. 2. Stir the oats and milk well. Make sure every oat is fully submerged in the milk. This step helps the oats soften overnight. 1. In another bowl, mix 1/2 cup of Greek yogurt and 1 tablespoon of softened cream cheese. 2. Now, add 2 tablespoons of honey or maple syrup to sweeten the mix. You can adjust this to your taste. 3. Don’t forget 1 teaspoon of vanilla extract for extra flavor. If you like, you can add 1 tablespoon of chia seeds for texture. Whisk everything until it is smooth and creamy. 1. Gently pour the yogurt mixture into the oats. Fold them together with a spatula. 2. Carefully add 1/2 cup of diced strawberries. Save a few pieces to use as a topping later. 3. Spoon the mixture into jars or containers. Make sure each serving is even. 4. Seal the containers tightly and place them in the fridge overnight. This chilling time allows the flavors to blend well. 5. In the morning, stir the oats again to mix any settled ingredients. Top with the reserved strawberries and a sprinkle of crushed graham crackers for that cheesecake touch. Adjust the sweetness of your overnight oats to fit your taste. You can use honey or maple syrup. Start with two tablespoons, then add more if you want it sweeter. Choosing the right yogurt and cream cheese can make a big difference. Greek yogurt adds creaminess and protein. Cream cheese gives that rich cheesecake flavor. For a lighter option, use a low-fat version of each. Add chia seeds for a creamier texture. They soak up liquid and get soft. If you want to try something different, swap out rolled oats for quinoa or oat flour. Each option gives a unique taste and feel. Serve your oats in clear jars for a pretty look. You can layer the oats and strawberries. This way, everyone can see the tasty ingredients. For garnishing, top with the reserved strawberries and crushed graham crackers. Drizzle a bit of honey or maple syrup on top for a sweet touch. This makes your dish not just tasty but also beautiful! Pro Tips Use Fresh Strawberries: For the best flavor, opt for fresh strawberries rather than frozen. They add a beautiful texture and natural sweetness to your overnight oats. Adjust Sweetness to Taste: Depending on your preference, feel free to adjust the amount of honey or maple syrup. Start with less and add more after tasting the mixture. Chill Overnight: Allowing the oats to sit overnight is crucial for achieving the right texture. It helps the oats absorb the liquid and flavors, making for a creamy dish in the morning. Layer for Presentation: When serving, layer the oats and strawberries in a clear jar. This not only looks appealing but also enhances the eating experience by showcasing each ingredient. {{image_4}} You can have fun with flavors! Here are two tasty ideas: - Chocolate strawberry cheesecake oats: Add 2 tablespoons of cocoa powder to the yogurt mix. This gives a rich chocolate flavor. Swirl in some melted chocolate for extra indulgence. - Coconut strawberry cheesecake oats: Use coconut milk instead of almond milk. Add 2 tablespoons of shredded coconut for a tropical twist. You can easily adapt this recipe to fit your needs: - Gluten-free options: Use gluten-free oats. Check labels to ensure they are certified gluten-free. This way, you can enjoy your oats worry-free. - Vegan substitutions: Swap Greek yogurt for coconut yogurt. Use a dairy-free cream cheese. Substitute honey with maple syrup for a vegan-friendly sweetener. Toppings can make your oats even better: - Fruit toppings and nuts: Try adding nuts like almonds or walnuts for crunch. Fresh berries, like blueberries or raspberries, are great too. They add color and extra flavor. - Alternate crust-like additions: For a fun twist, sprinkle crushed nuts instead of graham crackers. Or use crushed cookie crumbs for a different taste. Overnight oats can last in the fridge for about 3 to 5 days. This makes them great for meal prep. To keep them fresh, use airtight containers. This helps prevent any odors from other foods. Stir them well before eating. If you notice any liquid on top, just mix it back in. You can freeze overnight oats if you want to store them longer. Just make sure to use freezer-safe containers. When you're ready to eat, thaw them overnight in the fridge. If you need them fast, you can use the microwave. Heat them in short bursts and stir in between. Enjoy your creamy, fruity treat! Yes, you can! Use almond milk or any nut milk as a dairy-free option. Oat milk and soy milk also work great. For the yogurt, swap Greek yogurt for a plant-based alternative. This option keeps your oats creamy and tasty. Let the oats sit for at least 4 hours. However, I recommend overnight soaking. This time allows the oats to soak up the milk and flavors. The result is a smooth and creamy texture that you’ll love. Yes, you can easily scale this recipe. For two servings, use 1 cup of oats and 1 cup of milk. To make four servings, double those amounts. Just make sure to adjust the yogurt, cream cheese, and sweetener too. This way, every bite stays delicious! In this post, I shared how to make delicious overnight cheesecake oats. We covered the key ingredients needed, including oats, yogurt, and strawberries. You now know how to prepare, assemble, and store your oats. Remember to adjust the flavors to suit your taste. Feel free to explore variations for different diets. Enjoy your tasty creation and share it with others. Discovering new ways to enjoy healthy foods is always fun. Get cooking!

Strawberry Cheesecake Overnight Oats Simple Delight

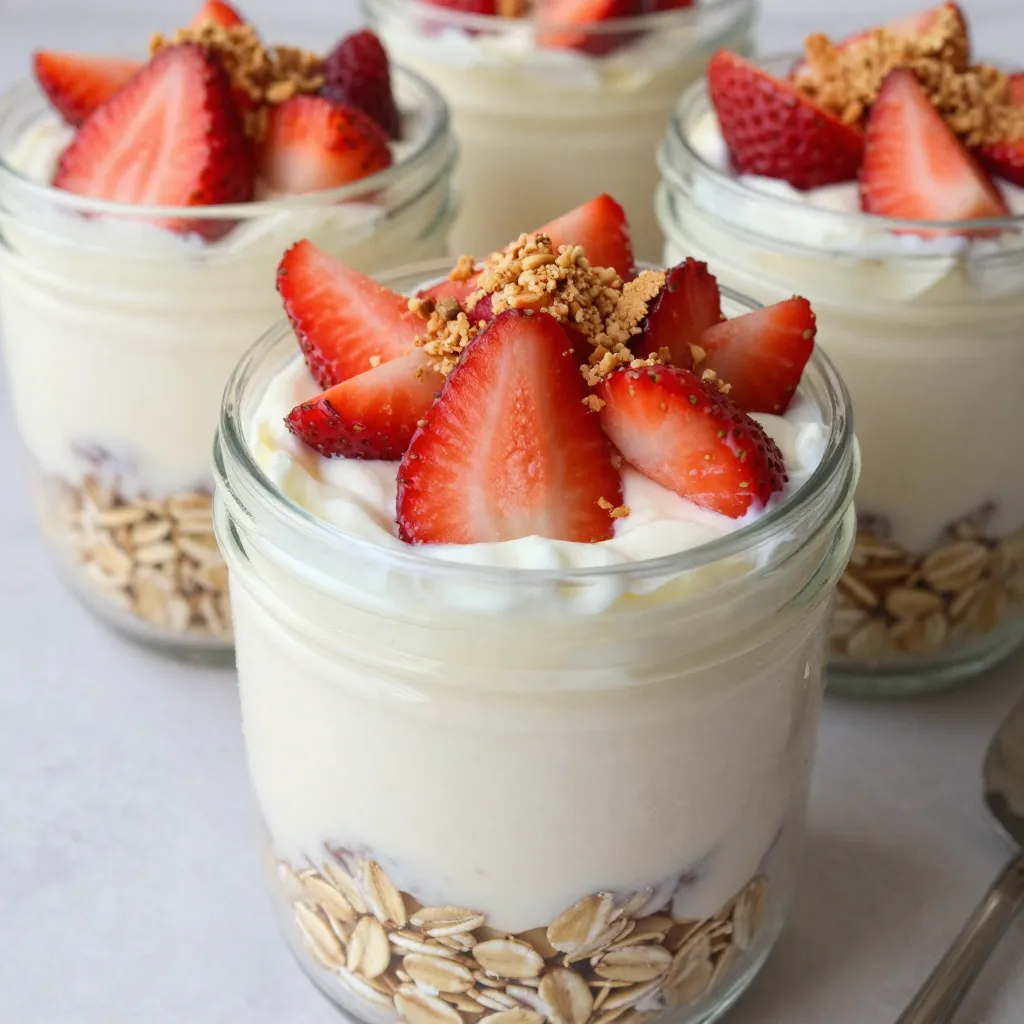
Are you ready to enjoy a delicious breakfast that tastes like dessert? Strawberry Cheesecake Overnight Oats are your answer! This

- 1 cup all-purpose flour - 1/2 cup unsweetened cocoa powder - 1 cup granulated sugar - 1 teaspoon baking powder - 1/2 teaspoon baking soda - 1/4 teaspoon salt - 1/2 cup unsalted butter, melted and slightly cooled - 2 large eggs, at room temperature - 1 teaspoon pure vanilla extract - 1/2 cup buttermilk, at room temperature - 1 cup fresh raspberries, rinsed and drained - 1/2 cup dark chocolate chips (preferably 60-70% cocoa) - Optional: powdered sugar for a delicate dusting - Powdered sugar: Adds a sweet touch and nice look. - Nuts: Walnuts or pecans add crunch and healthy fats. - Cinnamon: A sprinkle can boost flavor and warmth. - Gluten-Free Flour: Use this for a gluten-free option. - Dairy-Free Butter: Swap with coconut oil or vegan butter for a dairy-free treat. - Egg Substitute: Use flaxseed meal or applesauce for egg-free muffins. {{ingredient_image_2}} This blog post covered all the key steps to make perfect muffins. We discussed the ingredients, from essential measurements to optional adds that boost flavor. I shared tips for mixing and baking to achieve a great texture. We explored variations you can try and how to store muffins for lasting freshness. Remember, making muffins is simple and fun. With practice, you can create delicious treats your friends and family will love. Be bold and experiment with different flavors and textures!

Raspberry Dark Chocolate Muffins Delightful Treats

Looking to satisfy your sweet tooth with a simple and delicious treat? These Raspberry Dark Chocolate Muffins are sure to

To make this tasty dish, you need a few key items: - 4 bone-in, skin-on chicken thighs - 4 cloves garlic, finely minced - 2 tablespoons fresh rosemary, finely chopped - 2 tablespoons fresh thyme, finely chopped - 1 tablespoon fresh parsley, finely chopped - 1 lemon, zested and juiced - 3 tablespoons extra virgin olive oil - Salt and freshly cracked black pepper, to taste These ingredients work together to create a rich flavor that makes your meal shine. You can make this dish your own by adding a few optional items: - Fresh lemon wedges for serving These lemon wedges add a bright touch. They make the dish look great and taste fresh. This dish is not only delicious but also packed with good nutrients. Chicken thighs provide protein and healthy fats. Herbs like rosemary and thyme add antioxidants. The lemon juice brings vitamin C to the table. Each serving is balanced and satisfying, making it a great choice for a wholesome meal. {{ingredient_image_2}} First, heat your oven to 400°F (200°C). This step is crucial. A hot oven helps make the chicken crispy. While the oven warms, gather your ingredients for the marinade. You need garlic, rosemary, thyme, parsley, lemon juice, lemon zest, and olive oil. Mix these in a bowl. Stir them well. Add salt and pepper to taste. This mix will give your chicken a fresh taste. Next, take the chicken thighs and pat them dry using paper towels. This step helps the skin get crispy when cooked. Place the thighs in a large bowl or a resealable plastic bag. Pour the marinade over the chicken. Make sure every piece gets coated. If you use a bag, seal it tightly. Massage the marinade into the chicken gently. Let it sit for at least 30 minutes. If you have time, marinate for up to 2 hours in the fridge. This wait allows the flavors to soak in. Now, it’s time to cook! Heat a bit of olive oil in a large ovenproof skillet over medium-high heat. Once the oil is hot, add the chicken thighs, skin side down. Sear them for about 5-7 minutes. The skin should turn golden brown. Flip the thighs over carefully. Place the skillet in the oven. Roast for 20-25 minutes. The chicken is done when it reaches 165°F (75°C) inside. The juices should run clear. After cooking, take the skillet out of the oven and let the chicken rest for 5 minutes before serving. This resting time helps keep the chicken juicy. Marinating chicken is key for flavor. Use fresh herbs for the best taste. I like to mix garlic, rosemary, thyme, and parsley. These herbs bring a bright flavor. Add lemon juice and zest for a citrus twist. Let the chicken soak up the marinade for at least 30 minutes. If you have time, marinate it in the fridge for up to 2 hours. This makes the chicken even tastier. For crispy skin, start with dry chicken thighs. Pat them with paper towels to remove moisture. Searing the chicken on medium-high heat is vital. Cook skin side down for 5-7 minutes until golden brown. This step locks in the juices and makes the skin crispy. Once seared, finish cooking in the oven. This method gives you juicy chicken with a crispy skin. You can boost the flavor of garlic herb chicken in many ways. Consider adding spices like paprika or cayenne for a kick. For a smoky taste, try smoked paprika. A splash of white wine in the marinade can add depth. You can also garnish the dish with fresh herbs before serving. Lemon wedges not only look nice but also add freshness. Experiment with these ideas to make it your own! Pro Tips Marinate for Maximum Flavor: Allowing the chicken to marinate for at least 2 hours, or overnight if possible, enhances the flavor and tenderness of the meat. Ensure Crispy Skin: Patting the chicken thighs dry before applying the marinade helps achieve a crispy skin when seared and roasted. Use a Meat Thermometer: To ensure perfectly cooked chicken, use a meat thermometer to check that the internal temperature reaches 165°F (75°C). Let It Rest: Allow the chicken to rest for about 5 minutes after cooking to let the juices redistribute, resulting in moist and flavorful meat. {{image_4}} You can cook garlic herb chicken thighs in two great ways: the oven or the grill. The oven gives the chicken a nice, even cook. It also makes the skin crispy on the outside. You preheat your oven to 400°F (200°C). Sear the chicken first for a golden crust, then roast it. This method locks in juices and flavors. Grilling adds a smoky taste that many love. The grill gives the chicken a charred flavor that is hard to beat. Just make sure your grill is hot before adding the chicken. Cook each side until it’s golden and juicy. Both methods work well, so choose what suits you best! Herbs can change the taste of garlic herb chicken thighs. If you don’t have fresh rosemary, use dried rosemary. You can also swap it for sage or oregano. Thyme is versatile, so you can mix in basil or dill for a twist. Parsley adds freshness, but you can try cilantro for a different flavor. Get creative! Use what you have on hand. Fresh herbs work best, but dried herbs can also be great. Just remember, dried herbs are stronger, so use less. Adding citrus can brighten your dish. Use different fruits like lime or orange for a unique taste. Squeeze fresh juice over the chicken or mix it into the marinade. The zest enhances the flavor too. You can also add a bit of honey or mustard for sweetness and depth. This makes the chicken more exciting. Try mixing in chili flakes if you like heat. Each twist you add can turn a simple dish into a gourmet meal! After enjoying your garlic herb chicken thighs, let them cool. Place the chicken in an airtight container. If you have a lot, separate them into smaller portions. Store in the fridge for up to three days. This keeps them fresh and ready for later meals. To reheat your chicken thighs, use the oven. Preheat it to 350°F (175°C). Place the chicken on a baking sheet. Cover with foil to keep moisture in. Heat for about 15-20 minutes or until warm. Check the internal temperature reaches 165°F (75°C). This method keeps the skin crispy and juicy. If you want to save some for later, freezing is a great option. Wrap each thigh in plastic wrap. Then, place them in a freezer bag. Remove as much air as possible. Label the bag with the date. You can freeze them for up to three months. When ready to eat, thaw in the fridge overnight before reheating. You can serve Garlic Herb Chicken Thighs with many tasty sides. Here are some ideas: - Mashed potatoes - Roasted vegetables - Fresh green salad - Quinoa or rice - Garlic bread These sides pair well and add variety to your meal. They also soak up the chicken's flavors. You can mix and match to find your favorite combo. Yes, you can use boneless chicken thighs. They cook faster and are easier to eat. Just adjust the cooking time. Start with about 20 minutes in the oven. Ensure they reach 165°F (75°C) for safety. Boneless thighs absorb the flavors well too. To check if chicken thighs are done, use a meat thermometer. Insert it into the thickest part of the thigh. It should read 165°F (75°C). If you don't have a thermometer, cut into the meat. The juices should run clear, not pink. Let the chicken rest for about 5 minutes after cooking. This helps the juices stay inside and makes it juicy. In this blog post, I covered how to make garlic herb chicken thighs. We looked at essential and optional ingredients, along with the nutrition facts. I shared step-by-step instructions, marinating tips, and methods for crispy skin. I also explained various cooking options and storage tips. Cooking is fun and let’s you be creative. Try different herbs or cooking methods. Your chicken can be a hit at any meal. Enjoy every bite!

Garlic Herb Chicken Thighs Simple and Tasty Dish

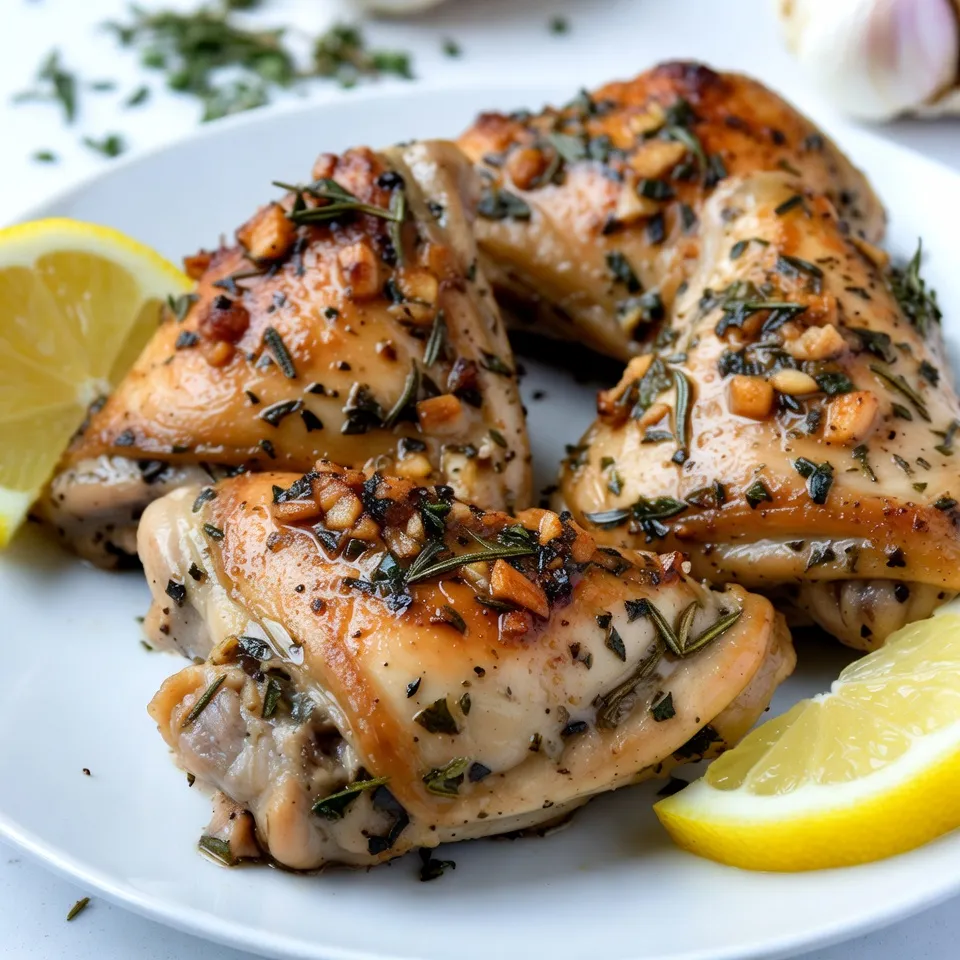
If you crave a dish that’s both simple and bursting with flavor, let me introduce you to Garlic Herb Chicken

- 1 cup rolled oats - 2 cups unsweetened almond milk - 2 tablespoons pure maple syrup - 1 teaspoon ground cinnamon - 1/2 teaspoon vanilla extract - 1/4 cup Greek yogurt - 1/4 cup chopped nuts (walnuts or pecans) - 1/2 cup diced apples To create maple cinnamon overnight oats, I use simple and wholesome ingredients. The rolled oats form the base. They soak up the almond milk, becoming soft and creamy by morning. I usually choose unsweetened almond milk, but any milk works well. Next, I add pure maple syrup to sweeten the oats naturally. It brings a rich flavor. A teaspoon of ground cinnamon adds warmth and spice. I also add a touch of vanilla extract for depth. For extra texture and flavor, I consider optional add-ins. A quarter cup of Greek yogurt makes the oats creamier. I love mixing in chopped nuts, like walnuts or pecans, for a satisfying crunch. Finally, I often add diced apples for freshness and sweetness. You can use fresh apples or cook them lightly for a softer bite. {{ingredient_image_2}} - In a medium bowl, combine 1 cup of rolled oats and 2 cups of unsweetened almond milk. - Add 2 tablespoons of pure maple syrup, 1 teaspoon of ground cinnamon, 1/2 teaspoon of vanilla extract, and a pinch of salt. - Whisk gently until well blended. This step is key to getting all the flavors mixed well. - If you want extra creaminess, stir in 1/4 cup of Greek yogurt now. This makes your oats rich and smooth. - Next, fold in 1/4 cup of chopped nuts and 1/2 cup of diced apples. This adds a nice crunch and sweetness to your oats. - Carefully portion the mixture into mason jars or airtight containers. Fill them to your liking. - Seal the jars tightly and place them in the refrigerator. Let them chill overnight. This allows the oats to soak up the flavors and become soft. When you wake up, your oats will be ready to enjoy! To get the best texture for your overnight oats, soak them for at least 4 hours. Overnight is even better. This lets the oats soak up the almond milk fully. When you wake up, give the oats a good stir. This makes them creamy and smooth. If you like them lighter, add a bit more milk while stirring. Layer your oats and toppings in jars for a fun look. Start with oats, then add diced apples, and top with nuts. This not only tastes good but also looks great. For a nice touch, add a fresh mint sprig or a sprinkle of extra chopped nuts on top. You can make your oats sweeter by adding more maple syrup. Taste as you go. If you want to try something different, use honey or agave syrup. These options can change the flavor and sweetness level to fit your taste. Pro Tips Use Old-Fashioned Rolled Oats: They absorb the liquid better and give a chewier texture compared to instant oats, making your overnight oats more satisfying. Experiment with Toppings: Feel free to switch up the nuts and fruits based on what’s in season or your personal preferences for a new flavor experience each time. Make Ahead in Batches: Prepare several jars at once to save time during busy mornings. They can last in the fridge for up to 5 days! Customize Sweetness: Adjust the amount of maple syrup to suit your taste. If you prefer less sweetness, start with one tablespoon and add more if needed. {{image_4}} You can change the flavor of your maple cinnamon overnight oats easily. Adding fruits like berries or bananas can give your oats a fresh taste. Simply mix in your favorite fruit when you prepare the oat mixture. The sweetness from the fruits pairs well with maple syrup. You can also add nut butters like almond or peanut. Just stir in a tablespoon or two when mixing the oats. This step not only adds a nutty taste but also boosts the protein content. If you want a dairy-free option, you have many choices. You can swap unsweetened almond milk for oat milk, coconut milk, or soy milk. Each type of milk brings its own unique flavor and texture. For Greek yogurt, you can use coconut yogurt or a nut-based yogurt. This change keeps the creamy texture while making it dairy-free. Using seasonal fruits can make your oats even more special. In the fall, try adding chopped pears or spiced pumpkin. In the summer, fresh peaches or strawberries can brighten your breakfast. You can also play with spices. During the holidays, add nutmeg or ginger for a festive twist. These small changes will make your oats feel new and exciting all year round. Overnight oats can last in the fridge for up to five days. This makes them perfect for meal prep. To tell if your oats have spoiled, check for an off smell or a change in texture. If they look slimy or have mold, it’s best to toss them out. You can freeze overnight oats for later use. To freeze, place your oats in an airtight container. Make sure to leave space at the top for expansion. When you’re ready to eat, thaw them in the fridge overnight. For the best texture, add a splash of milk after thawing. This helps restore creaminess. Making overnight oats in bulk saves time. You can prepare several servings at once. Portion them into individual jars for easy grab-and-go breakfasts. This way, you have a healthy meal ready whenever you need it. Top with fresh fruit or nuts just before eating for extra flavor. To make your overnight oats creamier, use these tips: - Add Greek yogurt for rich texture. - Use full-fat or creamier plant-based milk. - Blend the oats with milk before mixing. - Let them soak longer, up to 24 hours. These methods help the oats absorb more liquid, creating a smooth and silky blend. Yes, you can easily make these oats vegan. Here are some substitutions: - Replace Greek yogurt with a plant-based yogurt. - Choose almond milk or any nut milk. - Use maple syrup as the only sweetener. These swaps keep the oats tasty while maintaining a plant-based diet. Overnight oats offer several health benefits: - They are high in fiber, aiding digestion. - Oats contain protein, keeping you full longer. - They are rich in vitamins and minerals, supporting overall health. - Adding fruits boosts antioxidants, which are great for your body. Each serving provides a balanced breakfast, making it a smart choice for anyone. Overnight oats are easy to make and full of flavor. We covered the key ingredients like rolled oats and almond milk. You learned how to enhance flavors with maple syrup, cinnamon, and vanilla. Plus, you saw options for add-ins like Greek yogurt, nuts, and fruits. Final thoughts: With simple tweaks, overnight oats can suit your taste. They save time and result in a nutritious breakfast. Enjoy experimenting with flavors and textures. Your mornings will be brighter and more delicious!

Maple Cinnamon Overnight Oats Tasty and Simple Recipe

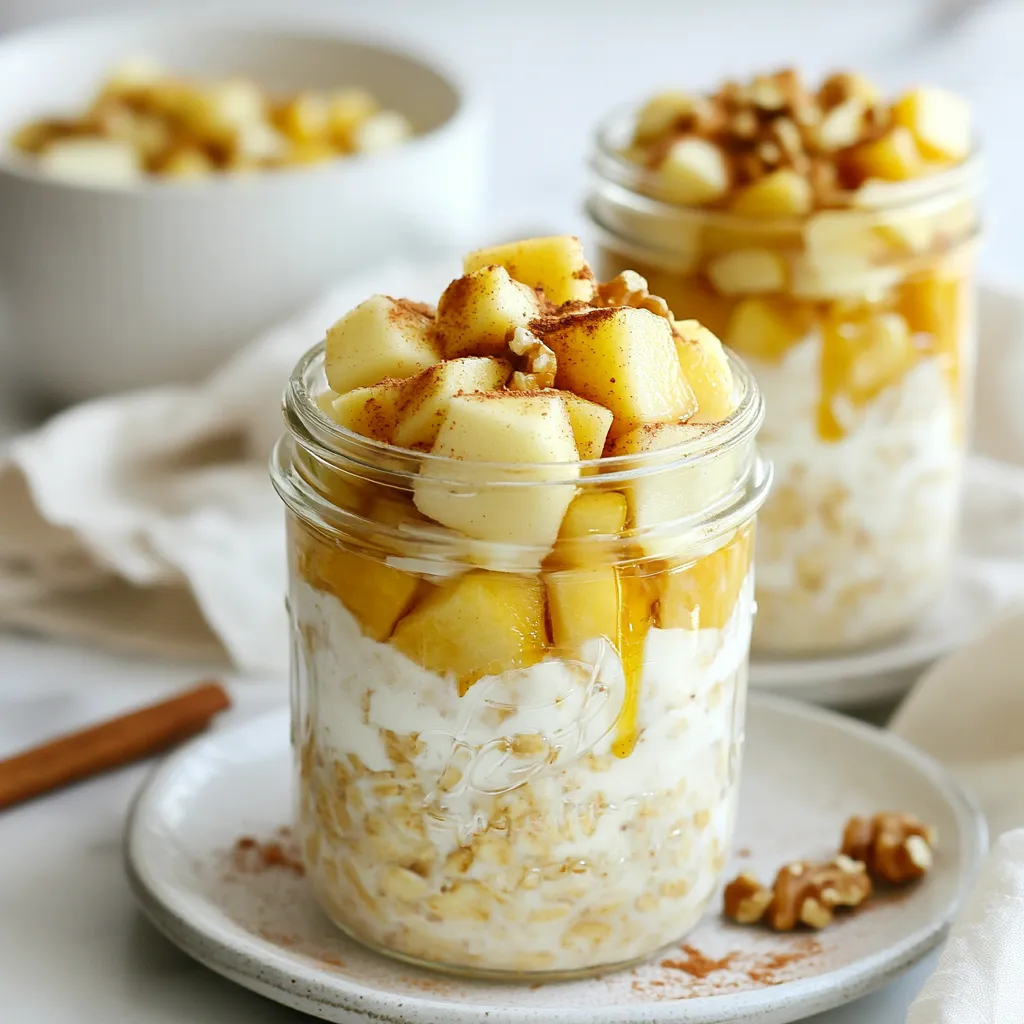
Start your day right with my simple Maple Cinnamon Overnight Oats! Packed with flavor and nutrition, this quick recipe uses

- 8 oz fettuccine or spaghetti - 1 lb flank steak, thinly sliced against the grain - 2 tablespoons olive oil, divided - 2 cloves garlic, minced - 1 red bell pepper, sliced into thin strips - 1 small zucchini, julienned - 1 teaspoon red pepper flakes (adjust based on your heat preference) - 3 tablespoons honey - 2 tablespoons soy sauce - 1 tablespoon rice vinegar - Salt and freshly ground black pepper, to taste - Fresh basil leaves for garnishing - Grated Parmesan cheese for serving (optional) - Ounces (oz) for pasta - Pounds (lb) for steak - Tablespoons (tbsp) for oil, honey, soy sauce, and vinegar - Teaspoon (tsp) for red pepper flakes - Cloves for garlic - Use chicken or shrimp instead of flank steak for a different protein. - Swap fettuccine for penne or gluten-free pasta if needed. - Replace honey with maple syrup for a vegan version. - Use bell peppers of any color for a new flavor. - For a spicy kick, try using sriracha instead of red pepper flakes. {{ingredient_image_2}} To start, fill a large pot with water and add a good pinch of salt. Bring the water to a boil. Add 8 oz of fettuccine or spaghetti to the pot. Cook it according to the package directions, usually 8-10 minutes, until it is al dente. Before draining, remember to save about 1/2 cup of the pasta water. Once it's ready, drain the pasta and set it aside. Next, take 1 lb of flank steak and slice it thinly against the grain. Season the beef with salt, black pepper, and red pepper flakes for some heat. Heat 1 tablespoon of olive oil in a large skillet over medium-high heat. Once hot, add the steak slices in a single layer. Cook them for about 2-3 minutes per side until they are browned. After cooking, remove the steak from the skillet and let it rest on a plate. Now, keep the same skillet on the heat. Add the remaining tablespoon of olive oil to the pan. Toss in 2 cloves of minced garlic and cook for about 30 seconds until it smells nice. Then, add in 1 sliced red bell pepper and 1 small julienned zucchini. Sauté these veggies for about 4-5 minutes. Stir them often until they are tender but still colorful. In a separate small bowl, mix together 3 tablespoons of honey, 2 tablespoons of soy sauce, and 1 tablespoon of rice vinegar. If you want more heat, add extra red pepper flakes. Pour this sauce over the sautéed vegetables in the skillet. Stir well to coat the veggies and heat everything through. Slice the rested steak into bite-sized pieces. Add the drained pasta and the steak to the skillet with the veggies and sauce. Gently toss everything together. Use the reserved pasta water a little at a time to help the sauce mix better and coat all the ingredients. Taste the dish and adjust the salt or pepper if needed. Serve this tasty pasta hot. You can garnish it with fresh basil leaves and sprinkle some grated Parmesan cheese on top if you like. Enjoy your sweet and spicy steak pasta! To cook steak perfectly, start with flank steak. It has a nice flavor and texture. Cut against the grain for tender bites. Season it with salt, pepper, and red pepper flakes. Heat the pan on medium-high. Add oil, then place steak slices in a single layer. Let them sear without moving for 2-3 minutes. Flip and repeat until browned. Remove and let it rest. This keeps it juicy and tasty. To change the spice in your dish, use red pepper flakes. Start with one teaspoon for a mild kick. If you want more heat, add more flakes. You can also add some sauce made with sriracha or chili paste. Mix in small amounts and taste as you go. This way, you can find the right heat for your taste. Cook pasta in a big pot with salted water. Bring the water to a boil before adding pasta. Follow the package instructions for timing, usually 8-10 minutes. To keep pasta from sticking, stir it occasionally. Before draining, save some pasta water. This water helps make the sauce creamy later. Drain and set the pasta aside until ready to mix with the other ingredients. Pro Tips Choose the Right Cut: Flank steak is ideal for this dish due to its flavor and texture. Make sure to slice it against the grain for maximum tenderness. Perfect Pasta Cooking: Always reserve some pasta water before draining. This starchy water can be used to adjust the sauce's consistency and help it cling to the pasta. Adjust the Heat Level: If you're sensitive to spice, start with less red pepper flakes in the steak seasoning and sauce. You can always add more to suit your taste. Fresh Herbs for Flavor: Garnishing with fresh basil not only adds a pop of color but also enhances the overall flavor profile of your dish. {{image_4}} You can make Sweet and Spicy Pasta without meat. Use mushrooms and bell peppers for a hearty bite. Swap the steak for 1 can of drained chickpeas for protein. Sauté the chickpeas with the vegetables. This will add a nice texture and flavor. To make this dish gluten-free, choose gluten-free pasta. Many brands offer great options made from rice or corn. Ensure the soy sauce is gluten-free too. This option keeps the taste while meeting dietary needs. If you want different protein, try shrimp or chicken. For shrimp, cook them the same way as the steak. For chicken, use thin slices and cook until golden. Both options bring a different flavor while keeping the dish fun and tasty. Store leftover Sweet and Spicy Steak Pasta in an airtight container. This keeps the dish fresh. It will last for about three to four days in the fridge. Make sure it cools down before sealing. This helps prevent moisture buildup. You can freeze this pasta dish if needed. First, let it cool completely. Then, place it in a freezer-safe container. Seal tightly to avoid freezer burn. It will stay good for up to three months. When ready to eat, thaw it in the fridge overnight. To reheat, use a skillet for the best results. Add a splash of water or broth to keep it moist. Heat over medium heat, stirring occasionally. You can also use a microwave. Cover it with a damp paper towel to keep it from drying out. Heat in short intervals, stirring in between. Enjoy your meal just like fresh! The best steak for this dish is flank steak. It has a nice flavor and cooks well when sliced thinly. You can also use skirt steak or sirloin if you prefer. Both options work nicely and add great taste. Yes, you can use any pasta you like. Fettuccine and spaghetti are my favorites, but penne or rigatoni also work. Choose a pasta that you enjoy and that holds sauce well. Just follow the cooking time on the package. To reduce the spice, use fewer red pepper flakes. You can start with half a teaspoon. If you want even less heat, leave out the red pepper flakes altogether. Honey adds sweetness, which can help balance any heat from the dish. This blog post covered all you need to cook a great pasta dish with steak. We explored ingredients, substitutions, and step-by-step cooking methods. You learned tips for perfect steak and how to tweak spice levels. We also discussed vegetarian and gluten-free options. Lastly, we shared storage and reheating info. With this guide, you can confidently prepare a delicious meal anytime. Enjoy experimenting and making it your own!

Sweet and Spicy Steak Pasta Flavorful Dinner Option

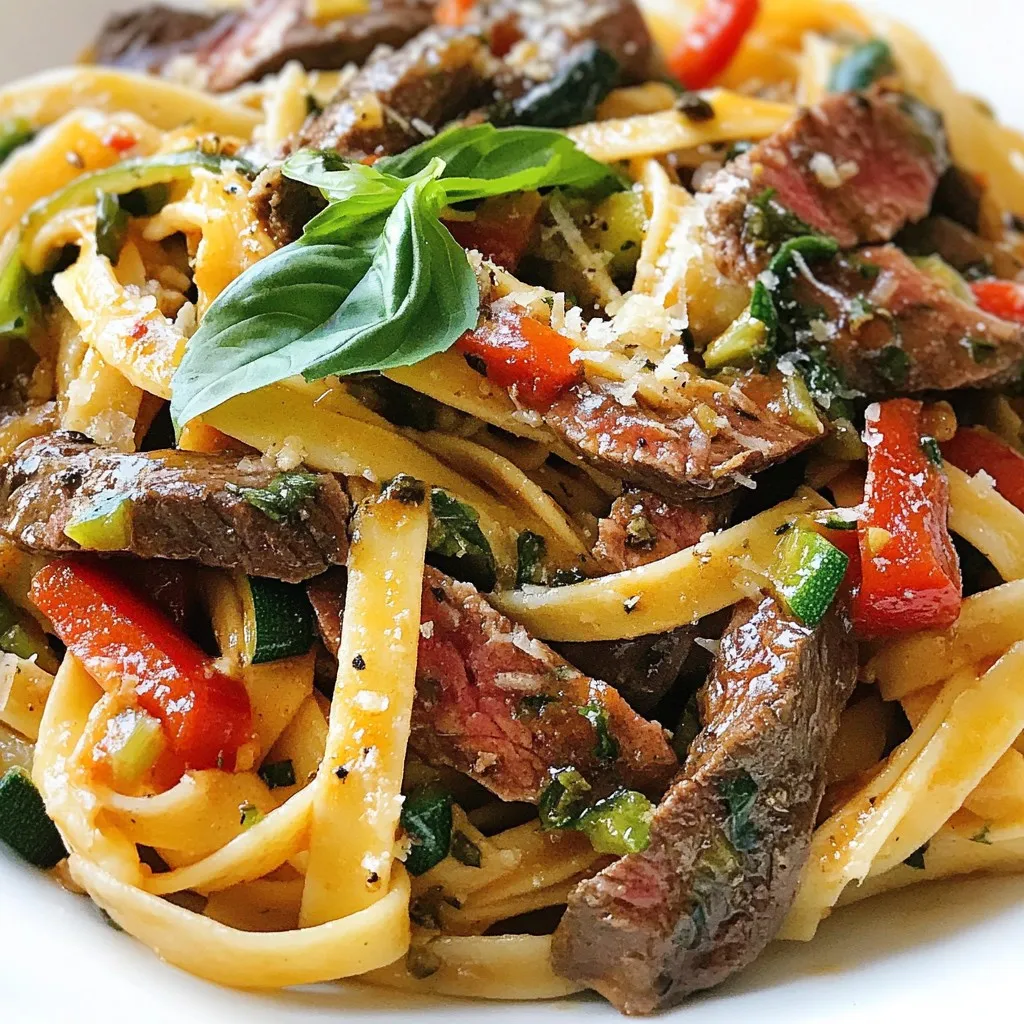
Looking for a dinner that packs a punch? Sweet and Spicy Steak Pasta is your answer! This dish blends tender

For this galette, you need 2 cups of fresh strawberries. Make sure to hull and slice them. Fresh strawberries give the best taste and color. They should be ripe and sweet. You can taste a slice to check their sweetness. You will also need a few other key ingredients: - 1 tablespoon granulated sugar: This adds sweetness to the strawberries. - 1 tablespoon fresh lemon juice: This brightens the flavor. - 1 tablespoon cornstarch: This helps thicken the juices. - 1 tablespoon fresh basil, finely chopped: This adds a unique, herbal touch. - 1 pre-made pie crust or galette dough: This makes your life easier. - 1 egg, beaten: This is for the egg wash to give shine. - 1 tablespoon coarse sugar: This is for sprinkling on top. For a nice finish, you might want to add some optional garnishes: - Fresh basil leaves: These look pretty and enhance flavor. - Creamy vanilla ice cream: This adds a rich, cold contrast to the warm galette. These ingredients combine to make a sweet and savory treat. The fresh strawberries and basil create a delightful balance. Enjoy gathering these items before you start cooking! {{ingredient_image_2}} Start by preheating your oven to 425°F (220°C). This is key for a crisp crust. A hot oven helps the dough cook evenly and rise well. In a bowl, mix 2 cups of fresh strawberries, 1 tablespoon of granulated sugar, 1 tablespoon of fresh lemon juice, 1 tablespoon of cornstarch, and 1 tablespoon of finely chopped basil. Toss gently so the strawberries get coated. Let it sit for about 10 minutes. This step helps the strawberries release their sweet juices. On a lightly floured surface, roll out your pie crust. Aim for a circle about 12 inches wide. Once rolled, carefully move the dough to a parchment-lined baking sheet. This will catch any juices that may drip while baking. Spoon your strawberry mix into the center of the dough. Leave a 2-inch border around the edges. This space allows for the beautiful folding that gives the galette its rustic charm. Using a pastry brush, apply the beaten egg to the edges of the dough. This makes the crust shiny and golden. Next, sprinkle 1 tablespoon of coarse sugar over the crust. This adds a delightful crunch and sweetness. Place the galette in your preheated oven. Bake for 25-30 minutes. Watch for a golden crust and bubbling filling. When done, take it out and let it cool for 10 minutes. This cooling helps the filling set and makes slicing easier. To get a great crust, use cold ingredients. I recommend chilling your pie crust for 30 minutes. This helps it stay flaky. Roll the dough on a lightly floured surface. Aim for a 12-inch circle. Don’t worry about making it perfect; rustic looks are charming! To bring out the best in your strawberries, mix them with sugar and lemon juice. This helps sweeten and brighten their flavor. Let the mixture sit for about 10 minutes. The juices will flow and create a tasty filling. Add finely chopped basil to give a fresh taste. Basil pairs well with strawberries, creating a lovely blend. When serving, slice the galette while warm. It looks great and tastes better that way! For a special touch, add fresh basil leaves or a scoop of ice cream. To store leftovers, place them in an airtight container. Keep it in the fridge for up to three days. You can reheat slices in the oven for a few minutes. Enjoy the flavors again! Pro Tips Use ripe strawberries: Ensure your strawberries are ripe and sweet for the best flavor. This will enhance the overall taste of the galette. Chill the dough: If your dough is warm, it may become difficult to handle. Chill it in the refrigerator for 15-20 minutes before rolling it out for easier manipulation. Experiment with herbs: Try adding other herbs like mint or thyme along with basil for a unique flavor twist that complements the strawberries beautifully. Serve with a drizzle: For an extra touch, drizzle the galette with balsamic reduction or honey before serving for added sweetness and sophistication. {{image_4}} You can mix things up with other herbs. Mint pairs well with strawberries. It adds a fresh twist. Thyme also works great, offering a unique taste. You can try rosemary too. Just use a small amount to avoid overpowering the fruit. Each herb brings its own charm to the galette. Experimenting lets you find your favorite flavor. If you need a gluten-free option, don’t worry! You can use gluten-free pie crusts. Many brands offer ready-made options. You can also make your own crust with almond flour or oat flour. Just follow the same steps for rolling and baking. Your galette will still be tasty and crispy. Feel free to swap strawberries for other fruits. Ripe peaches or nectarines are delightful in summer. In fall, use apples or pears for a warm flavor. You can even mix fruits, like strawberries and blueberries, for a colorful twist. Each fruit has its own sweetness and texture. This way, your galette stays fresh and fun all year! To keep your Strawberry Basil Galette fresh, store it in the fridge. Use an airtight container. This helps keep moisture in and prevents it from getting soggy. The galette stays good for about three days in the fridge. If you want to serve it later, make sure to cool it completely before storing. If you want to save your galette for later, freezing works great. First, let the galette cool down. Wrap it tightly in plastic wrap, then put it in a freezer bag. This helps prevent freezer burn. You can freeze it for up to two months. When you're ready to enjoy it, thaw it in the fridge overnight. To reheat your galette, preheat your oven to 350°F (175°C). Place the galette on a baking sheet. Heat it for about 10 to 15 minutes. This warms it up and keeps the crust crispy. You can also use the microwave, but it might make the crust soft. For best results, stick to the oven method. A galette is a free-form pie. It has a rustic look and is easy to make. Unlike a traditional pie, you do not need a pie pan. The dough wraps around the filling. This lets the fruit shine. It is a great way to enjoy fresh fruits, like strawberries. You can also use different fruits and flavors. Yes, you can use frozen strawberries. Just remember to thaw and drain them first. Frozen fruit may add extra moisture. This can change the texture of your galette. If you use frozen strawberries, add a bit more cornstarch. This will help thicken the juices. The galette lasts about 2-3 days at room temperature. Store it in a cool, dry place. You can also keep it in the fridge for up to 5 days. To enjoy it later, freeze the galette. Wrap it well before freezing. This keeps the flavor fresh for about 1-2 months. This blog post walked you through making a delicious strawberry galette. We explored fresh strawberries and key ingredients, along with optional garnishes to elevate your dessert. I provided clear steps, from preheating the oven to serving the galette. You learned vital tips for a perfect crust and creative flavor variations. Remember the storage info to enjoy your galette longer. With these insights, you can bake a lovely galette that impresses everyone. Enjoy the fun of creating this tasty treat!

Strawberry Basil Galette Fresh and Flavorful Delight

Looking for a sweet and savoury treat? This Strawberry Basil Galette is just the dish! With juicy strawberries paired with

- 6 large eggs - 1 ripe avocado - 2 tablespoons fresh lime juice - 1 tablespoon creamy Greek yogurt - 1 teaspoon Dijon mustard - Salt and freshly cracked black pepper to taste - 1 small jalapeño, finely chopped (optional) - Fresh cilantro leaves for garnish Gathering fresh ingredients is key to making these Avocado Lime Deviled Eggs shine. Start with six large eggs. They create the perfect base. Choose a ripe avocado. It should feel soft but not mushy. Fresh lime juice adds bright flavor. You can squeeze your own or use bottled juice. Next, grab creamy Greek yogurt. It gives a rich texture and tang. Dijon mustard adds a nice kick. Don’t forget salt and black pepper for seasoning. If you love heat, add a small jalapeño, finely chopped. Finally, fresh cilantro leaves act as a lovely garnish. These ingredients work together to create a creamy, zesty filling. Each bite is a burst of flavor. You can mix and match if you like. Enjoy this simple and fresh take on a classic dish! {{ingredient_image_2}} To make perfect hard-boiled eggs, start with a medium pot. Place the eggs inside and cover them with water. Bring the water to a rolling boil. Once it boils, cover the pot and take it off the heat. Let the eggs sit for exactly 12 minutes. This timing gives you that ideal hard-boiled texture. After the 12 minutes, move the eggs to a bowl of ice water. This ice water bath is key. It cools the eggs quickly and helps with peeling. Let them sit in the ice bath for 5 to 7 minutes. Once cooled, tap each egg gently on a hard surface to crack the shell. Peel the eggs under running water. This helps loosen the shell, making it easier to remove. Now, slice each egg in half lengthwise. Scoop the yolks into a mixing bowl. Add the ripe avocado, fresh lime juice, Greek yogurt, and Dijon mustard. Season with salt and pepper to taste. If you want a kick, add the finely chopped jalapeño. Mixing these ingredients together is key for a smooth filling. Use a fork or handheld mixer to mix until creamy. To fill the egg whites, use a spoon or piping bag. Fill each half with the avocado-lime mixture, making it nice and mounded. For garnish, sprinkle a pinch of extra salt on top if you like. Then, place a fresh cilantro leaf on each egg for a pop of color and flavor. - Overcooking eggs: This makes the yolks dry and crumbly. Stick to the 12-minute rule for perfect hard-boiled eggs. - Under-seasoning the filling: Avocado needs flavor. Don't skip the salt and pepper. Taste and adjust as needed. - Incorporating spices: Try adding smoked paprika or chili powder for a kick. A pinch can elevate the taste. - Alternatives to Greek yogurt: If you want a dairy-free option, use mashed avocado or silken tofu instead. This keeps the filling creamy. - Ideal accompaniments: These eggs pair well with fresh veggies, crackers, or tortilla chips. A crisp side salad adds freshness. - Presentation ideas: Serve on a colorful platter. Adding lime slices and a sprinkle of paprika can make the dish pop visually. Pro Tips Perfectly Boiled Eggs: For the best hard-boiled eggs, use eggs that are at least a week old. They are easier to peel than fresh eggs. Avocado Freshness: To keep your avocado filling from browning, use fresh lime juice as it acts as a natural preservative. Spice It Up: If you want extra heat, add more jalapeño or a dash of hot sauce to the filling mixture for a flavorful kick. Garnish Wisely: Fresh herbs like cilantro or even microgreens not only add color but also enhance the overall flavor of the deviled eggs. {{image_4}} You can easily change the flavor of your Avocado Lime Deviled Eggs. - Incorporate smoked paprika: Just sprinkle a bit on top. This adds a nice smokiness. - Use different herbs: Fresh dill or parsley can give a fresh twist. Try experimenting with your favorites. You can adjust this recipe to fit your diet. - Making it vegan: Swap the Greek yogurt for silken tofu or a vegan yogurt. This keeps it creamy and delicious. - Low-carb adjustments: Skip the yogurt and use more avocado. This will keep it low in carbs and rich in taste. There are fun ways to serve these deviled eggs. - Deviled eggs in a salad: Toss the egg halves in a salad for a tasty meal. Add greens, tomatoes, and your favorite dressing. - Avocado lime egg salad: Chop the eggs and mix with more avocado, lime juice, and herbs. This makes a great spread for sandwiches or crackers. To keep your avocado lime deviled eggs fresh, follow these steps: - Refrigeration: Place the filled deviled eggs in an airtight container. This helps prevent them from drying out. You can also cover them tightly with plastic wrap. Store them in the fridge for up to 3 days. - Freezing Options: I do not recommend freezing these deviled eggs. The avocado and yogurt can change texture when thawed, which may affect taste and quality. Understanding how long your deviled eggs last is key to enjoying them safely: - Freshness Timeline: When stored properly, deviled eggs can last in the fridge for about 3 days. If you notice any changes in smell or color, it’s best to toss them. - Signs of Spoilage: Watch for signs like an off smell, discoloration, or a slimy texture. If you notice any of these, throw them away to ensure your safety. Avocado Lime Deviled Eggs stay fresh for up to three days in the fridge. Store them in an airtight container to keep them from drying out. If they change color or smell off, it's best to toss them. Yes, you can make these deviled eggs ahead of time. Prepare them a day in advance and keep them in the fridge. Just add the garnish right before serving for the best look. If you don’t have Greek yogurt, use sour cream or plain yogurt. They add creaminess without changing the taste too much. You can also use avocado instead for a richer flavor. Jalapeños are optional. They add a nice kick but can be left out if you prefer a milder taste. Feel free to adjust the spice level to suit your taste. To check if an avocado is ripe, gently squeeze it. It should feel slightly soft but not mushy. The skin color can vary, so focus on the feel. If it’s hard, leave it out at room temperature for a few days. Making Avocado Lime Deviled Eggs is easy and fun. We covered the key steps: boiling, cooling, peeling, mixing, and filling. I shared tips to avoid mistakes and enhance flavor. You can also tweak the recipe for your diet or style. Remember to store your leftovers properly for freshness. Enjoy these tasty bites at your next event! With this guide, you're ready to impress friends and family. Keep experimenting to find your perfect mix. Happy cooking!

Avocado Lime Deviled Eggs Flavorful and Simple Recipe

Looking to jazz up your next gathering? Try my Avocado Lime Deviled Eggs! This simple recipe combines creamy avocado with

- 2 large flatbreads (whole wheat or gluten-free) - 1 cup marinara sauce (store-bought or homemade) - 1 1/2 cups shredded mozzarella cheese (or vegan cheese if desired) - 1/2 cup bell peppers (choose red, yellow, and green), diced - 1/2 cup red onion, thinly sliced - 1 cup cherry tomatoes, halved - 1/2 cup mushrooms, sliced (button or cremini work well) - 1/4 cup black olives, sliced (kalamata or regular) - 1 teaspoon dried oregano - 1 teaspoon dried basil - 1 tablespoon olive oil - Fresh basil leaves for garnish (optional but recommended) - Salt and pepper to taste You can change up your flatbread pizza. Try adding: - Spinach or kale for extra greens - Artichoke hearts for a unique flavor - Zucchini slices for more veggie goodness - Feta cheese or goat cheese for a tangy twist - Red pepper flakes for some heat This pizza is not just tasty; it’s also good for you! Here’s a quick look at the benefits: - Calories: Around 300-400 per serving, depending on toppings. - Protein: Good source from cheese and veggies. - Fiber: Whole wheat flatbread adds healthy fiber. - Vitamins: Packed with vitamins from colorful veggies. - Healthy Fats: Olive oil adds heart-healthy fats. Feel free to mix and match ingredients based on your tastes and what you have at home. This flexibility makes the Supreme Veggie Flatbread Pizza easy to love! {{ingredient_image_2}} 1. Preheat the Oven: Start by preheating your oven to 425°F (220°C). This ensures the flatbreads get crispy. 2. Prepare the Baking Sheet: Line a baking sheet with parchment paper. This makes cleanup easy and prevents sticking. 3. Arrange Flatbreads: Place the flatbreads side by side on the sheet. Leave space between them for even baking. 4. Spread the Sauce: Use a spatula or spoon to spread marinara sauce on each flatbread. Leave a small edge for the crust. 5. Add Cheese: Sprinkle shredded mozzarella cheese over the sauce evenly. This ensures every bite is cheesy. 6. Prepare the Veggie Topping: In a bowl, mix diced bell peppers, red onion, halved cherry tomatoes, sliced mushrooms, and black olives. 7. Season the Veggies: Drizzle olive oil on the veggies. Add dried oregano, dried basil, salt, and pepper. Toss the mixture until the veggies are coated. 8. Top the Flatbreads: Spread the seasoned veggie mix over the cheese on both flatbreads. Make it colorful and even. 9. Bake: Put the baking sheet in the oven. Bake for about 12-15 minutes. Look for melty cheese and golden edges. 10. Cool and Garnish: Take the flatbreads out of the oven. Let them cool for a minute to make slicing easier. 11. Slice and Serve: Garnish with fresh basil leaves. Slice the flatbreads into squares or triangles. Serve warm for the best taste. To get that perfect crisp, preheat your oven to 425°F (220°C). A hot oven helps the flatbreads bake evenly. Use a baking sheet lined with parchment paper to avoid sticking. This keeps the flatbread from getting soggy. Spread the marinara sauce thinly, leaving a small edge for the crust. Top with cheese, then add veggies. Bake for 12 to 15 minutes. Watch for golden edges and bubbly cheese. This way, you get a nice crunch in every bite. Feel free to mix and match toppings based on what you like or have on hand. Instead of bell peppers, try zucchini or spinach for a different taste. Swap out mozzarella for feta or goat cheese for a tangy twist. If you want a spicy kick, add jalapeños or crushed red pepper flakes. You can also replace black olives with artichoke hearts or sun-dried tomatoes. These swaps add new flavors and keep the dish fresh. If you have leftover flatbread pizza, let it cool completely before storing. Place it in an airtight container in the fridge. It will stay fresh for about three days. For longer storage, freeze the flatbread. Wrap it tightly in plastic wrap and then foil. This helps keep it from getting freezer burn. When you're ready to eat, reheat it in the oven for the best taste. Enjoy it warm for a quick meal! Pro Tips Use Fresh Veggies: Opt for fresh, seasonal vegetables to enhance the flavor and nutritional value of your pizza. Experiment with Cheeses: Try mixing different types of cheese like feta or goat cheese for a unique taste and texture. Make Your Own Sauce: For a richer flavor, consider making your own marinara sauce with fresh tomatoes, garlic, and herbs. Serve with Dips: Pair your flatbread pizza with homemade dips like tzatziki or hummus for an added layer of flavor. {{image_4}} For a gluten-free version, use gluten-free flatbreads. You can find them at most stores. If you want it vegan, swap out the cheese for a plant-based option. Vegan cheese melts well and adds flavor. Make sure your marinara sauce is also vegan. Many store brands fit the bill. This way, everyone can enjoy the pizza! You can mix and match toppings to fit your taste. Here are some ideas: - Spinach or kale for greens. - Artichoke hearts for a unique flavor. - Zucchini slices for extra crunch. - Feta cheese for a salty kick. Feel free to play with different herbs too. Fresh herbs can add a burst of flavor. Try fresh parsley or cilantro for a fresh twist. Seasonal veggies make this flatbread even better. In spring, use fresh asparagus and peas. Summer brings sweet corn and zucchini. Fall is perfect for roasted butternut squash and kale. In winter, go for hearty root veggies like carrots and beets. Using seasonal produce makes your meal fresh and fun. Plus, it supports local farmers! To keep your Supreme Veggie Flatbread Pizza fresh, let it cool first. Wrap each slice in plastic wrap or foil. Store the wrapped pizza in an airtight container. This helps keep moisture in, so your pizza stays tasty. Refrigerate for up to three days. Freezing is a great option for leftovers. First, cool the pizza completely. Then, wrap each slice tightly in plastic wrap. Place the wrapped slices in a freezer-safe bag or container. Make sure to label it with the date. You can freeze the pizza for up to two months. To reheat, use your oven for best results. Preheat your oven to 375°F (190°C). Place the slices on a baking sheet. Heat for about 10 minutes or until warm. This helps keep the crust crispy and cheese melty. If you're in a hurry, a microwave works too. Just heat for 30 seconds to 1 minute, but the crust may not be as crisp. Enjoy your delicious pizza! To make flatbread from scratch, you need just a few simple ingredients. Combine 2 cups of whole wheat flour, 1 teaspoon of salt, and 3/4 cup of warm water. Mix until it forms a dough. Knead for about five minutes until smooth. Let it rest for 30 minutes. Roll out the dough into flat circles. Cook them in a pan or bake them until golden. This homemade flatbread adds a nice touch to your pizza. For a veggie pizza, mozzarella cheese works great. It melts well and adds a creamy taste. You can also use provolone for a sharper flavor. If you want a vegan option, try cashew cheese or almond-based cheese. These alternatives provide a nice texture and taste without dairy. Experiment with different cheeses to find your favorite combination. Yes, you can use many sauces instead of marinara. Pesto is a tasty choice that adds a fresh, herby flavor. Alfredo sauce offers a creamy option for a richer taste. You might also try hummus for a unique twist. Each sauce brings its own flair to your flatbread pizza, so feel free to get creative! You now have a clear guide for making the best veggie flatbread pizza. We explored key ingredients, step-by-step cooking, and helpful tips. You can also customize your creation with seasonal toppings and dietary needs. Plus, we covered storage and reheating to keep leftovers fresh. With this knowledge, you can enjoy delicious, healthy meals any time. Embrace your cooking skills and have fun experimenting with flavors!

Supreme Veggie Flatbread Pizza Flavorful and Easy Recipe

Looking for a quick, tasty meal that’s packed with veggies? You’ve found it! My Supreme Veggie Flatbread Pizza is not

Older posts
Newer posts
← Previous Page1 … Page112 Page113 Page114 … Page120 Next →

dsad

© 2026 recipetorch • Built with GeneratePress

Our Policies

  • Copyright Policy
  • Cookie Policy
  • GDPR Policy
  • Privacy Policy
  • Disclaimer
  • Terms Of Use

More Information

  • Home
  • About
  • Contact
  • Appetizers
  • Dessert
  • Dinner
  • Drinks
©2026, recipetorch About Back To Top