Skip to content
DisclaimerTerms Of UseGDPR PolicyCookie Policy

recipetorch

  • Home
  • Drinks
  • Appetizers
  • Dinner
  • Dessert
  • About
  • Contact
  • Privacy Policy
DisclaimerTerms Of UseGDPR PolicyCookie Policy

Nicole

To make this rich and decadent treat, you will need: - 2 cups milk chocolate chips - 1 cup creamy peanut butter - 1/2 cup unsweetened cocoa powder - 1/4 cup sweetened condensed milk - 1 teaspoon pure vanilla extract - Pinch of fine sea salt - Chopped peanuts (optional, for topping) You can swap a few ingredients if you want to change the flavor. Here are some ideas: - Chocolate chips: Use dark chocolate or white chocolate chips. - Peanut butter: Try almond butter or cashew butter for a twist. - Sweetened condensed milk: Coconut milk can work as a dairy-free option. - Cocoa powder: You can skip this if you want a milder fudge. Toppings can make your fudge even better! Here are some fun options: - Chopped nuts like walnuts or pecans for crunch. - Sea salt flakes for a sweet and salty taste. - Mini marshmallows for a fun texture. - Drizzle with caramel or melted chocolate for extra sweetness. Adding your personal touch makes this fudge even more special! {{ingredient_image_2}} First, take an 8x8-inch baking dish. Line it with parchment paper. Make sure the paper hangs over the edges. This will help you lift out the fudge later. It’s an easy trick that saves time. Next, grab a medium saucepan. Add 2 cups of milk chocolate chips. Set the heat to low and melt them gently. Stir the chocolate often. This keeps it from burning. Once the chips melt, remove the pan from heat. Add 1 cup of creamy peanut butter. Mix them together until smooth and silky. Now, it’s time for more flavor. Add in the unsweetened cocoa powder, sweetened condensed milk, vanilla extract, and a pinch of sea salt. Stir these in well until everything is blended perfectly. Carefully pour your fudge mixture into the lined baking dish. Use a spatula to spread it evenly. Smooth the top for a nice finish. If you want some crunch, sprinkle chopped peanuts on top. Place the dish in the fridge. Let it chill for at least 2 hours. This helps the fudge set firm. When it’s ready, lift it out using the parchment paper. Cut it into 16 neat squares. Enjoy your rich and decadent treat! To melt chocolate well, use low heat. This keeps the chocolate smooth. Stir it often. This prevents burning. You can use a double boiler or a saucepan. If using a saucepan, add a little water to the pot. This helps create steam. Steam melts the chocolate without direct heat. If you notice lumps, keep stirring. Be patient; rushed melting can ruin your fudge. To get a smooth texture, mix the peanut butter in well. Use a strong spatula or spoon. Ensure the chocolate is hot but not boiling. Hot chocolate helps the peanut butter blend easier. After adding cocoa powder and milk, stir until it looks shiny. If it seems thick, don’t worry. It will smooth out when poured and set in the fridge. When serving fudge, cut it into neat squares. Place them on a pretty plate. Drizzle with melted chocolate for a fancy touch. You can also add whole chopped peanuts on top. This gives extra crunch and looks great. For a fun twist, serve with ice cream or fresh fruit. Enjoy your rich and decadent treat with friends or family! Pro Tips Use High-Quality Chocolate: For the best flavor, opt for high-quality milk chocolate chips. This will enhance the overall taste of your fudge. Let it Cool Gradually: After melting the chocolate, allow it to cool slightly before mixing in the peanut butter to prevent it from becoming too runny. Experiment with Add-Ins: Feel free to add other mix-ins like mini marshmallows, chocolate chunks, or even a swirl of caramel for added flavor and texture. Store Properly: Keep the fudge in an airtight container in the refrigerator for up to two weeks to maintain its freshness. {{image_4}} You can easily swap chocolate types in this fudge. Use dark chocolate for a richer taste. Dark chocolate adds depth and pairs well with peanut butter. If you prefer white chocolate, it creates a sweeter and creamier fudge. Just remember to adjust the cocoa powder to keep the balance right. Adding flavors can make your fudge even more fun! Try mixing in mint extract for a fresh twist. Just a few drops can brighten up your treat. If you love coffee, add espresso powder for a delightful kick. It enhances the chocolate flavor and makes it taste gourmet. You can also make this fudge vegan or healthier. Substitute milk chocolate with dairy-free chocolate chips. Use natural peanut butter without added sugar. For a healthier sweetener, try maple syrup instead of sweetened condensed milk. This way, you can enjoy fudge while sticking to your dietary needs! To keep your fudge fresh, store it in an airtight container. Make sure it is completely cool before sealing it. If you have leftovers, cut them into squares. Layer the fudge with parchment paper to avoid sticking. This method keeps the fudge from drying out. Chocolate peanut butter fudge lasts about one week at room temperature. If you want to keep it longer, you can freeze it. Wrap each piece in plastic wrap to prevent freezer burn. Place them in a freezer-safe bag. This way, the fudge can last up to three months. When you’re ready to eat, thaw it in the fridge overnight. If you want to enjoy your fudge warm, you can reheat it. Place a piece in the microwave for about 10 to 15 seconds. Check it often to avoid melting it too much. You can also warm it in a pan on low heat. Stir it gently to keep it smooth. Enjoy the rich and creamy taste all over again! Yes, you can make fudge without sweetened condensed milk. You can replace it with a mix of heavy cream and sugar. Use about 1/4 cup of heavy cream and add 2 tablespoons of sugar. This will give you a creamy texture. You can also use coconut cream for a dairy-free option. Just remember, the taste may change a bit. If you don’t have parchment paper, you can use aluminum foil. Grease it lightly with butter or oil. This will help the fudge lift out easily. You can also use wax paper, but it is less heat resistant. Always make sure to grease the paper for best results. If your fudge didn’t set, don't worry! You can reheat it gently in a saucepan. Add a little more sweetened condensed milk or a splash of cream. Stir until smooth, then pour it back into the pan. Chill it again for a few hours. This should help it firm up nicely. This blog post covered everything you need for delicious chocolate peanut butter fudge. We discussed key ingredients, substitutes, and the best ways to prepare your fudge. I shared tips for smooth texture and fun serving ideas. You can even try variations like dark chocolate or mint flavors. Remember to store your fudge properly to keep it fresh. With these steps, you can create tasty treats that impress everyone. Enjoy your fudge-making adventure!

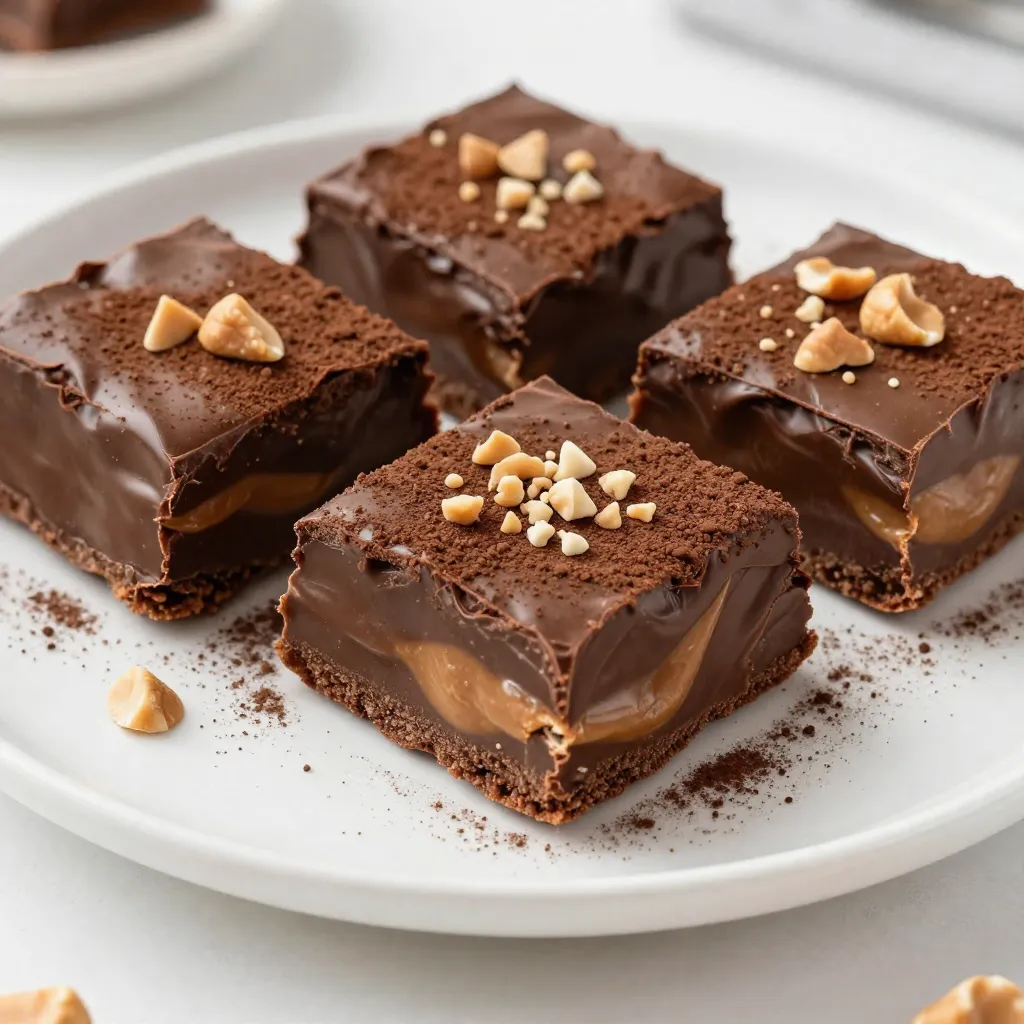
Chocolate Peanut Butter Fudge Rich and Decadent Treat

Ready to indulge in a rich and decadent treat? Chocolate peanut butter fudge is a simple yet luxurious delight that

- 2 cups all-purpose flour - 2 teaspoons baking powder - 1/2 teaspoon baking soda - 1/4 teaspoon salt - 1/2 teaspoon ground cinnamon - 3/4 cup granulated sugar - 1/4 cup unsalted butter, melted and slightly cooled - 2 large eggs, at room temperature - 1/2 cup buttermilk, at room temperature - 1 teaspoon pure vanilla extract - 1 cup pure maple syrup - 1/2 cup powdered sugar To start, gather your dry ingredients. All-purpose flour forms the base. Baking powder and baking soda help the donut holes rise. Salt adds flavor, while ground cinnamon gives warmth. Next, move on to the wet ingredients. Granulated sugar sweetens the batter. Melted unsalted butter brings richness. Use room-temperature eggs for better mixing. Buttermilk adds moisture and tang, and pure vanilla extract enhances the taste. Finally, for the glaze, pure maple syrup brings that iconic flavor. Powdered sugar gives the glaze a lovely texture. With these ingredients, you create a tasty treat that’s sure to please! {{ingredient_image_2}} Start by gathering your dry ingredients. In a large bowl, add the all-purpose flour, baking powder, baking soda, salt, and ground cinnamon. Use a whisk to mix them well. This helps to aerate the flour. Aerating makes the donut holes light and fluffy. Make sure there are no lumps left in the mixture. Next, you will blend the wet ingredients. In another bowl, combine the granulated sugar and melted butter. Whisk them together until the mix is smooth. Then, add the eggs, buttermilk, and vanilla extract. Keep whisking until everything is creamy and blended well. This step is key for a rich flavor. Now, it’s time to fry! Heat your oil in a deep fryer or a large pot over medium heat to 350°F (175°C). Use a kitchen thermometer to check the heat. When ready, use a small cookie scoop or a tablespoon to drop spoonfuls of the batter into the hot oil. Fry just a few at a time to avoid crowding. Cook for about 3-4 minutes or until they are golden brown. Turn them occasionally to cook evenly. Once the donut holes are golden, take them out with a slotted spoon. Place them on a plate lined with paper towels to soak up extra oil. While they are still warm, dip each donut hole into warm maple syrup. Let the excess syrup drip off. Then, roll them in powdered sugar for added sweetness. This gives them a lovely glaze that shines! To get the best glaze, start with the right frying temperature. Heat your oil to 350°F (175°C). Use a kitchen thermometer to check the temperature. This ensures the donut holes cook evenly and become golden brown. If the oil is too hot, the outside will burn before the inside cooks. If it is too cold, they will absorb more oil and become greasy. Mixing is key to fluffy donut holes. When you combine the wet and dry ingredients, do this gently. Stir just until you see no dry flour. It is okay if the batter has small lumps. Overmixing makes the donut holes tough. Remember, a light hand leads to fluffy treats. For a beautiful presentation, use a nice serving plate. Arrange the donut holes in a circle or stack them high. Dust them with extra powdered sugar for a sweet look. You can also add a small bowl of warm maple syrup for dipping. This adds fun and flavor to your treat. Pro Tips Use Room Temperature Ingredients: Ensure that your eggs and buttermilk are at room temperature before mixing. This helps create a smoother batter and improves the final texture of the donut holes. Check Oil Temperature: Use a kitchen thermometer to maintain the oil temperature at 350°F (175°C). Proper oil temperature is crucial for achieving perfectly golden and fluffy donut holes. Don't Overmix: When combining wet and dry ingredients, mix just until incorporated. Overmixing can lead to dense donut holes, so it's okay if the batter has a few lumps. Glaze While Warm: For the best glaze adherence, dip the donut holes in the maple syrup while they are still warm. This allows the syrup to soak in and enhances the flavor. {{image_4}} You can easily change the flavor of your donut holes. Just add spices or extracts. A pinch of nutmeg gives warmth. A teaspoon of almond extract adds a rich taste. Try adding cocoa powder for a chocolate twist. Each change gives a new fun vibe to your treats. While maple glaze is tasty, you can try different toppings too. A chocolate glaze can make them extra sweet. You could also sprinkle cinnamon sugar on top for a cozy feel. If you love fruits, a berry glaze can add a fresh touch. Use your favorite flavors to make each batch unique. Want lighter donut holes? You can swap some ingredients. Use whole wheat flour instead of all-purpose. You can also replace sugar with honey or maple sugar. For a lower-fat version, use applesauce instead of butter. These small swaps keep the taste while making them a bit healthier. To keep your donut holes fresh, store them in an airtight container. Place a paper towel in the container to absorb moisture. This helps prevent sogginess and keeps them soft. Store them at room temperature for up to two days. For longer storage, use the freezer. When it’s time to enjoy your donut holes again, reheating is key. The best way is to use an oven. Preheat your oven to 350°F (175°C). Place the donut holes on a baking sheet. Heat for about 5-7 minutes, or until warm. This method keeps them soft and tasty. Freezing donut holes is easy. First, let them cool completely. Then, arrange them in a single layer on a baking sheet. Freeze them for about an hour. Once frozen, transfer them to a freezer bag. They can stay frozen for up to three months. To thaw, transfer to the fridge overnight. Enjoy your freshly glazed treats anytime! Yes, you can prepare the dough ahead. Just cover the bowl with plastic wrap. Store it in the fridge for up to 24 hours. This helps the flavors blend. When ready, scoop and fry them fresh. You have a few easy options. You can mix regular milk with vinegar. Use one cup of milk and one tablespoon of vinegar. Let it sit for five minutes. You can also use yogurt mixed with water. This will give you a similar tangy taste. These donut holes will stay fresh for about two days at room temperature. Keep them in an airtight container. For longer storage, put them in the fridge for up to a week. The glaze may soften, but they will still taste great. Look for pure maple syrup at grocery stores. Many stores have it in the breakfast aisle. You can also check farmer’s markets or local shops. Always choose pure maple syrup for the best flavor. Avoid imitation syrups, as they lack that rich taste. We explored how to make delicious donut holes, starting with key ingredients. We talked about dry ingredients like flour, baking powder, and cinnamon, alongside essential wet ingredients such as butter and eggs. Then, I shared step-by-step instructions for mixing, frying, and glazing. With tips on achieving that perfect glaze and variations for fun flavors, you can enjoy these treats your way. Remember to store them right to keep them fresh. Now, you’re ready to create your own yummy donut holes! Happy cooking!

Maple Glazed Donut Holes Tasty and Simple Recipe

If you crave a sweet treat that’s easy to make, you’re in for a treat! These maple glazed donut holes

- 1 lb ground beef or turkey - 8 oz spaghetti - 1 medium onion, diced finely - 2 cloves garlic, minced - 1 packet taco seasoning (about 1 oz) - 1 can (15 oz) black beans, rinsed and drained - 1 can (14 oz) diced tomatoes with green chilies - 2 cups beef or vegetable broth - 1 cup corn, frozen or canned - 1 cup shredded cheddar cheese - Fresh cilantro, chopped - Sliced jalapeños {{ingredient_image_2}} First, heat a large pot over medium heat. Add 1 pound of ground beef or turkey. Cook the meat for about 5-7 minutes, breaking it apart with a spatula. Make sure it’s browned and fully cooked. Next, add 1 medium onion, diced finely, and 2 cloves of minced garlic. Sauté them in the pot for about 3-4 minutes. The onion should turn soft and translucent. Stir occasionally to stop sticking. Now it’s time to add flavor! Mix in 1 packet of taco seasoning with the meat, onions, and garlic. Stir well and let it cook for about 1 minute. This helps the spices release their aroma. Pour in 1 can of diced tomatoes with green chilies, drained black beans, and 1 cup of corn. Stir everything well to combine. This mix adds great texture and taste. Add 8 ounces of spaghetti to the pot. If needed, break it in half to fit. Pour in 2 cups of beef or vegetable broth, making sure the spaghetti is covered. Bring the whole mix to a rolling boil. Once boiling, reduce the heat to low. Cover the pot with a lid and let it simmer for 12-15 minutes. Stir occasionally to ensure even cooking. The spaghetti should be al dente and most liquid absorbed. If there’s extra liquid, remove the lid and simmer for an extra 2-3 minutes. Stir gently to help evaporate the moisture. After cooking, sprinkle 1 cup of shredded cheddar cheese over the top. Cover the pot for a few minutes to let the cheese melt. Taste your dish and season with salt and pepper as needed. Serve your taco spaghetti hot, garnished with fresh cilantro and sliced jalapeños for extra spice! To make the best One Pot Taco Spaghetti, ensure your spaghetti is fully submerged in the broth. This helps it cook evenly. If you want a firmer bite, adjust the cooking time. Aim for al dente, which means the pasta is cooked but still has a slight chew. Do not be afraid to experiment with different cheeses. Cheddar is a classic, but try Monterey Jack or pepper jack for a fun twist. You can also add extra spices like cumin or chili powder to amp up the flavor. These little changes can make a big difference! For a great look, serve your taco spaghetti in deep bowls. Top each bowl with a dollop of sour cream or Greek yogurt. This adds creaminess and a nice contrast. Fresh cilantro makes a bright garnish, adding color and flavor. Sliced jalapeños can give a spicy kick if you enjoy heat! Pro Tips Cook Pasta Al Dente: Make sure not to overcook the spaghetti; it should be firm to the bite to hold up against the sauce. Use Fresh Ingredients: Opt for fresh garlic and onions to enhance the flavor of your dish, making it more aromatic and tasty. Customize Your Spice Level: Adjust the amount of taco seasoning or add fresh jalapeños according to your preference for heat. Save Some Cheese for Topping: Reserve a bit of shredded cheese to sprinkle on top before serving for an extra melty finish. {{image_4}} You can make this dish lighter by swapping ground beef for ground turkey. Turkey has less fat but still packs flavor. If you want to go even leaner, try a plant-based meat option. It tastes great and is kinder to the planet. Adding extra veggies can boost the nutrition too. Try some bell peppers, zucchini, or spinach. They add color and crunch, making your meal more vibrant. For a meatless meal, use lentils instead of ground meat. Lentils are rich in protein and fiber. They soak up the taco seasoning well, giving you that classic flavor. You can also explore other proteins, like chickpeas or black beans. These options are filling and add a nice texture to your dish. If you love heat, you can crank up the spice! Add hot sauce or more jalapeños to the mix. This will give your dish a nice kick. You can also choose a spicier taco seasoning. There are many brands out there, so pick one that suits your taste. This will make your One Pot Taco Spaghetti a real flavor explosion! To keep your One Pot Taco Spaghetti fresh, cool it quickly. Let it sit at room temperature for only 30 minutes. Once cool, transfer it to airtight containers. This helps keep out air and moisture. Use shallow containers to help it cool faster. If you want to save leftovers, freezing is a great option. First, allow the spaghetti to cool completely. Then, portion it into freezer-safe bags or containers. Make sure to remove as much air as possible. When you’re ready to eat, thaw it overnight in the fridge. To reheat, place the spaghetti in a pot with a splash of broth. Heat it on low, stirring often. This helps keep the pasta from sticking together. In the fridge, your taco spaghetti lasts about 3 to 4 days. If you freeze it, it can stay good for up to 3 months. Always check for signs of spoilage. Look for any off smells or changes in color. If it seems off, it’s best to toss it. To make One Pot Taco Spaghetti lighter, you can adjust a few ingredients. Start by using ground turkey instead of beef. Turkey has less fat and fewer calories. You can also add more vegetables, like bell peppers or zucchini. These add nutrients without many calories. Use low-sodium broth to reduce salt intake. Finally, consider using whole grain or gluten-free spaghetti for a healthier pasta option. Yes, you can prepare One Pot Taco Spaghetti in advance. Cook it as usual and let it cool. Then, store it in an airtight container in the fridge for up to three days. This makes it easy to grab for lunch or dinner. You can also freeze it for a month. Just make sure to thaw it in the fridge before reheating. The best way to reheat leftover Taco Spaghetti is on the stove. Place it in a pot over medium heat. Add a splash of broth or water to keep it moist. Stir it often to heat evenly. You can also use a microwave. Place it in a microwave-safe bowl and cover it. Heat it in short bursts, stirring in between, until it’s hot. This way, you keep the pasta’s texture nice! This blog post covered everything you need for One Pot Taco Spaghetti. We talked about ingredients like ground beef, spaghetti, and spices. I shared easy steps for cooking and tips to enhance flavor. You can also explore healthy swaps or spicy twists. Proper storage can keep your dish fresh for longer. Remember, this recipe is flexible and allows for creativity. Enjoy making your own tasty version!

One Pot Taco Spaghetti Flavorful and Quick Meal

Looking for a quick and delicious meal? One Pot Taco Spaghetti is your answer! This easy recipe combines ground beef,

To make a yummy Strawberry Banana Smoothie Bowl, you need: - 2 ripe bananas, peeled and frozen - 1 cup strawberries, hulled and frozen - 1/2 cup almond milk (or any milk of your choice) - 1 tablespoon honey or maple syrup - 1 tablespoon chia seeds - 1/4 teaspoon vanilla extract These fresh ingredients create a smooth, creamy base. Frozen fruit gives it a chill and thick texture. The almond milk helps blend everything well. Sweeteners like honey or maple syrup add a touch of sweetness. Chia seeds boost nutrition and give it a nice texture. You can try some fun twists by adding: - Spinach or kale for added greens - A scoop of protein powder for an extra boost - Greek yogurt for creaminess and protein - Other frozen fruits like mango or blueberries These options let you customize your smoothie bowl. You can make it healthier or change the taste to suit your mood. Don’t be afraid to mix and match! To make your smoothie bowl look great and taste even better, top it with: - Fresh strawberries, sliced - Banana slices - Granola for crunch - Coconut flakes for sweetness - Chopped nuts for extra protein Toppings add color and texture. You can arrange them in fun patterns on top. A drizzle of honey or maple syrup can make it even sweeter. Get creative and enjoy your beautiful bowl! {{ingredient_image_2}} Start by gathering your ingredients. You need: - 2 ripe bananas, peeled and frozen - 1 cup strawberries, hulled and frozen - 1/2 cup almond milk (or any milk of your choice) - 1 tablespoon honey or maple syrup - 1 tablespoon chia seeds - 1/4 teaspoon vanilla extract - Toppings: fresh strawberries, sliced; banana slices; granola; coconut flakes; chopped nuts Make sure your bananas and strawberries are frozen. This gives your smoothie bowl a thick and creamy texture. Place the frozen bananas and strawberries into a blender. Add the almond milk, honey or maple syrup, chia seeds, and vanilla extract. Blend all the ingredients on high speed. Keep blending until the mix is smooth and creamy. Pause to scrape down the sides. You want a thick base that holds toppings well. Pour the blended smoothie into a bowl. Now comes the fun part—decorate your bowl! Start with a swirl of sliced strawberries and banana. Add a sprinkle of granola, coconut flakes, and chopped nuts. These toppings add flavor and texture. For extra sweetness, drizzle more honey or maple syrup on top. Grab a spoon and enjoy your vibrant, tasty smoothie bowl! To get the best texture, use frozen bananas and strawberries. These fruits make your smoothie thick and creamy. Start with two frozen bananas and one cup of frozen strawberries. Add half a cup of almond milk. Blend it all on high speed. If it seems too thick, add a bit more milk. You want a smooth mix that holds toppings without sinking. You can boost the flavor of your smoothie bowl. Try adding one tablespoon of chia seeds for a nutty touch. For sweetness, use a tablespoon of honey or maple syrup. A hint of vanilla extract also adds depth. If you want more fruitiness, consider adding a handful of spinach or kale. These greens blend well and add nutrients without changing the taste much. Making your smoothie bowl look great is fun! Pour the smoothie into a bowl first. Then, slice fresh strawberries and bananas to arrange on top. Add a sprinkle of granola for crunch. Coconut flakes and chopped nuts can add texture too. For a sweet finish, drizzle extra honey or syrup over everything. You can even create patterns with the fruit for a beautiful presentation. Pro Tips Use Fully Ripe Bananas: The riper the bananas, the sweeter and creamier your smoothie bowl will be. Look for bananas with plenty of brown spots for maximum flavor. Experiment with Milk Alternatives: While almond milk is great, feel free to substitute with coconut milk, oat milk, or any other dairy-free option to suit your taste. Chill Your Bowl: For an extra refreshing experience, chill your serving bowl in the freezer for a few minutes before adding the smoothie. This keeps it cool longer! Layer Your Toppings: For a visually appealing bowl, layer your toppings in a circular pattern or in rows. This not only looks great but allows for a mix of flavors in every bite! {{image_4}} You can have fun with your smoothie bowl by using other fruits. Try adding mangoes, blueberries, or peaches. Each fruit brings a new taste and color. You can mix and match to find your favorite flavor. I love using berries for a tart kick or pineapple for a tropical touch. Experiment with seasonal fruits for a fresh twist! To make your smoothie bowl dairy-free, choose almond milk or coconut milk. Both options taste great and keep it creamy. For a vegan sweetener, replace honey with maple syrup or agave nectar. This way, you can enjoy a delicious bowl that fits your diet while still being tasty and satisfying. Want to boost your protein? Add a scoop of protein powder to the mix. Greek yogurt is another great option if you eat dairy. It adds creaminess and protein. You can also sprinkle some chia seeds or hemp seeds on top. They are small but pack a protein punch. These extras will keep you feeling full and energized! If you have any leftover smoothie bowl, store it in the fridge. Use an airtight container. It will stay fresh for about one day. Smoothies taste best when fresh, so eat them soon! You can freeze extra smoothie bowl parts for later use. Freeze ripe bananas and strawberries in a single layer. Once frozen, transfer them to a bag. They can last for up to three months. When you're ready, blend them again for a quick smoothie bowl. Smoothie bowls are best enjoyed cold. If it melts a bit, just stir it well. You can add a splash of almond milk to refresh it. If it’s too thick, blend in a bit more milk. Enjoy your delicious bowl just like you made it! Yes, you can easily make a smoothie bowl without dairy. Use almond milk, coconut milk, or oat milk instead. These options keep the smoothie creamy and tasty. They also add different flavors. You can even try fruit juice for a fun twist. To make your smoothie bowl thicker, use frozen fruits like bananas and strawberries. Frozen fruits create a rich texture. You can also add less liquid, like almond milk. Another trick is to mix in chia seeds. They soak up liquid and help thicken your bowl. A strawberry banana smoothie bowl is packed with nutrients. Strawberries offer vitamin C and antioxidants. Bananas provide potassium and fiber. Chia seeds add omega-3 fatty acids and protein. This bowl is a great way to fuel your body with healthy goodness. Your smoothie bowl will last in the fridge for about one day. After that, it may lose its creamy texture. If you want to enjoy it later, store it in an airtight container. Just stir it well before eating to bring back its smoothness. You learned how to make a tasty smoothie bowl from fresh ingredients. We covered the steps for blending, assembling, and garnishing. Tips helped you get the right texture and perfect flavor. You also discovered fun variations to mix it up and storage tips to keep it fresh. Now, you can enjoy delicious smoothie bowls while being creative in your kitchen. Go ahead and try your own twists today!

Strawberry Banana Smoothie Bowl Dreamy and Delicious

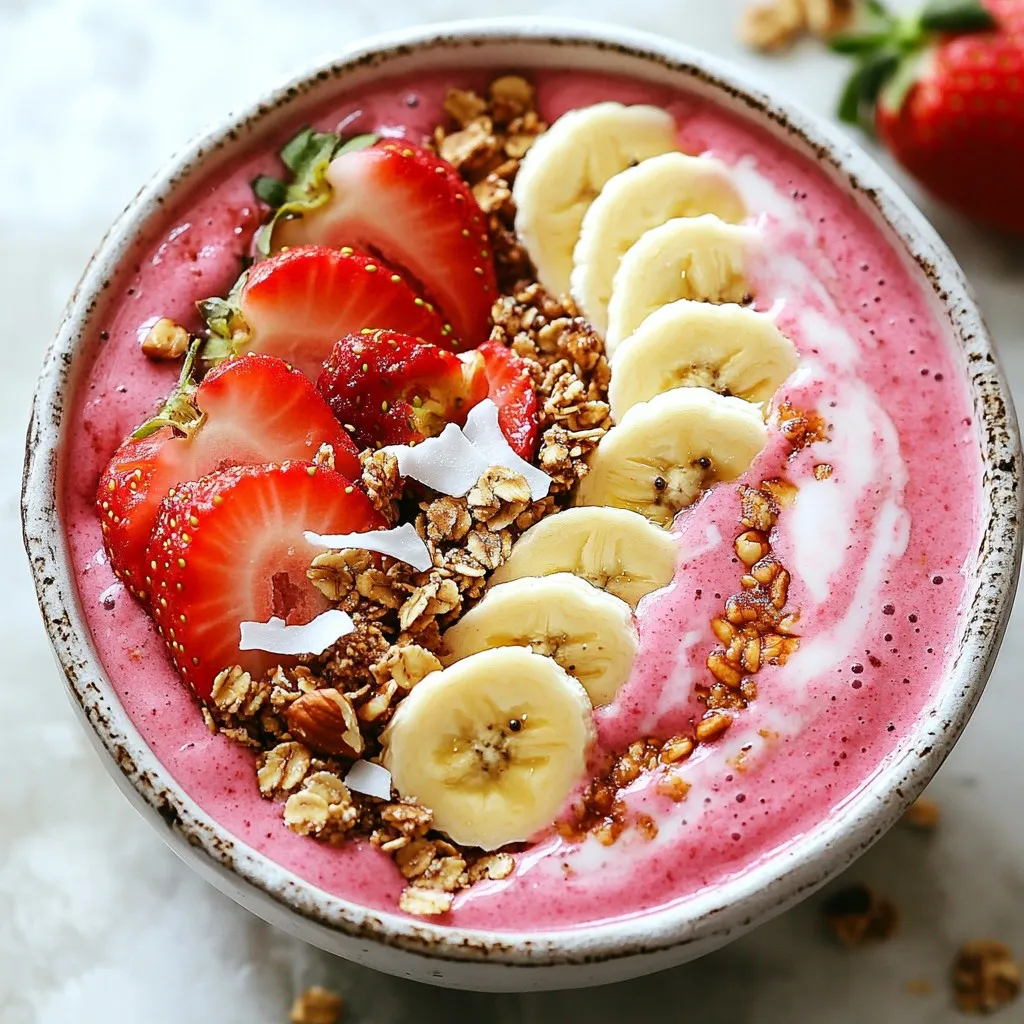
Are you ready to dive into a bowl of pure bliss? The Strawberry Banana Smoothie Bowl is not just tasty;

To make Creamy Sun-Dried Tomato Chicken, gather these key ingredients: - 4 boneless, skinless chicken breasts - 1 cup sun-dried tomatoes packed in oil, drained and roughly chopped - 1 cup heavy cream - 1 cup chicken broth - 1 cup fresh baby spinach - 3 cloves of garlic, minced - 1 teaspoon dried Italian herbs (a blend of oregano, basil, and thyme) - 1 tablespoon extra virgin olive oil - Salt and freshly ground black pepper, to taste - Freshly grated Parmesan cheese, for garnish - A handful of fresh basil leaves, for garnish These ingredients create a rich, creamy sauce that coats the chicken beautifully. You can change a few ingredients to suit your taste or what you have at home. - Chicken: Use chicken thighs for a juicier option. - Cream: Substitute with half-and-half for a lighter sauce. - Spinach: Kale or arugula work well if you want a different green. - Sun-Dried Tomatoes: Use roasted red peppers for a fresh twist. - Parmesan Cheese: Try Pecorino Romano for a sharper flavor. These swaps can still give you a delicious meal without losing the essence of the dish. To create this dish, you will need a few basic kitchen tools: - Large skillet: For searing chicken and making the sauce. - Tongs: To handle the chicken safely. - Cutting board: For chopping sun-dried tomatoes and garlic. - Chef's knife: For precise cutting. - Measuring cups: To measure out liquids and ingredients. - Wooden spoon: To stir the sauce and combine ingredients. Having these tools ready will make cooking smoother and more enjoyable. {{ingredient_image_2}} Start by seasoning the chicken breasts. Use salt and black pepper. Make sure to cover both sides. This step boosts the chicken's flavor. Set the seasoned chicken aside while you prepare to cook. Next, grab a large skillet. Heat extra virgin olive oil over medium-high heat. Wait until the oil shimmers. Carefully add the chicken breasts. Sear each side for 6-7 minutes. Look for a golden-brown crust. Once cooked through, remove the chicken from the skillet. Place it on a plate and cover it loosely. In the same skillet, add minced garlic. Sauté for about 30 seconds. You want it fragrant, not burnt. Then, add the chopped sun-dried tomatoes. Cook for 2 more minutes. This step helps the tomatoes soften and release their flavors. Now, pour in the chicken broth. Bring it to a gentle simmer. Let it reduce for about 3-4 minutes. This makes the flavors stronger. Reduce the heat to medium-low. Carefully stir in the heavy cream. Add the dried Italian herbs and mix well. Next, fold in the baby spinach. Let it wilt in the creamy sauce for about 2 minutes. Then, return the seared chicken to the skillet. Make sure to place it in the sauce. Let everything simmer together for 5 minutes. This step allows the chicken to soak up the flavors. Taste the sauce and adjust seasoning. Add more salt or pepper if needed. Finally, plate the chicken. Spoon the creamy sun-dried tomato sauce over it. Garnish with Parmesan cheese and fresh basil leaves. Enjoy your meal! To cook chicken well, start with fresh, thawed chicken breasts. Season them with salt and black pepper. Heat olive oil in the skillet until it shimmers. Sear the chicken for 6-7 minutes on each side. The chicken should be golden brown and cook through. Use a meat thermometer; it should read 165°F. Let the chicken rest after cooking. This keeps it juicy and flavorful. You can easily tweak the flavors in this dish. If you like it spicy, add crushed red pepper flakes when you add the garlic. Want it herbier? Toss in fresh herbs like thyme or rosemary. If you prefer a tangy flavor, add a splash of lemon juice at the end. Always taste the sauce before serving. Adjust salt and pepper to your liking. When making cream sauces, keep a few tips in mind. Always start with a good base, like sautéed garlic or onion. Stir in your cream slowly to avoid curdling. Simmer gently; high heat can separate it. If it gets too thick, add a bit more chicken broth to loosen it. Lastly, always finish with freshly grated cheese for a rich, creamy texture. Pro Tips Optimal Chicken Cooking: For perfectly juicy chicken, use a meat thermometer to ensure the internal temperature reaches 165°F (74°C). Flavor Boosting: For an extra depth of flavor, consider adding a splash of white wine to the skillet after sautéing the garlic, letting it reduce before adding the broth. Spinach Alternatives: If you're not a fan of spinach, feel free to substitute it with kale or arugula for a different taste and texture. Serving Suggestions: This dish pairs beautifully with a side of garlic bread or over a bed of fluffy rice to soak up the delicious sauce. {{image_4}} If you want a lighter dish, swap out some ingredients. Use chicken breast, which is leaner than thighs. You can also use low-fat cream instead of heavy cream. This change cuts calories but keeps the creaminess. For a dairy-free option, try coconut cream. It adds a nice flavor and richness. Mix things up by using different sauces. A pesto sauce gives a fresh taste. You can also try Alfredo sauce for a rich twist. For a tangy flavor, use a lemon-butter sauce. Each sauce brings a new vibe to your creamy sun-dried tomato chicken. Seasonal ingredients can enhance your dish. In spring, add fresh asparagus. In summer, try sweet cherry tomatoes. Fall calls for roasted pumpkin cubes. Winter is perfect for sautéed kale or Swiss chard. These add-ins boost nutrition and flavor, making the dish exciting all year round. To store your creamy sun-dried tomato chicken, let it cool first. Place leftovers in an airtight container. This keeps the chicken fresh and flavorful. Store it in the fridge for up to three days. Make sure to label the container with the date. When you're ready to enjoy leftovers, take them out of the fridge. You can reheat the chicken in a skillet over medium heat. Add a splash of chicken broth to keep it moist. Stir gently to heat evenly. You can also use a microwave. Heat in short intervals to avoid overcooking. If you want to save the dish for later, freezing works great! First, let the chicken cool completely. Then, place it in a freezer-safe container or bag. Remove as much air as you can. It can last in the freezer for up to three months. To enjoy, thaw it overnight in the fridge before reheating. Yes, you can use chicken thighs or drumsticks. These cuts add more flavor and stay juicy. Just adjust the cooking time, as they may need longer to cook through. Always check for doneness with a meat thermometer. Aim for 165°F (75°C) to ensure safety. This dish pairs well with many sides. Here are some tasty options: - Pasta: Toss with fettuccine or penne to soak up the sauce. - Rice: Serve over fluffy white or brown rice. - Bread: A crusty baguette is perfect for dipping. - Salad: Fresh greens with a light vinaigrette balance the creaminess. The total time for Creamy Sun-Dried Tomato Chicken is about 30 minutes. This includes a quick prep time of 15 minutes. Cooking takes another 15 minutes. It’s a great option for busy weeknights or special occasions. Enjoy your meal in under half an hour! This blog post covered the key ingredients for Creamy Sun-Dried Tomato Chicken and how to prepare it step by step. You learned about useful kitchen tools and tips for cooking perfectly tender chicken. We also explored fun variations and how to store your dish. Whether you want to impress guests or enjoy a cozy meal, this dish is simple and satisfying. With these insights, you can make a delicious meal that everyone will love. Enjoy your cooking adventure!

Creamy Sun-Dried Tomato Chicken Delicious Dinner Recipe

Are you ready to elevate your dinner game? Creamy Sun-Dried Tomato Chicken is a flavorful dish that combines juicy chicken,

- 1 cup cream cheese, softened to room temperature - 1/2 cup powdered sugar - 1 teaspoon pure vanilla extract - 1 cup heavy whipping cream - 1 cup fresh strawberries, hulled and finely diced - 1/2 teaspoon fresh lemon juice In this recipe, cream cheese is the star. It gives the dip its rich and creamy base. Use softened cream cheese for easy mixing. The powdered sugar adds sweetness without being too heavy. The vanilla extract brings warmth and flavor to the mix. Heavy whipping cream is key for that fluffy texture. It whips up nicely to make the dip light and airy. Fresh strawberries provide a burst of flavor and color. Dicing them adds a lovely texture. Finally, lemon juice keeps the strawberries bright and fresh. - Graham cracker crumbs for serving - Whole strawberries for garnish Graham cracker crumbs add a nice crunch. They also make the dip feel like a dessert. You can sprinkle them on top for extra flair. Whole strawberries can serve as a lovely garnish. They make your dip look even more appealing. Plus, they are fun to add as dippers! {{ingredient_image_2}} Start by gathering your ingredients. In a medium mixing bowl, add the softened cream cheese, powdered sugar, and vanilla extract. Use an electric mixer to beat the mixture on medium speed. Keep mixing until it becomes smooth and creamy. Make sure there are no lumps left. This step sets a great base for your dip. Next, grab a large mixing bowl. Pour in the heavy whipping cream. Use a whisk or an electric mixer to whip the cream on high speed. You want to whip it until stiff peaks form. Stiff peaks mean the cream is firm and holds its shape well. This will make your dip light and fluffy. Now it’s time to combine everything. Gently fold the whipped cream into the cream cheese mixture. Use a spatula or a wooden spoon for this step. Fold carefully to keep the air in the whipped cream. This will help keep the dip fluffy. In a small bowl, toss the diced strawberries with fresh lemon juice. This prevents browning and makes them taste even better. Now, gently fold the strawberries into your creamy dip. Be careful not to break them up too much. You want the dip to look pretty with nice pieces of fruit. Once combined, transfer the strawberry cheesecake dip into a serving bowl. Top it off with more diced strawberries and sprinkle graham cracker crumbs over the top. This adds texture and looks great. For an extra touch, chill the dip for 30 minutes before serving. This helps the flavors come together nicely. To get the best texture for your dip, be gentle when folding. This keeps the air in the whipped cream, making it light and fluffy. When you whip the cream, look for stiff peaks. This means the cream should stand tall without falling over. If you see that, you are ready to mix! For the best dippers, think about fresh fruits, graham crackers, and pretzels. These pair well with the creamy dip. To make your presentation shine, use a pretty bowl. Place whole strawberries around the bowl. This creates a lovely display that will catch eyes and smiles. Want to add more flavor? Try citrus zest, like lemon or orange. This gives a bright twist to your dip. You can also mix in other fruits. Chopped bananas or blueberries can make great additions. Get creative and have fun with flavors! Pro Tips Use Room Temperature Ingredients: Make sure your cream cheese is softened to room temperature for a smoother blend and creamier dip. Whip Cream to Stiff Peaks: When whipping the heavy cream, ensure that you reach stiff peaks so the dip maintains its fluffy texture. Fresh Strawberries: Use ripe, fresh strawberries for the best flavor; frozen strawberries can make the dip watery and affect texture. Chill Before Serving: Allowing the dip to chill in the refrigerator for at least 30 minutes enhances the flavors and makes it more refreshing. {{image_4}} You can switch up the classic dip in fun ways. One great option is the chocolate strawberry cheesecake dip. Just add melted chocolate to the cream cheese mix. This gives a rich, sweet twist. The chocolate pairs well with the strawberries, making each bite a treat. Another option is a Nutella-infused version. Mix in some Nutella with the cream cheese. This adds a hazelnut flavor, which is delightful. You still get the creaminess of the dip, but with a new taste. If you need dairy-free options, you can use vegan cream cheese. Many brands offer this, and it works well. You can also use coconut cream in place of heavy cream. Just whip it up like you would with regular cream for a rich texture. For low-sugar alternatives, consider using a sugar substitute. Options like stevia or erythritol can work great. Adjust the amount to taste, so the dip remains sweet but healthier. To keep your strawberry cheesecake dip fresh, you should store it in the fridge. Use an airtight container to prevent it from absorbing any strong scents. If you want to serve it later, a glass bowl with a tight lid works best. This keeps the dip creamy and tasty. Your dip can last about 3 to 5 days in the fridge. To know if it’s still good, look for a few signs. If you see any discoloration or a change in smell, it's time to toss it. Also, if the dip separates or becomes watery, it’s best to discard it. Enjoy it fresh for the best flavor! Yes, you can make this dip ahead of time! Prepare it up to one day before serving. Store it in an airtight container in the fridge. This way, the flavors blend well. Just give it a gentle stir before serving to mix everything back together. If you need a cream cheese substitute, try mascarpone or Greek yogurt. Both options provide a rich, creamy texture. You can also use vegan cream cheese for a dairy-free version. Just make sure the alternative is smooth to keep the dip creamy. Freezing this dip is not ideal, but you can do it. Place it in a freezer-safe container. It can last up to three months in the freezer. When you want to eat it, let it thaw in the fridge overnight. After thawing, stir well before serving. The texture may change a bit, but it will still taste great! This blog post covered how to make a delicious strawberry cheesecake dip. We discussed key ingredients like cream cheese, strawberries, and heavy cream. I shared step-by-step instructions to achieve the right consistency and texture. You can tweak the flavors and make it fit any diet. Remember to store the dip properly, so it stays fresh. Now, it’s your turn to create this tasty treat. Enjoy sharing it with family and friends.

Strawberry Cheesecake Dip Irresistible and Easy Recipe

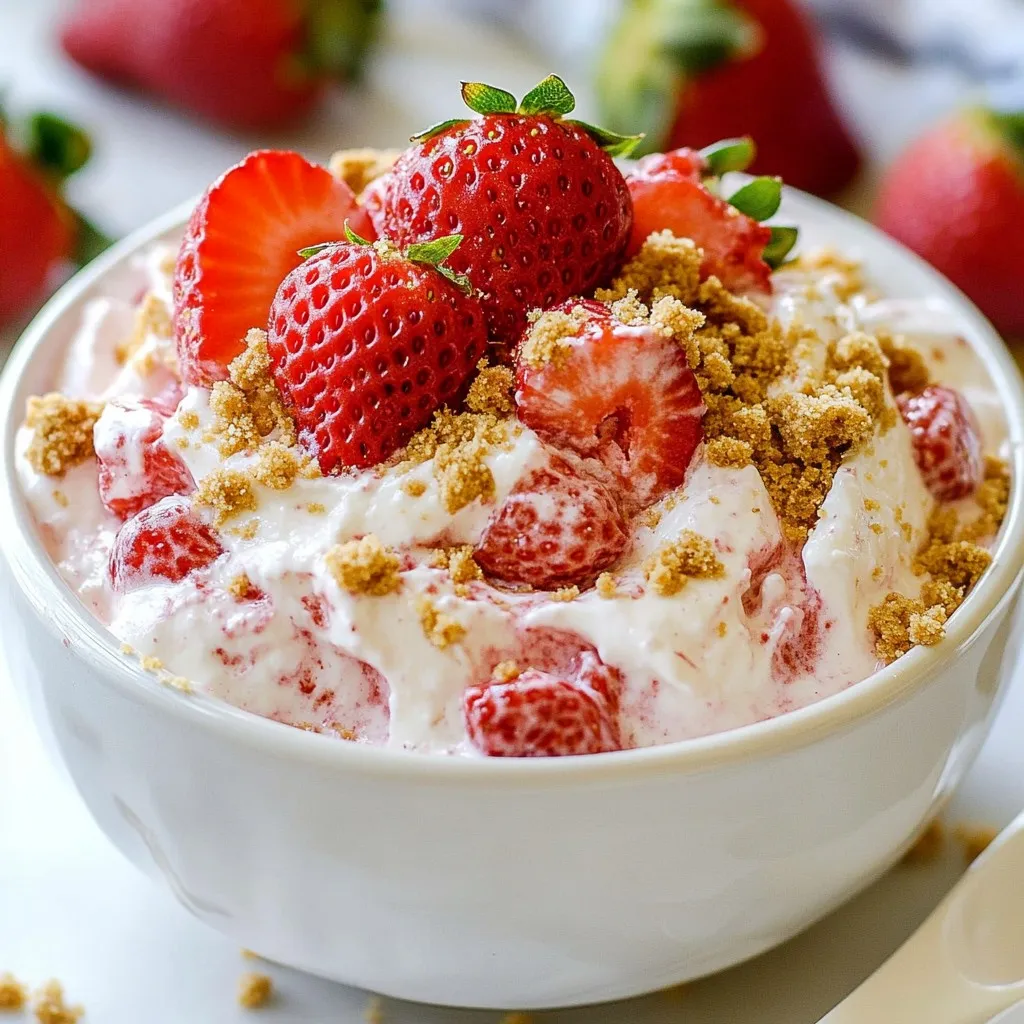
Are you ready for a treat that takes just minutes to prepare? This Strawberry Cheesecake Dip is creamy, sweet, and

- 1 lb shrimp, peeled and deveined - 2 ripe avocados, halved and pitted - 1 cup cherry tomatoes, halved - 1/4 cup red onion, finely chopped - 1 jalapeño, deseeded and minced - 2 tablespoons fresh cilantro, chopped - 2 tablespoons lime juice The shrimp serves as the star of this dish. It brings a sweet and light taste. Avocados add a rich creaminess. They also provide healthy fats that make this meal satisfying. The vegetables for pico de gallo give color and crunch. Cherry tomatoes offer freshness, while red onion and jalapeño add a bite. Cilantro brightens it all up, and lime juice ties the flavors together. - 1 teaspoon garlic powder - 1 teaspoon ground cumin - Salt and pepper to taste - Optional toppings: crumbled feta cheese, dollop of sour cream, lime wedges Seasonings are key to making the shrimp shine. Garlic powder and cumin add warmth and depth. Salt and pepper enhance the natural flavors, while lime juice adds zesty brightness. For those who want extra flavor, try crumbled feta cheese or a dollop of sour cream. Lime wedges on the side give you a fresh squeeze when serving. These simple options make your taco boats even better! {{ingredient_image_2}} First, season the shrimp. In a bowl, mix the peeled and deveined shrimp with garlic powder, ground cumin, salt, and pepper. Toss the shrimp well so they are coated evenly. This step adds great taste to our dish. Next, cook the shrimp in a skillet. Heat a splash of olive oil in a pan over medium-high heat. When the oil shimmers, add the shrimp. Cook them for about 2-3 minutes on each side. The shrimp should turn pink and opaque when done. Once cooked, take the shrimp off heat and set them aside. Now, let’s make the pico de gallo. In another bowl, mix the halved cherry tomatoes, chopped red onion, and minced jalapeño. Add chopped fresh cilantro for flavor. Then, drizzle lime juice over the mixture. Stir everything well to combine. Taste it and adjust seasoning with salt and pepper to your liking. It’s time to assemble the taco boats. Take each avocado half and carefully scoop out some flesh. This makes room for our filling. Be careful not to break the skin. Fill each avocado half with the cooked shrimp. Then, top them with a generous amount of the pico de gallo mixture. For extra flavor, you can add optional toppings like crumbled feta cheese or a dollop of sour cream. Serve the taco boats right away, with lime wedges on the side for a zesty kick. To cook shrimp just right, aim for a cooking time of 2-3 minutes per side. This short time keeps the shrimp tender and juicy. Cook them until they turn pink and opaque. If you leave them too long, they will become tough. Use medium-high heat for cooking. This helps the shrimp cook evenly and quickly. I always watch them closely to prevent overcooking. As soon as they look pink, take them off the heat. When selecting ripe avocados, look for ones that yield slightly to gentle pressure. Avoid ones that feel mushy or have dark spots. A ripe avocado should have a dark green skin and feel firm yet soft. To prevent browning, squeeze fresh lime juice over any cut avocado. This juice acts as a barrier to slow oxidation. If you have leftover avocado, wrap it tightly in plastic wrap to keep air out. For serving, arrange the taco boats on a colorful platter. This makes them eye-catching and fun. Place lime wedges around the platter for guests to use. Garnish with fresh cilantro leaves for a pop of color. You can also sprinkle crumbled feta cheese on top for added flavor. A well-presented dish makes every meal feel special. Enjoy your beautiful and tasty shrimp avocado taco boats! Pro Tips Best Shrimp Selection: Opt for wild-caught shrimp for superior flavor and texture. Check for a slight sheen and firm texture when purchasing. Ripeness of Avocados: Make sure your avocados are perfectly ripe. They should yield slightly to gentle pressure but not be overly soft. Enhancing Flavor: Marinate the shrimp in lime juice and spices for at least 15 minutes before cooking to deepen the flavors. Serving Suggestion: Serve the taco boats on a bed of shredded lettuce or cabbage for added crunch and a colorful presentation. {{image_4}} You can switch shrimp for chicken or fish in this dish. Both options work well. Simply season them like you do with shrimp. Cook chicken until it reaches 165°F. For fish, choose a firm type, like tilapia or cod. If you want a vegetarian or vegan option, try black beans or jackfruit. Both add great flavor and texture. For a meat-like feel, use seasoned tofu. Cook until golden brown to enhance taste. To add a kick, mix spices or hot sauce into your shrimp. Chipotle powder or cayenne pepper can really elevate the flavor. If you love heat, add more minced jalapeño or a hotter variety. Changing toppings can also change the dish. Try adding fresh corn, diced mango, or even pickled onions. Crumbled feta cheese or sour cream can add creaminess. Lime wedges give a zesty touch, too. For side dishes, consider serving with rice or quinoa. A fresh green salad pairs well, too. You could also add tortilla chips and salsa for crunch. To make this a full meal, serve with grilled veggies or a hearty soup. This way, you create a vibrant dining experience that everyone will love. To keep your shrimp avocado taco boats fresh, store them in an airtight container. This helps prevent air from getting in and drying them out. For the shrimp and pico de gallo, you can store them separately. Keep the avocado halves in the fridge, but they might brown. Use lemon or lime juice on the avocado flesh to slow this process. You can keep the shrimp in the fridge for up to three days. The pico de gallo lasts about two days. However, try to eat them soon for the best taste. Yes, you can freeze shrimp avocado taco boats, but it takes some care. The shrimp can be frozen, but avocado does not freeze well. It turns mushy when thawed. If you want to freeze the shrimp, cook it first. Cool it down, then place it in a freezer-safe bag. Remove as much air as possible. You can freeze it for up to three months. For the pico de gallo, freeze the tomatoes and onions separately. Avoid freezing the avocado. When you're ready to serve, simply thaw the shrimp and pico de gallo in the fridge overnight. To cook shrimp for tacos, start with fresh or thawed shrimp. Season them well for flavor. I like to use garlic powder and cumin. Heat a skillet over medium-high heat and add olive oil. When the oil is hot, add the shrimp. Cook them for about 2-3 minutes on each side. They should turn pink and opaque. This method keeps the shrimp tender and juicy. Yes, you can use frozen shrimp! First, thaw them in the fridge overnight or under cold water for about 15 minutes. After thawing, peel and devein if needed. Then, follow the same cooking steps as fresh shrimp. This way, you’ll still enjoy tasty shrimp in your taco boats. To keep avocados fresh, use lime juice. Squeeze some lime juice over the cut avocado. This helps slow down browning. You can also store them in an airtight container. If you want to use the avocado later, leave the pit in the unused half. This can help too. Enjoy your bright green avocado in the taco boats! This guide covers how to create delicious shrimp avocado taco boats. You learned about the key ingredients, like shrimp and fresh pico de gallo. I shared step-by-step cooking instructions, helpful tips, and storage guides. Don’t forget the fun variations to try. Enjoy your cooking journey. These taco boats can impress everyone at your table. They are simple, tasty, and full of fresh flavors. Get creative and make them your own!

Shrimp Avocado Taco Boats Fresh and Flavorful Dish

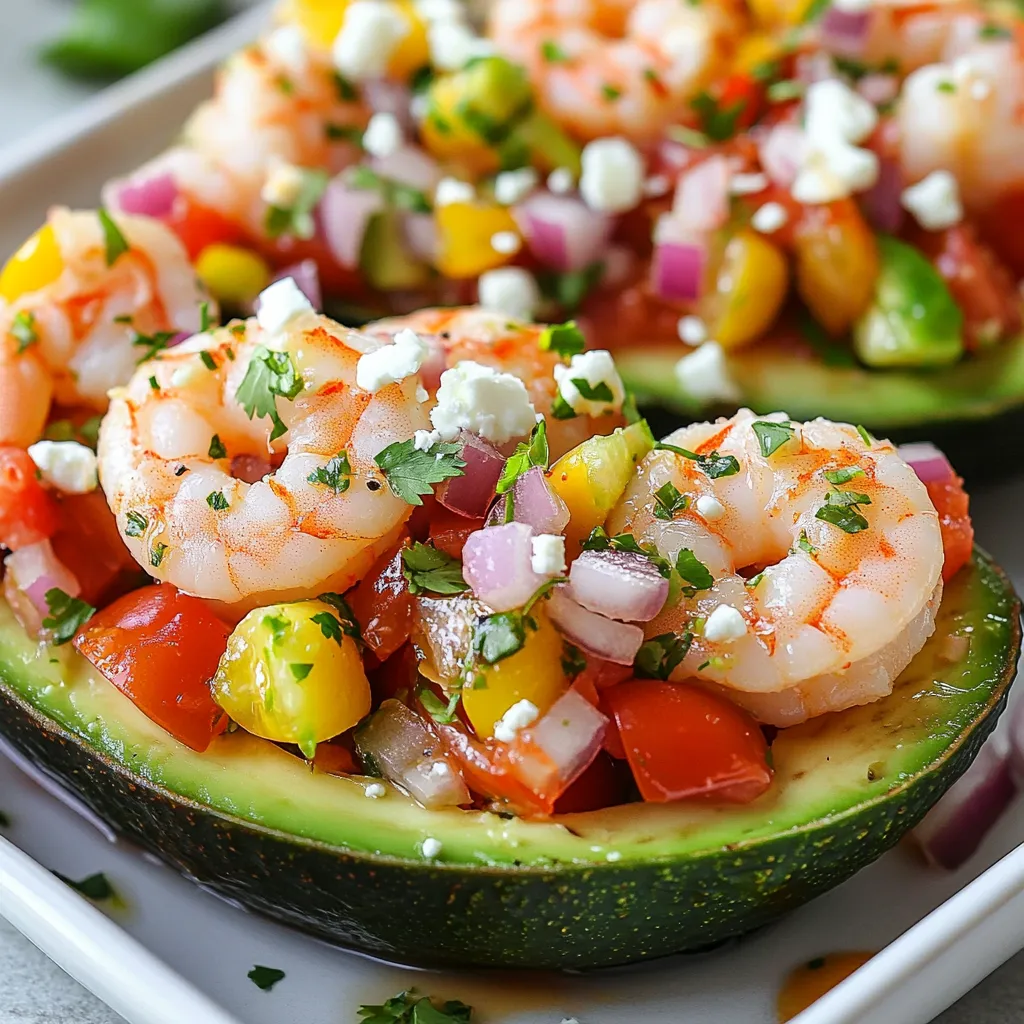
Discover the fresh and vibrant world of Shrimp Avocado Taco Boats! This dish is quick to make and packed with

- 4 cups all-purpose flour - 1/4 cup granulated sugar - 2 1/4 teaspoons instant yeast - 1 teaspoon salt - 1 cup milk - 1/2 cup unsalted butter - 2 large eggs - 1 tablespoon ground cinnamon - 1/2 cup packed brown sugar - Powdered sugar for dusting - Fresh fruit for serving - Caramel sauce for drizzling When I make Cinnamon Sugar Pull-Apart Bread, I gather my ingredients first. This helps me stay organized and ensures I have everything I need. Here’s what I use: - All-purpose flour is the main ingredient. It gives the bread structure. - Granulated sugar adds sweetness to the dough. - Instant yeast helps the bread rise quickly. It makes the dough fluffy. - Salt balances the flavors and enhances the bread. - Milk makes the dough tender and moist. I warm it gently before using. - Unsalted butter adds richness. I melt it for easy mixing. - Eggs give the bread a lovely color and help it rise. - Ground cinnamon is the star of the show. It brings warm, cozy flavors. - Brown sugar adds sweetness and a hint of caramel flavor. For a little extra fun, I sometimes add optional ingredients. Lightly dusting with powdered sugar makes it look pretty. I also like to serve it with fresh fruit or a drizzle of caramel sauce on top. These touches make it even more special. {{ingredient_image_2}} 1. In a large bowl, mix 2 cups of all-purpose flour, granulated sugar, instant yeast, and salt. Stir until well combined. 2. In another bowl, whisk together the warm milk, melted butter, and eggs. Make sure it is smooth. 3. Gradually pour the wet mixture into the dry ingredients. Stir until a shaggy dough forms. 4. Slowly add the remaining flour, about 1/2 cup at a time, until the dough is soft and slightly sticky. 5. Transfer the dough to a floured surface. Knead it for 5-7 minutes until it feels smooth and elastic. 1. Shape the kneaded dough into a ball. Place it in a greased bowl. 2. Cover the bowl with a clean towel. Let the dough rise in a warm spot for 1 hour, or until it doubles in size. 1. While the dough rises, mix the ground cinnamon and packed brown sugar in a small bowl. Combine well. 2. Once the dough has risen, gently punch it down to remove air bubbles. Roll it out into a 12x18 inch rectangle on a floured surface. 3. Brush the surface of the dough with the melted butter. Evenly sprinkle the cinnamon-sugar mixture over the dough. 4. Cut the dough into strips that are about 1-2 inches wide. Stack the strips on top of each other and cut the stack into squares. 5. Grease a loaf pan and carefully arrange the squares inside it vertically, making sure they fit snugly. 1. Cover the loaf pan with a towel. Allow it to rise in a warm place for about 30 minutes. 2. Preheat your oven to 350°F (175°C) during the last 10 minutes of the second rise. 3. Bake the bread for 30-35 minutes, or until the top is golden brown. A toothpick inserted in the center should come out clean. 4. After baking, let the bread cool in the pan for 10 minutes. Carefully transfer it to a wire rack to cool completely. To make sure your dough rises well, choose a warm spot. A sunny kitchen or near an oven works great. The heat helps the yeast grow, making the dough fluffy. Watch your oven temperature closely. Preheat it to 350°F (175°C) before baking. An accurate oven ensures even baking. Use an oven thermometer for best results. For extra flavor, brush more melted butter on the dough before adding cinnamon sugar. This adds richness and helps the sugar stick well. You can also mix in chocolate chips or nuts for added texture. They make each bite unique and tasty. Serve the pull-apart bread warm for the best taste. Dust it lightly with powdered sugar for a pretty finish. Pair it with melted butter for dipping. Fresh fruit or a drizzle of caramel sauce adds a lovely touch. It makes the bread feel even more special! Pro Tips Use Room Temperature Ingredients: Ensuring that your eggs and butter are at room temperature will help create a smoother dough that rises better. Kneading Technique: Knead the dough until it is smooth and elastic; this helps develop gluten, which gives the bread its structure and chewiness. Perfect Rising Environment: To create an ideal environment for rising, place the dough in a warm spot, or use an oven with the light on to keep it cozy. Check for Doneness: To ensure your bread is fully baked, use a toothpick; it should come out clean from the center of the loaf. {{image_4}} You can change the taste of your Cinnamon Sugar Pull-Apart Bread easily. Adding nuts like walnuts or pecans gives a nice crunch. These nuts blend well with the sweet cinnamon. You can also mix in chocolate or fruit fillings. Dark chocolate chips melt into gooey pockets. Fresh berries or sliced apples add a fruity twist. These flavors make the bread unique and fun. If you need gluten-free options, you can swap all-purpose flour for a gluten-free blend. Make sure to use a mix that works for yeast breads. This will help keep the texture light and fluffy. For those who want a vegan treat, use plant-based milk and replace eggs with flaxseed meal. Mix one tablespoon of flaxseed with three tablespoons of water. Let it sit until it thickens. This works great as an egg substitute. These simple swaps keep the joy of cinnamon bread for everyone. To keep your Cinnamon Sugar Pull-Apart Bread fresh, store it at room temperature. Wrap it in plastic wrap or place it in an airtight container. This helps prevent it from drying out. Your bread will stay good for about 2 to 3 days this way. If you want to keep it longer, refrigeration is an option, but it can change the texture. If you choose to refrigerate, wrap it in foil. This will help it stay moist. Just remember to let it sit at room temperature before serving. For long-term storage, you can freeze your pull-apart bread. First, let it cool completely. Then, wrap it tightly in plastic wrap. After that, place it in a freezer bag. Make sure to remove as much air as possible. Your bread can last up to 3 months in the freezer. When you’re ready to enjoy it, take it out of the freezer. Let it thaw in the fridge overnight. Then, to reheat, place it in a preheated oven at 350°F (175°C) for about 10-15 minutes. This will help restore its warmth and softness. Can I make Cinnamon Sugar Pull-Apart Bread ahead of time? Yes, you can prepare the dough ahead of time. After the first rise, you can cover it and place it in the fridge overnight. Just remember to let it warm up before shaping and baking. How can I tell if my bread is fully baked? To check if the bread is done, insert a toothpick into the center. If it comes out clean, the bread is ready. The top should also be golden brown and feel firm to the touch. Can I use active dry yeast instead of instant yeast? Yes, you can use active dry yeast. Just remember to proof it first in warm milk with a bit of sugar before adding it to the flour. This step wakes up the yeast. What can I substitute for milk? If you need a substitute for milk, try using almond milk or oat milk. Both options work well and keep the dough moist. Is it better to serve warm or cold? It’s best to serve the bread warm. The cinnamon sugar filling will be gooey and tasty. Warm bread is a cozy treat for everyone. How long does Cinnamon Sugar Pull-Apart Bread last? If stored in an airtight container, the bread lasts about 3 days. Reheat it in the oven for a few minutes to enjoy its warm flavors again. This blog post covered how to make a delicious Cinnamon Sugar Pull-Apart Bread. We talked about the key ingredients and step-by-step baking instructions. You learned tips for baking and how to enhance flavor. We also explored fun variations to fit your needs. Lastly, we discussed the best ways to store your bread. With these insights, you can make a tasty treat at home. Enjoy experimenting with your creations and share them with others!

Cinnamon Sugar Pull-Apart Bread Warm and Comforting Treat

Warm, gooey, and oh-so-delicious, Cinnamon Sugar Pull-Apart Bread is the ultimate comfort treat. You can easily whip this up in

- 2 cups pretzel sticks - 1 cup semisweet chocolate chips - 1 cup caramel bits - 1/4 cup heavy cream - Sea salt, for sprinkling - Baking sheet - Parchment paper - Medium-sized saucepan - Wooden spoon or spatula - Microwave-safe bowl Gathering the right ingredients and tools is key for making salted caramel pretzel bark. You need crunchy pretzel sticks, sweet chocolate chips, and creamy caramel bits for the base. The pretzel sticks give a nice crunch. The chocolate adds rich flavor, while the caramel brings sweetness. For tools, you will want a baking sheet and parchment paper. The paper keeps the bark from sticking. A medium-sized saucepan helps melt the caramel smoothly. A wooden spoon or spatula makes stirring easy. Lastly, a microwave-safe bowl is perfect for melting the chocolate. With these ingredients and tools ready, you can start making your bark. It’s fun and simple! {{ingredient_image_2}} 1. Preheat your oven to 350°F (175°C). This heat helps crisp the pretzels. 2. Line a baking sheet with parchment paper. This step prevents sticking and makes cleanup easy. 3. Arrange pretzel sticks in a single layer on the baking sheet. Make sure they do not overlap for even baking. 1. Combine caramel bits and heavy cream in a medium-sized saucepan. Use low heat to avoid burning the caramel. 2. Stir the mixture continuously with a wooden spoon or spatula. Keep stirring until it melts into a smooth consistency. This may take a few minutes. 1. Pour the melted caramel over the cooled pretzels. Use a spatula to spread it evenly. Each pretzel should be well-coated. 2. Melt the semisweet chocolate chips in a microwave-safe bowl. Heat in 30-second intervals. Stir after each interval until smooth. 3. Drizzle the chocolate over the caramel-coated pretzels. Aim for an even coverage for a nice look. 4. Sprinkle sea salt over the warm chocolate. The salt adds a nice contrast to the sweet caramel. 5. Place the baking sheet in the refrigerator for about 30 minutes. This helps the chocolate set and harden. Once the bark is firm, break it into pieces. Enjoy your tasty treat! To keep pretzels crisp, bake them just right. Bake them for 5-7 minutes until warm. Watch them closely to avoid burning. After baking, let them cool completely on the sheet. This step is key for crunch. For a silky chocolate finish, melt the chocolate gently. Use a microwave-safe bowl. Heat in 30-second bursts, stirring in between. This keeps the chocolate smooth and avoids burning. Drizzle it over the caramel. The warm chocolate will spread easily. Serving and gifting the bark can be fun! Arrange the pieces on a nice platter. Use a colorful plate for a pop of style. You can also fill a clear jar with the bark. Tie a pretty ribbon around it for a lovely gift. For storage, consider decorative tins or boxes. This not only keeps the bark fresh but also makes it look great. Choose containers that are air-tight to keep the bark crunchy. Pro Tips Use Fresh Pretzels: For the best flavor and texture, use fresh or high-quality pretzel sticks. Stale pretzels can result in a less enjoyable bite. Adjust the Salt: Feel free to adjust the amount of sea salt to your taste preference. A little extra salt can enhance the sweet caramel and chocolate flavors! Experiment with Chocolates: Try different types of chocolate, such as dark or white chocolate, for a unique twist on your bark. Each will give a different flavor profile! Storage Tips: Store the pretzel bark in an airtight container at room temperature for up to a week. For longer freshness, keep it in the fridge! {{image_4}} You can change the flavor of your salted caramel pretzel bark easily. Try using milk chocolate or dark chocolate instead of semisweet chocolate. Each type brings a different taste, so pick what you love most. You can also add nuts or dried fruits for more texture. Chopped pecans, almonds, or cranberries work well. They add a nice crunch and flavor burst. Mix and match to create your perfect bark! If you need gluten-free options, look for gluten-free pretzels. Many brands offer these, and they taste great. You can enjoy this treat without worry. For those avoiding dairy, use dairy-free chocolate. There are many brands available that melt nicely. This way, you can still enjoy this sweet treat, even with dietary needs. To keep your Salted Caramel Pretzel Bark fresh, store it in an airtight container. This prevents air from making the bark chewy. A glass jar or a plastic container with a tight lid works great. Be sure to let the bark cool completely before sealing it up. If it’s warm, it can create moisture inside the container, affecting texture. You can freeze Salted Caramel Pretzel Bark for longer storage. To do this, cut the bark into pieces and place them in a single layer on a baking sheet. Freeze until solid, then transfer the pieces to a freezer-safe bag. Remove as much air as possible to prevent freezer burn. The bark can stay frozen for up to three months. When you’re ready to enjoy it, let the bark thaw in the fridge for a few hours. This keeps it tasty and crunchy. You can use soft caramels in place of caramel bits. Just unwrap them and chop them into small pieces. Another option is to make homemade caramel from sugar and cream. This way, you can control the texture and taste. If you want something quick, try using dulce de leche. It works well and has a nice flavor. Yes, you can make this recipe ahead of time. Prepare the bark and store it in an airtight container. It stays fresh for several days. If you want to make it even earlier, you can freeze it. Just wrap the bark tightly in plastic wrap before placing it in the freezer. When ready to eat, let it thaw in the fridge for a few hours. To avoid melting issues, use good quality chocolate. When melting, do it slowly in short bursts. Heat the chocolate in the microwave for 30 seconds at a time, stirring in between. This keeps the chocolate from burning. If it gets too thick, add a little bit of vegetable oil or coconut oil to smooth it out. Salted Caramel Pretzel Bark lasts about a week at room temperature. Keep it in an airtight container to maintain freshness. For longer storage, you can freeze it. It can last up to three months in the freezer. Just remember to let it cool completely before storing. We explored how to make delicious Salted Caramel Pretzel Bark. This treat combines crunchy pretzels, smooth caramel, and rich chocolate for a perfect snack. Remember to use fresh ingredients for the best flavor. Consider different flavors and dietary needs to make it unique. Store leftovers well to enjoy later. Making this bark is simple and fun. This treat is great for sharing or gifting. Use these tips and variations to create your perfect version. Enjoy your sweet creation!

Salted Caramel Pretzel Bark Irresistible Treat Recipe

Discover the joy of making Salted Caramel Pretzel Bark with this easy recipe! This treat combines crunchy pretzels, rich chocolate,

Fresh cherries are the stars of this ice cream. They add bright flavor and natural sweetness. Using ripe, sweet cherries makes the ice cream taste even better. I recommend looking for cherries that are firm and shiny. You want them to be red or dark purple, as they have the best taste. Don’t skip the maceration step! This process helps release the juices, making the cherries even more flavorful. Granulated sugar plays a key role in this recipe. It balances the tartness of the cherries. You will use ¾ cup in total. If you want to try alternatives, consider using honey or maple syrup. Just remember, they will change the flavor a bit. You can also adjust the amount based on your taste. Always taste the mixture before churning it to ensure it’s sweet enough. For this recipe, you need both heavy cream and whole milk. Heavy cream gives the ice cream its rich and creamy texture. Whole milk helps keep it smooth and light. Make sure to use high-quality dairy products for the best taste. If you want a lighter version, you can use half-and-half instead of heavy cream. Just know it may not be as rich, but it will still taste great! {{ingredient_image_2}} Start by pitting and halving 2 cups of fresh cherries. This is key for flavor. Place the cherries in a medium bowl. Add 1 tablespoon of lemon juice and 2 tablespoons of granulated sugar. Gently toss the cherries so they get all coated. Let them sit for 30 minutes. This step is called maceration. It helps draw out the sweet juices from the cherries. While the cherries sit, take a large mixing bowl. Add 1 cup of heavy cream and 1 cup of whole milk. Next, pour in the remaining ½ cup of granulated sugar. Add 1 teaspoon of pure vanilla extract and ¼ teaspoon of salt. Whisk the mixture well. Keep mixing until the sugar dissolves completely, making it smooth and creamy. After the cherries are ready, mix them into the cream base. Stir gently to combine everything. Now, pour this cherry-cream mix into your ice cream maker. Follow the machine’s instructions to churn it. This usually takes about 20 to 25 minutes. The ice cream should be soft and fluffy. Once done, fold in ½ cup of semi-sweet chocolate chips. Make sure they spread evenly. Transfer the ice cream to an airtight container. Smooth the top with a spatula. Freeze it for at least 4 hours. This allows it to firm up. When it's ready, scoop it into bowls or cones. Enjoy the yummy mix of cherry and chocolate! To get the best texture, chill your cream mixture well. This helps it churn better. Don't skip the maceration step for the cherries. It draws out their juices, making the ice cream creamy. When you're ready to churn, keep an eye on the time. Churn for about 20 to 25 minutes. You want it to be soft-serve, not too hard. One common mistake is not macerating the cherries long enough. This will lead to a less flavorful ice cream. Another mistake is over-churning. If you churn it too long, the ice cream will become too hard. Make sure to use fresh ingredients. Old cream or milk can ruin the taste. For a fun look, use colorful waffle cones. Scoop the ice cream high for a great visual. Add a few fresh cherry halves on top. A sprinkle of chocolate chips adds a nice touch. A sprig of mint can make it even more appealing. Presentation makes your ice cream feel special and inviting! Pro Tips Use Ripe Cherries: Choose cherries that are bright and plump for the best flavor and sweetness in your ice cream. Chill Your Mixture: For a creamier texture, make sure your cream mixture is well chilled before churning it in the ice cream maker. Don’t Over-Churn: Keep an eye on the ice cream as it churns. Stop once it reaches a soft-serve consistency to avoid a grainy texture. Storage Tips: To prevent ice crystals from forming, press a piece of parchment paper directly onto the surface of the ice cream before sealing the container. {{image_4}} You can change the taste of your ice cream by adding flavors. Almond extract gives a nutty hint. Just one teaspoon adds depth. Mint extract brings a fresh taste. Again, one teaspoon is enough. Mix these extracts into your cream base before churning. This small change can make a big difference! Chocolate chips come in many types. You can swap semi-sweet chips for dark chocolate. Dark chocolate adds a rich taste. White chocolate gives a sweet, creamy flavor. You can even mix them! Try adding chunks of chocolate bars for fun texture. Each type will change the ice cream's flavor profile. If you want a dairy-free treat, use coconut milk. It gives a creamy texture. Almond milk is another option but may be less rich. Use the same amount as cream and milk. Add a bit of cornstarch to thicken it. This way, you can enjoy delicious cherry chocolate chip ice cream without dairy! Store your cherry chocolate chip ice cream in an airtight container. This helps keep out air and prevents ice crystals. Use a spatula to smooth the top. This step reduces air pockets, which can make your ice cream icy. Be sure to place a piece of plastic wrap directly on the ice cream before sealing with the lid. This extra layer keeps it fresh longer. You can keep your cherry chocolate chip ice cream for about two weeks in the freezer. After this time, it may lose some flavor and texture. For the best taste, try to eat it within a week. Always check for any unusual smells or changes in color before serving. If your ice cream gets too hard, don’t worry! Simply take it out of the freezer and let it sit at room temperature for about 5 to 10 minutes. This will soften it, making it easier to scoop. If it’s still hard, you can warm a scoop with your hands for a few seconds. This little trick helps bring back that creamy texture you love. Yes, you can use frozen cherries. Just make sure to thaw them first. This helps the cherries release their juices, just like fresh ones. Keep in mind that frozen cherries may be softer. This can change the texture of the ice cream a little. Overall, they still work well in this recipe. If you don’t have an ice cream maker, no problem! You can still make this ice cream. Pour the cherry-cream mixture into a shallow dish. Freeze it for about 2 hours. Then, take it out and stir it well. Return it to the freezer. Repeat this every 30 minutes for about 3 hours. This method helps create a creamy texture without an ice cream maker. Yes, this recipe is great for kids! It has simple ingredients and fun flavors. Kids can help with mixing and adding chocolate chips. Just keep an eye on the sugar amount. If you want to make it healthier, you can reduce the sugar a bit. It’s a delicious treat that everyone will enjoy! In this blog post, we explored making cherry chocolate chip ice cream. We discussed key ingredients like fresh cherries, sweeteners, and cream choices. I shared simple steps for preparation, churning, and adding chocolate chips. We also covered tips for texture, common mistakes, and fun serving ideas. I offered variations for flavor and dairy-free options, plus smart storage tips. Remember, the right ingredients and care make all the difference in your ice cream. Enjoy your sweet creation!

Cherry Chocolate Chip Ice Cream Delightful and Easy Recipe

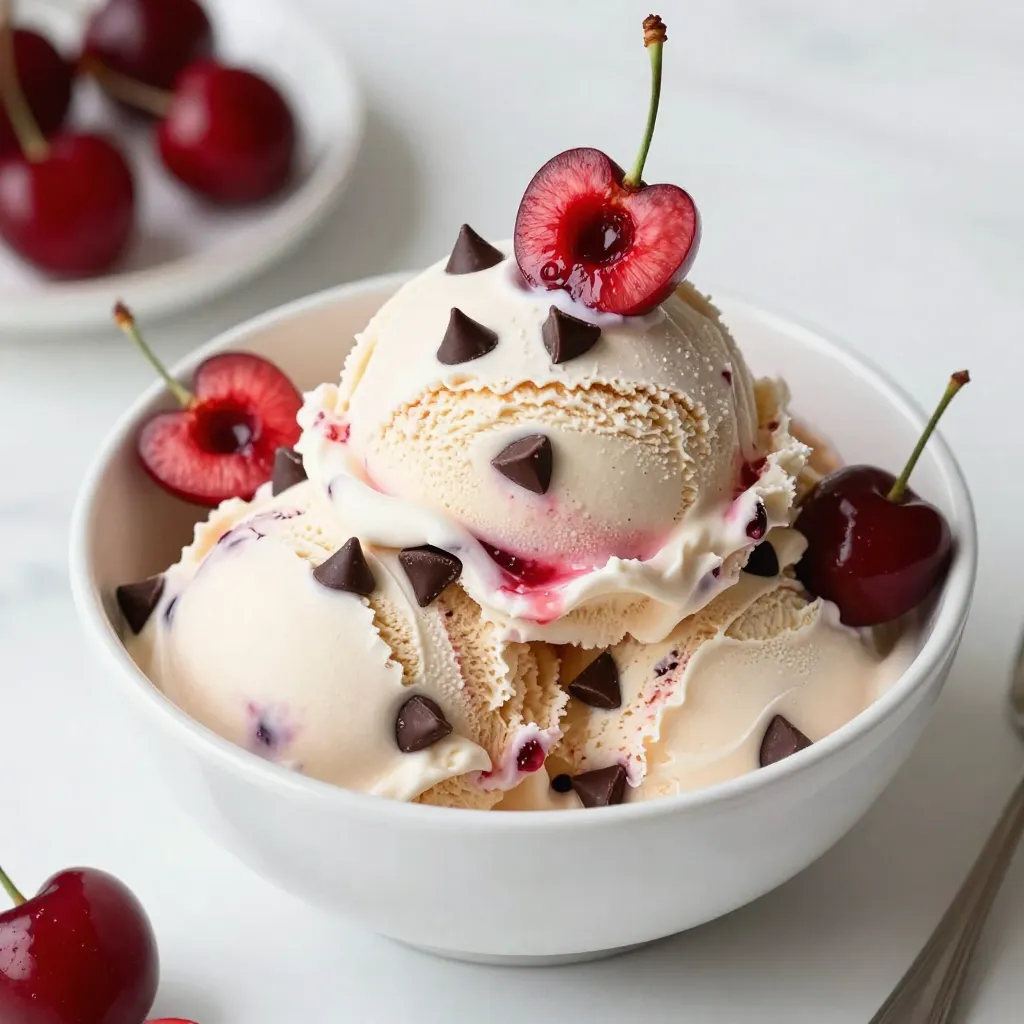
Get ready for a treat! In this blog post, I’ll show you how to make Cherry Chocolate Chip Ice Cream

Older posts
Newer posts
← Previous Page1 … Page110 Page111 Page112 … Page120 Next →

dsad

© 2026 recipetorch • Built with GeneratePress

Our Policies

  • Copyright Policy
  • Cookie Policy
  • GDPR Policy
  • Privacy Policy
  • Disclaimer
  • Terms Of Use

More Information

  • Home
  • About
  • Contact
  • Appetizers
  • Dessert
  • Dinner
  • Drinks
©2026, recipetorch About Back To Top