Skip to content
DisclaimerTerms Of UseGDPR PolicyCookie Policy

recipetorch

  • Home
  • Drinks
  • Appetizers
  • Dinner
  • Dessert
  • About
  • Contact
  • Privacy Policy
DisclaimerTerms Of UseGDPR PolicyCookie Policy

Nicole

- 4 cups Rice Krispies cereal - 1 cup mini marshmallows - 1/2 cup unsalted butter - 1 cup caramel sauce (store-bought or homemade) - 1 large Granny Smith apple, diced - 1/2 teaspoon ground cinnamon - 1/2 teaspoon pure vanilla extract - 1/4 cup chopped pecans (optional) - A pinch of fine sea salt Each ingredient in Caramel Apple Rice Krispie Treats has a special job. The Rice Krispies cereal gives a nice crunch and texture. Mini marshmallows add sweetness and help hold everything together. Unsalted butter adds richness and creaminess to the mix. Caramel sauce brings that sweet, gooey flavor we all love. The Granny Smith apple adds a tart bite that balances the sweetness. Ground cinnamon adds warmth and spice. Pure vanilla extract enhances the overall flavor. Pecan pieces can add a nice crunch and nutty taste, but they are optional. Finally, a pinch of sea salt brightens the flavors and cuts through the sweetness. You can change things up a bit with different ingredients. Try adding nuts like almonds or walnuts for extra crunch. You might also swap in dried fruit like cranberries or raisins for a chewy texture. For a chocolate twist, mix in some mini chocolate chips. If you want a fall flavor, add pumpkin spice instead of cinnamon. The fun is in mixing and matching to make these treats your own! 1. Prepare the Pan: Grease a 9x13 inch baking dish with butter or spray. Set it aside. 2. Melt Butter and Marshmallows: In a large saucepan, melt 1/2 cup of unsalted butter over medium-low heat. This takes about 2 minutes. Once melted, add 1 cup of mini marshmallows. Stir constantly until melted and smooth, about 3 to 4 minutes. 3. Infuse with Flavor: Remove the pan from heat. Stir in 1/2 teaspoon of pure vanilla extract, a pinch of fine sea salt, and 1/2 teaspoon of ground cinnamon. Mix well. 4. Mix in Rice Krispies: Gradually fold in 4 cups of Rice Krispies cereal. Use a gentle stirring motion until all pieces are coated. This should take about 2 minutes. 5. Fold in Apple and Caramel: Carefully add 1 diced Granny Smith apple and 3/4 cup of caramel sauce. If using, add 1/4 cup of chopped pecans. Fold gently to mix. 6. Transfer to the Baking Pan: Pour the mixture into the greased dish. Press it down evenly with a spatula or your hands. 7. Add the Final Touch of Caramel: Drizzle the remaining 1/4 cup of caramel sauce on top. Use a spatula to swirl it into the mixture gently. 8. Cool and Set: Allow the treats to cool at room temperature for about 30 minutes. For faster cooling, refrigerate for around 15 minutes. 9. Cut and Serve: Once set, slice into squares or rectangles. Enjoy your treats! - Use fresh marshmallows for the best gooeyness. - Do not overheat the marshmallows. They should melt, not brown. - Press the mixture firmly into the pan for a good shape. - Allow the treats to cool fully for a firm texture. - When melting butter, it should become completely liquid with no bubbles. - The marshmallow mixture should be smooth and glossy without lumps. - The Rice Krispies should be evenly coated, looking shiny but not wet. - After cooling, the treats should feel firm to the touch and hold their shape when cut. When making caramel apple Rice Krispie treats, avoid overcooking the marshmallows. They should melt but not brown. If they brown, your treats may taste burnt. Also, don’t skip the salt; it enhances the flavor. If you overload the caramel, it makes the treats too sticky and hard to cut. To mix well, fold the Rice Krispies gently into the melted marshmallows. Use a spatula for even mixing. Press down the mixture firmly in the pan, but don’t squish it. This keeps the treats light and airy. Use a piece of wax paper to help spread the mixture evenly without it sticking to your hands. To get that perfect gooey texture, use fresh mini marshmallows. They melt better and provide a softer bite. Adding the diced Granny Smith apple gives a nice tartness, balancing the sweetness of the caramel. For extra flavor, sprinkle cinnamon on top before serving. A drizzle of caramel adds both beauty and a delightful taste. {{image_4}} You can change the flavor of these treats for each season. For fall, try adding pumpkin spice. Just add one teaspoon of pumpkin spice to the butter and marshmallows. This gives the treats a warm, cozy flavor that fits right in with autumn. If you need gluten-free treats, use gluten-free Rice Krispies. They taste great and keep the same crunch. You can also swap the butter with coconut oil for a dairy-free version. This keeps the treats soft and tasty. Boost the flavor with fun add-ins. Try adding chocolate chips or toffee bits for extra sweetness. You can mix in 1/2 cup of either when you add the Rice Krispies. This adds a nice crunch and makes the treats even more fun. You can also toss in dried fruit like raisins or cranberries for a fruity twist. To keep your Caramel Apple Rice Krispie Treats fresh, store them in an airtight container. This helps prevent them from getting hard or stale. Place a piece of parchment paper between layers if they are stacked. This will keep them from sticking together. You can also wrap them in plastic wrap for extra protection. These treats stay fresh for about 3 to 5 days at room temperature. If you place them in the fridge, they can last up to a week. However, they may become a bit firmer when chilled. If you want to keep them longer, freezing is a good option. If your treats get a bit hard, you can refresh them easily. Just place a damp paper towel on top and microwave them for 10-15 seconds. This will help soften the marshmallow again. Be careful not to overheat, or they may melt too much. Enjoy them warm or at room temperature for the best taste! Yes, you can use store-bought caramel sauce. It saves time and tastes great. Just pour it over your treats as directed. If you want a homemade touch, you can make your own. You can use any puffed cereal. Crisped rice, corn puffs, or even granola work well. Each option gives a different taste and crunch. Yes! You can freeze these treats. Wrap them tightly in plastic wrap and store in an airtight container. They stay fresh for about two months. To reduce stickiness, butter your hands when pressing the mixture into the pan. You can also add a bit more cereal to the mix. Absolutely! You can make them a day or two ahead. Just store them in an airtight container to keep them fresh. Enjoy whenever you want! In this blog post, we explored key ingredients and their roles, plus steps for perfect treats. You learned tips to avoid mistakes and ways to keep the texture just right. We also discussed fun variations and storage methods. Each point shows you how to make tasty treats easier and more enjoyable. Remember, the best treats come from following the steps and thinking outside the box. Enjoy creating your version!

Caramel Apple Rice Krispie Treats Tasty and Fun Snack

Looking for a fun and tasty snack? You’ll love these Caramel Apple Rice Krispie Treats! Mixing sweet apples, gooey caramel,

To make these tasty bars, you need a few key ingredients: - 1 cup rolled oats - 1/2 cup pumpkin puree - 1/2 cup almond butter (or your favorite nut butter) - 1/4 cup honey or maple syrup - 1/4 cup unsweetened cocoa powder - 1/2 teaspoon vanilla extract - 1/4 teaspoon ground cinnamon - 1/4 teaspoon salt - 1/4 cup chocolate chips (or dark chocolate chunks) - 1/4 cup chopped nuts (optional, like walnuts or pecans) Each ingredient plays a big role. The oats give structure, while pumpkin adds moisture and flavor. The nut butter binds everything together, and the cocoa powder makes it chocolatey. You can customize this recipe by swapping nut butters and sweeteners. Here are some ideas: - Use peanut butter or sunflower seed butter instead of almond butter. - Swap honey for agave syrup if you want a vegan option. - Maple syrup can replace honey for a different flavor. These swaps keep the bars tasty and fit your diet needs. Want to add more flair to your bars? Try these fun mix-ins: - Chopped dried fruits like cranberries or apricots for sweetness. - Seeds like chia or flaxseeds for extra crunch. - A pinch of sea salt on top for a sweet and salty kick. These options not only add flavor but also give the bars a fun texture. Experiment to find your favorite combination! Start by gathering your ingredients. In a large bowl, mix together: - 1 cup rolled oats - 1/2 cup pumpkin puree - 1/2 cup almond butter - 1/4 cup honey or maple syrup - 1/4 cup unsweetened cocoa powder - 1/2 teaspoon vanilla extract - 1/4 teaspoon ground cinnamon - 1/4 teaspoon salt Stir all these ingredients well. You want a thick, sticky mixture that looks like cookie dough. It should be smooth and well combined. This base is where the magic begins. Next, you can add some fun extras! If you want, fold in: - 1/4 cup chocolate chips - 1/4 cup chopped nuts like walnuts or pecans Mix them gently. This step adds a nice crunch and extra flavor. Make sure the chocolate and nuts are spread out evenly. This way, every bite is a treat. Now, prepare your baking dish. Line an 8x8 inch dish with parchment paper. Leave some paper hanging over the sides. This helps with easy removal later. Pour your mixture into the dish. Press it down firmly with your hands or a spatula. Make sure it is nice and even. Place the dish in the fridge. Let it chill for at least 2 hours. This helps the mixture set and firm up. After that, you can slice it into bars. Enjoy your tasty snack! To get the best texture for your Chocolate Pumpkin Oat Bars, mix the ingredients well. You want a thick, sticky dough that holds together nicely. If it feels too dry, add a little more pumpkin puree or nut butter. If it’s too wet, sprinkle in a bit more oats or cocoa powder. Press the mixture firmly into the pan. This helps the bars hold their shape when you cut them. Chilling the bars for at least 2 hours is key. Cold helps them firm up and makes cutting easier. Keep your bars fresh by storing them in an airtight container. They will last about one week in the fridge. For longer storage, freeze them in single portions. Wrap them in plastic wrap, then place them in a freezer bag. This way, you can grab a bar whenever you want a snack. Just let it sit at room temperature for a few minutes to soften. When serving these bars, cut them into fun shapes or sizes. You can slice them into squares, rectangles, or even fun shapes with cookie cutters. For a nice touch, wrap each bar in parchment paper and tie a string around it. This makes them look great for sharing. Pair them with a glass of milk or a warm cup of tea for a delightful treat. Enjoy them as a quick breakfast, an afternoon snack, or a sweet dessert! {{image_4}} To make these bars vegan, swap honey for maple syrup. This change keeps the sweetness while being plant-based. For a gluten-free option, ensure your oats are certified gluten-free. Most rolled oats are safe, but checking the label is a smart step. You can also use sunflower seed butter instead of almond butter if you have nut allergies. This maintains the creamy texture without the nuts. Spices can elevate these bars. Try adding a pinch of nutmeg or ginger for warmth. A splash of almond or coconut extract adds a new flavor twist, too. For a richer chocolate taste, increase the cocoa powder to 1/3 cup. This makes the bars even more decadent and chocolatey. Don’t hesitate to experiment with mix-ins like dried fruit or seeds for a unique touch. If you want more bars, double the recipe. Use a 9x13 inch pan for a larger batch. Just remember to chill them longer if the mixture is thicker. For fewer bars, halve the ingredients and use a smaller dish. Adjust the chilling time as needed, making sure they set firmly. This flexibility makes these bars easy to fit into any occasion! Each bar contains about 150 calories. This means you can enjoy a sweet treat without guilt. The bars are made with healthy ingredients, so they provide good energy. - Rolled oats: These are great for your heart and give you fiber. - Pumpkin puree: This adds vitamins A and C, plus antioxidants. - Almond butter: Rich in healthy fats, it helps keep you full. - Honey or maple syrup: These natural sweeteners provide energy without refined sugar. - Cocoa powder: This offers antioxidants and may boost your mood. These ingredients work together to support your health and taste great too. - Swap almond butter for peanut butter if you prefer. - Use agave syrup instead of honey for a vegan option. - Try adding chia seeds for extra fiber and Omega-3s. - Use dark chocolate chips for less sugar and more antioxidants. These simple swaps keep your bars delicious and nutritious! You can store Chocolate Pumpkin Oat Bars in an airtight container. They stay fresh for up to one week in the refrigerator. If you want them to last longer, keep them in a cool, dry place. Always check for any signs of spoilage before eating. Yes, you can freeze these bars for later use. Wrap each bar in plastic wrap or parchment paper. Place them in a freezer-safe bag or container. They can last up to three months in the freezer. When you're ready to eat one, just take it out and let it thaw. These bars pair well with a variety of drinks and snacks. Here are some great suggestions: - A glass of cold almond milk or regular milk. - A cup of hot tea or coffee for a cozy snack. - Fresh fruit, like apple slices or banana, for a balanced treat. - Yogurt, which adds creaminess and extra protein. Feel free to mix and match these pairings to find your favorite! In this blog post, we explored how to make chocolate pumpkin oat bars. We discussed the main ingredients and shared options for nut butters and sweeteners. I provided step-by-step instructions to prepare and chill your mixture. You learned tips for perfect texture and storage. We also covered variations to fit different diets and tastes. These bars are a tasty treat packed with nutrition. They are easy to customize and perfect for any occasion. Enjoy making them your own and savor every bite!

Chocolate Pumpkin Oat Bars No-Bake Easy Snack Recipe

Are you looking for a quick and tasty snack? Try my Chocolate Pumpkin Oat Bars! They are easy to make,

To create the Pumpkin Spice Chia Pudding Parfaits, you'll need: - 1 cup almond milk (or your milk of choice) - 1/4 cup chia seeds - 1/2 cup pumpkin puree - 2 tablespoons maple syrup (adjust according to sweetness preference) - 1 teaspoon pumpkin pie spice - 1/2 teaspoon vanilla extract - A pinch of salt - 1/2 cup granola (choose your favorite variety) - 1/4 cup chopped nuts (such as walnuts or pecans, for added crunch) - Whipped coconut cream (optional, for an indulgent garnish) You can switch out some ingredients if you need to. Here are a few ideas: - Almond Milk: Use soy milk, coconut milk, or regular milk if you prefer. - Chia Seeds: Flaxseeds can work, but they may yield a different texture. - Pumpkin Puree: Sweet potato puree or butternut squash puree can be a tasty alternative. - Maple Syrup: Honey or agave syrup can replace maple syrup for sweetness. - Granola: You can use muesli or crushed graham crackers for a different crunch. Each ingredient in this parfait adds health benefits: - Chia Seeds: Rich in fiber, omega-3s, and protein, these seeds help digestion and heart health. - Pumpkin Puree: Loaded with vitamins A and C, pumpkin supports eye health and boosts your immune system. - Maple Syrup: This natural sweetener contains antioxidants and minerals like zinc and manganese. - Nuts: Chopped nuts add healthy fats and protein, which support brain health and energy levels. - Almond Milk: Low in calories, it is a great dairy alternative and is often fortified with vitamins. These ingredients make the parfait not just delicious but also nutritious! Enjoy the blend of flavors and health benefits with each spoonful. To start, grab a medium-sized mixing bowl. In it, combine the following ingredients: - 1 cup almond milk - 1/4 cup chia seeds - 1/2 cup pumpkin puree - 2 tablespoons maple syrup - 1 teaspoon pumpkin pie spice - 1/2 teaspoon vanilla extract - A pinch of salt Whisk these ingredients together until fully mixed. Make sure there are no clumps. The chia seeds will absorb the liquid, so this step is key. Next, cover the bowl with plastic wrap or a lid. Place it in the fridge for at least 4 hours. If you can, let it chill overnight. This gives the chia seeds time to expand. You want a thick, pudding-like texture. After chilling, stir the mixture again. This breaks up any clumps and makes it nice and smooth. Now, it’s time to build your parfaits. Take individual serving glasses or bowls. Start by adding a layer of chia pudding to the bottom. Then, add a layer of granola. Follow this with a sprinkle of chopped nuts. Repeat these layers until you fill the glasses. Make sure the last layer is chia pudding. For an extra treat, add a dollop of whipped coconut cream on top. You can finish it off with a sprinkle of cinnamon or more pumpkin pie spice for flair. Serve them right away to enjoy the fresh flavors! If you want, you can refrigerate them briefly for a cool dessert. To make the best chia seed pudding, follow these simple steps: - Mix well: Whisk the mixture until no clumps remain. This helps the seeds soak up the liquid evenly. - Chill: Let the pudding sit in the fridge for at least 4 hours. Overnight is even better! This gives the seeds time to swell and thicken. - Stir before serving: After chilling, give the pudding a good stir. This breaks up any clumps and makes it smooth. Presentation is key for parfaits. Here are some easy tips: - Use clear glasses: This shows off the pretty layers of pudding and toppings. - Layer carefully: Start with pudding at the bottom, then add granola and nuts. Repeat layers for a beautiful look. - Garnish: Top with whipped coconut cream and a sprinkle of spices. A mint sprig or a slice of pumpkin adds extra charm. You can customize the sweetness and flavor easily. Here’s how: - Taste as you go: Start with the maple syrup. Add more if you like it sweeter. - Play with spices: If you love spice, add more pumpkin pie spice or try cinnamon. - Experiment with milk: Different milks change the taste. Almond milk is great, but coconut or oat milk works too. These tips will help you make perfect pumpkin spice chia pudding parfaits every time! {{image_4}} You can mix flavors to create your own special parfait. Try using vanilla or chocolate pudding instead of pumpkin. You could add fresh berries for a fruity twist. Another option is to use matcha powder for a green, earthy flavor. Mix in spices like cinnamon or nutmeg for warmth. The goal is to have fun and experiment with flavors you love. This recipe is quite flexible. If you need a dairy-free option, use almond milk, coconut milk, or oat milk. For nut-free choices, try sunflower seed butter or pumpkin seed milk. If you want to skip the granola, use puffed rice or cereal instead. This way, everyone can enjoy a tasty parfait without worry. Seasonal fruits can add freshness to your parfait. In the fall, use apples or pears. In the spring, add strawberries or blueberries. You can also sprinkle in spices like ginger or cardamom. These flavors can uplift your dish and make it feel special. Don’t hesitate to mix in seasonal favorites that excite your taste buds! Store any leftover parfaits in the fridge. Use airtight containers to keep them fresh. This helps maintain the taste and texture. If you have layers, keep them separate for the best results. You can mix them before serving if you prefer. These parfaits last up to four days in the fridge. If you want to freeze them, do so without granola or cream. Store the chia pudding in a freezer-safe container. It can stay fresh for about two months in the freezer. Thaw overnight in the fridge before serving. You don’t need to reheat chia pudding. It tastes best when chilled. Serve parfaits cold with fresh toppings. Add extra granola, nuts, or a dollop of whipped cream for a tasty finish. Enjoy your parfaits as a healthy snack or dessert! Yes, you can make these parfaits ahead of time. The chia pudding needs time to chill and thicken. I recommend preparing it the night before. You can layer the parfaits before serving, or keep the layers separate in the fridge. This way, you can enjoy a quick breakfast or snack anytime. If you do not have chia seeds, you can use flax seeds. They will give a similar texture. Just remember to grind them for better absorption. You can also try using tapioca pearls for a different texture. Both options work well in this recipe. This recipe is already vegan-friendly! The ingredients like almond milk, pumpkin puree, and maple syrup are plant-based. Just make sure to use a vegan granola for the layers. This way, you can enjoy a tasty treat without any animal products. We covered all you need to make tasty chia pudding parfaits. We explored the ingredients and their health perks. Then, I shared easy steps to prepare and present your parfaits. I also gave tips to adjust sweetness and offered great flavor ideas. To wrap up, making chia pudding is fun and flexible. You can customize it to fit your taste and diet. Now, you can enjoy a delicious treat that’s also healthy.

Pumpkin Spice Chia Pudding Parfaits Delightfully Simple

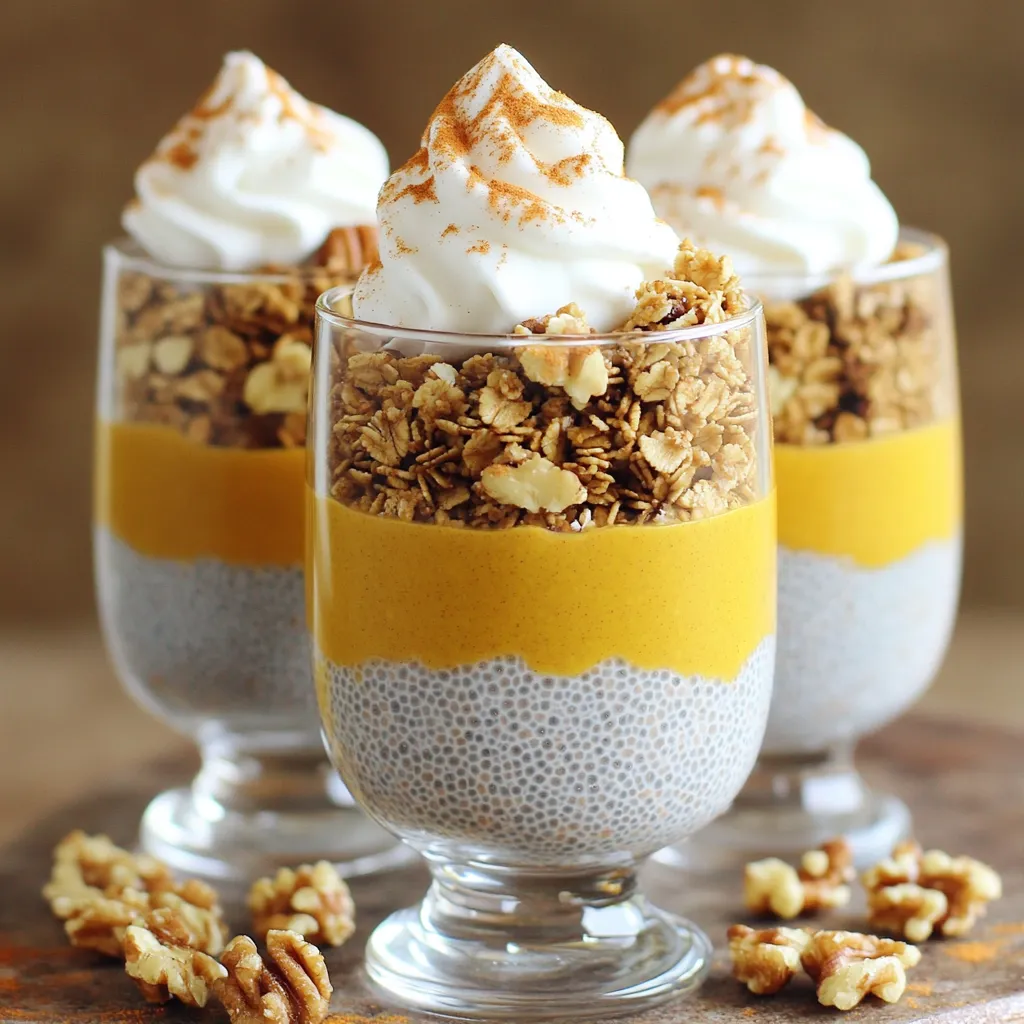
Fall is here, and that means pumpkin spice everything! If you love this cozy flavor, you’ll adore these Pumpkin Spice

- Oreo cookies - Semi-sweet chocolate chips - White chocolate chips - Pretzel twists - Candy eyes - Red M&M's - Vegetable oil The key to making these Chocolate Covered Oreo Reindeer is gathering the right ingredients. Start with a package of Oreo cookies. These cookies give the base a rich and chocolatey flavor that everyone loves. Next, you’ll need semi-sweet chocolate chips. They melt beautifully and coat the Oreos perfectly. If you want to add a fun twist, use white chocolate chips. They will help create a festive look and a nice flavor contrast. Don’t forget about the fun extras! Pretzel twists serve as antlers. Candy eyes add character, and red M&M's make the perfect nose. Each component adds to the fun and flavor of these treats. For a smoother chocolate finish, you might want to use a tablespoon of vegetable oil. This step is optional but helps the chocolate glide on easily. With these ingredients ready, you can create a tasty treat that brings joy to any holiday gathering! {{ingredient_image_2}} To start, melt the semi-sweet chocolate chips. Use a microwave-safe bowl. If you want a smooth finish, add one tablespoon of vegetable oil. Heat the chocolate in the microwave. Do this in 30-second intervals. Stir the chocolate well after each interval. This helps it melt evenly. Be careful not to overheat. You want it melted and smooth. Next, take each Oreo cookie. Use a fork to dip it into the melted chocolate. Make sure the cookie is fully submerged. This gives it a nice, even coating. Allow excess chocolate to drip back into the bowl. This step is key for a clean look. Place the dipped Oreos on wax paper on a baking sheet. While the chocolate is still wet, add the pretzel antlers. Insert two pretzel twists into the top of each Oreo. This makes them look like reindeer. Now, melt the white chocolate chips in the microwave, just like before. Once smooth, drizzle the white chocolate over the cookies. You can make fun patterns or zigzags. It adds a nice touch. Next, quickly place two candy eyes on each cookie. Finally, add one red M&M as the nose. This completes the look of your festive reindeer. To make the best chocolate-covered Oreo reindeer, start with high-quality chocolate. Good chocolate melts smoothly and tastes better. I recommend using semi-sweet chocolate chips for a rich flavor. If you want a nice shine, add one tablespoon of vegetable oil. This makes the chocolate smooth and easy to coat. To prevent chocolate from overheating, use short bursts in the microwave. Heat it in 30-second intervals. Stir the chocolate well between each interval. This helps you avoid burning the chocolate. If you see some lumps, keep stirring. The heat will melt them. When it comes to decorating, try creative ways to drizzle white chocolate. You can use a piping bag or a ziplock bag with a tiny corner cut. This gives you control over the drizzle. Make fun patterns on top of your reindeer. You can also alternate candy eyes for a unique look. Mix and match the colors for a playful vibe. For holiday presentations, place your reindeer on a decorative platter. Arrange them nicely to create a festive display. You can add sprigs of pine or jingle bells around the edges. This adds a cheerful touch to your table. If you are serving at a party, consider using small plates. Guests will enjoy picking them up easily. Pro Tips Use Quality Chocolate: For the best flavor, opt for high-quality chocolate chips. They melt more smoothly and have a richer taste, enhancing the overall deliciousness of your reindeer. Chill Between Steps: If the chocolate starts to become too soft while dipping the Oreos, consider chilling the cookies for a few minutes before proceeding. This helps maintain a nice coating. Experiment with Toppings: Feel free to add additional decorations like sprinkles or crushed candy canes for a festive twist. This will make your reindeer even more eye-catching! Perfect for Gift Giving: These chocolate-covered Oreos make great edible gifts. Package them in a decorative box or tin, and add a festive ribbon for a charming presentation. {{image_4}} You can switch things up with flavored Oreos. Try mint Oreos for a cool twist. Peanut butter Oreos add a nutty taste. These flavors pair well with chocolate. You can also experiment with different types of chocolate. Dark chocolate gives a rich flavor. Milk chocolate adds sweetness. Each option makes a unique treat. You can adapt these reindeer for other holidays too. For Halloween, use orange chocolate and spooky sprinkles. For Valentine's Day, make them with pink chocolate and heart candies. This keeps your treats fun and festive. Use seasonal decorations to match the theme. Different colors and shapes make them exciting. If you want a healthier version, try dark chocolate. It has less sugar and more antioxidants. You can also reduce the sugar in the recipe. Use less candy or choose sugar-free options. This way, you can enjoy these treats without guilt. Remember, small changes can make a big difference! To keep your Chocolate Covered Oreos fresh, store them in a cool, dry place. If your home is warm, the fridge is a better choice. Make sure to use an airtight container. This helps keep moisture out. You want these treats to stay crunchy and tasty. These festive treats can last about one week at room temperature. If you store them in the fridge, they can stay fresh for up to two weeks. Look for signs of spoilage, like a change in texture or white spots on the chocolate. If they smell off, it's best to toss them. If you want to save some for later, freezing is a great option. Wrap each cookie tightly in plastic wrap. Then, place them in a freezer bag. This prevents freezer burn and keeps them safe. When you're ready to eat, let them thaw in the fridge. This keeps the chocolate from melting too fast. Yes, you can use other cookies. Try chocolate wafers, vanilla cookies, or even graham crackers. Each cookie gives a new taste and texture. Experiment and find your favorite! To thin your chocolate coating, add a little vegetable oil. Start with one teaspoon and stir well. This helps the chocolate flow better when dipping. If you lack pretzel twists, use candy canes or almonds instead. They can mimic antlers well. Just make sure they stick into the chocolate nicely. Yes, you can prepare these treats ahead of time. Store them in an airtight container in the fridge. They will stay fresh for about a week. To transport your reindeer, place them in a sturdy container. Use parchment paper to separate each layer. This keeps the decorations intact and prevents them from sticking. This article walks you through making fun chocolate-covered Oreos. You learned about the key ingredients, like Oreo cookies, chocolate chips, and pretzel twists. I shared tips for dipping and decorating them with candy eyes and M&M's. Don't forget to try different flavors or seasonal themes for a unique twist. In the end, these treats are great for any occasion. Enjoy making them fresh and sharing the joy with friends and family!

Chocolate Covered Oreo Reindeer Festive Treat Idea

Get ready to spread some holiday cheer with an easy and fun treat: Chocolate Covered Oreo Reindeer! These festive snacks

- 2 medium sweet potatoes, peeled and cubed - 1 can (15 oz) chickpeas, thoroughly drained and rinsed - 2 tablespoons extra-virgin olive oil - 1 teaspoon smoked paprika - 1 teaspoon garlic powder - Sea salt and freshly ground black pepper, to taste - 2 cups cooked quinoa, seasoned with a pinch of salt - 1 ripe avocado, sliced - 1 cup cherry tomatoes, halved - 1 cup fresh baby spinach, washed and dried - 2 tablespoons tahini - 1 tablespoon freshly squeezed lemon juice - 1 tablespoon water (adjust for desired consistency) - Optional toppings: Chopped fresh parsley, sesame seeds, or pumpkin seeds - Sweet Potatoes: Rich in vitamins A and C, these root veggies support eye health and boost immunity. - Chickpeas: Packed with protein and fiber, they keep you full and aid digestion. - Quinoa: A complete protein source, quinoa is gluten-free and full of essential amino acids. - Avocado: Loaded with healthy fats, it promotes heart health and adds creaminess to your bowl. - Spinach: This leafy green is high in iron and vitamins, perfect for overall health. - Tahini: Made from sesame seeds, tahini provides calcium and healthy fats, enhancing flavor. - Sweet Potatoes: Try butternut squash or regular potatoes for a different taste. - Chickpeas: Black beans or lentils work great as protein alternatives. - Quinoa: Use brown rice or farro if you prefer a different grain. - Tahini: Almond butter or yogurt can replace tahini for a creamy dressing. - Spinach: Kale or arugula can add variety and different nutrients. This section gives you the key ingredients and their benefits, along with easy swaps to keep your dish exciting and nutritious! {{ingredient_image_2}} To start, peel and cube two medium sweet potatoes. Aim for uniform sizes, so they cook evenly. Next, open a can of chickpeas, drain, and rinse them well. This removes any excess sodium and helps them crisp up nicely. In a large bowl, combine the sweet potatoes and chickpeas. Drizzle two tablespoons of extra-virgin olive oil over them. This oil adds flavor and helps with roasting. Now, it's time to spice things up! Add one teaspoon each of smoked paprika and garlic powder. Sprinkle in sea salt and freshly ground black pepper to taste. Toss everything well until the sweet potatoes and chickpeas are fully coated. This step is key for flavor. Preheat your oven to 400°F (200°C). This temperature is perfect for roasting. Line a baking sheet with parchment paper for easy cleanup. Spread the sweet potato and chickpea mixture on the sheet in a single layer. Make sure they have space. This helps them caramelize instead of steam. Roast the mixture for about 25-30 minutes. Halfway through, toss the ingredients gently. This promotes even browning and ensures all sides get that nice, caramelized look. When done, the sweet potatoes should be tender and have a lovely golden hue. While the sweet potatoes and chickpeas roast, prepare the tahini dressing. In a small bowl, mix two tablespoons of tahini with one tablespoon of freshly squeezed lemon juice. Add one tablespoon of water to start. Whisk until you achieve a smooth, creamy consistency. If it’s too thick, add water one teaspoon at a time until it’s just right. This dressing is versatile. You can adjust it by adding garlic powder or even a pinch of cayenne for some heat. Feel free to play with flavors to suit your taste! To get the best flavor, roast sweet potatoes and chickpeas until they are golden. Start by preheating your oven to 400°F (200°C). Cut the sweet potatoes into equal cubes for even cooking. Toss them well in olive oil, smoked paprika, garlic powder, salt, and pepper. Spread them on a baking sheet in a single layer. This helps them caramelize nicely. Roast for 25-30 minutes, turning halfway through. That way, you ensure even browning. You can easily change the flavor of your Buddha bowl. For a spicier kick, add cayenne pepper or chili flakes to the sweet potatoes. For a fresh taste, mix in herbs like cilantro or mint in your tahini dressing. You can swap the tahini for almond butter for a nutty twist. Want more texture? Add crunchy seeds or nuts on top. Each change brings a new flavor that can surprise your taste buds. To make your Buddha bowl a full meal, start with a base of quinoa. It is high in protein and keeps you full. Add a variety of colors with cherry tomatoes and spinach. For extra creaminess, layer on sliced avocado. Drizzle with tahini dressing right before serving for added richness. If you're feeling fancy, garnish with fresh parsley or sprinkle sesame seeds for crunch. Enjoy your bowl warm for the best experience! Pro Tips Uniform Cut for Even Cooking: Ensure that the sweet potato cubes are cut into similar sizes. This helps them cook evenly and achieve that perfect caramelization. Customize Your Dressing: Feel free to modify the tahini dressing by adding herbs like dill or parsley for an extra flavor boost. Batch Cooking for Meal Prep: This Buddha bowl is perfect for meal prep. Roast a larger batch of sweet potatoes and chickpeas to have on hand for quick lunches throughout the week. Fresh Ingredients Matter: Use fresh and ripe ingredients, especially for the avocado and tomatoes, as they enhance the overall flavor and texture of the bowl. {{image_4}} You can easily change this recipe to fit your diet. If you're vegan, this bowl is perfect as it is. For gluten-free eaters, quinoa is a great choice. Instead of chickpeas, try black beans or lentils for protein. You can swap sweet potatoes for butternut squash for a fun twist. If you want a lower-carb option, cauliflower rice works well too. Toppings can make your bowl even better. Here are some ideas: - Chopped fresh parsley adds a burst of color and flavor. - Sesame seeds give a nice crunch. - Pumpkin seeds add healthy fats and a lovely texture. - Sliced radishes add a spicy kick. - A dollop of hummus can make it creamy and rich. Feel free to mix and match these toppings based on what you love. You can create many different Buddha bowls. Try a Mediterranean bowl with roasted veggies, olives, and feta cheese. Or go Asian with teriyaki tofu, steamed broccoli, and brown rice. Each bowl can have its unique flavors and textures. Explore these options to keep your meals exciting and satisfying! To keep your Sweet Potato Chickpea Buddha Bowl fresh, store leftovers in an airtight container. I recommend dividing it into single servings. This way, you can easily grab a meal when needed. Place the container in the fridge. Your bowl will stay good for up to three days. When you’re ready to enjoy your leftovers, reheat them gently. Use a microwave for quick heating, but keep it low. Heat for 1 to 2 minutes, stirring halfway through. This helps keep the sweet potatoes soft and the chickpeas tender. If you prefer, you can use a skillet. Heat it over medium-low heat and stir until warmed through. To freeze, pack the sweet potato and chickpea mix separately from the quinoa and fresh veggies. Use freezer-safe bags or containers. Make sure to leave some space for air. You can store these for up to three months. When you’re ready to eat, thaw overnight in the fridge, then reheat as mentioned above. This keeps your flavors bright and tasty. You can add many tasty things. Try adding roasted bell peppers for sweetness. Grated carrots add crunch and color. You can also use different greens, like kale or arugula. Nuts or seeds, such as almonds or sunflower seeds, boost texture and protein. If you like spice, add jalapeños or chili flakes. A sprinkle of feta cheese gives a nice salty kick. Fresh herbs, like cilantro or mint, can brighten the dish too. Yes, this recipe is gluten-free. Sweet potatoes and chickpeas are naturally gluten-free. Quinoa is also a great gluten-free grain. Just ensure any toppings or dressings you choose are gluten-free too. Always check labels for safety if you have gluten sensitivities. Making a Buddha bowl from scratch takes about 40 minutes. You spend about 10 minutes prepping the ingredients. The roasting takes around 25 to 30 minutes. This includes time to make the tahini dressing. It’s a quick and satisfying meal to prepare. Yes, you can make this recipe ahead of time. Roasted sweet potatoes and chickpeas store well in the fridge. They keep their flavor for about three to four days. You can also prepare the tahini dressing in advance. Just mix it gently before serving. Assemble your bowl right before eating for the best taste. In this blog post, you learned about creating a tasty Buddha bowl with sweet potatoes and chickpeas. We discussed ingredients, their benefits, and substitutions. You also found easy steps to prepare and roast, plus a versatile tahini dressing. I shared helpful tips and variations to fit your diet. Finally, we covered storage methods and answered common questions. Enjoy crafting your bowl and experiment with flavors. Simple ingredients can create delicious meals that are nutritious and fun to make! Keep exploring and customizing your dishes for the best results.

Sweet Potato Chickpea Buddha Bowl Flavor Boost Recipe

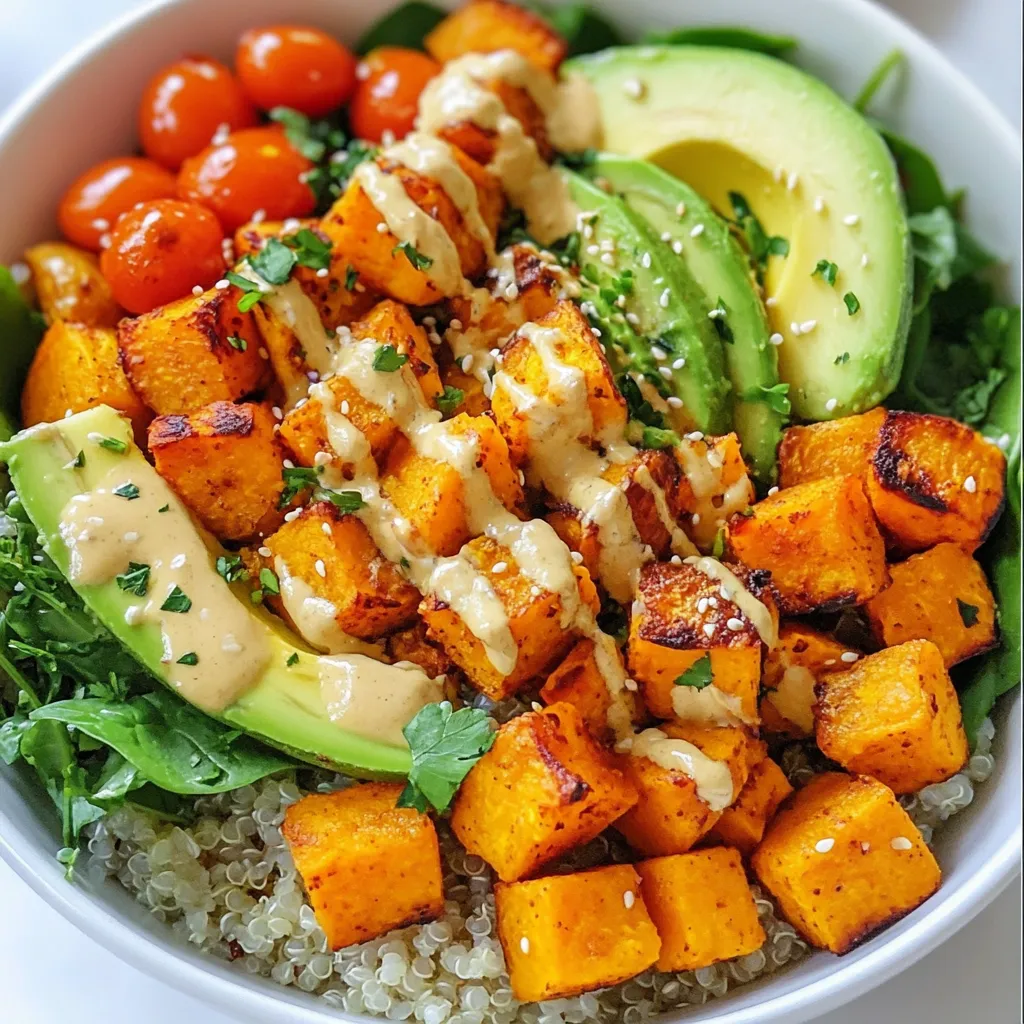
Craving a healthy, tasty meal? The Sweet Potato Chickpea Buddha Bowl is here to satisfy! It blends flavors and nutrition

- 8 thick slices of bread (preferably Challah or Brioche for optimal flavor and texture) - 1 cup cream cheese, softened to room temperature - 1/2 cup powdered sugar - 1 teaspoon pure vanilla extract - 4 large eggs - 1 cup whole milk - 1 teaspoon ground cinnamon - 1 cup fresh blueberries (you can reserve some for garnish) - 2 tablespoons unsalted butter (for cooking) - Maple syrup (for drizzling, to taste) The heart of this recipe lies in its key ingredients. Cream cheese gives the French toast a rich and creamy flavor. Softening it first makes mixing easy. Powdered sugar adds sweetness and smoothness, making each bite delightful. Vanilla extract brings warmth and a sweet note that works well with blueberries. Fresh blueberries are a star in this dish. They burst with flavor as you cook them, adding a juicy pop. The eggs and milk create a custard-like mix that coats the bread. This mix makes the French toast soft inside and golden outside, while cinnamon adds a warm, cozy touch. Choosing the right bread is vital. I suggest using Challah or Brioche. Both have a rich flavor and a soft texture, making them perfect for soaking up the creamy filling. Their eggy nature holds up well during cooking. You can also try Texas toast or sourdough if you want something different. Just avoid thin bread, as it may get too soggy. {{ingredient_image_2}} First, gather your ingredients. You need cream cheese, powdered sugar, and vanilla. In a bowl, blend the cream cheese until smooth. Use an electric mixer or a spatula. Add the powdered sugar and vanilla. Mix until creamy and well combined. Set this aside for later. This mix gives the French toast a rich, sweet flavor. Next, you need to make the egg mixture. In a separate bowl, crack four large eggs. Pour in one cup of whole milk and add ground cinnamon. Whisk the mix until it’s frothy. This mixture coats the bread and gives it a soft texture. Make sure it’s well mixed for even flavor. Now, it's time to assemble the sandwiches. Take a slice of your bread and spread a layer of the cream cheese mix on one side. Scatter fresh blueberries on top. Place another slice of bread on top to form a sandwich. Repeat this with the rest of the bread. Then, preheat a skillet over medium heat. Add unsalted butter to melt. Dip each sandwich into the egg mixture. Make sure both sides are coated. Let any extra egg drip off. Place the sandwiches in the skillet. Cook for 3-4 minutes on each side. Look for a golden-brown color. When done, take the sandwiches out and slice them diagonally. Serve warm, drizzled with maple syrup, and topped with more blueberries. Enjoy this delightful twist on French toast! To get the perfect texture, choose thick-cut bread. I recommend using Challah or Brioche. These breads soak up the egg mixture well. This adds flavor and keeps the toast soft inside. When cooking, keep the heat medium. Too high, and the outside burns. Too low, and the inside stays raw. Flip the toast when it turns golden brown. This gives it a nice crunch. Soggy bread can ruin your French toast. To avoid this, do not soak the bread too long. A quick dip in the egg mixture is enough. Let excess egg drip off before cooking. Also, ensure the skillet is hot before you add the bread. The butter should sizzle when it touches the pan. This seals the bread and keeps it from getting soggy. Serve your Blueberry Cheesecake French Toast warm. Drizzle maple syrup on top for sweetness. You can add extra blueberries for color and taste. For a fun touch, serve with whipped cream or a scoop of yogurt. It makes the dish feel special. Arrange slices on a nice platter for a beautiful presentation. Enjoy every bite! Pro Tips Choose the Right Bread: Using thick slices of Challah or Brioche enhances the flavor and texture, making your French toast extra indulgent. Perfect Egg Mixture: Ensure your egg mixture is well whisked and slightly frothy to achieve a light and fluffy texture in the French toast. Don’t Rush Cooking: Cooking the sandwiches on medium heat allows for an even, golden-brown finish without burning them. Garnish for Presentation: Fresh blueberries and a drizzle of maple syrup not only add flavor but also make your dish visually appealing. {{image_4}} You can change things up with this recipe. Add nuts like walnuts or pecans for a nice crunch. Chopped nuts pair well with the creamy cheese and sweet blueberries. You might also try other fruits. Sliced bananas or strawberries add fresh flavors. Mixing berries, like raspberries or blackberries, brings color and taste. Each fruit adds its own twist, so feel free to be creative! If you want a lighter version, use low-fat cream cheese. It will still taste great and save some calories. You can also swap whole milk for skim milk. This change keeps the rich taste while cutting fat. Another option is to use less sugar in the cheese mixture. You can even use a sugar substitute if you prefer. These small swaps help you enjoy this dish while being mindful of health. Making this dish vegan is easy! Use dairy-free cream cheese and plant-based milk instead of regular milk. You can replace eggs with a mixture of flaxseed and water. This mix binds well and gives a nice texture. For gluten-free options, choose gluten-free bread. Many brands offer tasty choices that work well here. These simple changes let everyone enjoy this delicious treat! To store leftovers, let the Blueberry Cheesecake French Toast cool down completely. Place the slices in an airtight container. You can keep them in the fridge for up to three days. Make sure to separate layers with parchment paper to avoid sticking. When you are ready to eat, preheat your oven to 350°F (175°C). Place the French toast on a baking sheet. Heat for about 10-15 minutes, or until warm. You can also use a microwave for quick reheating. Just warm them for about 30 seconds to 1 minute. If you want to save some for later, you can freeze the slices. Wrap each piece tightly in plastic wrap. Then place them in a freezer bag. They can last up to two months in the freezer. When ready to eat, thaw in the fridge overnight before reheating. For the best Blueberry Cheesecake French Toast, I recommend using thick slices of either Challah or Brioche. These breads have a soft texture and absorb the egg mixture well. Their sweetness and richness enhance the overall flavor of the dish. Yes, you can prepare some parts in advance. Make the cream cheese mixture and store it in the fridge for up to two days. You can also assemble the sandwiches and keep them in the fridge. Just cook them fresh when you are ready to eat! To reduce the sweetness, you can cut back on the powdered sugar in the cream cheese mixture. You can also use less maple syrup when serving. Choosing a less sweet bread, like whole wheat, can also balance the flavors nicely. This blog post outlined how to make a tasty French toast sandwich. We covered key ingredients, the steps to create the dish, and helpful tips for perfect results. I shared flavor variations and storage tips to help you enjoy it longer. Remember, your choice of bread and how you prepare it make a big difference. You can adapt this recipe to fit your taste or needs. Enjoy making your own delicious French toast creation every time!

Delicious Blueberry Cheesecake French Toast Recipe

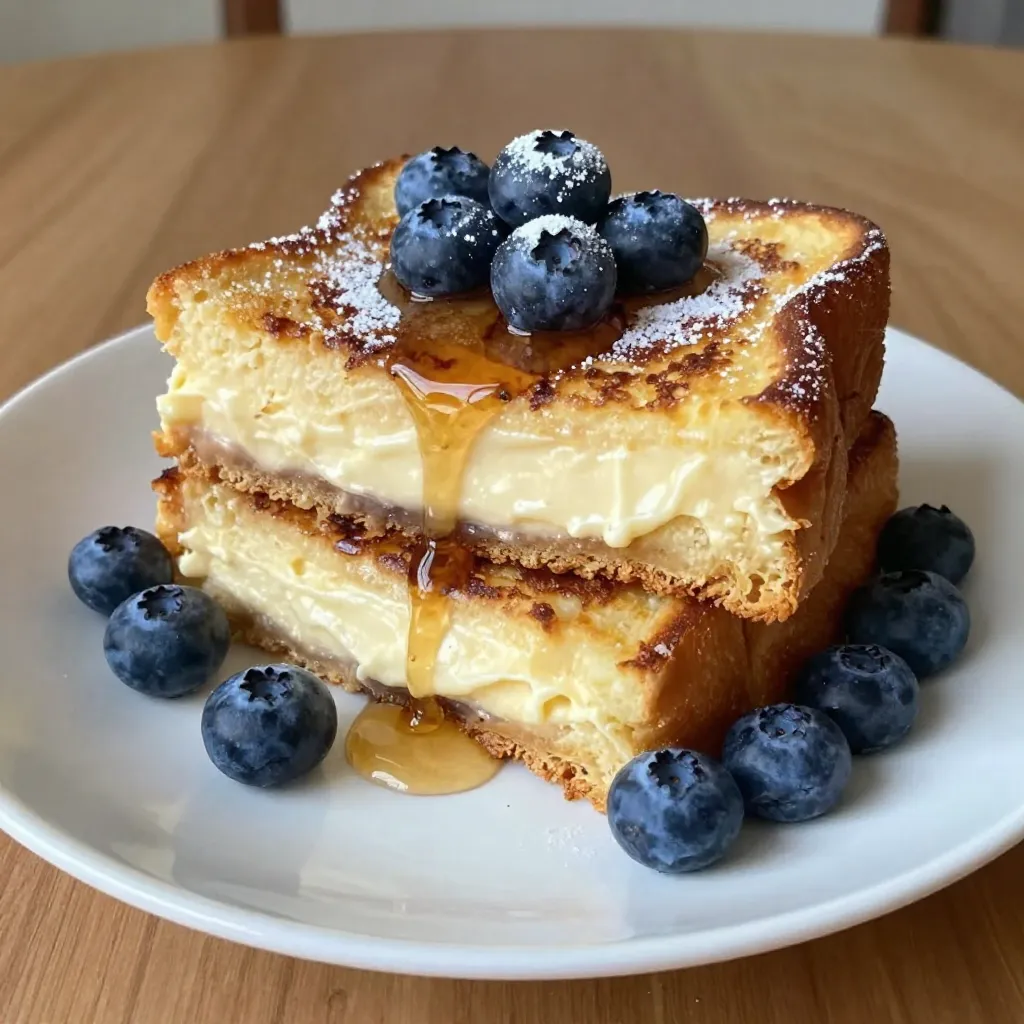
Are you ready to treat yourself to a sweet breakfast twist? This delicious blueberry cheesecake French toast recipe combines creamy

- 2 cups all-purpose flour - 1 teaspoon baking powder - 1 teaspoon baking soda - 1/2 teaspoon salt - 1 teaspoon ground cinnamon - 1/2 teaspoon ground nutmeg - 1/2 cup unsalted butter, softened - 3/4 cup granulated sugar - 1/4 cup packed brown sugar - 2 large eggs, at room temperature - 1 teaspoon pure vanilla extract - 1/2 cup buttermilk - 2 medium apples, peeled and diced For the Streusel Topping: - 1/3 cup all-purpose flour - 1/3 cup rolled oats - 1/4 cup packed brown sugar - 1 teaspoon ground cinnamon - 3 tablespoons unsalted butter, melted - A pinch of salt When baking, measure dry and wet ingredients separately. Use a dry measuring cup for flour. Scoop the flour and level it off with a straight edge. For wet ingredients, use a liquid measuring cup. Always check for accuracy. To soften butter, cut it into small pieces and leave it at room temp for 15 to 20 minutes. You can also microwave it in short bursts, about 5 seconds each. If you don't have buttermilk, mix 1/2 tablespoon of vinegar with milk to make a quick substitute. You can also use yogurt or sour cream. For apples, Granny Smith adds a nice tartness, while Honeycrisp offers sweetness. You can mix and match types for extra flavor. First, you need to preheat the oven. Set it to 350°F (175°C). This step is key. A hot oven helps the loaf rise well. While the oven heats, prepare your loaf pan. Grease it with unsalted butter. Then, dust it lightly with flour. This keeps the loaf from sticking. You can also line the pan with parchment paper for easier removal. To make the streusel topping, start with a small bowl. Combine 1/3 cup all-purpose flour, rolled oats, and packed brown sugar. Add a teaspoon of ground cinnamon. Pour in 3 tablespoons of melted butter. Mix this well. You want it to look like coarse crumbs. This texture gives a nice crunch. Set the mixture aside while you work on the batter. Now, let’s mix the batter. In a medium bowl, whisk together the dry ingredients: flour, baking powder, baking soda, salt, cinnamon, and nutmeg. In a large bowl, cream the softened butter with granulated and brown sugar. Use an electric mixer for this step. Beat until the mixture is light and fluffy, about three to four minutes. Next, add the eggs one by one. Mix well after each egg. Then stir in the vanilla extract. Now, combine the dry ingredients with the wet mixture. But do it slowly. Alternate adding the dry mix and buttermilk. Start and end with the dry ingredients. Mix just until combined. Overmixing will make the loaf tough. After mixing, gently fold in the diced apples. Use a spatula for this. Be careful not to deflate the batter. The apples should be evenly spread. Now, you’re ready to pour half of the batter into the prepared pan. Sprinkle half of the streusel topping on top. Then add the rest of the batter and finish with the remaining streusel. With everything in the pan, it’s time to bake. Place it in the oven and bake for 55 to 65 minutes. You can check for doneness with a toothpick. If it comes out clean, your loaf is ready! Using room temperature ingredients is key for a great loaf. When butter and eggs are warm, they mix better. This gives you a smooth batter. Cold ingredients can make the batter lumpy. When you fold in the apples, do it gently. Use a spatula to mix them in. This way, you won’t deflate the batter. A light touch keeps the loaf fluffy and airy. To check if your loaf is done, use a toothpick. Insert it into the center. If it comes out clean, the loaf is ready. If it has batter on it, bake a few more minutes. Baking time can change based on your pan size. If you use a smaller pan, the loaf may bake faster. Always keep an eye on it. Adjust the time based on how thick your batter is. For a fun serving style, slice the loaf warm. You can dust it with powdered sugar for a sweet touch. Pair the slices with a small bowl of vanilla or caramel sauce. This adds flavor and makes it look pretty. You can also serve it with whipped cream on the side for extra indulgence. {{image_4}} You can make this loaf even better. Adding nuts like walnuts or pecans gives a nice crunch. You can also toss in raisins for a sweet touch. They pair well with apples and spices. Different spices can change the flavor too. Try adding ginger or allspice. These spices add warmth and depth to your loaf. A dash of cardamom can also bring out the apple's sweetness. Want to make this loaf gluten-free? Use a gluten-free flour blend instead of all-purpose flour. Make sure it has xanthan gum for the right texture. If you prefer a vegan version, swap the eggs for flaxseed meal. Mix one tablespoon of flaxseed with three tablespoons of water. Let it sit for a few minutes to thicken. Use plant-based butter instead of regular butter. This way, everyone can enjoy the loaf! You can change the fruits based on the season. In the fall, use apples and pears for a cozy flavor. In summer, try peaches or berries for a fresh twist. Festive flavors can make your loaf special too. Add a splash of maple syrup for a fall vibe. Cinnamon and nutmeg are great for winter holidays. You can even sprinkle some pumpkin spice for a fun twist! To keep your Bakery-Style Apple Streusel Loaf fresh, follow these tips: - Wrap the loaf tightly in plastic wrap. This method helps keep moisture in. - You can also use an airtight container. It protects the loaf from air exposure. - If you cut the loaf, cover the cut side to keep it moist. Freezing the loaf is simple and effective: - Wrap the cooled loaf in plastic wrap, then foil. This prevents freezer burn. - Place the wrapped loaf in a freezer bag for extra protection. - To thaw, leave the loaf in the fridge overnight. - For a quick option, you can microwave slices for about 15-20 seconds. Understanding how long your loaf lasts is important: - At room temperature, it stays fresh for about 3 days. - In the fridge, it can last up to a week. - If frozen, it keeps well for 2-3 months. If you don't have buttermilk, don’t worry! You can make a quick substitute. Mix 1/2 tablespoon of vinegar with enough milk to make 1/2 cup. Let it sit for five minutes. This will mimic buttermilk's tangy taste. You can also use plain yogurt or sour cream thinned with a bit of milk. These options keep your loaf moist and tasty. Yes, you can prepare this loaf ahead of time. You can mix the batter and store it in the fridge for a few hours. Just remember to bring it back to room temperature before baking. If you bake it in advance, let it cool fully. Wrap it in plastic wrap before storing it in an airtight container. The loaf stays fresh for up to three days on the counter. To check if your loaf is done, use a toothpick. Insert it into the center of the loaf. If it comes out clean or with a few crumbs, it's ready. If the toothpick has wet batter, it needs more time. Keep an eye on the color. The top should be golden brown. If you notice it browning too fast, cover it with foil. This will help it bake evenly. In this article, we covered key ingredients for your loaf, along with helpful tips. You learned about measuring, substitutes, and techniques for mixing. We shared ways to enhance flavor and adjust for dietary needs. Storage methods were also discussed to keep your loaf fresh. Remember, baking is an adventure. Experiment with ingredients and enjoy the process! Your perfect loaf awaits.

Bakery-Style Apple Streusel Loaf Delightful Recipe

Are you ready to bake a delicious Bakery-Style Apple Streusel Loaf? This easy recipe is perfect for any home cook.

- 1 pound large shrimp, peeled and deveined - 2 cups fresh broccoli florets - 1 bell pepper, sliced (you can choose red, yellow, or green for color) - 1 cup snap peas, trimmed - 2 medium carrots, cut into thin rounds - 1/4 cup high-quality teriyaki sauce - 2 tablespoons extra virgin olive oil - 2 teaspoons fresh ginger, finely minced - 2 cloves garlic, finely minced When I make this dish, I love using fresh, colorful veggies. They add great taste and look lovely on the plate. Shrimp is the star here. It cooks fast and soaks up all the flavors from the teriyaki sauce. - Toasted sesame seeds, for garnish - Fresh green onions, thinly sliced, for garnish - Lime wedges These garnishments take your meal to the next level. The toasted sesame seeds add crunch, and the green onions bring a fresh taste. A squeeze of lime brightens everything up. You can serve these on the side or sprinkle them right on top before serving. 1. Preheat the Oven: Start by preheating your oven to 400°F (200°C). This heat will help cook the shrimp and veggies just right. 2. Mix the Marinade: In a bowl, whisk together 1/4 cup of teriyaki sauce, 2 tablespoons of olive oil, 2 teaspoons of minced ginger, and 2 cloves of minced garlic. Make sure it blends well. 3. Marinate the Shrimp: Add 1 pound of peeled and deveined shrimp to the marinade. Coat them evenly and let them sit for 15 minutes. This step brings out the flavors. 4. Prepare the Vegetables: On a large baking sheet, place 2 cups of broccoli florets, 1 sliced bell pepper, 1 cup of trimmed snap peas, and 2 sliced carrots. Drizzle with olive oil and sprinkle with salt and pepper. Toss everything to coat. 1. Add the Shrimp: Once marinated, place the shrimp on top of the seasoned vegetables. Spread them out to ensure even baking. 2. Bake the Dish: Put the sheet pan in the oven and bake for 12-15 minutes. Watch the shrimp; they should turn pink and opaque. The veggies should be tender-crisp. 3. Garnish and Serve: Take the sheet pan out of the oven. Sprinkle toasted sesame seeds and sliced green onions on top for extra crunch and flavor. This easy recipe makes a colorful and tasty meal. Enjoy your delicious sheet-pan teriyaki shrimp and veggies! To make your sheet-pan teriyaki shrimp and veggies shine, follow these tips: - Ensure Even Baking: Spread the shrimp and veggies in a single layer on the pan. This allows hot air to circulate and cook everything evenly. - Use Fresh Ingredients: Fresh shrimp and crisp vegetables give the best flavor. Look for vibrant colors and firm textures. - Proper Seasoning: Don’t skimp on the salt and pepper. This boosts the dish's overall taste. Season both the shrimp and veggies before baking. Presentation can elevate your meal: - Rustic Look: Serve directly from the sheet pan. It looks cozy and inviting. - Elegant Touch: Plate the shrimp and veggies individually. Drizzle with extra teriyaki sauce for a refined look. - Add Lime Wedges: A wedge of lime on the side adds a fresh zing when squeezed over the dish. If you want to explore more, consider pairing this dish with steamed rice or a light salad for a complete meal. {{image_4}} You can easily change up the veggies in this dish. Try adding zucchini, asparagus, or even mushrooms. Each vegetable brings a unique taste and texture. If you want to swap the shrimp, chicken and tofu work great too. Chicken gives a heartier bite, while tofu adds a nice plant-based option. Just remember to adjust cooking times for these substitutes. Spice it up with a pinch of red pepper flakes or a dash of cayenne. This will add a kick to your teriyaki shrimp. You can also try different sauces. For instance, use a spicy garlic sauce or a sweet chili sauce for a new twist. Mixing flavors keeps the meal exciting and fresh each time you make it. To keep your delicious sheet-pan teriyaki shrimp and veggies fresh, store leftovers in the fridge. Use airtight containers for the best results. Glass containers work well, but plastic ones are fine too. Make sure to cool the dish before sealing it to avoid condensation. This will help keep the shrimp and veggies tasty for up to three days. When it's time to enjoy your leftovers, reheating them properly is key. You can use the oven or a microwave. If you choose the oven, preheat it to 350°F (175°C). Place the shrimp and veggies on a baking sheet. Heat them for about 10 minutes. This keeps the shrimp juicy and the veggies crisp. If using a microwave, heat on medium power for 1-2 minutes. Stir halfway to ensure even warming. Enjoy your meal! Bake your sheet-pan teriyaki shrimp for 12 to 15 minutes. Check for doneness when the shrimp turn pink and opaque. The veggies should be tender but still crisp. If they need more time, you can leave them in for a few extra minutes. Just avoid overcooking, which can make shrimp tough. Yes, you can use frozen shrimp! Just thaw them in cold water before marinating. Drain them well to avoid excess water in your dish. Fresh shrimp will cook faster, but frozen shrimp work fine. Just make sure they are peeled and deveined. Great choices include broccoli, bell peppers, snap peas, and carrots. These veggies add color and crunch. You can also try zucchini, asparagus, or mushrooms for a twist. Mixing different textures and flavors makes the dish even better! This blog post covered how to make sheet-pan teriyaki shrimp. We discussed main ingredients like shrimp and fresh vegetables. You learned important tips for preparation and cooking. We also explored variations to suit your taste and storage tips for leftovers. In conclusion, this dish is easy to make and customizable. Enjoy experimenting with flavors and ingredients. Your kitchen can turn into a flavorful space with just a few steps. Happy cooking!

Sheet-Pan Teriyaki Shrimp and Veggies Delightful Meal

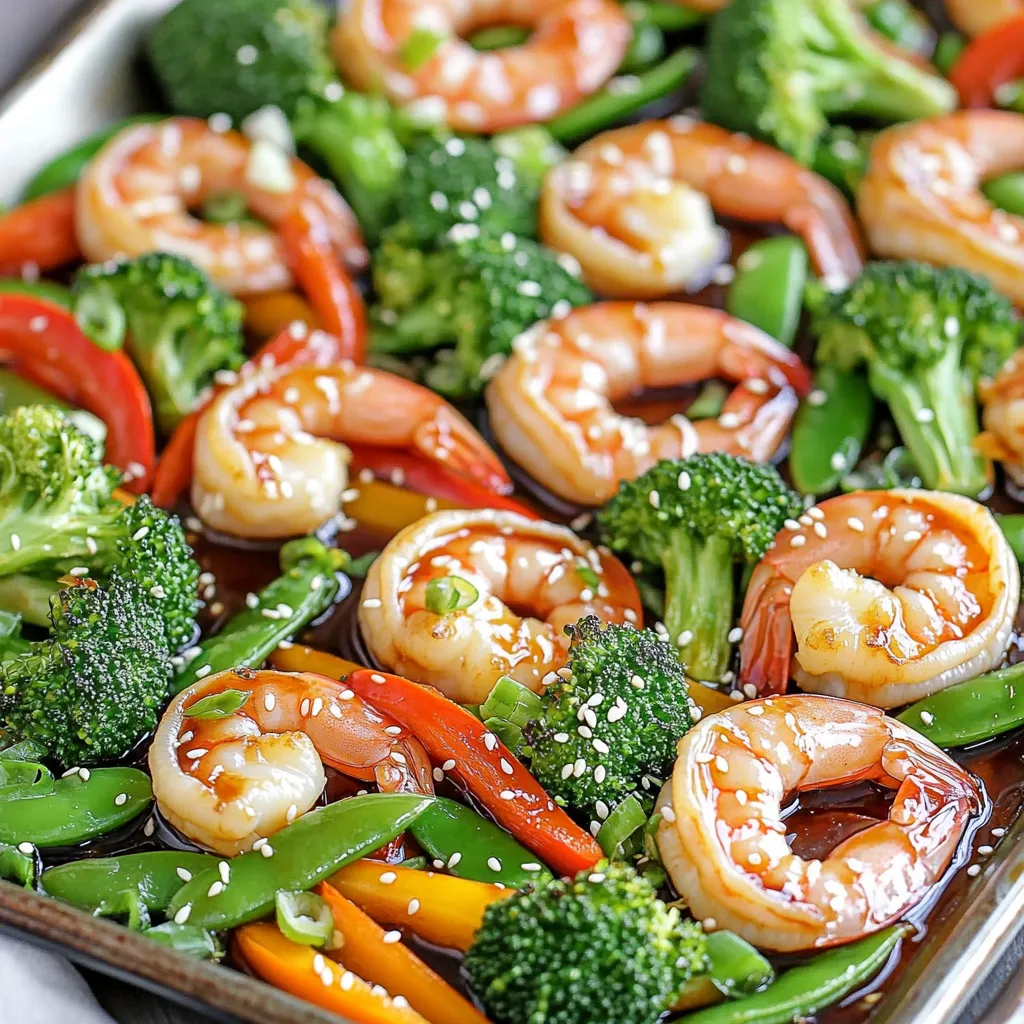
Looking for a quick and tasty dinner? You’ve come to the right place! This Sheet-Pan Teriyaki Shrimp and Veggies recipe

For this caramel apple bread pudding, you will need: - 6 cups of day-old bread (brioche or challah works best), cut into cubes - 3 medium apples (Granny Smith or Honeycrisp), peeled, cored, and diced - 1 cup granulated sugar - 1 cup whole milk - 1 cup heavy cream - 4 large eggs - 1 teaspoon pure vanilla extract - 1 teaspoon ground cinnamon - 1/2 teaspoon ground nutmeg - 1/4 teaspoon salt - 1 cup caramel sauce (store-bought or homemade) The key flavors come from the apples, spices, and caramel. - Apples: They add sweetness and a tart bite. Granny Smith gives a punch while Honeycrisp adds a juicy crunch. - Spices: Ground cinnamon and nutmeg bring warmth and depth. These spices make every bite cozy and inviting. - Caramel Sauce: Drizzling caramel on top finishes the dish. It creates a rich layer of sweetness that ties everything together. You can add more fun to your bread pudding with these options: - Nuts: Walnuts or pecans add crunch. Toast them first for even more flavor. - Chocolate Chips: Add semi-sweet or dark chocolate for a sweet twist. - Dried Fruit: Raisins or cranberries can bring extra sweetness and chewiness. These add-ins can make your dessert even more special! Customize it to fit your taste. First, preheat your oven to 350°F (175°C). This step is key for baking. Next, grease a 9x13 inch baking dish with butter or cooking spray. This helps prevent sticking. In a large bowl, add 6 cups of day-old bread cut into cubes. I prefer brioche or challah for the best texture. Then, add 3 medium apples that are peeled, cored, and diced. Toss the bread and apples gently to mix. Now, transfer this mixture into the prepared baking dish. Spread it evenly across the bottom. In another bowl, whisk together 1 cup of granulated sugar, 1 cup of whole milk, 1 cup of heavy cream, and 4 large eggs. Add 1 teaspoon of pure vanilla extract, 1 teaspoon of ground cinnamon, 1/2 teaspoon of ground nutmeg, and 1/4 teaspoon of salt. Whisk until smooth. Pour this custard mixture over the bread and apple mix. Make sure to coat the bread well. Press down with a spatula so all the bread absorbs the liquid. Let it sit for 15-20 minutes to soak. Now, drizzle half of the 1 cup of caramel sauce over the top of the soaked mix. Use a spatula to swirl the caramel in gently. This adds a nice flavor. Place the baking dish in your preheated oven. Bake for 40-45 minutes. You want the top to be golden-brown and the pudding fully set. When it’s done baking, take the dish out of the oven. Let it cool for about 10 minutes. This helps the texture set. Serve the bread pudding warm. Add an extra drizzle of caramel sauce on top. If you like, you can also add whipped cream for a rich finish. For a fun twist, serve in individual ramekins or on dessert plates. A sprinkle of cinnamon or a few apple slices on top makes it even prettier! For this recipe, I recommend using brioche or challah. These breads have a rich flavor and soft texture. They soak up the custard well, making the pudding creamy. Avoid using very dry bread, as it will not absorb the liquid properly. Day-old bread works best because it is firmer and less soggy. Soaking the bread is key to great bread pudding. After mixing the bread and apples, pour the custard over it. Press the bread down gently with a spatula. This helps each piece soak up the liquid. Let it sit for 15 to 20 minutes before baking. If time allows, soak it longer for a richer flavor. If your bread pudding comes out too dry, it likely did not soak long enough. Next time, allow more time for the bread to absorb the custard. If it is too wet, you may have added too much liquid. Make sure to measure your ingredients carefully. Lastly, if the top burns before the inside sets, cover it with foil during baking. This protects the top while the center cooks through. {{image_4}} You can mix up the fruit in this recipe. Pears work well, too. They add a sweet and juicy flavor. You might also try berries like blueberries or raspberries for a fun twist. Each fruit gives a new taste and texture. So, feel free to experiment and find your favorite! Want to add a bit of crunch? Toss in some chopped nuts. Walnuts or pecans bring a nice texture. You can also add chocolate chips for a sweet touch. Dark, milk, or white chocolate all make great choices. Just sprinkle them on top before baking for extra flavor. Change the spices for the season! In fall, add more cinnamon or swap in pumpkin spice. In winter, try ginger or even a hint of peppermint. Each season brings its own flavors, so use them to inspire your dessert. Adjusting these flavors keeps the dish fresh and exciting! To store your caramel apple bread pudding, let it cool first. Once cool, cover it tightly with plastic wrap or foil. You can also place it in an airtight container. Keep it in the fridge for up to three days. This keeps it fresh and tasty. When you're ready to enjoy leftovers, preheat your oven to 350°F (175°C). Place the pudding in an oven-safe dish. Add a splash of milk or cream to keep it moist while reheating. Bake for about 15-20 minutes until hot. You can also use the microwave. Heat in short bursts of 30 seconds, checking often. You can freeze caramel apple bread pudding for later. After it cools, cut it into portions. Wrap each piece in plastic wrap, then place in a freezer bag. Remove as much air as possible. It can stay in the freezer for up to three months. To eat, thaw overnight in the fridge before reheating. Yes, you can make this recipe ahead of time. Prepare the bread pudding up to the soaking step. Cover it well and chill it in the fridge for up to 24 hours. When you are ready to bake, just take it out and let it sit at room temperature for about 30 minutes. Then, pour on the caramel sauce and bake as directed. If you need a substitute for heavy cream, use whole milk or half-and-half. You can also blend milk with a tablespoon of butter for a similar effect. This will change the texture a bit, but it still works well in this recipe. To check if your bread pudding is done, look for a golden-brown top. The edges should puff up, and the center should not jiggle. You can also insert a knife in the center. If it comes out clean, your pudding is ready. If not, give it a few more minutes in the oven. This blog post guides you through making a delicious bread pudding. We covered the main ingredients, key flavors, and optional add-ins. I walked you through detailed steps for prep, baking, and serving. You learned tips for choosing the best bread and troubleshooting common issues. We explored fun variations and storage methods for leftovers, too. Try this recipe and enjoy a comforting treat. With these tips, you can create the perfect bread pudding every time.

Caramel Apple Bread Pudding Delightful Dessert Recipe

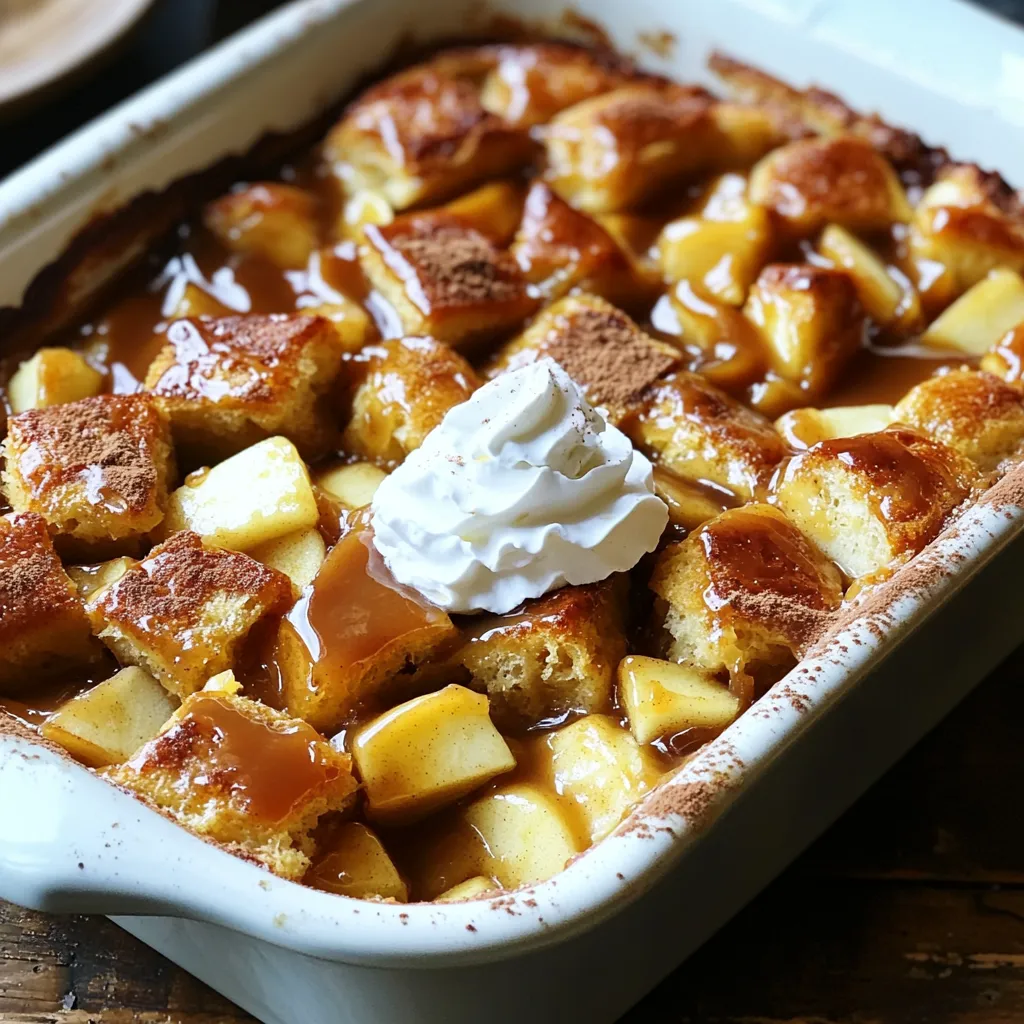
Get ready to indulge in a warm, sweet treat with my Caramel Apple Bread Pudding! This dessert blends soft bread,

To make Pumpkin Cheesecake Icebox Bars, you need these simple ingredients: - 1 ½ cups graham cracker crumbs - ½ cup unsalted butter, melted - 2 tablespoons granulated sugar - 1 (8 oz) package cream cheese, softened - 1 cup canned pumpkin puree - ½ cup powdered sugar - 1 teaspoon pure vanilla extract - 1 teaspoon ground cinnamon - ½ teaspoon ground nutmeg - 1 teaspoon pumpkin pie spice - 1 cup heavy whipping cream - ¼ cup granulated sugar (for whipping cream) These ingredients come together to create a creamy, pumpkin-flavored dessert. The graham cracker crumbs make a great base, while the cream cheese and pumpkin give it a rich texture. The spices add warmth and flavor, making each bite delightful. Make sure your cream cheese is at room temperature. This helps it blend smoothly with the other ingredients. Feel free to adjust the spices to your taste. If you love cinnamon, add a little more! If you like nutmeg, go for it! Using canned pumpkin puree saves time and gives consistent flavor. You can try fresh pumpkin, but it takes longer to prepare. Gather these ingredients, and you are on your way to a tasty treat! First, gather your graham cracker crumbs, melted butter, and sugar. In a medium bowl, mix the graham cracker crumbs with the melted butter and sugar. Stir until the mixture feels moist and holds together. This step is key for a great crust. Next, press the mixture evenly into the bottom of an 8x8 inch pan. Use your hands or a flat tool to pack it tightly. This will help form a sturdy base for your bars. Place the crust in the fridge while you prepare the filling. This keeps it firm and ready for the next step. In a large bowl, beat the softened cream cheese until it's smooth. You can use a hand mixer for this. Next, add in the pumpkin puree, powdered sugar, vanilla extract, ground cinnamon, nutmeg, and pumpkin pie spice. Mix until everything is blended well and creamy. The spices will give your filling that warm, cozy flavor. Make sure there are no lumps in the mixture for a smooth texture. Tasting the filling at this stage is a must! Adjust spices if needed for your taste. In a separate bowl, pour in the heavy cream and add granulated sugar. Using a mixer, whip the cream until stiff peaks form. This means the cream should hold its shape when you lift the mixer out. Be careful not to over-whip, or it can turn grainy. Once it's ready, gently fold the whipped cream into the pumpkin mixture. Use a spatula and combine until no white streaks remain. This step adds lightness and creaminess to your bars. Now it's time to assemble! Pour the creamy filling over the chilled crust. Use a spatula to spread it evenly. Smooth the top to make it nice and pretty. Cover the pan with plastic wrap and place it in the refrigerator. Chill for at least four hours, or until the filling is firm. This cooling time is crucial for the bars to set properly. Once ready, you can cut them into squares and serve. Enjoy your tasty treat! To get the best texture, start by making sure your cream cheese is soft. Leave it out for about an hour before mixing. This helps it blend smoothly with other ingredients. If it's too cold, your filling will be lumpy. When you whip the cream, go slow at first. Use a mixer on low speed to combine the cream and sugar. Once it starts to thicken, increase the speed. You want stiff peaks for a light and fluffy texture. When you fold the whipped cream into the pumpkin mix, be gentle. Use a spatula and a folding motion. This keeps the air in the whipped cream, giving the bars a light feel. Don't stir too hard, or you'll lose that fluffiness. For a stunning presentation, serve the bars chilled on a nice platter. You can add a dollop of whipped cream on top of each bar. A sprinkle of cinnamon adds a nice touch. It makes the bars look pretty and adds more flavor. When cutting the bars, use a sharp knife. Dip the knife in hot water first, then dry it. This helps create clean cuts. Cut them into squares for a neat look. You can also decorate each square with a piece of caramel or chocolate drizzle for extra flair. {{image_4}} You can easily change the taste of your Pumpkin Cheesecake Icebox Bars. Adding chocolate or caramel drizzles can create a rich twist. Just melt some chocolate or caramel sauce and drizzle it on top before serving. This adds a sweet touch and looks great too! You can also use alternative spices if you want a new flavor. Instead of just cinnamon and nutmeg, try ginger, cardamom, or allspice. Each spice will give the bars a different taste. Experimenting with spices can make this recipe fun! You can adjust this recipe to fit your diet. For a gluten-free crust, use gluten-free graham cracker crumbs. Mix them with the butter and sugar just like the original recipe. This way, everyone can enjoy the bars. If you need a dairy-free option, swap cream cheese with a dairy-free cream cheese. You can also use coconut cream instead of heavy whipping cream. Just chill the coconut cream first. This will help it whip better. These adjustments make the bars suitable for more diets! To keep your Pumpkin Cheesecake Icebox Bars fresh, store them in the fridge. Use an airtight container to prevent them from drying out. If you don’t have one, wrap them tightly in plastic wrap. This keeps them moist and tasty. These bars last about five days in the refrigerator. After that, they can lose their fresh taste and creamy texture. Always check for any off smells or changes in texture before enjoying them. If you want to save some bars for later, freezing is a great option. Cut the bars into squares first. Then, place them in a single layer on a baking sheet. Freeze them for about one hour. This step keeps them from sticking together. After they are frozen, wrap each square in plastic wrap. Next, put them in a freezer-safe bag or container. This way, they stay fresh for up to three months. When you are ready to eat them, remove the bars from the freezer. Let them thaw in the fridge for a few hours. This method helps maintain their creamy texture. Enjoy your delicious treat anytime! Can I use fresh pumpkin instead of canned? Yes, you can use fresh pumpkin. First, cook the pumpkin until soft. Then, mash it until smooth. Make sure to remove excess water. This keeps your bars from being too wet. What can I substitute for cream cheese? You can use Greek yogurt or mascarpone cheese. Both give a creamy texture. Greek yogurt adds a tart flavor that works well in the bars. How do I know when the bars are set? The bars are set when they feel firm to the touch. You can also gently shake the pan. If the filling jiggles slightly in the center, give it more chilling time. What to do if the filling is too runny? If your filling is runny, try adding more powdered sugar. This can help thicken it. You can also chill the mixture longer before pouring it over the crust. How to fix a crumbling crust? To fix a crumbling crust, add more melted butter. Mix it well until the crumbs stick together. Press the mixture firmly into the pan for a solid base. This pumpkin cheesecake icebox bar recipe combines tasty layers with simple steps. You'll create a crunchy crust, a creamy filling, and whip up light cream for a perfect finish. Remember to follow tips for texture and garnish for a lovely presentation. Explore variations to suit your taste or dietary needs. Store leftovers correctly so they stay fresh. With these tips, your cheesecake bars will impress everyone. Enjoy making this delicious treat.

Pumpkin Cheesecake Icebox Bars Easy and Tasty Treat

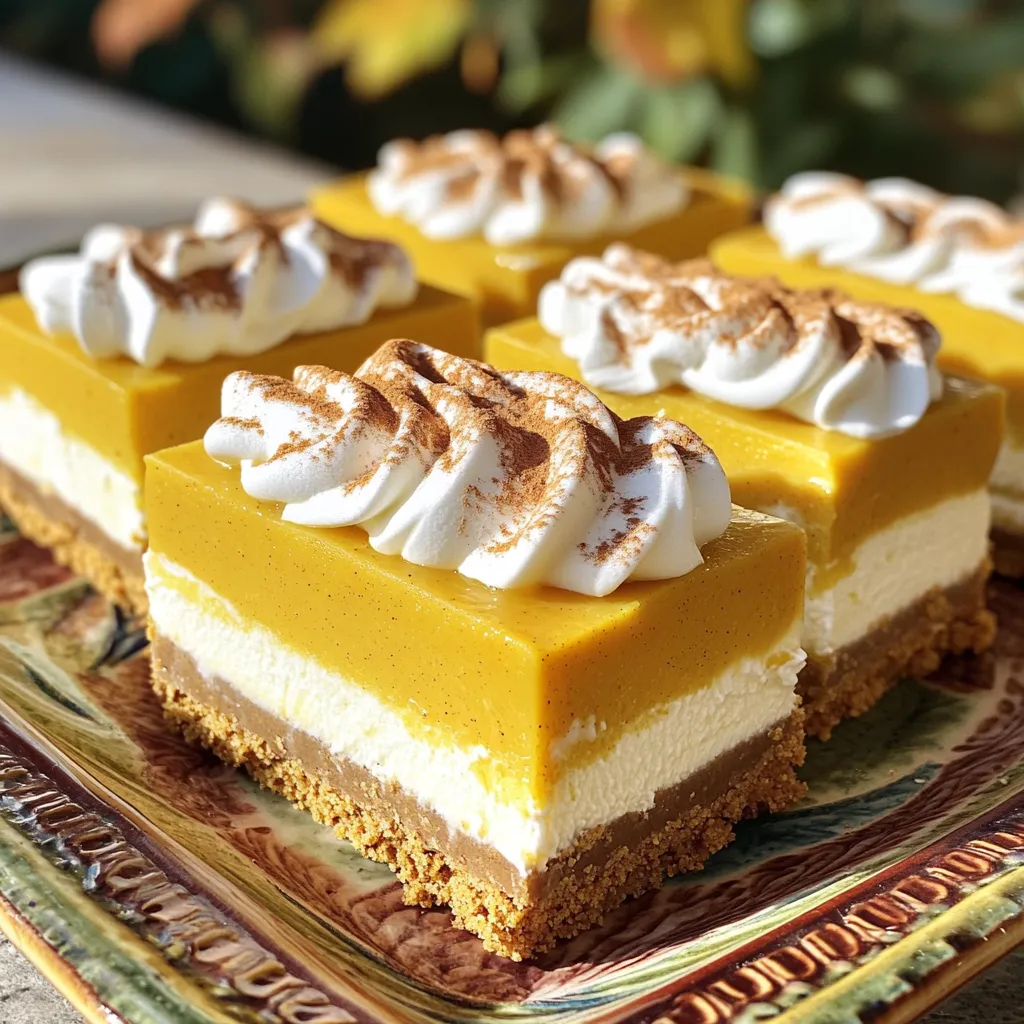
Love pumpkin treats? You’re in for a real treat with my Pumpkin Cheesecake Icebox Bars! These no-bake bars blend creamy

Older posts
Newer posts
← Previous Page1 … Page10 Page11 Page12 … Page120 Next →

dsad

© 2026 recipetorch • Built with GeneratePress

Our Policies

  • Copyright Policy
  • Cookie Policy
  • GDPR Policy
  • Privacy Policy
  • Disclaimer
  • Terms Of Use

More Information

  • Home
  • About
  • Contact
  • Appetizers
  • Dessert
  • Dinner
  • Drinks
©2026, recipetorch About Back To Top