Skip to content
DisclaimerTerms Of UseGDPR PolicyCookie Policy

recipetorch

  • Home
  • Drinks
  • Appetizers
  • Dinner
  • Dessert
  • About
  • Contact
  • Privacy Policy
DisclaimerTerms Of UseGDPR PolicyCookie Policy

Nicole

- 1 cup quinoa, thoroughly rinsed - 2 cups vegetable broth (or water) - 1 can (15 oz) black beans, drained and rinsed - 1 cup corn kernels (can be fresh, frozen, or canned) - 1 red bell pepper, diced into small pieces - 1 ripe avocado, diced - 1/4 cup red onion, finely chopped - 1/4 cup fresh cilantro, chopped - Juice of 2 limes - 2 tablespoons extra virgin olive oil - 1 teaspoon ground cumin - 1/2 teaspoon chili powder - Salt and pepper to taste You can add extras to make this salad your own. Here are some great options: - Cherry tomatoes, halved for a sweet touch - Jalapeños for heat - Feta cheese for a salty kick - Chopped green onions for freshness - Sliced olives for a briny flavor This salad is not only tasty but also packed with good nutrients. Here’s what you get per serving: - Calories: Approximately 250 - Protein: 9g - Carbohydrates: 40g - Dietary Fiber: 10g - Fat: 6g - Sodium: Varies with added salt Enjoy this salad as a meal or a side. It's colorful, healthy, and easy to make! Start by rinsing one cup of quinoa under cold water. This removes the bitter coating. In a medium saucepan, combine the rinsed quinoa and two cups of vegetable broth. Bring this mix to a boil over medium-high heat. Once it boils, lower the heat and cover the pan. Let it simmer for about 15 minutes. The quinoa is ready when it is fluffy and all the liquid is gone. Remove the pan from heat and let it cool a bit while still covered. While the quinoa cooks, prepare the vegetable mixture. In a large mixing bowl, combine one can of drained black beans, one cup of corn kernels, and one diced red bell pepper. Add one diced avocado, a quarter cup of finely chopped red onion, and a quarter cup of chopped fresh cilantro. Stir gently to mix everything. Be careful not to mash the avocado; we want nice chunks for texture. Next, make the dressing. In a small bowl, whisk together the juice of two limes, two tablespoons of extra virgin olive oil, one teaspoon of ground cumin, and half a teaspoon of chili powder. Add salt and pepper to taste. Whisk until the dressing is smooth and well blended. This mix adds a zesty kick to our salad. Once the quinoa has cooled, add it to the bowl with the vegetable mixture. Pour the dressing over the top. Gently toss everything together. Ensure all the ingredients are well-coated with the dressing. Taste the salad and adjust the seasoning if needed. Serve it chilled or at room temperature. Enjoy the fresh and vibrant flavors! When picking an avocado, look for one that feels slightly soft. It should not be too mushy. The skin can be dark green to almost black. Check for any large dark spots. This may mean it is overripe. If you want to eat it soon, choose one that is soft. If you plan to use it later, pick a firmer one. Let it ripen on the counter. To keep your salad fresh, store it in an airtight container. This helps keep air out and stops browning. If you have leftover avocado, squeeze lime juice on it. This will slow down browning. You can also cover it with plastic wrap. Press the wrap directly onto the surface to limit air exposure. If you like more heat, add extra chili powder or fresh jalapeños. For less spice, reduce the chili powder amount. You can also serve hot sauce on the side. Let everyone spice their salad as they like. It makes the meal more fun and customizable. {{image_4}} You can boost this salad with protein. Grilled chicken adds a savory taste. Use about one cup of diced chicken. It pairs well with the spices. For a plant-based choice, use tofu. Firm tofu works best. Cube it and sauté until golden. This adds a nice texture to your salad. This salad is naturally vegan and gluten-free. To keep it that way, stick with black beans and corn. If you want more flavor, add nutritional yeast. It gives a cheesy taste without dairy. Always check labels for gluten in packaged ingredients. This way, you ensure your meal is safe. Fresh ingredients make this salad shine. In spring, add peas or radishes for crunch. Summer is perfect for fresh tomatoes or cucumbers. In fall, consider roasted sweet potatoes for sweetness. Winter calls for hearty greens like kale. These changes keep your salad exciting all year round. To keep your quinoa salad fresh, store it in an airtight container. This helps prevent the salad from absorbing other odors in the fridge. Make sure the salad cools completely before sealing it. If you add avocado, it may brown faster. You can add it just before serving. This keeps the salad looking vibrant and tasty. You can freeze quinoa salad, but it’s best to leave out fresh avocado and cilantro. These ingredients do not freeze well. To freeze, place the salad in a freezer-safe bag or container. Remove as much air as possible before sealing. When ready to eat, thaw it in the fridge overnight. This keeps it from getting mushy. Reheat quinoa salad gently. Use a microwave on low power to warm it up without cooking it further. Stir occasionally to heat evenly. If the salad seems dry, add a splash of lime juice or olive oil to liven it up. Enjoy your leftovers while they are still fresh and flavorful! To add some heat to your Southwest Quinoa Salad, you can use a few tricks. First, add diced jalapeños to the vegetable mix. You can adjust the amount to fit your spice level. Another option is to sprinkle in some cayenne pepper when you make the dressing. This will give your salad a nice kick. Finally, consider adding chili flakes as a garnish before serving. Yes, you can make this salad ahead of time. It tastes great after chilling in the fridge. Just prepare the salad and dressing separately. Combine them just before serving. This keeps the veggies fresh and crunchy. You can store the salad for up to three days in the fridge. Remember to taste and adjust the seasoning before serving. Absolutely! You can use raw ingredients in your Southwest Quinoa Salad. If you prefer fresh corn, just cut it off the cob. For beans, you can cook dried beans instead of using canned ones. This may take longer, but the flavor is often better. Make sure to rinse any raw ingredients well before adding them to the salad. This blog post detailed how to make a tasty Southwest quinoa salad. We covered the main and optional ingredients. You learned step-by-step cooking tips and solutions for different diets. We also discussed how to store leftovers and answered common questions. Enjoy this colorful dish with your family and friends. Customize it to your taste. With fresh ingredients, this salad can fit any meal!

Southwest Quinoa Salad Fresh and Flavorful Delight

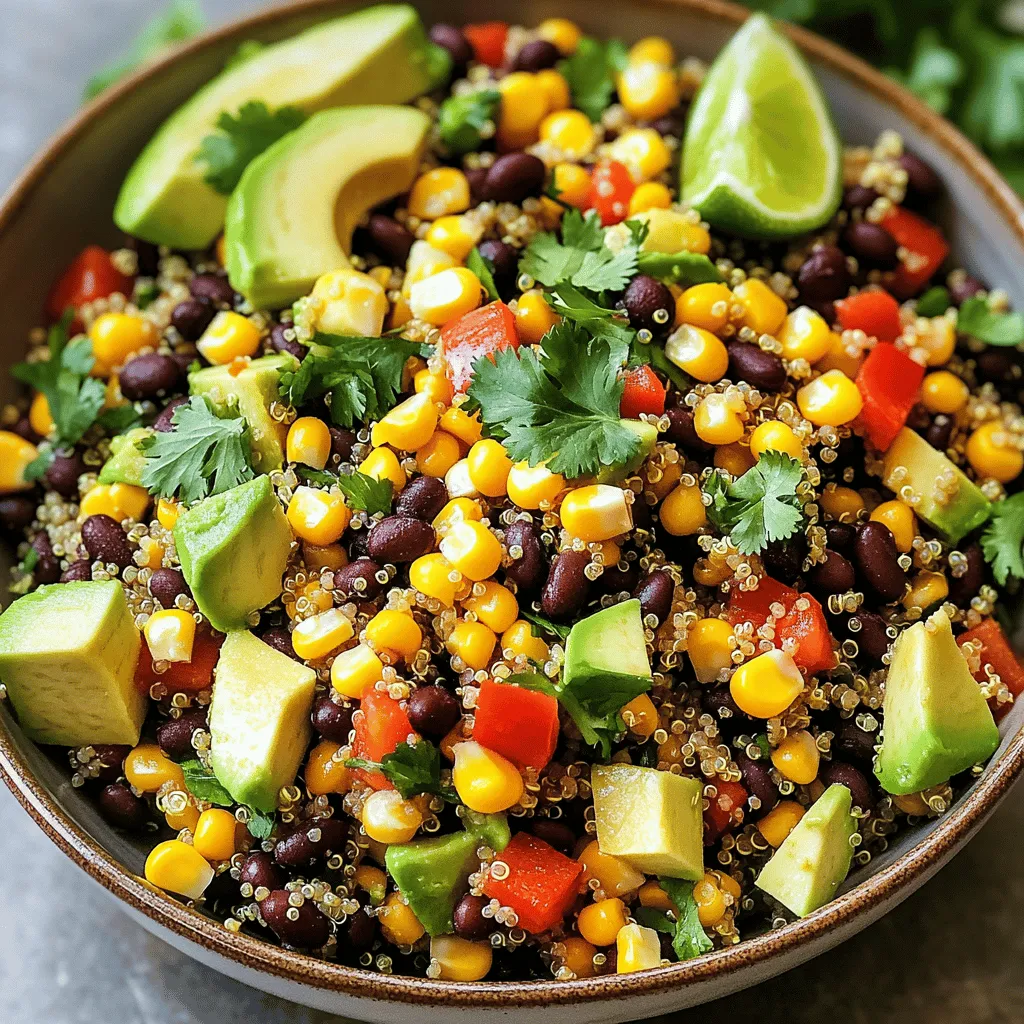
Looking for a fresh and tasty dish that packs a punch? The Southwest Quinoa Salad is your answer! With vibrant

- 1 cup unsalted butter - 1 cup granulated sugar - 1 cup packed brown sugar - 4 large eggs - 1 teaspoon pure vanilla extract - 1 cup all-purpose flour - 1 cup unsweetened cocoa powder - 1 cup semi-sweet chocolate chips - 1/2 cup white chocolate chips - 1/2 cup dark chocolate chunks Fudgy triple chocolate brownies need good ingredients. Each one plays a key role. The butter gives these brownies a rich base. I use unsalted butter for control over the salt. The two sugars, granulated and brown, add sweetness and moisture. Brown sugar gives a nice depth. Next, the eggs make the texture smooth and soft. They also help the brownies rise a bit. The vanilla extract adds a warm flavor that pairs well with chocolate. The flour is the backbone of the recipe. It holds everything together. The unsweetened cocoa powder is what makes these brownies chocolatey and fudgy. For the real chocolate experience, I add semi-sweet chocolate chips for sweetness, white chocolate chips for creaminess, and dark chocolate chunks for richness. Each chocolate type brings its own taste, making the brownies a chocolate lover's dream. This mix of ingredients ensures a fudgy, rich, and decadent treat that is hard to resist. - Preheat the oven to 350°F (175°C). - Prepare the baking dish with parchment paper. Start by heating your oven. This helps the brownies bake evenly. Next, take a 9x13 inch baking dish. Grease it lightly. Line the bottom and sides with parchment paper. Leave some paper hanging over the edges. This will help you lift the brownies out later. - Melt the butter and mix with sugars. - Incorporate eggs and vanilla. In a medium saucepan, melt the butter over low heat. Stir it often so it melts evenly. Once melted, remove it from heat. Add both the granulated and brown sugars. Mix well until the sugars blend. Let this mixture cool for about 5 minutes. Then, add the eggs one at a time. Mix well after each egg. Finally, whisk in the vanilla extract. The mixture should be smooth and creamy. - Sift dry ingredients together. - Fold dry into wet mixture carefully. In a separate bowl, sift together the flour, cocoa powder, baking powder, and flaky sea salt. This helps remove lumps. Gradually fold this dry mix into the wet mixture. Use a spatula or wooden spoon. Mix gently until just combined. Be careful not to overmix. This keeps the brownies soft. - Fold in chocolate chips and chunks. - Transfer to the baking dish and bake. Now, fold in the semi-sweet chocolate chips, white chocolate chips, and dark chocolate chunks. Make sure they spread evenly throughout the batter. Pour the brownie batter into the prepared baking dish. Spread it out evenly with a spatula. If you like, sprinkle a pinch of flaky sea salt on top. This adds a nice touch. Bake in the oven for 25-30 minutes. Check for doneness using a toothpick. It should come out with a few moist crumbs for that fudgy texture. - Cool in the pan and cut into squares. - Serving suggestions for optimal enjoyment. Let the brownies cool in the pan for about 15 minutes. Use the parchment paper to lift them out. Place them on a wire rack to cool completely. Once cooled, cut into squares. For a special treat, serve warm brownies with a scoop of vanilla ice cream. Drizzle with chocolate sauce for extra delight. Enjoy your rich and decadent brownies! To get that perfect fudgy texture, bake your brownies for 25-30 minutes. Use the toothpick test to check. Insert a toothpick into the center. If it comes out with a few moist crumbs, they are done. If it comes out clean, you may have overbaked them. Using room temperature ingredients is key. It helps combine everything smoothly. Cold eggs or butter can lead to uneven mixing. Always take them out of the fridge ahead of time. One big mistake is overmixing the batter. This can make your brownies dense. Mix just until combined, and you'll keep them light and fudgy. Another mistake is using the wrong pan size. Stick to a 9x13 inch pan for best results. A smaller pan can lead to thicker brownies, and a larger pan will make them too thin. You can boost flavor by adding nuts or extracts. Chopped walnuts or pecans add crunch. A splash of almond extract gives a nice twist. For a richer treat, try topping your brownies. A sprinkle of flaky sea salt enhances the chocolate. You can also add a scoop of vanilla ice cream on top. It pairs well with the warm brownies. {{image_4}} If you want a gluten-free version of these brownies, you can easily swap the flour. Use 1 cup of almond flour or a gluten-free all-purpose blend. These options keep the brownies moist and fudgy. Just make sure the blend has xanthan gum for the right texture. To make these brownies vegan, you can replace the eggs and butter. Use 1 cup of unsweetened applesauce for the eggs. For the butter, use 1 cup of coconut oil or vegan butter. This keeps the brownies rich and moist without any animal products. Want to jazz up your brownies? Try these fun flavors! - Mint Chocolate Brownies: Add 1 teaspoon of peppermint extract to the batter. This gives a fresh, minty flavor that pairs well with chocolate. - Peanut Butter Swirl Option: Drop spoonfuls of peanut butter into the brownie batter. Use a knife to swirl it in before baking. This adds a creamy, nutty taste to each bite. To keep your fudgy brownies fresh, first let them cool completely. Then, cut them into squares. Place them in an airtight container. This keeps them soft and moist. If you do not have an airtight container, use plastic wrap. Wrap each brownie individually. This helps prevent drying out. Freezing brownies is a great way to save them for later. Once cooled, cut the brownies into squares. Place them in a single layer on a baking sheet. Freeze them for about an hour. After that, transfer the squares to a freezer-safe bag. Be sure to remove as much air as possible. To thaw, take them out and let them sit at room temperature for a few hours. You can also warm them in the microwave for a few seconds. At room temperature, your brownies will stay fresh for about 3 to 4 days. Keep them in an airtight container to ensure the best quality. If you want to keep them longer, freezing is the way to go! To check if your brownies are done, use the toothpick test. Insert a toothpick into the center of the brownies. If it comes out with a few moist crumbs, they are ready. If it’s clean, the brownies might be overbaked. Look for a shiny top and slightly puffed edges. These signs show they are baked just right. Yes, you can swap some ingredients. For example, use coconut oil instead of butter. This change gives a different flavor and makes them dairy-free. You can also use brown sugar instead of white sugar for a richer taste. If you don’t have eggs, use applesauce or a flaxseed mix as a binder. Each swap can change the texture or flavor slightly. Brownies and fudge differ in texture and ingredients. Brownies are cake-like and often have flour. Fudge is denser, creamier, and does not use flour. Brownies have a brownie batter texture, while fudge is smooth and rich. Both are sweet, but they feel different in your mouth. This blog post covered the essential steps to make fudgy triple chocolate brownies. You learned about key ingredients like butter, sugars, and three types of chocolate. We explored how to mix everything properly while avoiding common mistakes. Plus, we shared tips for storage, variations, and FAQs to help you succeed. In the end, with a few simple techniques, you can create delicious brownies that impress your friends and family. Enjoy the process and have fun experimenting with flavors!

Fudgy Triple Chocolate Brownies Rich and Decadent Treat

Are you ready for the ultimate chocolate treat? These fudgy triple chocolate brownies will satisfy every chocolate lover’s dream. Rich,

- 1 pound cooked chicken breast, shredded - 1/2 cup buffalo sauce - 1 tablespoon olive oil - 1/2 cup celery, finely diced - 1/4 cup red onion, finely diced - 1 cup shredded carrots - 1/2 cup blue cheese dressing (or ranch dressing) - Lettuce leaves (butter or romaine) - Fresh cilantro for garnish (optional) - Salt and pepper to taste Let’s break down the ingredients for these tasty wraps. First, you need 1 pound of cooked chicken breast. Shredding the chicken makes it easy to mix with the buffalo sauce. You can use store-bought rotisserie chicken to save time. Next, grab 1/2 cup of buffalo sauce. This sauce gives the chicken its spicy kick. If you want less heat, choose a milder sauce or adjust the amount. You’ll also need 1 tablespoon of olive oil. This oil helps cook the veggies and adds flavor. Now, for the fresh vegetables: 1/2 cup of finely diced celery adds crunch. You also want 1/4 cup of finely diced red onion for extra flavor. Finally, use 1 cup of shredded carrots. They add sweetness and color to your wraps. For dressing, choose 1/2 cup of blue cheese dressing or ranch dressing, based on your taste. The dressing ties all the flavors together. You’ll also need fresh lettuce leaves, like butter or romaine, to wrap everything up. Optionally, add fresh cilantro for garnish. It adds a nice touch. Don’t forget to season with salt and pepper to taste. These simple ingredients come together to create a flavorful and fresh dish that everyone will love. 1. Start with a large mixing bowl. Add the cooked, shredded chicken and buffalo sauce. 2. Mix well. Make sure all the chicken is coated in the sauce. This step is key for flavor. 1. Heat olive oil in a large skillet over medium heat. 2. Add the finely diced celery and red onion. Sauté them for about 3-4 minutes. They should become tender and fragrant. 3. Next, add the buffalo chicken mixture to the skillet. Stir to combine everything. Cook for another 2-3 minutes. Ensure the chicken heats through. Add salt and pepper as needed. 1. In a separate bowl, toss the shredded carrots with blue cheese dressing. Make sure they are evenly coated. 2. Take a lettuce leaf and place a generous spoonful of the buffalo chicken mixture in the center. 3. Top it off with a few spoonfuls of the carrot and blue cheese mixture. 4. If you like, garnish with fresh cilantro for extra freshness. 5. Drizzle any remaining blue cheese dressing on top for more flavor. 6. Carefully roll or fold the lettuce leaf to secure the filling. Enjoy your wraps right away! To make buffalo chicken less spicy, use a milder sauce. You can mix in yogurt or sour cream. These add creaminess and reduce heat. For hotter buffalo sauce, look for extra spicy options. You can also add more hot sauce to your mix. For shredding chicken, use two forks. Pull apart the chicken while it’s warm. This gives you the best texture. To enhance flavor and crunch, add sliced almonds or chopped nuts. They add a nice crunch to each bite. For serving, arrange the wraps on a large platter. You can add extra carrot ribbons around the wraps. A small bowl of blue cheese dressing is great for dipping. It makes the dish look inviting and colorful. Consider garnishing with fresh herbs like cilantro. This adds a pop of color and freshness. {{image_4}} You can switch up the protein in buffalo chicken lettuce wraps. Shredded turkey works great instead of chicken. It has a similar texture and absorbs the buffalo sauce well. If you want a plant-based option, try tofu. Just press and cube it, then sauté it with buffalo sauce. You will still get that spicy taste without meat. If you desire a different flavor, swap buffalo sauce for BBQ sauce. This change gives a sweet and tangy twist. You can also add toppings to enhance the wraps. Try creamy avocado for richness or spicy jalapeños for a kick. These additions can make your wraps unique and exciting. Buffalo chicken lettuce wraps are not the only way to enjoy this dish. Serve the filling with crackers or tortilla chips for a fun snack. You can also create a buffalo chicken salad. Just mix the chicken and veggies with some greens. This option keeps the same great flavors while adding a fresh twist. To store buffalo chicken lettuce wraps, place them in an airtight container. This keeps the chicken and veggies fresh. You can also separate the filling and lettuce to maintain crispness. These wraps last about 3 days in the fridge. After that, the flavors may fade, and the veggies can get soggy. Yes, you can freeze the buffalo chicken filling! It freezes well and stays tasty. Store it in a freezer-safe container. To reheat frozen wraps, thaw them in the fridge overnight. Then, warm the filling in a skillet on medium heat for about 5-7 minutes. Stir until it's hot throughout. When you reheat the wraps, make sure they are warm but not overcooked. To freshen them up, add a drizzle of blue cheese dressing or some fresh cilantro. You can also toss in some fresh veggies for extra crunch. This way, you keep the wraps vibrant and full of flavor! Yes, you can prepare the ingredients ahead of time. Cook the chicken and mix it with buffalo sauce. Store this mixture in the fridge for up to three days. Dice the celery and red onion, and keep them in a separate container. Shred the carrots and store them with a little dressing to keep them fresh. When you’re ready to eat, just heat the chicken mixture and assemble the wraps. If you don’t like blue cheese dressing, you have options. Ranch dressing is a great swap. You can also make your own dressing using yogurt, mayonnaise, and herbs. This will give you a tasty flavor without the strong blue cheese taste. Feel free to experiment with different dressings to find what you like best. Buffalo Chicken Lettuce Wraps can be spicy, but you control the heat. The spice level depends on the buffalo sauce you choose. If you want less heat, use a milder sauce or mix in some yogurt. For more spice, look for a hot sauce. Adjust the amount to fit your taste. Enjoy the heat that works for you! Buffalo chicken lettuce wraps are simple and full of flavor. You learned about the main ingredients, how to prepare and cook them, and tips to make them just right. Feel free to explore variations and storage ideas to make this dish your own. These wraps offer a tasty and healthy choice for any meal. Enjoy diving into your kitchen and creating your own buffalo chicken wraps!

Buffalo Chicken Lettuce Wraps Flavorful and Fresh Dish

Are you ready for a fresh take on a classic dish? Buffalo Chicken Lettuce Wraps offer bold flavors while keeping

- 2 medium sweet potatoes, peeled and diced - 1 can (15 oz) black beans, drained and rinsed - 1 cup corn kernels - 1 cup diced bell peppers - 1 teaspoon ground cumin - 1 teaspoon smoked paprika - Salt and pepper, to taste - 1 cup enchilada sauce - 8 small corn tortillas - 1 cup shredded cheese - Fresh cilantro for garnish - Lime wedges for serving Sweet potatoes are sweet and creamy. They add a great base for the dish. Black beans give a hearty texture and protein. Corn kernels add sweetness and crunch. Bell peppers bring color and a fresh taste. The ground cumin and smoked paprika enhance the flavor with warmth and depth. Salt and pepper help balance the dish. You can use store-bought enchilada sauce for ease, or make your own. Both options work well. Corn tortillas are best because they roll easily. Shredded cheese adds a melty, gooey topping. Fresh cilantro makes a lovely garnish, giving a bright touch. Lime wedges serve as a zesty finish that wakes up all the flavors. With these ingredients, you create a meal that is packed with flavor and nutrients. You can easily adjust the ingredients based on what you have at home. Enjoy the process and get creative! Prepping the Sweet Potatoes First, peel and dice two medium sweet potatoes. Place them in a pot of boiling water. Cook for 10 to 12 minutes. You want them tender enough to pierce with a fork. Drain and mash them lightly in the pot. The sweet potatoes should be chunky yet smooth. Mixing the Filling Add the drained black beans, corn, and diced bell peppers to the sweet potatoes. For flavor, include one teaspoon of ground cumin and one teaspoon of smoked paprika. Season with salt and pepper to taste. Mix everything well until fully combined. Preparing the Baking Dish Take a 9x13 inch baking dish. Pour a layer of enchilada sauce on the bottom. This step helps the tortillas from sticking. Warming and Filling Tortillas Heat a skillet over medium heat. Warm each tortilla for 10 to 15 seconds on both sides. This makes them flexible. Spoon about ¼ cup of the sweet potato mixture into the center of each tortilla. Roll them tightly and place seam-side down in the dish. Repeat until all tortillas are filled. Assembling the Enchiladas After filling all the tortillas, pour the remaining enchilada sauce over them. Make sure to cover them evenly. Sprinkle one cup of shredded cheese on top. Baking Process Cover the dish with aluminum foil. Place it in the preheated oven at 375°F (190°C). Bake for 20 minutes. Remove the foil and bake for another 10 minutes. Look for bubbling and golden cheese. Garnishing and Serving Suggestions Once baked, take the dish out of the oven. Garnish with fresh cilantro. Serve with lime wedges for an extra burst of flavor. Enjoy your delicious Sweet Potato Black Bean Enchiladas! How to Select Fresh Ingredients Choose sweet potatoes that feel firm and smooth. Look for ones with no dark spots. For black beans, pick cans with no dents. Fresh bell peppers should be bright and crisp. Check corn kernels for vibrant color, whether fresh or frozen. Alternative Cooking Methods for Sweet Potatoes You can bake sweet potatoes in the oven at 400°F for 45 minutes. They will be sweet and soft. Boiling them is quicker, taking just 10-12 minutes. If you want to steam them, place in a steamer basket for about 15 minutes. Ensuring Tortillas Don't Tear Warm your corn tortillas in a skillet. Heat them for 10-15 seconds on each side. This makes them soft and flexible. You can also wrap them in a damp cloth and microwave for 30 seconds. Recommended Accompaniments Serve the enchiladas with lime wedges. Add cilantro for freshness. You can also include a side of guacamole or salsa for extra flavor. Best Practices for Plating Place each enchilada on a plate and drizzle with sauce. Garnish with chopped cilantro. A lime wedge on the side adds color and zest. Flavor Enhancements Try adding jalapeños for a spicy kick. You can also sprinkle some feta cheese on top for a tangy flavor. A dollop of sour cream can balance the heat and add creaminess. {{image_4}} Alternative Beans or Protein Options You can switch black beans for pinto beans or kidney beans. If you want protein, try shredded chicken or cooked quinoa. These swaps keep the dish tasty and satisfying. Other Veggies to Include Feel free to add spinach, zucchini, or mushrooms to your filling. These veggies add flavor and color, making your enchiladas even more appealing. Dairy-Free Cheese Choices For a dairy-free option, use cashew cheese or a plant-based cheese. These choices melt well and still give you that cheesy goodness without dairy. Different Sauces to Use You can try different sauces like green enchilada sauce or mole. Both add unique flavors and turn your dish into something special. Flavor Profiles (spicy, smoky, etc.) Adjust the seasonings for a spicy kick. Add jalapeños or chipotle peppers for heat, or use smoked paprika for a deeper flavor. One-Pan vs. Traditional Recipes If you want an easier option, try a one-pan version. Just mix everything in a skillet and bake. This saves time and reduces cleanup! - Refrigeration Tips: Place leftover enchiladas in an airtight container. Keep them in the fridge for up to three days. To maintain flavor, cover the enchiladas with foil or plastic wrap. - Freezing Instructions: For longer storage, freeze enchiladas in a freezer-safe container. Separate layers with parchment paper to avoid sticking. They can stay fresh for up to three months. Label the container with the date for easy tracking. - Best Methods to Reheat Enchiladas: The oven is the best way to reheat enchiladas. Preheat the oven to 350°F (175°C). Place enchiladas on a baking dish and cover them with foil to keep them moist. - Recommended Timing and Temperatures: Heat for about 20 minutes. If using a microwave, place enchiladas on a microwave-safe plate. Heat for 2-3 minutes on high, checking to ensure they are hot throughout. Enjoy your tasty leftovers! Yes, you can prepare these enchiladas ahead of time. Simply follow the recipe up to the baking step. Then, cover the dish and place it in the fridge. When you're ready to eat, bake them straight from the fridge. Just add a few extra minutes to the baking time. Making homemade enchilada sauce is simple. You need: - 1 can (15 oz) tomato sauce - 1 tablespoon chili powder - 1 teaspoon ground cumin - 1 teaspoon garlic powder - Salt, to taste Mix all these ingredients in a bowl. Adjust spices as you like. This sauce adds a fresh touch to your enchiladas. These enchiladas pair well with many sides. You can serve them with: - Mexican rice - Refried beans - A fresh salad - Guacamole - Sour cream These sides balance the flavors and add more texture to your meal. Yes, these enchiladas can be gluten-free. Use corn tortillas, as they are naturally gluten-free. Always check labels on your enchilada sauce and other ingredients to ensure they are gluten-free. Enjoy without worry! This blog post covered the key ingredients for sweet potato black bean enchiladas and how to make them. I shared useful tips on selecting fresh produce and the best methods for cooking sweet potatoes. You also learned how to store leftovers and reheat them for later meals. In closing, these enchiladas offer great flavor and nutrition. Whether you stick to the basics or try variations, they are sure to please. Enjoy your cooking journey and feel free to explore different flavors!

Sweet Potato Black Bean Enchiladas Flavorful Treat

If you’re looking for a tasty, healthy meal, you’ve come to the right place! Sweet Potato Black Bean Enchiladas are

- 1 cup smooth almond butter - 1/2 cup packed brown sugar - 1/4 cup honey or pure maple syrup - 2 large eggs - 1 teaspoon pure vanilla extract - 1 teaspoon baking powder - 1/4 teaspoon fine sea salt - 1 cup rolled oats - 1/2 cup dark chocolate chips - 1/2 cup chopped walnuts (optional) - To make this recipe vegan, substitute eggs with flax eggs. Mix 2 tablespoons of ground flaxseed with 6 tablespoons of water. Let it sit for 5 minutes until it thickens. - For a gluten-free option, use certified gluten-free rolled oats. Ensure all other ingredients are gluten-free as well. - If you prefer to avoid honey, maple syrup works perfectly as a sweetener. It adds a nice flavor. What types of almond butter can I use? You can use any smooth almond butter. Look for natural almond butter with no added sugars or oils. This keeps the blondies healthy and tasty. Can I use crunchy almond butter? Yes, crunchy almond butter adds a fun texture. It makes the blondies chewy and tasty. Just be aware that the texture will change slightly. Is it okay to use different sweeteners? Yes, you can use agave syrup or coconut sugar instead of brown sugar. Each sweetener brings a unique taste. Start by preheating your oven to 350°F (175°C). This step is key for even baking. Grab an 8x8-inch baking pan and line it with parchment paper. Make sure some paper hangs over the sides. This helps you lift out the blondies later. In a large bowl, mix 1 cup of smooth almond butter with 1/2 cup of packed brown sugar. Add 1/4 cup of honey or maple syrup. Use a spatula or whisk to blend until smooth. Next, crack in 2 large eggs, one at a time. Mix well after each egg. Finally, stir in 1 teaspoon of pure vanilla extract until it’s all combined. In another bowl, whisk together 1 teaspoon of baking powder, 1/4 teaspoon of fine sea salt, and 1 cup of rolled oats. This mix makes sure your blondies rise well. Carefully fold the dry mix into the wet mix using a spatula. Be gentle; overmixing can change the texture. Pour the batter into your lined pan. Spread it evenly with a spatula. Place the pan in the oven and bake for about 20-25 minutes. To check if they’re done, insert a toothpick in the center. It should come out clean or with a few moist crumbs. Once baked, let the blondies cool for 10 minutes. Use the parchment paper to lift them out. Move them to a wire rack to cool completely. Then, cut into 16 squares and enjoy! To get a soft and chewy texture, use smooth almond butter. This keeps your blondies moist. Make sure to measure your brown sugar tightly. This adds the right sweetness and texture. When mixing, blend until just combined. Overmixing can make them tough. Bake your blondies until they are lightly golden on top. This helps to create a nice crust while keeping them soft inside. One common mistake is using cold eggs. Always bring your eggs to room temperature first. This helps them mix better. Another mistake is not lining the pan with parchment paper. This can make it hard to remove the blondies later. Avoid opening the oven door too early. This can cause them to sink in the middle. Lastly, don't skip the cooling time. Letting them cool helps set the texture. To add more depth, try adding spices like cinnamon or nutmeg. These bring warmth and richness. You can also mix in dried fruits like cranberries for a tart contrast. For a nutty twist, try adding pecans or hazelnuts. If you love coconut, shredded coconut can add a nice texture. Finally, a pinch of sea salt on top before baking brightens all the flavors. {{image_4}} You can switch almond butter for other nut butters. Peanut butter adds a classic taste. Cashew butter gives a creamy texture. Sunflower seed butter is great for nut allergies. Each choice changes the flavor and texture. Experiment to find your favorite! You can add fun flavors to your blondies. Coconut flakes give a tropical touch. Dried fruits like cranberries or apricots add sweetness. For a spice kick, try cinnamon or nutmeg. You can also add a splash of espresso for depth. Each extra ingredient makes your blondies unique. Need a sugar-free option? Use a sugar substitute like erythritol. You can also replace honey with agave syrup. For gluten-free blondies, swap rolled oats with gluten-free oats. These changes keep the taste while fitting your diet. Enjoy the blondies without worry! To keep your almond butter blondies fresh, store them in an airtight container. This helps retain moisture and flavor. Place parchment paper between layers to prevent sticking. You can store them at room temperature for up to three days. If you want to keep them longer, freezing is a great option. Cut blondies into squares, then wrap each piece tightly in plastic wrap. Place them in a freezer-safe bag or container. They will stay good for up to three months in the freezer. When you're ready to enjoy, let them thaw in the fridge overnight. The blondies last about a week in the fridge. If you want to reheat, simply place a square in the microwave for about 10-15 seconds. This warms them up nicely without drying them out. Enjoy them soft and gooey, just like fresh out of the oven! To make these blondies vegan, replace the eggs with flaxseed meal. Use 1 tablespoon of flaxseed meal mixed with 2.5 tablespoons of water for each egg. Let it sit for 5 minutes to thicken. You can also substitute honey with pure maple syrup or agave nectar. These swaps keep the texture and taste delicious. Yes, you can! Maple syrup works great as a substitute for honey. It adds a similar sweetness and flavor. You can also use agave nectar or coconut sugar. Keep in mind that each sweetener may change the texture slightly, but they all taste amazing. Flax eggs are a great choice! Mix 1 tablespoon of flaxseed meal with 2.5 tablespoons of water. Let it sit for a few minutes until it thickens. You can also use applesauce, mashed banana, or silken tofu. Each option gives a different flavor but works well in blondies. To keep your blondies moist, do not overmix the batter. Mix just until combined. Also, make sure not to overbake them. Check for doneness a few minutes before the time is up. The toothpick should come out with a few moist crumbs. If you want extra moisture, add more almond butter or a splash of non-dairy milk. You learned about making delicious almond butter blondies. We explored key ingredients, easy steps, and useful tips. I shared common mistakes to avoid and how to enhance flavors. Variations allow for creativity, whether you need vegan options or want to try new nut butters. Proper storage keeps your blondies fresh. Remember, a few simple adjustments can make or break your treat. Enjoy baking and experimenting with flavors. Your perfect blondie awaits!

Almond Butter Chocolate Chip Blondies Simple Delight

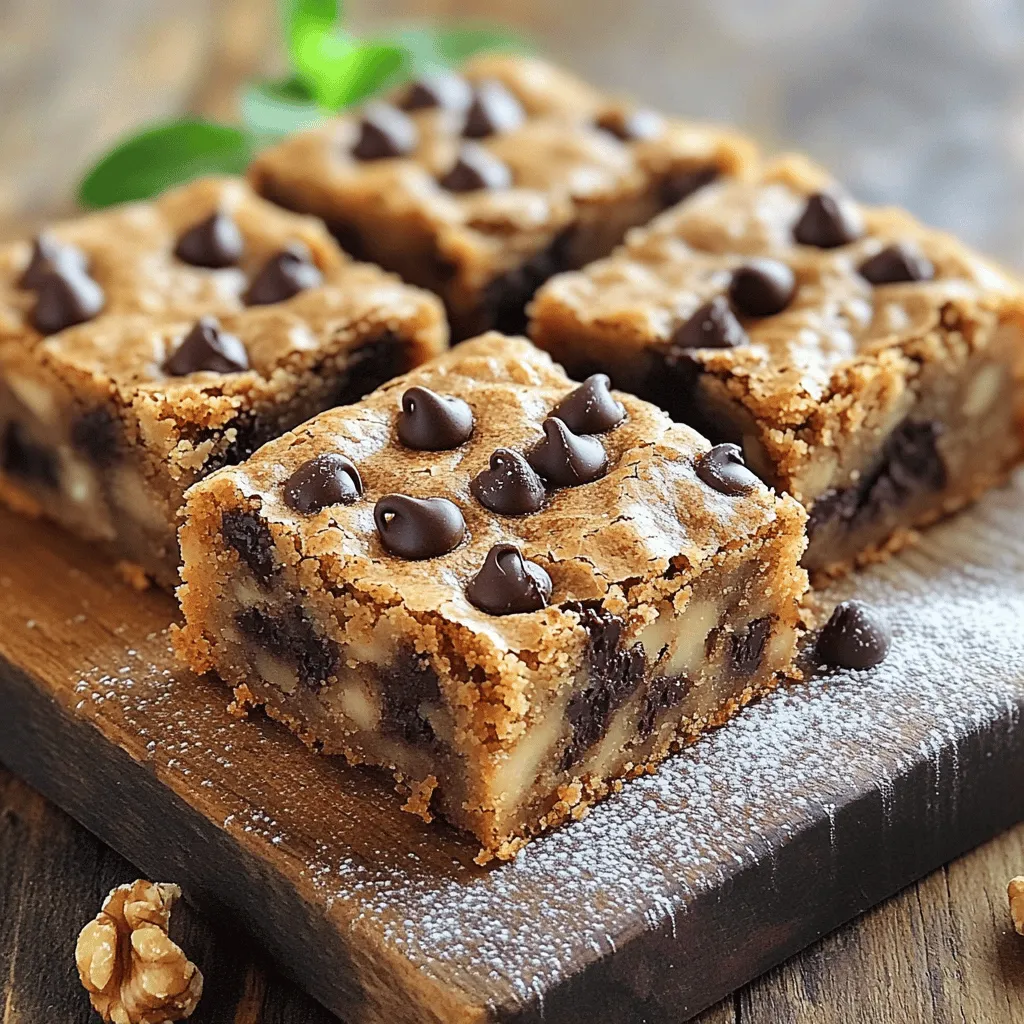
Are you ready to indulge in a treat that’s both simple and delicious? Almond Butter Chocolate Chip Blondies are the

- 4 large Russet potatoes, thinly sliced - 1 onion, finely chopped - 2 cups heavy cream - 1 ½ cups shredded sharp cheddar cheese - 1 cup grated Gruyère cheese - 3 cloves garlic, minced - 2 tablespoons unsalted butter (divided) - 1 teaspoon dried thyme - Salt and freshly ground black pepper, to taste - Fresh chives, chopped (for garnish) When making cheesy scalloped potatoes, I love using Russet potatoes. They cook well and have a nice texture. Thinly slicing them helps create soft layers. Use a sharp knife or mandoline for even slices. Next, I chop the onion finely. It adds sweetness and depth. Mince the garlic to ensure it blends well with the cream. I also choose sharp cheddar for its strong flavor, and Gruyère for its meltiness. Heavy cream gives the dish its rich and creamy texture. It makes every bite smooth and decadent. Dried thyme adds that lovely herb taste. Salt and pepper are key for balancing flavors. Finally, I top it all with fresh chives. They add a pop of color and a mild onion taste. Gather all these ingredients to create a delicious and comforting meal. First, preheat your oven to 375°F (190°C). This step ensures your potatoes bake evenly. Next, take a large baking dish and butter it well. Use 1 tablespoon of unsalted butter to coat the bottom and sides. This helps prevent sticking and makes clean-up easier. In a medium saucepan, melt the other tablespoon of butter over medium heat. Add the finely chopped onion and cook it until soft and clear, about 5 minutes. Stir in the minced garlic and cook for 1 more minute. You want it fragrant but not burnt. Then, pour in the heavy cream. Add the dried thyme, salt, and black pepper. Heat this mixture until it simmers, then remove it from the heat. Letting the flavors blend is key. Now, let’s layer the potatoes. Start by spreading half of the thinly sliced potatoes in the buttered dish. Drizzle half of the creamy onion mixture over them. Next, sprinkle half of both the shredded sharp cheddar and grated Gruyère cheeses on top. Repeat this process with the remaining potatoes and cream mixture. Finally, add the rest of the cheese for a rich, gooey top. Cover the baking dish tightly with aluminum foil. This traps steam and helps the potatoes cook. Bake in your preheated oven for 40 minutes. After that, remove the foil and bake for another 20 to 25 minutes. You’ll know it’s done when the top is golden brown and bubbly. Let the dish cool for 10 minutes before serving. This cooling time helps the flavors set and makes it easier to serve. Garnish with chopped chives for a fresh touch. To get that rich, creamy texture, cook the potatoes evenly. Slice them thinly for fast cooking. Use a sharp knife or mandoline for uniform slices. This helps them cook at the same speed. For cheese, I recommend mixing sharp cheddar with Gruyère. Cheddar adds a strong flavor, while Gruyère brings a nutty richness. This combo melts beautifully and creates layers of taste. Herbs and spices can make a big difference. Dried thyme works well, but you can also try rosemary or parsley. These add a fresh touch to your dish. Want to switch it up? Add cooked bacon for a smoky flavor. You can also mix in sautéed mushrooms or spinach to add depth. These twists keep the dish exciting and unique. Serving scalloped potatoes can be fun! You can dish them right from the baking dish for a casual feel. For special occasions, spoon portions onto plates. Garnish with fresh chives for a pop of color. Chives add a mild onion flavor and make the dish look fancy. You can also sprinkle some paprika on top for a nice contrast. {{image_4}} You can enjoy cheesy scalloped potatoes even without dairy. Start by using a plant-based cream. Coconut cream or cashew cream works great as a substitute for heavy cream. For cheese, look for dairy-free cheese. Options like almond or soy cheese melt well and add flavor. Add nutrition and color by mixing in vegetables. Broccoli or spinach adds a nice touch. Chop them finely and layer them with the potatoes. If you want extra flavor, try adding cooked bacon or ham. These meats give a savory taste that pairs well with the cheese. Don’t be afraid to play with spices! Add fresh herbs like rosemary or basil for a fragrant twist. A dash of cayenne or paprika can add heat and depth. These spices will make your dish stand out at any meal. To keep your cheesy scalloped potatoes fresh, cool them completely. Place them in an airtight container. Store in the fridge for up to 3 days. When you're ready to enjoy them, reheat in the oven. Preheat to 350°F (175°C). Cover with foil to keep them moist, then heat for about 20 minutes. This keeps the texture creamy and delicious. If you want to save your cheesy scalloped potatoes for later, freezing is a great option. First, let them cool completely. Then, wrap them tightly in plastic wrap and foil. You can freeze them for up to 2 months. When you’re ready to eat, thaw in the fridge overnight. Reheat in the oven at 350°F (175°C) until hot throughout, about 30 minutes. This way, they stay tasty and satisfying. To make cheesy scalloped potatoes, start by preheating your oven to 375°F (190°C). Butter a large baking dish with one tablespoon of unsalted butter. Next, cook one finely chopped onion in a saucepan with the remaining butter until soft. Add three minced garlic cloves and cook for one more minute. Pour two cups of heavy cream into this mix, adding dried thyme, salt, and pepper. Simmer it gently. Now, layer half of four thinly sliced Russet potatoes in the dish. Pour half of the cream mixture over that, followed by half of the shredded sharp cheddar and grated Gruyère cheeses. Repeat with the remaining potatoes, cream, and cheese. Cover with foil and bake for 40 minutes, then remove the foil and bake for 20-25 minutes until golden brown. Let it cool for ten minutes before serving. Yes, you can use alternatives like cauliflower or turnips for a low-carb version. Simply slice them thinly as you would the potatoes. These options absorb the creamy sauce well. Cauliflower has a mild taste that pairs nicely with cheese. Turnips offer a slightly peppery flavor, adding a unique twist. Both keep the dish creamy and delicious without the carbs from potatoes. Cheesy scalloped potatoes last about three to five days in the fridge. Make sure to store them in an airtight container. Always check for any signs of spoilage before eating. Reheat in the oven or microwave until hot. If you see any change in smell or color, it's best to discard them. You can prepare the dish a day ahead. Assemble it up to the baking step, then cover it with foil and store it in the fridge. When ready to cook, let it sit for 30 minutes at room temperature before baking. This helps the potatoes cook evenly. For reheating, bake it until bubbly and golden, just like the original recipe. Cheesy scalloped potatoes are a delicious dish you can easily make at home. We covered the key ingredients, step-by-step instructions, and storage tips to help you succeed. You can even experiment with variations to make the dish your own. Remember, this recipe is perfect for gatherings or cozy nights in. Enjoy every creamy bite, and don't hesitate to share your tasty results with friends and family!

Cheesy Scalloped Potatoes Rich and Creamy Delight

Get ready to indulge in a rich and creamy dish that will elevate any meal: Cheesy Scalloped Potatoes! With layers

The main ingredients in these muffins bring flavor and health. Here are the key players: - 2 ripe bananas, thoroughly mashed - 1/2 cup creamy almond butter - 1/4 cup natural honey or pure maple syrup - 2 large eggs, at room temperature - 1 teaspoon pure vanilla extract - 1 teaspoon baking soda - 1/2 teaspoon baking powder - 1/2 teaspoon ground cinnamon - 1 1/2 cups whole wheat flour - 1/4 teaspoon fine sea salt Ripe bananas provide natural sweetness and moisture. Almond butter adds creaminess and nutty flavor. Honey or maple syrup gives an extra touch of sweetness. The eggs bind everything together, while baking soda and baking powder help the muffins rise. You can customize your muffins with these fun add-ins: - 1/2 cup chopped walnuts (optional, for crunch) - 1/4 cup dark chocolate chips (optional, for sweetness) Adding walnuts brings a nice crunch. Dark chocolate chips add a sweet surprise that pairs well with bananas. You can mix and match these options to suit your taste. Feel free to experiment if you need to swap ingredients: - Use peanut butter instead of almond butter for a different flavor. - Try different sweeteners like agave syrup or coconut sugar. - Substitute flax eggs for a vegan option. Just mix 1 tablespoon of ground flaxseed with 2.5 tablespoons of water and let it sit for 5 minutes. These substitutions help make the recipe work for your needs while keeping it tasty. Adjusting ingredients can lead to new favorites! Start by gathering your ingredients. You need: - 2 ripe bananas, thoroughly mashed - 1/2 cup creamy almond butter - 1/4 cup natural honey or pure maple syrup - 2 large eggs, at room temperature - 1 teaspoon pure vanilla extract - 1 teaspoon baking soda - 1/2 teaspoon baking powder - 1/2 teaspoon ground cinnamon - 1 1/2 cups whole wheat flour - 1/4 teaspoon fine sea salt - 1/2 cup chopped walnuts (optional) - 1/4 cup dark chocolate chips (optional) Preheat your oven to 350°F (175°C). Line a muffin tin with paper liners. This prevents sticking and makes for easy cleanup. In a large mixing bowl, combine the mashed bananas with the almond butter. Mix them until smooth. Next, add the honey or maple syrup, eggs, and vanilla. Whisk these ingredients until they blend well and become creamy. In another bowl, whisk the dry ingredients together. Combine the whole wheat flour, baking soda, baking powder, cinnamon, and sea salt. Mix these until they are evenly combined. Now, gently fold the dry ingredients into the banana mixture. Use a spatula or wooden spoon to stir until just combined. It is fine if you see a few lumps; do not overmix. If you want extra texture, fold in the walnuts and chocolate chips. Spoon the batter into each muffin cup, filling them about two-thirds full. Place the muffin tin in your preheated oven. Bake for 18-20 minutes, or until a toothpick inserted in the center comes out clean. When the muffins are done, let them cool in the tin for about 5 minutes. After that, carefully transfer them to a wire rack to cool completely. Enjoy the warm aroma as they cool! To get soft and fluffy muffins, start with ripe bananas. They add moisture and sweetness. Use creamy almond butter for richness and flavor. Avoid overmixing your batter. Stir until just combined, leaving some lumps. This keeps the muffins light. Bake at 350°F for 18-20 minutes. Keep an eye on them. Use a toothpick to check for doneness. The toothpick should come out clean. Let the muffins cool completely on a wire rack. This prevents sogginess. Store them in an airtight container. They stay fresh for about three days at room temperature. If you want to keep them longer, freeze them. Wrap each muffin in plastic wrap and place in a freezer bag. They can last up to three months in the freezer. Serve these muffins warm for the best taste. A light dusting of powdered sugar makes them pretty. You can also drizzle extra almond butter on top. These muffins pair well with coffee or tea. They make a great breakfast or snack. Consider adding fresh fruit on the side for extra flavor. {{image_4}} You can easily make these muffins gluten-free. Use almond flour or a gluten-free flour blend. Both options give your muffins a soft texture. The taste will remain rich and delicious. Just make sure the baking soda and baking powder are gluten-free. To make vegan almond butter banana muffins, swap the eggs for flax eggs. Mix one tablespoon of flaxseed meal with three tablespoons of water. Let it sit for five minutes. This will create a perfect binder for your muffins. You can also use maple syrup instead of honey for sweetness. You can customize the flavor of your muffins. Try adding spices like nutmeg or ginger for warmth. You can also mix in fruit like blueberries or chopped apples for a fruity twist. Want some crunch? Add chopped walnuts or pecans. For sweetness, toss in dark chocolate chips. Each of these options enhances the muffins and makes them unique. To keep your almond butter banana muffins fresh, store them in an airtight container. Place a piece of parchment paper between layers to avoid sticking. You can keep them at room temperature for up to three days. If you want them to last longer, refrigerate them. Just remember to let them come to room temperature before enjoying. Freezing these muffins is easy and effective. Wrap each muffin tightly in plastic wrap. Then, place them in a freezer-safe bag or container. They can stay frozen for up to three months. To reheat, simply take one out and microwave it for about 20 seconds. You can also warm them in the oven at 350°F for about 10 minutes. This will help keep the muffins soft and fluffy. Baked almond butter banana muffins can last about three days at room temperature. If kept in the fridge, they can last up to a week. However, for the best taste and texture, enjoy them fresh. If you freeze them, remember to use them within three months for the best flavor. Yes, you can use other nut butters. Peanut butter works well and adds a nice taste. Cashew butter is creamy and mild, making it a great choice too. Just keep in mind that different nut butters may change the flavor and texture a bit. If you want to skip eggs, try using flaxseed meal. Mix 1 tablespoon of flaxseed meal with 2.5 tablespoons of water. Let it sit for 5 minutes to thicken. You could also use 1/4 cup of unsweetened applesauce or mashed banana as a replacement. These options keep your muffins soft and moist. To check if the muffins are done, use a toothpick. Insert it into the center of a muffin. If it comes out clean, the muffins are ready. They usually take 18 to 20 minutes to bake. Keep an eye on them to avoid overbaking. Yes, you can make these muffins ahead of time! Bake them, then let them cool completely. Store them in an airtight container at room temperature for up to three days. You can also freeze them for up to three months. Just thaw them before serving. We explored how to make delightful almond butter banana muffins. You learned about key ingredients and optional add-ins to boost flavor. We covered step-by-step baking, tips for perfect texture, and storage tips for freshness. You can even adapt this recipe for gluten-free or vegan diets. In short, these muffins are tasty and easy. Enjoy making them for breakfast or snacks!

Almond Butter Banana Muffins Soft and Fluffy Treat

Welcome to the world of Almond Butter Banana Muffins! These soft and fluffy treats are perfect for breakfast or a

To craft a vibrant Greek Orzo Salad, gather these key ingredients: - 1 cup orzo pasta - 1 ½ cups cherry tomatoes, halved - 1 cucumber, diced - 1 bell pepper (red or yellow), diced - ½ red onion, finely chopped - 1 cup Kalamata olives, pitted and halved - 1 cup feta cheese, crumbled - ¼ cup fresh parsley, chopped - ¼ cup extra virgin olive oil - 2 tablespoons freshly squeezed lemon juice - 1 teaspoon dried oregano - Salt and freshly cracked black pepper to taste These ingredients create the base for a delicious and colorful salad packed with flavors. - Orzo Pasta: This small pasta cooks quickly and adds a nice texture. - Feta Cheese: Creamy and tangy, feta brings depth to the salad. It also offers protein and calcium. - Kalamata Olives: They add a briny flavor that enhances the dish. Olives are rich in healthy fats. - Cherry Tomatoes: Sweet and juicy, they provide color and freshness. Tomatoes are high in vitamins. - Cucumber: Crunchy and refreshing, cucumber offers hydration and a crisp texture. - Extra Virgin Olive Oil: A must for dressing, it brings richness and healthy fats. - Fresh Lemon Juice: Adds brightness and acidity that balances the salad's flavors. These special ingredients not only make your salad tasty but also pack it with nutrients. If you need to swap ingredients, consider these options: - Orzo: Use quinoa or couscous for a gluten-free option. - Feta Cheese: Try goat cheese or a dairy-free feta for different flavors. - Kalamata Olives: Black olives or green olives can replace them if needed. - Cherry Tomatoes: Regular tomatoes, diced, work well if you can't find cherry tomatoes. - Cucumber: Zucchini or bell pepper can add crunch if you prefer. These substitutions help you customize the salad while keeping its essence. First, bring a pot of salted water to a boil. Add the orzo pasta. Cook it for about 8-10 minutes until it is al dente. Once cooked, drain the orzo in a colander. Rinse it under cold water to stop cooking. This keeps the orzo from getting mushy. Let it drain thoroughly before moving to a large mixing bowl. While the orzo cooks, chop your fresh veggies. Take 1 ½ cups of cherry tomatoes and cut them in half. Dice one cucumber and one bell pepper, either red or yellow. Finely chop half a red onion. Add all these veggies to the large bowl with the orzo. Stir gently to mix them well. In a small bowl, whisk together the dressing. Use ¼ cup of extra virgin olive oil and 2 tablespoons of freshly squeezed lemon juice. Add 1 teaspoon of dried oregano, a pinch of salt, and some freshly cracked black pepper. Mix until the dressing is smooth and well-blended. Now, fold the drained orzo into the veggie mix. Add in 1 cup of halved Kalamata olives and 1 cup of crumbled feta cheese. Gently combine these ingredients. Be careful not to smash the feta, as you want to keep its shape. Pour the dressing over your salad. Toss everything together using salad tongs. Make sure all the ingredients are coated in the zesty dressing. Sprinkle ¼ cup of chopped fresh parsley over the top. Give it a final gentle toss. Let the salad rest for at least 10 minutes at room temperature. This helps the flavors mix. Serve it in a colorful salad bowl or in mason jars for a fun touch. Add a lemon wedge for extra zest! To get the best orzo, cook it just right. Bring a pot of salted water to a boil. Add the orzo and stir well. Cook for about 8 to 10 minutes until it is al dente. This means it should be firm but not hard. When done, drain it in a colander. Rinse the orzo with cold water to stop cooking. This keeps it from getting mushy. Allow it to drain well before mixing it into the salad. Fresh herbs make your Greek Orzo Salad pop! I love using parsley in this dish. It adds a bright taste. Chop it finely and sprinkle it on top before serving. You can also use fresh oregano for a deeper flavor. If you want to try new herbs, add mint or dill. These herbs give a fresh twist. Always add herbs just before serving to keep their taste and color. A beautiful salad makes for a great meal. For a colorful display, use a large salad bowl. This allows all the vibrant colors to shine. If you want something fun, serve the salad in mason jars. It makes a neat, portable option. Add a lemon wedge on the side for extra zest. You can also sprinkle some extra feta on top for a tasty touch. This way, your salad looks as good as it tastes! {{image_4}} To make your Greek Orzo Salad even more exciting, consider adding Mediterranean flavors. You can include artichoke hearts for a tangy bite. Roasted red peppers add a sweet depth. Try using sun-dried tomatoes for an extra kick. These additions enhance the salad's taste and bring vibrant colors. You can also toss in some capers for a briny touch. These flavors work well with the fresh ingredients. If you want to boost the protein, there are great options. Grilled chicken or shrimp can add a savory element. Simply grill the protein and chop it before mixing it into the salad. You can also add chickpeas for a plant-based protein. They blend seamlessly with the orzo and veggies. For a heartier choice, try adding diced ham or salami. These meats add a salty flavor that pairs well with feta cheese. For a vegan-friendly Greek Orzo Salad, swap out the feta cheese. Use crumbled tofu or cashew cheese instead. These options provide a creamy texture without dairy. You can also add more veggies, like shredded carrots or radishes. They add crunch and color. For extra flavor, include a dash of balsamic vinegar. This gives the salad a nice tang that complements the other ingredients. Enjoy the fresh taste while keeping it completely plant-based. To store leftovers, place the Greek Orzo Salad in an airtight container. Seal it tightly to keep out air. This helps maintain freshness. You can enjoy this salad for up to three days in the fridge. After that, the veggies may lose their crunch and flavor. Always check for any signs of spoilage before eating. Freezing Greek Orzo Salad is not ideal. The texture of the vegetables and feta changes when frozen. If you must freeze it, separate the orzo from the veggies and dressing. You can freeze cooked orzo for up to three months. When ready to use, thaw it overnight in the fridge. Mix it with fresh veggies and dressing before serving. To keep your salad fresh longer, store the dressing separately. Combine it just before serving. Avoid cutting the veggies too small; larger pieces hold up better. Use fresh ingredients whenever possible. This will enhance both flavor and shelf life. Remember to keep the salad in a cool spot, away from sunlight. You can use other small pasta types like couscous or ditalini. Quinoa or rice also works well. These options will keep the salad tasty and fun. Greek Orzo Salad stays fresh for about 3 to 5 days in the fridge. Store it in an airtight container to keep it crisp and flavorful. Yes, you can prepare the salad a day in advance. Just mix the dressing separately and add it right before serving. This keeps the ingredients fresh and crunchy. No, this salad isn’t gluten-free because of the orzo pasta. You can use gluten-free pasta if you want a gluten-free option. Serve it chilled or at room temperature. For a fun twist, use mason jars for individual servings. Add a lemon wedge or extra parsley on top for a pop of color! Greek orzo salad is a tasty mix of fresh ingredients and flavors. We covered essential and special ingredients, plus substitutions. I shared how to cook orzo and prepare vegetables. The dressing, mixing, and serving ideas make it easy to enjoy. Tips on texture and herbs bring it to life. In the end, you can customize this salad to fit your tastes. Keep leftovers safe, or freeze for later. Whatever your choice, this dish is sure to please!

Greek Orzo Salad Fresh and Flavorful Recipe Idea

Looking for a fresh and tasty dish? My Greek Orzo Salad is packed with flavor and easy to make. It’s

- 1 large head of cauliflower, chopped into florets - 3 cloves garlic, finely minced - 1 cup sharp cheddar cheese, shredded - 1/4 cup cream cheese, at room temperature - 1/4 cup unsalted butter - 1/4 cup milk (add more if needed for desired creaminess) - Salt and black pepper, to taste - Fresh chives or parsley, chopped, for garnish These main ingredients create a wonderful blend of flavors. The cauliflower serves as the base. Garlic adds depth and aroma. The cheeses give that rich, cheesy finish. Cream cheese makes the mash smooth and creamy. Butter provides a rich mouthfeel. Milk adjusts the texture to your liking. Finally, salt and pepper enhance all the flavors. Chives or parsley add a fresh touch. - Alternate cheese options - Additional seasonings For cheese, you can try different types. Gruyère or mozzarella can add unique flavors. You can also mix cheeses for a richer taste. For seasonings, consider adding garlic powder or onion powder. You can also use smoked paprika for a twist. Experiment with these options to find your favorite mix. 1. Boiling cauliflower Start by filling a large pot with water. Add a generous amount of salt to the water. Bring the water to a rolling boil. Once boiling, add the chopped cauliflower florets. Cook them for about 10 to 12 minutes. You want them tender enough to pierce with a fork. 2. Sautéing garlic While the cauliflower cooks, grab a small saucepan. Place it over medium heat. Add the unsalted butter and let it melt. Once melted, add the minced garlic. Sauté it for 1 to 2 minutes. Stir often until the garlic is fragrant and golden. Take care not to brown the garlic. Remove the saucepan from heat and set it aside. 1. Combining ingredients After your cauliflower is done cooking, drain it in a colander. Transfer the drained florets to a large mixing bowl. Add the sautéed garlic and melted butter to the bowl. Also include the softened cream cheese, shredded cheddar cheese, and milk. Season the mixture with salt and black pepper to taste. 2. Achieving desired consistency Now it’s time to mash! Use a potato masher for a chunky texture. If you want it super smooth, use an immersion blender. Mash the mixture until it reaches your favorite consistency. If it seems too thick, add more milk for creaminess. Adjust the seasoning with salt and pepper as needed. 1. Keeping warm before serving Once everything is well mixed and creamy, return the mashed cauliflower to the original pot. Keep it warm on low heat while you prepare to serve it. 2. Plating suggestions To plate the dish, spoon generous portions into bowls. Finish with a sprinkle of chopped fresh chives or parsley. This adds a pop of color and extra flavor to your dish. Enjoy your cheesy garlic mashed cauliflower! To make your cheesy garlic mashed cauliflower super creamy, start by adjusting the milk quantity. Use 1/4 cup of milk as a base. If you want it creamier, add more milk a little at a time. Mix it well after each addition. This lets you control the texture. Choosing the right cheese is also key. Sharp cheddar adds a tangy flavor. You can try mozzarella for a milder taste. For a twist, use pepper jack for some heat. Adding herbs and spices can really boost the taste. Fresh chives or parsley brighten the dish. You could also mix in some garlic powder for extra garlic flavor. A pinch of nutmeg gives a warm touch, too. Customizing with extra ingredients can make this dish your own. Consider adding crispy bacon bits for crunch. You could also stir in some sautéed spinach for extra color and nutrients. For mashing, a potato masher works well for a chunky texture. If you prefer smooth cauliflower, an immersion blender does the job nicely. The best pot for boiling is a large, heavy-bottomed pot. This helps cook the cauliflower evenly. Make sure to use a colander for draining, as it allows excess water to escape easily. {{image_4}} You can add cooked bacon bits for a tasty twist. Start by frying bacon until it’s crispy, then chop it into small pieces. Mix these bits into your cheesy garlic mashed cauliflower. The salty and smoky flavor of bacon pairs well with the creamy cauliflower. This variation makes the dish even more hearty and satisfying. For a vegan version, swap out dairy ingredients. Use cashew cream or almond milk instead of cream and butter. Nutritional yeast can replace cheese, adding a cheesy flavor without dairy. This option keeps the dish rich while making it suitable for a plant-based diet. You won’t miss the dairy at all! If you like heat, spice it up! Add chopped jalapeños or red pepper flakes to the cauliflower while it cooks. This will give your mashed cauliflower a nice kick. You can also mix in some hot sauce before serving. The spicy flavor balances nicely with the creamy texture, making it a fun twist on the classic dish. To keep your cheesy garlic mashed cauliflower fresh, store it in an airtight container. Make sure to let it cool before sealing it. Place the container in the fridge. It will last up to three days. Always check for any signs of spoilage before eating. When you reheat this dish, you want to keep it creamy. The best way is to use a microwave. Add a splash of milk to the cauliflower before heating. Stir it a few times while warming. This will help maintain its smooth texture. If you prefer, you can also reheat it on the stove. Just warm it over low heat and stir often. If you want to freeze your cheesy garlic mashed cauliflower, first let it cool completely. Then, place it in a freezer-safe container. It can stay in the freezer for up to two months. When you’re ready to eat it, thaw it in the fridge overnight. Reheat it gently on the stove or in the microwave, adding a bit of milk for creaminess. The best cheese for cheesy garlic mashed cauliflower is sharp cheddar. Its strong flavor adds great taste. Other good options include: - Cream cheese for creaminess - Gruyère for a nutty flavor - Parmesan for a salty kick Each cheese brings its own twist to this dish. You can mix and match for even more flavor! Yes, you can prepare cheesy garlic mashed cauliflower ahead of time. Here are some tips: - Make the dish fully, then cool it down. - Store it in an airtight container in the fridge for up to three days. - Reheat it on low heat, adding a splash of milk to restore creaminess. This way, you can enjoy this comfort food without the last-minute rush. To make cheesy garlic mashed cauliflower dairy-free, try these options: - Use nutritional yeast instead of cheese for a cheesy taste. - Substitute cream cheese with cashew cream or vegan cream cheese. - Use almond or coconut milk instead of regular milk. These swaps keep the richness while making it dairy-free and delicious! This blog post covered how to make cheesy garlic mashed cauliflower from scratch. We looked at the key ingredients and preparation steps. You learned tips for perfect creaminess and flavor. We also explored fun variations and storage tips. Remember, you can customize this dish to fit your taste. Whether you prefer a vegan version or one loaded with bacon, there's a way for everyone to enjoy it. Happy cooking!

Cheesy Garlic Mashed Cauliflower Comfort Dish Recipe

If you’re ready to elevate your comfort food game, cheesy garlic mashed cauliflower is a must-try! This creamy side dish

To make Thai mango sticky rice, you need a few key ingredients: - 1 cup glutinous rice (also known as sweet rice) - 1 ½ cups coconut milk (divided) - 2 ripe mangoes, peeled and thinly sliced - ½ cup granulated sugar - ½ teaspoon salt - 1 tablespoon sesame seeds, toasted (for garnish) - Fresh mint leaves (for garnish) These ingredients create a sweet and creamy dish. Glutinous rice gives the sticky texture. Coconut milk adds rich flavor. Ripe mangoes provide sweetness and freshness. If you can't find glutinous rice, you can try other types. Short-grain rice can work as a substitute. It won't be as sticky but will still taste good. Jasmine rice is another option. It has a lovely aroma and texture. The best mangoes for this dish are ripe and sweet. Look for mangoes that give slightly when you press them. Varieties like Ataulfo or Haden are great choices. They have a smooth texture and sweet flavor. Avoid mangoes that are too hard or have blemishes. The right mango makes your dessert shine. First, rinse your glutinous rice under cold water. Keep rinsing until the water runs clear. This step is key to removing extra starch. After rinsing, place the rice in a bowl and cover it with water. Let it soak for at least four hours. If you have time, soak it overnight. This makes the rice soft and easy to cook. Once the rice has soaked, drain it well. Then, line a steamer with cheesecloth. This step stops the rice from sticking. Place the drained rice in the steamer. Steam the rice over boiling water for about 20 to 25 minutes. The rice will be ready when it looks translucent and feels tender. This method gives you the perfect sticky rice. In a medium saucepan, mix one cup of coconut milk with the sugar and salt. Set the heat to low or medium. Stir the mixture gently. You want the sugar to dissolve fully. Be careful not to let it boil. After the sugar is dissolved, take the pan off the heat. Keep half a cup of coconut milk aside for serving later. This sauce will add rich flavor to your sticky rice. To make perfect sticky rice, soak your glutinous rice for at least four hours. This softens the grains. If you have time, soak it overnight for the best texture. Rinse the rice under cold water until it runs clear. This step removes excess starch that can make the rice gummy. When cooking, steam the rice in a cheesecloth-lined steamer. This prevents sticking and allows the rice to cook evenly. Your rice should look translucent and feel tender when done. For a smooth coconut sauce, combine one cup of coconut milk, sugar, and salt in a saucepan. Heat it gently over low to medium heat. Stir until the sugar dissolves, but do not let it boil. Boiling can change the texture. Set aside half a cup of coconut milk for serving. This will drizzle beautifully over your dish. Remember to stir the sauce slowly for a velvety finish. When serving, take a generous scoop of sticky rice and place it on a decorative plate. Artfully arrange the sliced mangoes beside the rice. Drizzle the reserved coconut milk over both the rice and mango. This adds shine and flavor. For a pop of color, sprinkle toasted sesame seeds on top. Fresh mint leaves make a lovely garnish. They add a refreshing touch and enhance the look of your dessert. {{image_4}} You can make Thai mango sticky rice vegan and dairy-free with some simple swaps. Use coconut milk as your main liquid. It is already dairy-free and gives a rich flavor. The sugar is generally vegan, but check if you want to be sure. This dish remains a treat for everyone! You can easily change the toppings to switch things up. Try adding chopped nuts like peanuts or cashews for crunch. Fresh fruit like strawberries or kiwi can add color and flavor. You can also drizzle some honey or maple syrup for extra sweetness. Don't be afraid to experiment! Serving this dessert can be fun and creative. Use small bowls for individual portions. You can layer the rice and mango in clear cups for a pretty look. Add a sprig of mint on top for color. Another idea is to serve it in half mango shells for a tropical feel. Enjoy making it your own! To store leftover sticky rice, first let it cool. Place it in an airtight container. This helps keep it fresh and moist. You can keep it in the fridge for up to 3 days. If you have a lot, divide it into smaller portions. This makes it easier to reheat later. To reheat sticky rice, use a steamer. Place the rice in the steamer basket. Steam for about 5-10 minutes until warm. You can also use the microwave. Put the rice in a bowl with a splash of water. Cover with a damp paper towel and heat for 1-2 minutes. For the mango, keep it fresh. Serve it cold, as warm mango can lose its nice texture. Sticky rice can last up to 3 days in the fridge. If you want to store it longer, freezing is a good option. Wrap the rice tightly in plastic wrap, then place it in a freezer bag. It can stay frozen for up to 2 months. When ready to eat, thaw it in the fridge overnight, then reheat. No, you cannot use regular rice. Glutinous rice gives this dish its unique sticky texture. Regular rice will not clump together like glutinous rice. If you want the right taste and feel, stick to glutinous rice. You can tell when the rice is fully cooked by its look and feel. The grains will become translucent and soft. You can also taste a small piece. It should be tender but still have a slight bite. Mango is the star, but other fruits work well too. You can try ripe bananas, sweet strawberries, or juicy pineapples. Each fruit adds a unique flavor that complements the sticky rice and coconut. Yes, you can prepare some parts ahead. You can soak the rice overnight and cook it the next day. You can also make the coconut sauce early. Just keep everything in the fridge until you are ready to serve. In this article, I shared how to make Thai Mango Sticky Rice. You learned about key ingredients, like glutinous rice and ripe mangoes. I provided step-by-step instructions on soaking and cooking the rice, plus making the coconut sauce. You also found tips for perfect rice and serving ideas. This dish is fun to make and great to share. With a few variations and storage tips, you can enjoy it anytime. Now, get cooking and treat yourself to this sweet delight!

Thai Mango Sticky Rice Delightful Dessert Recipe

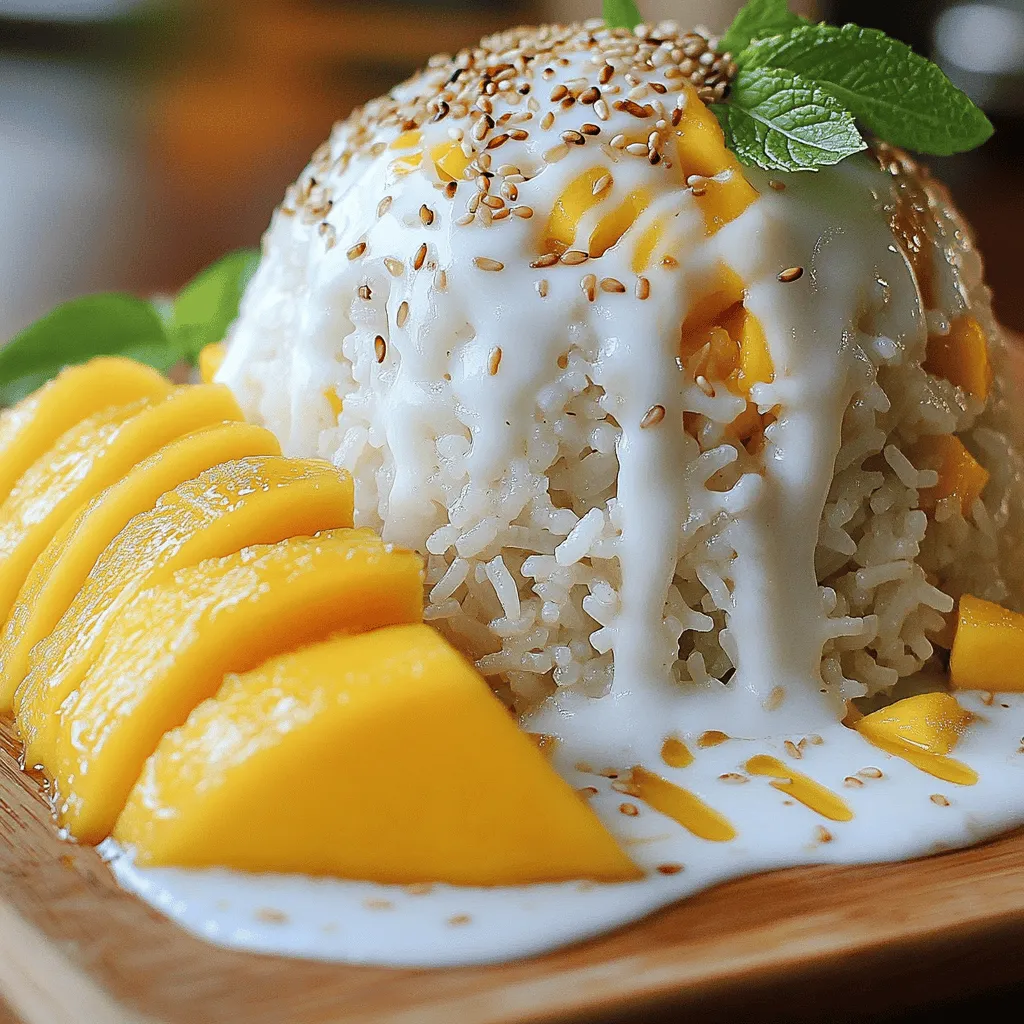
Thai Mango Sticky Rice is a sweet treat you don’t want to miss. This delightful dessert combines soft, sticky rice

Older posts
Newer posts
← Previous Page1 … Page9 Page10 Page11 … Page90 Next →

dsad

© 2025 recipetorch • Built with GeneratePress

Our Policies

  • Copyright Policy
  • Cookie Policy
  • GDPR Policy
  • Privacy Policy
  • Disclaimer
  • Terms Of Use

More Information

  • Home
  • About
  • Contact
  • Appetizers
  • Dessert
  • Dinner
  • Drinks
©2025, recipetorch About Back To Top