WANT TO SAVE THIS RECIPE?
If you’re craving a sweet treat that’s simple to make, look no further! My Chocolate Caramel Slice is an irresistible no-bake dessert that combines rich chocolate, smooth caramel, and a crunchy base. You’ll only need a few ingredients, and I’ll guide you through each easy step. Whether you want a quick dessert for guests or a little indulgence for yourself, this slice is sure to satisfy. Ready to enjoy each delicious bite? Let’s get started!
Why I Love This Recipe
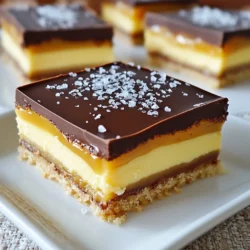
- Irresistible Layers: This recipe features a perfect combination of crunchy biscuit base, rich caramel, and smooth chocolate, creating a delightful texture in every bite.
- Easy to Make: With simple ingredients and straightforward steps, this decadent treat can be whipped up by bakers of all skill levels without any fuss.
- Perfect for Sharing: Cut into squares, these slices are ideal for parties, gatherings, or just enjoying with family, making them a great choice for any occasion.
- Customizable: Feel free to add your favorite toppings or mix-ins, such as nuts or dried fruit, to make this dessert uniquely yours!
Ingredients
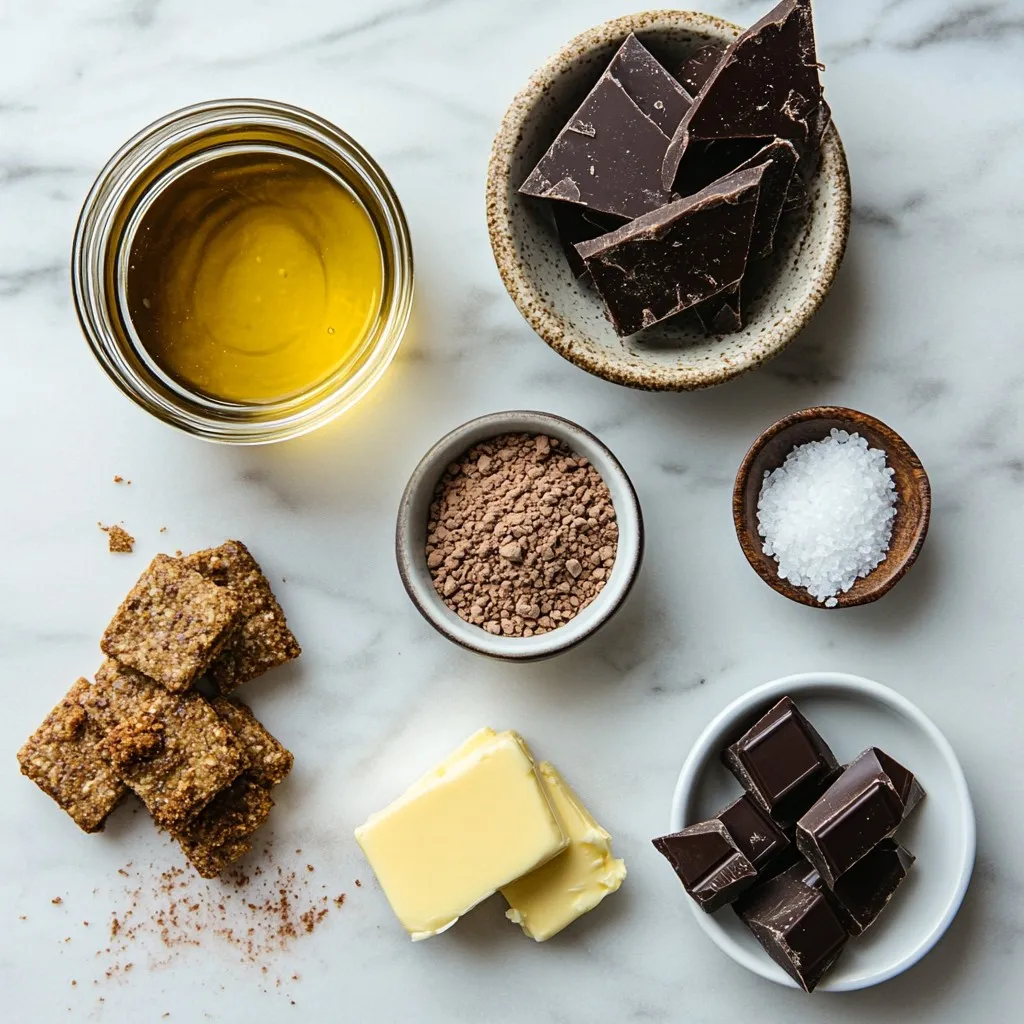
To make this delicious Chocolate Caramel Slice, you will need the following ingredients:
– 1 ½ cups digestive biscuits, finely crushed
– ½ cup unsalted butter, melted
– 1 can (14 oz) sweetened condensed milk
– ¼ cup golden syrup (or light corn syrup)
– ¼ cup packed brown sugar
– 200g dark chocolate, coarsely chopped
– 2 tablespoons coconut oil
– Sea salt flakes, for garnish
Each ingredient plays a key role in creating that perfect blend of crunchy, creamy, and sweet flavors.
The digestive biscuits form the base. Their crunch gives a nice texture. The unsalted butter binds the crumbs, making a solid crust. Sweetened condensed milk is the star of the caramel layer. It adds rich sweetness and creaminess. Golden syrup, or light corn syrup, helps the caramel set and adds depth to the flavor.
Brown sugar enhances the caramel’s sweetness and gives it a lovely, warm color. Dark chocolate is used for the topping. It adds richness and a touch of bitterness to balance the sweetness. Coconut oil makes the chocolate melt smoothly and helps it set correctly. Finally, sea salt flakes on top elevate the taste and give a gourmet touch.
Gather all these ingredients, and you are ready to create a treat that will impress everyone!

Step-by-Step Instructions
Preparing the Base
– Start by combining 1 ½ cups of finely crushed digestive biscuits with ½ cup of melted unsalted butter in a medium bowl. Mix until the crumbs are coated.
– Next, press this mixture firmly into the bottom of a lined 8×8 inch baking pan. Make sure it’s even and compact.
– Refrigerate the pan for 30 minutes. This helps the base set well for the layers above.
Making the Caramel Layer
– In a medium saucepan, mix 1 can of sweetened condensed milk, ¼ cup of golden syrup, and ¼ cup of packed brown sugar.
– Heat this mixture over medium heat. Stir constantly to prevent it from sticking.
– After about 8 to 10 minutes, the caramel thickens. It should have a rich golden color. Pour this warm caramel over your chilled biscuit base, spreading it evenly.
Preparing the Chocolate Topping
– For the topping, combine 200g of coarsely chopped dark chocolate and 2 tablespoons of coconut oil in a small saucepan or bowl.
– Heat gently until both melt together smoothly. Stir well to combine.
– Pour the melted chocolate over the set caramel layer. Use a spatula to spread it evenly across the top.
Chilling Time for the Complete Slice
– Place the pan back in the fridge for at least 2 hours. This time helps the entire slice set properly.
– Once firm, remove it from the pan and place it on a cutting board. Cut it into squares.
– Just before serving, sprinkle a light pinch of sea salt flakes on top to enhance the flavor.
Tips & Tricks
Achieving the Perfect Caramel
To make great caramel, avoid boiling the mixture. Keep the heat medium and stir constantly. This prevents burning and ensures a smooth texture. The cooking time should be about 8 to 10 minutes. You want it to thicken and turn golden. When it looks rich and creamy, it’s ready to pour over the base.
Chocolate Topping Variations
If you prefer a sweeter taste, use milk chocolate instead of dark chocolate. It melts nicely and gives a creamy finish. You can also add flavor extracts, like vanilla, to your chocolate. Just a few drops can enhance the chocolate’s flavor and make it unique.
Serving Suggestions
Pair your chocolate caramel slice with a warm drink like coffee or tea. The flavors match well and create a cozy vibe. For presentation, arrange the squares neatly on a colorful plate. You can even add fresh berries or a sprinkle of nuts for a pop of color.
Pro Tips
- Use Room Temperature Ingredients: Ensuring that your butter and eggs are at room temperature can help create a smoother mixture, resulting in a better texture for your slice.
- Don’t Rush the Caramel: Take your time when cooking the caramel. Stir constantly and watch for that rich golden color; this ensures a deep flavor and prevents burning.
- Chill Properly: Allowing each layer to chill adequately in the refrigerator is key. It helps the layers to set firmly, making it easier to cut clean squares.
- Garnish with Care: A sprinkle of sea salt enhances the chocolate and caramel flavors beautifully. Just a pinch on each square will elevate your slice to the next level.
Variations
Different Biscuit Bases
You can switch up the biscuit base for your Chocolate Caramel Slice. This change can add new flavors and textures. If you need a gluten-free option, try using gluten-free digestive biscuits. They work just as well and keep the slice tasty. You can also use crushed graham crackers or chocolate cookies. These alternatives can give a richer taste to your slice.
Nutty Additions
Adding nuts to your layers can elevate the slice. Nuts bring crunch and flavor. You can mix in chopped nuts like pecans or walnuts. Almonds also work nicely if you want a lighter touch. Just sprinkle them on top of the caramel or stir them into the biscuit base. This extra layer of flavor makes the dessert even more special.
Flavor Enhancements
You can enhance flavors by adding spices or using different chocolates. A pinch of cinnamon can bring warmth to the caramel. It blends well with the chocolate and adds depth. You could also use flavored chocolate, like orange or mint. These options create a unique twist on the classic recipe. Experimenting with flavors makes your Chocolate Caramel Slice one-of-a-kind.
Storage Info
How to Store Chocolate Caramel Slice
To store your chocolate caramel slice, place it in an airtight container. Keep it in the fridge. This will keep the slice fresh. It can last up to one week in the fridge. Make sure it is well-covered to avoid drying out.
Freezing Tips
You can freeze the chocolate caramel slice for longer storage. Cut it into squares before freezing. Wrap each piece tightly in plastic wrap. Then, place them in a freezer-safe bag. They will stay good for up to three months.
To thaw, take out the slices and leave them in the fridge overnight. This helps them defrost slowly. You can also thaw them at room temperature for about 30 minutes.
Reheating Suggestions
Reheating is not usually needed for this dessert. If you want a warm treat, you can gently reheat it. Use the microwave at a low setting, about 10 seconds at a time. Check it often to avoid melting the chocolate too much. Enjoy the slice at your preferred temperature!
FAQs
Can I substitute the biscuits?
Yes, you can use other biscuits. Try graham crackers or gingersnaps for a twist. If you need a gluten-free option, use gluten-free digestive biscuits or almond flour cookies. The base will taste different, but it will still be delicious.
How do I know when the caramel is ready?
Watch for color and texture. The caramel should turn a rich golden brown. It will also thicken as you stir. If you dip a spoon in, it should coat the back lightly. Avoid boiling to keep it creamy.
Can I make this recipe ahead of time?
Absolutely! You can prepare the base and caramel a day in advance. Just keep them in the fridge. Assemble the chocolate topping right before serving for the best taste. This makes it perfect for parties or family gatherings.
You now have a simple and clear guide to make a delicious chocolate caramel slice. We covered the ingredients, step-by-step instructions, and tips for perfecting it. Remember, you can customize flavors and presentations too. Keep your slices fresh by storing them well. Enjoy making this treat and sharing it with friends and family. It’s an easy and rewarding recipe that will impress anyon
Decadent Chocolate Caramel Slice
A rich and indulgent dessert featuring layers of biscuit, caramel, and chocolate.
Prep Time 15 minutes mins
Cook Time 30 minutes mins
Total Time 3 hours hrs
Course Dessert
Cuisine American
Servings 16
Calories 250 kcal
- 1.5 cups digestive biscuits, finely crushed
- 0.5 cup unsalted butter, melted
- 1 can (14 oz) sweetened condensed milk
- 0.25 cup golden syrup (or light corn syrup)
- 0.25 cup packed brown sugar
- 200 g dark chocolate, coarsely chopped
- 2 tablespoons coconut oil
- to taste sea salt flakes, for garnish
Prepare the Base: In a medium mixing bowl, combine the finely crushed digestive biscuits and melted unsalted butter. Stir gently until the crumbs are well-coated with butter. Press this mixture evenly and firmly into the base of a lined 8x8 inch (20x20 cm) square baking pan to ensure a solid base. Place the pan in the refrigerator for 30 minutes to allow it to set and firm up.
Make the Caramel Layer: In a medium-sized saucepan, combine the sweetened condensed milk, golden syrup, and packed brown sugar. Heat the mixture over medium flames, stirring constantly. Continue to stir for about 8 to 10 minutes or until the caramel thickens and develops a rich golden hue. Be attentive to avoid boiling. Once ready, remove it from the heat and pour the warm caramel over the chilled biscuit base, spreading it evenly with a spatula. Return the pan to the fridge for an additional 30 minutes to let the caramel layer set properly.
Prepare the Chocolate Topping: In a small saucepan or microwave-safe bowl, combine the dark chocolate and coconut oil. Heat gently until both ingredients melt and mix together smoothly, stirring continuously until fully incorporated. Once melted, pour the luscious chocolate mixture over the set caramel layer, using a spatula to spread it evenly across the surface.
Chill and Garnish: Allow the slice to chill in the refrigerator for at least 2 hours, or until it feels completely firm to the touch. Once set, carefully remove it from the pan and place it on a cutting board. Use a sharp knife to cut it into elegant squares. Just before serving, sprinkle a light pinch of sea salt flakes on top of each square to enhance the overall flavor profile.
Serve: Arrange the delectable slices on a decorative plate and indulge in this delightful treat with friends or family!
Best served chilled with a sprinkle of sea salt.
Keyword caramel, chocolate, dessert, slices
WANT TO SAVE THIS RECIPE?