![To create my delicious pesto chicken stuffed peppers, you need the following: - 4 large bell peppers (any vibrant color you like) - 2 cups cooked chicken, shredded (rotisserie chicken works great) - 1/2 cup basil pesto (store-bought or homemade) - 1 cup quinoa, thoroughly cooked and cooled - 1/2 cup mozzarella cheese, freshly shredded - 1/4 cup sun-dried tomatoes, finely chopped - 1/4 cup pine nuts, lightly toasted - Salt and black pepper, to taste - Fresh basil leaves for garnish (optional, but adds nice color) You can add these ingredients if you want to boost the taste: - Garlic powder or minced garlic for extra flavor - Red pepper flakes for a little heat - Parmesan cheese for a cheesy topping - Olives, chopped, for a tangy twist - Fresh spinach, chopped, for added nutrition If you have dietary needs, here are some swaps: - Use cauliflower rice instead of quinoa for a low-carb option. - Replace chicken with chickpeas or black beans for a vegetarian dish. - Swap mozzarella for a dairy-free cheese alternative. - Use almond or sunflower seeds instead of pine nuts for nut-free diets. These ingredients make your pesto chicken stuffed peppers easy and full of flavor. For the full recipe, check the details above. Enjoy cooking! First, preheat your oven to 375°F (190°C). This step is key for even cooking. Next, take your bell peppers and cut the tops off. Carefully remove the seeds and membranes inside. Keep the peppers whole so you can fill them later. Set the tops aside or toss them if you don’t need them. In a large bowl, combine the shredded chicken, basil pesto, cooked quinoa, mozzarella cheese, sun-dried tomatoes, and toasted pine nuts. Stir the mixture gently until everything is well-coated with the pesto. This blend brings the flavors together. Add salt and black pepper to taste. Make sure it’s tasty! Now, it’s time to fill the peppers. Use a spoon to pack the chicken mixture into each pepper. Fill them to the top for maximum flavor. Place the stuffed peppers upright in a baking dish. If any peppers wobble, trim the bottom slightly to help them stand firm. Cover your baking dish tightly with aluminum foil. This helps keep the moisture in. Bake for 25 minutes in your preheated oven. After that, remove the foil and bake for another 10 to 15 minutes. Watch for the peppers to become tender and the tops to get a nice golden color. For the full recipe, check out the details above! To make your peppers tender, start by choosing the right ones. Look for large, fresh bell peppers with smooth skin. When you cut the tops off, make sure you remove all seeds and membranes. This helps the peppers cook evenly. Baking them covered with foil at first traps steam, softening the peppers. After 25 minutes, remove the foil to allow the tops to brown nicely. You can boost flavor easily! Try adding garlic powder or onion powder to the chicken mixture. A sprinkle of Italian herbs can add depth. If you like a bit of heat, add crushed red pepper flakes. Experiment with different cheeses, like feta or gouda, too. These small changes can elevate your dish. Using the right tools can make cooking easier. A sharp knife helps you cut the peppers cleanly. A sturdy baking dish is essential to hold the peppers upright. I recommend using a large mixing bowl for combining your filling. A spoon or spatula works well for mixing. Finally, don’t forget oven mitts for safe handling! For the complete recipe, check out the Full Recipe. {{image_4}} You can easily make these stuffed peppers vegetarian. Instead of chicken, use cooked lentils or black beans. They add protein and taste great. You can also use diced mushrooms for a meaty texture. If you want more flavor, add extra spices like cumin or paprika. Mix in more veggies like zucchini or spinach for added health benefits. If you want to switch up the protein, try ground turkey, beef, or tofu. Each protein adds a unique flavor. Ground turkey is light and healthy. Beef gives a rich taste. Tofu soaks up flavors well and is great for a plant-based option. Just make sure to season each protein well with salt and black pepper. Toppings can change the whole dish. Try adding sliced olives or jalapeños on top for a kick. A sprinkle of feta cheese or goat cheese adds creaminess. You can also drizzle balsamic reduction for a sweet touch. Fresh herbs like parsley or cilantro make it look pretty and fresh. Experiment with your favorite toppings to make it your own. For the full recipe, refer to the Pesto Chicken Stuffed Peppers section above. To store your pesto chicken stuffed peppers, first let them cool down. Once cool, wrap each pepper in plastic wrap or place them in an airtight container. This keeps them fresh and prevents any drying out. Store them in the fridge. They can last up to three days if stored properly. When you're ready to eat leftovers, preheat your oven to 350°F (175°C). Place the stuffed peppers in a baking dish. Add a splash of water to keep them moist. Cover the dish with foil to help them heat evenly. Bake for about 20-25 minutes, until they are hot throughout. You can also use a microwave. Heat them for about 2-3 minutes, checking often to avoid overcooking. If you want to freeze your stuffed peppers, do it before baking. Wrap each one tightly in plastic wrap and then place them in a freezer bag. They can stay frozen for up to three months. When you're ready to cook them, bake straight from the freezer. Just add about 10 extra minutes to the baking time. This way, you can enjoy a tasty meal anytime! For the full recipe, check back to make cooking these delicious stuffed peppers easy and fun. No, you should not use raw chicken. Raw chicken needs to cook fully. Stuffed peppers bake for a short time. Using raw chicken can lead to undercooked meat. Always use cooked chicken for safety and flavor. Stuffed peppers pair well with many sides. A simple salad adds freshness. Garlic bread can also complement the meal. You might try roasted vegetables for a healthy option. These sides enhance your dining experience. Stuffed peppers last about 3 to 5 days in the fridge. Store them in an airtight container for best results. Always check for any signs of spoilage before eating. Enjoy them within this time for fresh flavor. If you prefer a different grain, try brown rice or couscous. Both options work well in stuffed peppers. They provide a nice texture and flavor. Choose what fits your taste and diet. Yes, you can prepare the peppers in advance. Stuff them and store in the fridge. Bake them the next day for a quick meal. This makes dinner easy and convenient. Try it for busy weeknights. For the full recipe, visit the [Full Recipe]. We explored how to make delicious pesto chicken stuffed peppers. You learned about key ingredients, options for flavor, and smart substitutions for diets. The step-by-step guide gave clear instructions, while tips helped ensure perfect results. We even discussed fun variations and how to store leftovers. Now you have all the tools to make stuffed peppers your own. Get creative in the kitchen and enjoy each bite!](https://recipetorch.com/wp-content/uploads/2025/06/e4db532f-af17-49c9-83ec-81b95da8da80-768x768.webp)
Looking for a quick, tasty meal? Pesto Chicken Stuffed Peppers are easy to make and packed with flavor. You’ll love how this dish combines tender peppers with a zesty chicken filling. Whether you’re cooking for a family dinner or meal prep, these stuffed peppers are sure to impress. Let me guide you through this simple recipe that’s both delicious and satisfying!
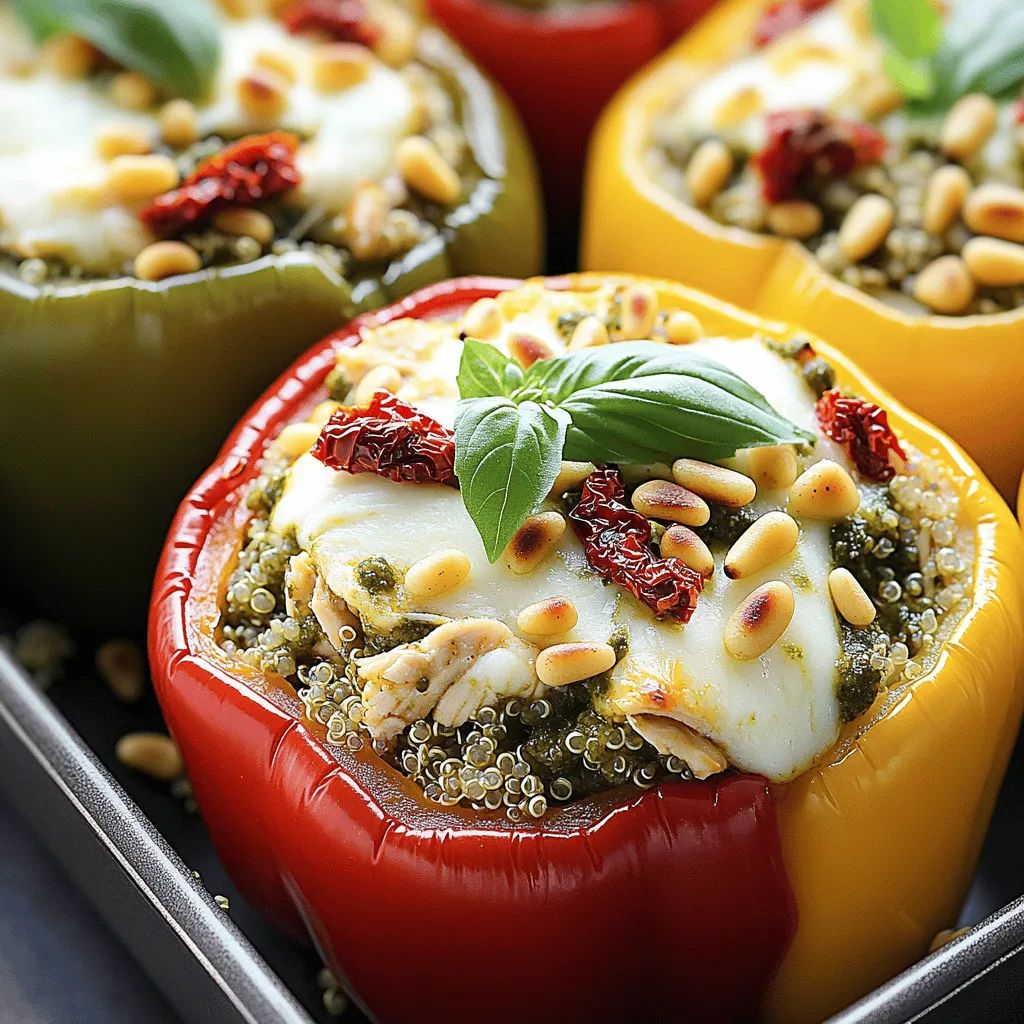
Ingredients
Main Ingredients for Pesto Chicken Stuffed Peppers
To create my delicious pesto chicken stuffed peppers, you need the following:
– 4 large bell peppers (any vibrant color you like)
– 2 cups cooked chicken, shredded (rotisserie chicken works great)
– 1/2 cup basil pesto (store-bought or homemade)
– 1 cup quinoa, thoroughly cooked and cooled
– 1/2 cup mozzarella cheese, freshly shredded
– 1/4 cup sun-dried tomatoes, finely chopped
– 1/4 cup pine nuts, lightly toasted
– Salt and black pepper, to taste
– Fresh basil leaves for garnish (optional, but adds nice color)
Optional Ingredients to Enhance Flavor
You can add these ingredients if you want to boost the taste:
– Garlic powder or minced garlic for extra flavor
– Red pepper flakes for a little heat
– Parmesan cheese for a cheesy topping
– Olives, chopped, for a tangy twist
– Fresh spinach, chopped, for added nutrition
Substitutions for Dietary Preferences
If you have dietary needs, here are some swaps:
– Use cauliflower rice instead of quinoa for a low-carb option.
– Replace chicken with chickpeas or black beans for a vegetarian dish.
– Swap mozzarella for a dairy-free cheese alternative.
– Use almond or sunflower seeds instead of pine nuts for nut-free diets.
These ingredients make your pesto chicken stuffed peppers easy and full of flavor.Enjoy cooking!
Step-by-Step Instructions
Preheat the Oven and Prepare Peppers
First, preheat your oven to 375°F (190°C). This step is key for even cooking. Next, take your bell peppers and cut the tops off. Carefully remove the seeds and membranes inside. Keep the peppers whole so you can fill them later. Set the tops aside or toss them if you don’t need them.
Mix and Prepare the Filling
In a large bowl, combine the shredded chicken, basil pesto, cooked quinoa, mozzarella cheese, sun-dried tomatoes, and toasted pine nuts. Stir the mixture gently until everything is well-coated with the pesto. This blend brings the flavors together. Add salt and black pepper to taste. Make sure it’s tasty!
Stuff the Peppers and Arrange for Baking
Now, it’s time to fill the peppers. Use a spoon to pack the chicken mixture into each pepper. Fill them to the top for maximum flavor. Place the stuffed peppers upright in a baking dish. If any peppers wobble, trim the bottom slightly to help them stand firm.
Baking Process and Timing
Cover your baking dish tightly with aluminum foil. This helps keep the moisture in. Bake for 25 minutes in your preheated oven. After that, remove the foil and bake for another 10 to 15 minutes. Watch for the peppers to become tender and the tops to get a nice golden color.
Tips & Tricks
How to Achieve Perfectly Tender Peppers
To make your peppers tender, start by choosing the right ones. Look for large, fresh bell peppers with smooth skin. When you cut the tops off, make sure you remove all seeds and membranes. This helps the peppers cook evenly. Baking them covered with foil at first traps steam, softening the peppers. After 25 minutes, remove the foil to allow the tops to brown nicely.
Enhancing Flavor with Additional Seasonings
You can boost flavor easily! Try adding garlic powder or onion powder to the chicken mixture. A sprinkle of Italian herbs can add depth. If you like a bit of heat, add crushed red pepper flakes. Experiment with different cheeses, like feta or gouda, too. These small changes can elevate your dish.
Tools & Equipment for Easy Preparation
Using the right tools can make cooking easier. A sharp knife helps you cut the peppers cleanly. A sturdy baking dish is essential to hold the peppers upright. I recommend using a large mixing bowl for combining your filling. A spoon or spatula works well for mixing. Finally, don’t forget oven mitts for safe handling!
Variations
Vegetarian Alternatives for Stuffed Peppers
You can easily make these stuffed peppers vegetarian. Instead of chicken, use cooked lentils or black beans. They add protein and taste great. You can also use diced mushrooms for a meaty texture. If you want more flavor, add extra spices like cumin or paprika. Mix in more veggies like zucchini or spinach for added health benefits.
Different Types of Proteins to Use
If you want to switch up the protein, try ground turkey, beef, or tofu. Each protein adds a unique flavor. Ground turkey is light and healthy. Beef gives a rich taste. Tofu soaks up flavors well and is great for a plant-based option. Just make sure to season each protein well with salt and black pepper.
Creative Toppings and Garnishes
Toppings can change the whole dish. Try adding sliced olives or jalapeños on top for a kick. A sprinkle of feta cheese or goat cheese adds creaminess. You can also drizzle balsamic reduction for a sweet touch. Fresh herbs like parsley or cilantro make it look pretty and fresh. Experiment with your favorite toppings to make it your own.
Storage Info
Proper Storage Techniques for Leftovers
To store your pesto chicken stuffed peppers, first let them cool down. Once cool, wrap each pepper in plastic wrap or place them in an airtight container. This keeps them fresh and prevents any drying out. Store them in the fridge. They can last up to three days if stored properly.
Reheating Instructions for Best Results
When you’re ready to eat leftovers, preheat your oven to 350°F (175°C). Place the stuffed peppers in a baking dish. Add a splash of water to keep them moist. Cover the dish with foil to help them heat evenly. Bake for about 20-25 minutes, until they are hot throughout. You can also use a microwave. Heat them for about 2-3 minutes, checking often to avoid overcooking.
Freezing Pesto Chicken Stuffed Peppers
If you want to freeze your stuffed peppers, do it before baking. Wrap each one tightly in plastic wrap and then place them in a freezer bag. They can stay frozen for up to three months. When you’re ready to cook them, bake straight from the freezer. Just add about 10 extra minutes to the baking time. This way, you can enjoy a tasty meal anytime!
FAQs
Can I use raw chicken instead of cooked?
No, you should not use raw chicken. Raw chicken needs to cook fully. Stuffed peppers bake for a short time. Using raw chicken can lead to undercooked meat. Always use cooked chicken for safety and flavor.
What are the best side dishes to serve with stuffed peppers?
Stuffed peppers pair well with many sides. A simple salad adds freshness. Garlic bread can also complement the meal. You might try roasted vegetables for a healthy option. These sides enhance your dining experience.
How long do stuffed peppers last in the fridge?
Stuffed peppers last about 3 to 5 days in the fridge. Store them in an airtight container for best results. Always check for any signs of spoilage before eating. Enjoy them within this time for fresh flavor.
What is a good substitute for quinoa?
If you prefer a different grain, try brown rice or couscous. Both options work well in stuffed peppers. They provide a nice texture and flavor. Choose what fits your taste and diet.
Can I make pesto chicken stuffed peppers ahead of time?
Yes, you can prepare the peppers in advance. Stuff them and store in the fridge. Bake them the next day for a quick meal. This makes dinner easy and convenient. Try it for busy weeknights.
We explored how to make delicious pesto chicken stuffed peppers. You learned about key ingredients, options for flavor, and smart substitutions for diets. The step-by-step guide gave clear instructions, while tips helped ensure perfect results. We even discussed fun variations and how to store leftovers.
Now you have all the tools to make stuffed peppers your own. Get creative in the kitchen and enjoy each bite!
![To create my delicious pesto chicken stuffed peppers, you need the following: - 4 large bell peppers (any vibrant color you like) - 2 cups cooked chicken, shredded (rotisserie chicken works great) - 1/2 cup basil pesto (store-bought or homemade) - 1 cup quinoa, thoroughly cooked and cooled - 1/2 cup mozzarella cheese, freshly shredded - 1/4 cup sun-dried tomatoes, finely chopped - 1/4 cup pine nuts, lightly toasted - Salt and black pepper, to taste - Fresh basil leaves for garnish (optional, but adds nice color) You can add these ingredients if you want to boost the taste: - Garlic powder or minced garlic for extra flavor - Red pepper flakes for a little heat - Parmesan cheese for a cheesy topping - Olives, chopped, for a tangy twist - Fresh spinach, chopped, for added nutrition If you have dietary needs, here are some swaps: - Use cauliflower rice instead of quinoa for a low-carb option. - Replace chicken with chickpeas or black beans for a vegetarian dish. - Swap mozzarella for a dairy-free cheese alternative. - Use almond or sunflower seeds instead of pine nuts for nut-free diets. These ingredients make your pesto chicken stuffed peppers easy and full of flavor. For the full recipe, check the details above. Enjoy cooking! First, preheat your oven to 375°F (190°C). This step is key for even cooking. Next, take your bell peppers and cut the tops off. Carefully remove the seeds and membranes inside. Keep the peppers whole so you can fill them later. Set the tops aside or toss them if you don’t need them. In a large bowl, combine the shredded chicken, basil pesto, cooked quinoa, mozzarella cheese, sun-dried tomatoes, and toasted pine nuts. Stir the mixture gently until everything is well-coated with the pesto. This blend brings the flavors together. Add salt and black pepper to taste. Make sure it’s tasty! Now, it’s time to fill the peppers. Use a spoon to pack the chicken mixture into each pepper. Fill them to the top for maximum flavor. Place the stuffed peppers upright in a baking dish. If any peppers wobble, trim the bottom slightly to help them stand firm. Cover your baking dish tightly with aluminum foil. This helps keep the moisture in. Bake for 25 minutes in your preheated oven. After that, remove the foil and bake for another 10 to 15 minutes. Watch for the peppers to become tender and the tops to get a nice golden color. For the full recipe, check out the details above! To make your peppers tender, start by choosing the right ones. Look for large, fresh bell peppers with smooth skin. When you cut the tops off, make sure you remove all seeds and membranes. This helps the peppers cook evenly. Baking them covered with foil at first traps steam, softening the peppers. After 25 minutes, remove the foil to allow the tops to brown nicely. You can boost flavor easily! Try adding garlic powder or onion powder to the chicken mixture. A sprinkle of Italian herbs can add depth. If you like a bit of heat, add crushed red pepper flakes. Experiment with different cheeses, like feta or gouda, too. These small changes can elevate your dish. Using the right tools can make cooking easier. A sharp knife helps you cut the peppers cleanly. A sturdy baking dish is essential to hold the peppers upright. I recommend using a large mixing bowl for combining your filling. A spoon or spatula works well for mixing. Finally, don’t forget oven mitts for safe handling! For the complete recipe, check out the Full Recipe. {{image_4}} You can easily make these stuffed peppers vegetarian. Instead of chicken, use cooked lentils or black beans. They add protein and taste great. You can also use diced mushrooms for a meaty texture. If you want more flavor, add extra spices like cumin or paprika. Mix in more veggies like zucchini or spinach for added health benefits. If you want to switch up the protein, try ground turkey, beef, or tofu. Each protein adds a unique flavor. Ground turkey is light and healthy. Beef gives a rich taste. Tofu soaks up flavors well and is great for a plant-based option. Just make sure to season each protein well with salt and black pepper. Toppings can change the whole dish. Try adding sliced olives or jalapeños on top for a kick. A sprinkle of feta cheese or goat cheese adds creaminess. You can also drizzle balsamic reduction for a sweet touch. Fresh herbs like parsley or cilantro make it look pretty and fresh. Experiment with your favorite toppings to make it your own. For the full recipe, refer to the Pesto Chicken Stuffed Peppers section above. To store your pesto chicken stuffed peppers, first let them cool down. Once cool, wrap each pepper in plastic wrap or place them in an airtight container. This keeps them fresh and prevents any drying out. Store them in the fridge. They can last up to three days if stored properly. When you're ready to eat leftovers, preheat your oven to 350°F (175°C). Place the stuffed peppers in a baking dish. Add a splash of water to keep them moist. Cover the dish with foil to help them heat evenly. Bake for about 20-25 minutes, until they are hot throughout. You can also use a microwave. Heat them for about 2-3 minutes, checking often to avoid overcooking. If you want to freeze your stuffed peppers, do it before baking. Wrap each one tightly in plastic wrap and then place them in a freezer bag. They can stay frozen for up to three months. When you're ready to cook them, bake straight from the freezer. Just add about 10 extra minutes to the baking time. This way, you can enjoy a tasty meal anytime! For the full recipe, check back to make cooking these delicious stuffed peppers easy and fun. No, you should not use raw chicken. Raw chicken needs to cook fully. Stuffed peppers bake for a short time. Using raw chicken can lead to undercooked meat. Always use cooked chicken for safety and flavor. Stuffed peppers pair well with many sides. A simple salad adds freshness. Garlic bread can also complement the meal. You might try roasted vegetables for a healthy option. These sides enhance your dining experience. Stuffed peppers last about 3 to 5 days in the fridge. Store them in an airtight container for best results. Always check for any signs of spoilage before eating. Enjoy them within this time for fresh flavor. If you prefer a different grain, try brown rice or couscous. Both options work well in stuffed peppers. They provide a nice texture and flavor. Choose what fits your taste and diet. Yes, you can prepare the peppers in advance. Stuff them and store in the fridge. Bake them the next day for a quick meal. This makes dinner easy and convenient. Try it for busy weeknights. For the full recipe, visit the [Full Recipe]. We explored how to make delicious pesto chicken stuffed peppers. You learned about key ingredients, options for flavor, and smart substitutions for diets. The step-by-step guide gave clear instructions, while tips helped ensure perfect results. We even discussed fun variations and how to store leftovers. Now you have all the tools to make stuffed peppers your own. Get creative in the kitchen and enjoy each bite!](https://recipetorch.com/wp-content/uploads/2025/06/e4db532f-af17-49c9-83ec-81b95da8da80-250x250.webp)
