WANT TO SAVE THIS RECIPE?
Indulge your sweet side with my Chocolate Mint Oreo Truffles! These truffles blend the rich taste of chocolate with a refreshing mint twist. Perfect for any occasion, they’re simple to make and a hit at parties. I’ll guide you through every step, from mixing to melting, so you can impress friends and family with ease. Let’s dive into this delightful dessert treat that will satisfy any sweet tooth!
Why I Love This Recipe
- Decadent Flavor: The combination of rich chocolate and refreshing mint creates an irresistible flavor that’s perfect for any occasion.
- Easy to Make: With just a few simple ingredients and steps, these truffles come together quickly, making them a great choice for both novice and experienced bakers.
- Perfect for Gifting: These truffles not only taste amazing but also look beautiful, making them an ideal homemade gift for friends and family.
- Customizable: Feel free to experiment with different extracts or toppings to make these truffles your own!
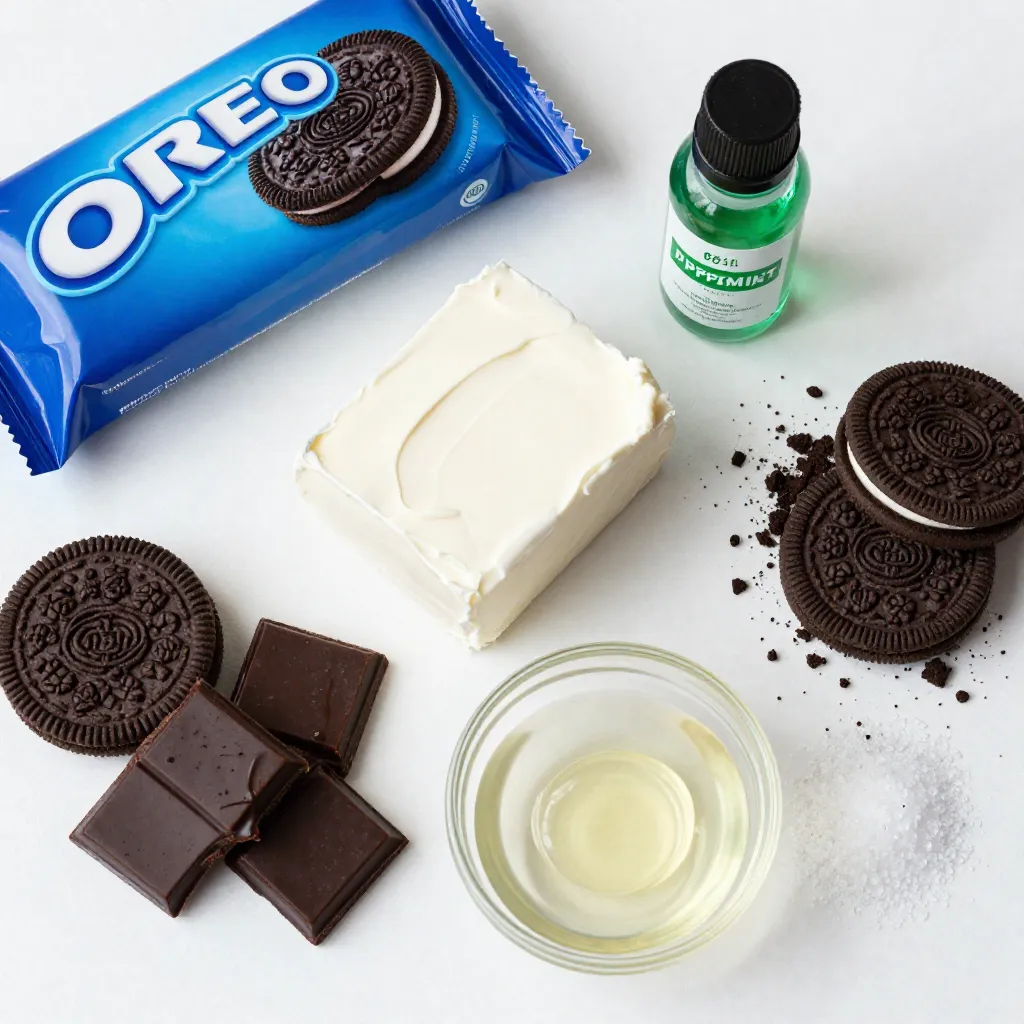
Ingredients
List of Ingredients
– 1 package (15.25 oz) Oreo Cookies
– 8 oz cream cheese, softened to room temperature
– 1 teaspoon peppermint extract
– 8 oz dark chocolate melting wafers
– 1 tablespoon coconut oil (optional, for smoother chocolate coating)
– Crushed mint Oreo cookies (for garnish)
– A pinch of sea salt (for garnish)
Measurement Details
Each ingredient plays a key role in flavor and texture. Use one full package of Oreo cookies. The cream cheese needs to be soft so it mixes well. A teaspoon of peppermint extract adds the perfect mint flavor. Use 8 oz of dark chocolate melting wafers for the coating. The coconut oil makes the chocolate smooth but is optional. For garnishing, crushed mint Oreo cookies and a pinch of sea salt finish the truffles nicely.
Recommended Brands or Types
I recommend using regular Oreo cookies for the base. Look for a good quality cream cheese like Philadelphia, as it blends best. For the dark chocolate melting wafers, brands like Merckens or Ghirardelli work great. They melt evenly and cover the truffles well. If you want a nice touch, use Trader Joe’s crushed mint Oreos for the garnish.

Step-by-Step Instructions
Preparation of the Oreo Mixture
First, grab a package of Oreo cookies. Place them in a food processor. Pulse the cookies until they become fine crumbs. This creates a great base for our truffles. Next, take a large bowl. Mix the crushed Oreos with softened cream cheese. Add one teaspoon of peppermint extract for flavor. Blend everything together until it forms a thick dough. This part needs some effort, but it is worth it!
Rolling the Truffle Balls
Now, it’s time to shape the mixture into truffles. Use a cookie scoop or your hands for this. Take a small amount of the mixture and roll it into a ball. Aim for about one inch in size. Place each ball on a baking sheet lined with parchment paper. This will help them not stick later.
Melting the Chocolate Coating
While the truffle balls chill, let’s melt the chocolate. Use dark chocolate melting wafers for a rich taste. Place these in a microwave-safe bowl. Heat them in 30-second bursts. Stir between each interval to keep them smooth. If you want a creamier finish, add one tablespoon of coconut oil. This makes the chocolate easier to work with.
Dipping the Truffles
Once the truffle balls are firm, take them out of the freezer. One by one, dip each ball into the melted chocolate. Use a fork to cover them well. Let any extra chocolate drip off before you put them back on the tray. This step is key for a nice coating!
Cooling and Setting the Truffles
While the chocolate is still wet, sprinkle crushed mint Oreo cookies on top. Add a pinch of sea salt for a nice touch. Then, place the tray in the fridge for about 30 minutes. This allows the chocolate to harden completely. Once set, your truffles are ready to enjoy!
Tips & Tricks
Achieving the Perfect Texture
To get the best texture, mix the cream cheese with the crushed Oreos well. This helps the truffles hold together. If the dough is too soft, add more crushed Oreos. If too dry, mix in a little more cream cheese. You want a thick, moldable mixture.
Customizing Flavor Profiles
You can change the flavor by adding more mint extract or using different extracts. Try vanilla or almond for a twist. You can also add a splash of liqueur, like peppermint schnapps, for an adult version. Just remember to adjust the sweetness to balance the flavor.
Presentation Ideas
Make your truffles shine by placing them on a beautiful plate. Drizzle extra melted chocolate on top for flair. You can also use colorful sprinkles or edible glitter. For a festive look, stack them in a pyramid shape or use cupcake liners.
Pro Tips
- Chill for Firmness: Ensure your truffle mixture is well-chilled before rolling. This makes it easier to form balls and helps them hold their shape when dipped in chocolate.
- Quality Chocolate Matters: Use high-quality dark chocolate for coating. It not only enhances the flavor but also provides a smoother finish.
- Experiment with Flavors: Feel free to swap peppermint extract for other flavors like orange or almond to create a unique twist on your truffles.
- Storage Tips: Store your truffles in an airtight container in the refrigerator to keep them fresh. They can last up to a week!
Variations
Alternative Coatings
You can mix things up with different coatings. Instead of dark chocolate, try white chocolate. It adds a sweet twist. For a fun crunch, roll the truffles in crushed nuts or sprinkles. You can also use candy melts in bright colors for a festive look. Each option gives a new taste and style.
Different Flavor Extracts
While peppermint shines in these truffles, other flavors work great too. Use vanilla extract for a classic taste. Almond extract adds a nice nutty flavor. Or try orange extract for a fruity touch. Each extract creates a different experience and can surprise your taste buds.
Dietary Adjustments
To make these truffles fit various diets, you have options. Use vegan cream cheese for a dairy-free treat. Swap regular Oreos for gluten-free ones if needed. You can also use sugar-free chocolate to cut back on sweetness. These changes keep the fun alive while catering to different needs.
Storage Info
Best Storage Practices
To keep your Chocolate Mint Oreo Truffles fresh, place them in an airtight container. Line the container with parchment paper to prevent sticking. If you have multiple layers, add more parchment between each layer. Store them in the fridge to help them stay firm and tasty.
Freezing Instructions
If you want to save some truffles for later, freezing works great. First, place the truffles on a baking sheet in a single layer. Freeze them for about an hour until they are solid. Then, transfer them to a freezer-safe bag or container. Don’t forget to label the bag with the date!
Shelf Life
Homemade truffles can last about one week in the fridge. If frozen, they can stay good for up to three months. Just remember to let them thaw in the fridge before enjoying them. This way, they will taste fresh and delicious!
FAQs
What can I use instead of cream cheese?
You can use mascarpone cheese or Greek yogurt. Both options give a creamy texture. Mascarpone offers a rich taste. Greek yogurt adds a tangy flavor. Make sure to adjust the sweetness if needed.
How can I make these truffles less sweet?
Cut back on the cream cheese or use a sugar substitute. You can also add a pinch of salt to balance the sweetness. Dark chocolate has less sugar than milk chocolate, so consider using that too.
Can I use milk chocolate instead of dark chocolate?
Yes, you can use milk chocolate. It will make the truffles sweeter. Milk chocolate melts easily, but it may not give the same rich flavor as dark chocolate. Experiment with both to find your favorite.
How do I prevent the chocolate from cracking?
Make sure the chocolate is properly melted. Stir it until smooth, and avoid overheating. Adding coconut oil can help create a smoother coating. Chill the truffles before dipping them into the chocolate.
This blog post covered making Oreo truffles with simple steps. We explored the ingredients, focused on preparation, and discussed storage tips. Customization options let you play with flavors as you create your truffles. Remember, try different coatings and adjust for dietary needs. Follow these tips to enhance your truffle-making skills. Enjoy sharing your delicious treats, and impress everyone with your sweet creation
Chocolate Mint Oreo Truffles
Delicious truffles made with crushed Oreo cookies, cream cheese, and a hint of peppermint, coated in dark chocolate.
Prep Time 30 minutes mins
Total Time 1 hour hr
Course Dessert
Cuisine American
Servings 24
Calories 150 kcal
- 1 package Oreo Cookies (15.25 oz)
- 8 oz cream cheese, softened to room temperature
- 1 teaspoon peppermint extract
- 8 oz dark chocolate melting wafers
- 1 tablespoon coconut oil (optional, for smoother chocolate coating)
- to taste crushed mint Oreo cookies (for garnish)
- a pinch sea salt (for garnish)
Begin by placing the Oreo cookies into a food processor. Pulse them until they are finely crushed and resemble a fine crumb texture.
In a large mixing bowl, combine the crushed Oreos with the softened cream cheese and peppermint extract. Mix thoroughly until everything is well incorporated, and a thick, dough-like consistency forms. This may take a bit of elbow grease!
Using a cookie scoop or your hands, scoop out portions of the mixture and roll them into small balls, approximately 1 inch in diameter. Arrange the truffle balls on a baking sheet lined with parchment paper.
Place the baking sheet with the truffle balls in the freezer for about 30 minutes to allow them to firm up.
While the truffles are chilling, prepare the chocolate coating. In a microwave-safe bowl, add the dark chocolate melting wafers. Heat them in the microwave in 30-second intervals, stirring after each interval, until completely melted and smooth. For an extra creamy finish, stir in the coconut oil at this stage.
Once the truffles are firm, remove them from the freezer. One at a time, dip each truffle ball into the melted chocolate, using a fork to ensure they are well coated. Let any excess chocolate drip off before placing them back on the lined baking sheet.
While the chocolate coating is still wet, generously sprinkle crushed mint Oreo cookies and a pinch of sea salt over the top of each truffle for a delightful garnish.
Refrigerate the truffles for an additional 30 minutes to allow the chocolate to set properly before serving.
To elevate your presentation, arrange the truffles on a decorative serving plate. For an elegant touch, drizzle some additional melted chocolate over the top before serving. Enjoy these decadent treats!
Keyword chocolate, dessert, mint, Oreo, truffles
WANT TO SAVE THIS RECIPE?