WANT TO SAVE THIS RECIPE?
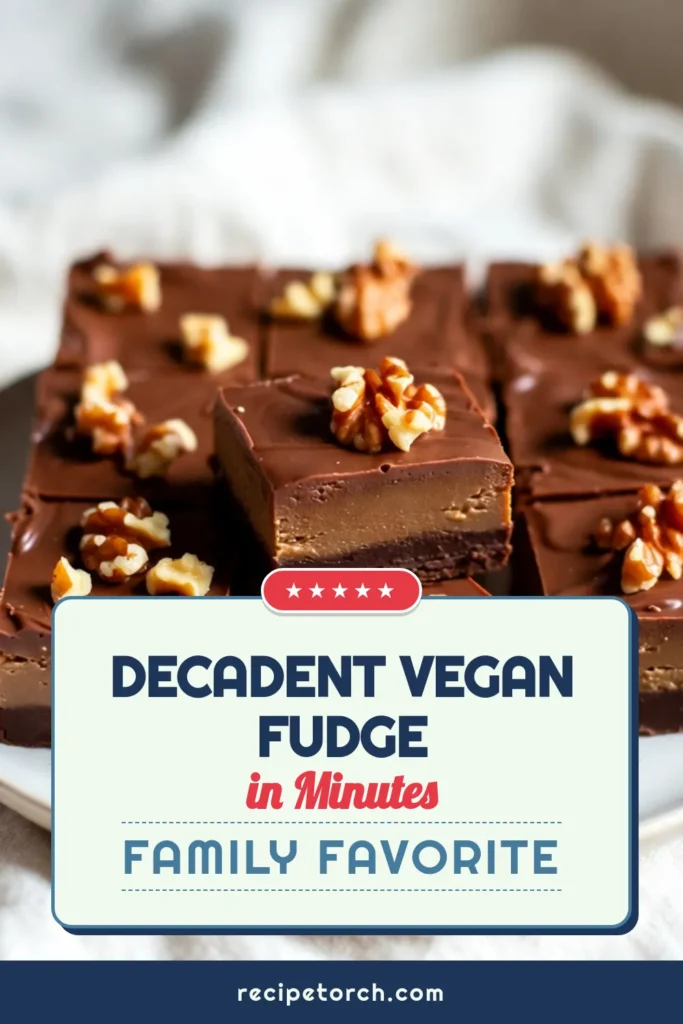
Craving something sweet and guilt-free? You’ll love this Vegan Peanut Butter Chocolate Fudge! It’s rich, creamy, and perfect for any snack or dessert. With just five simple ingredients, you can whip up this delightful treat in no time. Whether you’re a vegan, a chocoholic, or just someone looking for a tasty treat, this recipe checks all the boxes. Let’s dive into how you can create your own heavenly fudge today!
Why I Love This Recipe
- Deliciously Rich Flavor: This fudge combines the nutty taste of peanut butter with the richness of dark chocolate, creating a decadent treat that satisfies your sweet tooth.
- Easy to Make: With just a few simple ingredients and easy steps, this recipe is perfect for both beginner and experienced bakers.
- Vegan-Friendly: Made without dairy and animal products, this fudge is a great option for those following a vegan lifestyle.
- Customizable Delight: You can easily add your favorite nuts or toppings, making this fudge versatile for any occasion.
Ingredients
Main Ingredients
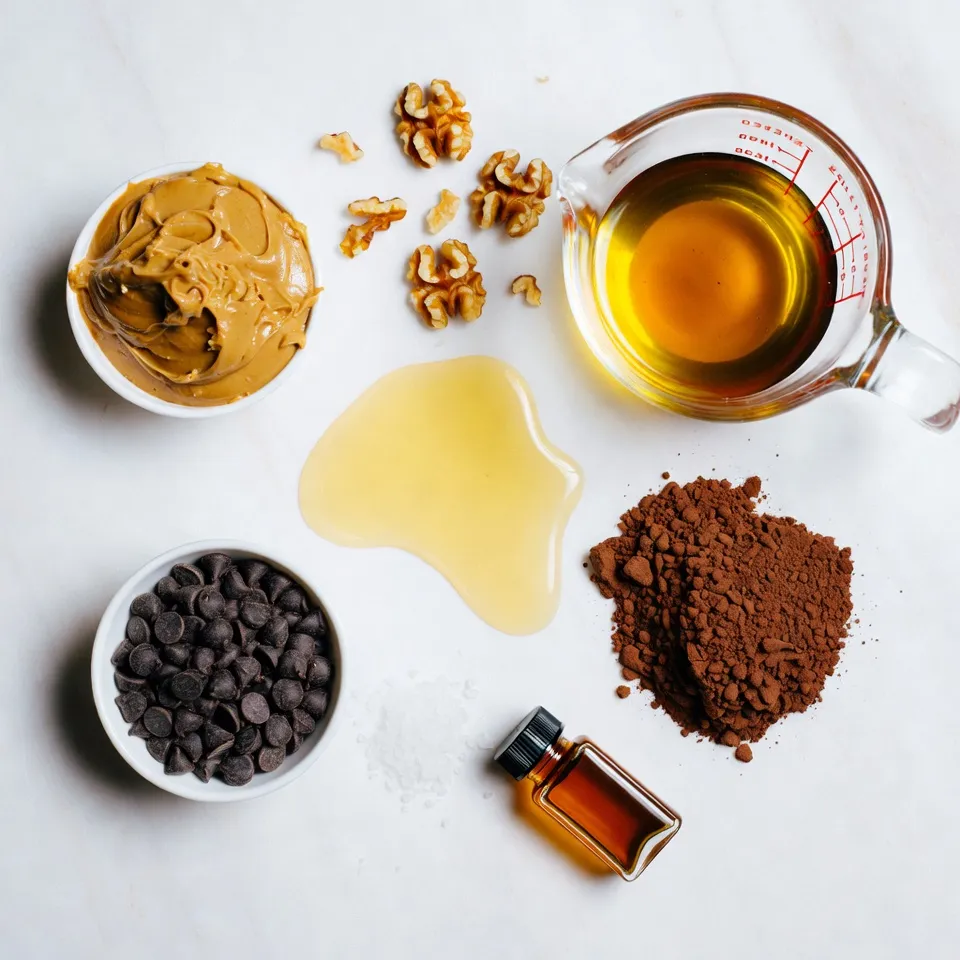
– 1 cup natural peanut butter
– 1/2 cup pure maple syrup
– 1/4 cup melted coconut oil
– 1 cup dairy-free dark chocolate chips
– 1/2 cup unsweetened cocoa powder
These main ingredients create a rich and creamy texture. Natural peanut butter gives a smooth base, while maple syrup adds sweetness. The coconut oil helps to bind everything together and gives a slight sheen to the fudge. Dairy-free dark chocolate chips are perfect for a deep, rich flavor. The cocoa powder intensifies the chocolate taste.
Optional Toppings
– 1/4 cup chopped nuts (walnuts or almonds)
– Sea salt for garnish
Adding toppings like nuts introduces a delightful crunch. Walnuts or almonds pair well with chocolate and peanut butter. A sprinkle of sea salt on top enhances the sweetness and balances the flavors.
Dietary Substitutions
– Alternatives for peanut butter (sunflower seed butter, almond butter)
– Sugar-free options (sugar-free maple syrup)
If you have nut allergies, sunflower seed butter works great. Almond butter is another tasty choice. For those watching sugar intake, sugar-free maple syrup can replace the regular syrup. These swaps keep the fudge delicious while meeting dietary needs.

Step-by-Step Instructions
Preparation Steps
– First, prepare your baking dish. Line an 8×8 inch dish with parchment paper. Make sure the paper hangs over the edges. This helps you lift the fudge out easily later.
– Next, grab a medium bowl. Combine the natural peanut butter, pure maple syrup, melted coconut oil, and pure vanilla extract. Whisk until the mixture is smooth.
Mixing Steps
– In another bowl, sift the unsweetened cocoa powder to remove lumps. Add the fine sea salt to the cocoa powder.
– Gradually fold the cocoa mixture into the peanut butter mixture. Use a spatula and mix until smooth and well blended.
– Now it’s time to melt the dairy-free dark chocolate chips. Place them in a microwave-safe bowl. Heat them in 30-second bursts, stirring well after each interval. Continue until the chocolate is fully melted.
Finalizing the Fudge
– Pour the melted chocolate into your peanut butter mixture. Stir well until everything combines into a creamy fudge batter.
– Transfer the fudge batter into the prepared baking dish. Use a spatula to spread the mixture evenly in the corners. Flatten the top to create a smooth surface.
– If you like, sprinkle chopped nuts on top for extra flavor and crunch.
Chilling Process
– Place the baking dish in the refrigerator. Chill the fudge for about 2-3 hours. It should be firm to the touch when set.
– To check if the fudge is ready, gently press the top. If it feels solid, it’s set!
Tips & Tricks
Achieving the Perfect Texture
To get the best fudge, use room temperature ingredients. This helps the mixture blend well. Cold peanut butter can make your fudge clumpy.
Next, sifting the cocoa powder is key. Lumps can ruin the smooth texture. Take a moment to sift before mixing. It makes a big difference.
Time-Saving Techniques
Melting chocolate can be quick and easy. Use the microwave. Heat the chocolate in short bursts. Stir between intervals for a smooth melt.
You can also prepare fudge in advance. Make it a day before your event. This gives it time to chill and set perfectly.
Presentation Tips
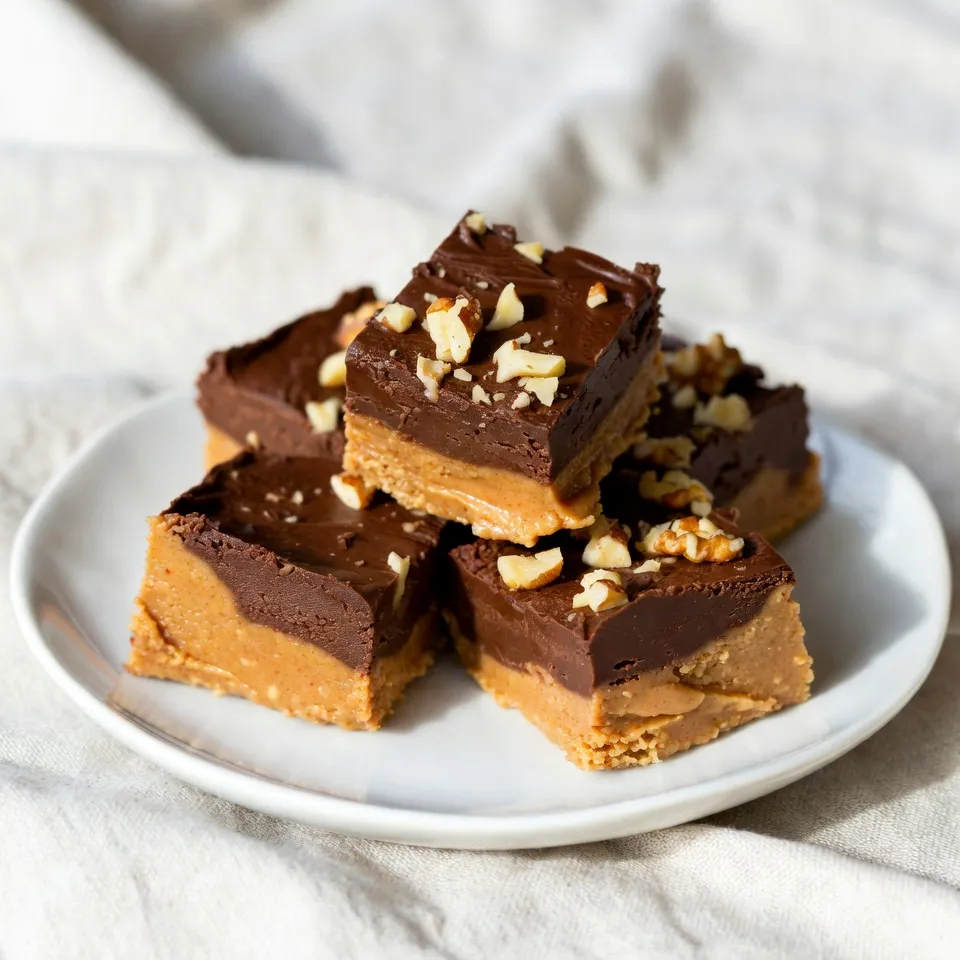
Arranging fudge on a cute platter makes a great impact. Cut the fudge into neat squares. Place them neatly for a lovely display.
For an elegant touch, try garnishing with sea salt. A drizzle of melted chocolate adds flair too. These small details make your treat shine.
Pro Tips
- Use Natural Peanut Butter: Opt for natural peanut butter without added sugars or oils for the best flavor and texture.
- Cool Coconut Oil: Allow the melted coconut oil to cool slightly before mixing to prevent the chocolate chips from seizing when combined.
- Chill Long Enough: Be patient and allow the fudge to chill for the full 2-3 hours to ensure it sets properly and achieves the right consistency.
- Experiment with Toppings: Try different toppings like shredded coconut, or a sprinkle of sea salt to enhance the flavor and presentation of your fudge.
Variations
Flavor Enhancements
You can make your fudge even more fun by adding spices. A pinch of cinnamon can add warmth. If you like some heat, try a tiny bit of cayenne pepper. Both give a nice twist to the flavor. You can also add extracts. Almond extract gives a nutty taste, while coffee flavor brings depth to the fudge. Just a few drops can change everything!
Different Nut Combinations
If you want to switch up the nuts, try using pistachios or hazelnuts. They add a unique taste and crunch. You can also make a nut-free version. Just skip the nuts or use seeds like sunflower or pumpkin. This makes the fudge safe for more people to enjoy.
Chocolate Variations
For a fun twist, swap in white chocolate chips instead of dark chocolate. This makes the fudge sweeter and really tasty. You can also use flavored chocolate, like mint or raspberry. These choices can take your fudge to a whole new level. You’ll surprise your friends with every bite!
Storage Info
Storing Fudge
To keep your fudge fresh, always store it in the fridge. Use an airtight container to avoid drying out. This helps keep the fudge soft and tasty. If you want to enjoy it later, make sure to wrap it well in parchment paper first.
Freezing the Fudge
You can freeze fudge for long-term storage. Cut it into squares before freezing. Place the squares in a single layer on a baking sheet to freeze them first. Once solid, you can transfer them to a freezer bag. For thawing, take them out and let them sit at room temperature. This keeps the fudge creamy and smooth.
Shelf Life Expectations
In the fridge, your fudge will stay fresh for about a week. Check for any signs of spoilage. If you see any mold or if it smells off, it is best to throw it away. Keeping an eye on your fudge helps ensure you enjoy every bite!
FAQs
Can I use crunchy peanut butter instead of creamy?
Yes, you can use crunchy peanut butter. It adds texture and a nice crunch. The flavor stays the same, but you will get bits of peanuts in each bite. This makes your fudge even more fun to eat!
How do I know when the fudge is ready to eat?
The fudge is ready when it feels firm to the touch. If you press it gently, it should not leave a mark. You can also check the edges; they should pull away from the sides of the dish. If it looks set and feels firm, it’s ready for you to enjoy!
Is this fudge gluten-free?
Yes, this fudge is gluten-free. All the ingredients, like peanut butter and cocoa powder, do not contain gluten. Make sure to check that your chocolate chips are also gluten-free. This way, everyone can enjoy this sweet treat!
Can I make this recipe without sugar?
Yes, you can use sugar substitutes. Options like stevia or monk fruit work well. Just know that they may change the taste a bit. If you choose a liquid sweetener, like agave, adjust the other wet ingredients to keep the texture right.
This blog post showed how to make easy, tasty fudge. You learned the key ingredients and steps. Optional toppings add flair, while substitutions make it suitable for various diets. I shared tips for a perfect texture and quick prep, plus ideas for fun flavors. Storing and freezing keep your fudge fresh and delicious. Remember, you can get creative and customize to your taste. Enjoy making and sharing this delightful trea
Vegan Peanut Butter Chocolate Fudge
A rich and creamy vegan fudge made with peanut butter, dark chocolate, and cocoa powder.
Prep Time 15 minutes mins
Total Time 3 hours hrs 15 minutes mins
Course Dessert
Cuisine Vegan
Servings 16
Calories 150 kcal
- 1 cup natural peanut butter
- 1/2 cup pure maple syrup
- 1/4 cup coconut oil, melted and slightly cooled
- 1 cup dairy-free dark chocolate chips
- 1/2 cup unsweetened cocoa powder
- 1 teaspoon pure vanilla extract
- 1/4 teaspoon fine sea salt
- 1/4 cup chopped nuts (optional for topping)
Begin by preparing your workspace. Line an 8x8 inch baking dish with parchment paper, ensuring that there’s an overhang on the sides.
In a medium-sized mixing bowl, combine the natural peanut butter, pure maple syrup, melted and slightly cooled coconut oil, and pure vanilla extract. Whisk thoroughly until the mixture is smooth and well blended.
In a separate bowl, sift the unsweetened cocoa powder to eliminate any lumps, then add the fine sea salt. Gradually fold the cocoa mixture into the peanut butter mixture, using a spatula, until it is fully incorporated and smooth.
To melt the dairy-free dark chocolate chips, place them in a microwave-safe bowl. Microwave them in 30-second intervals, stirring well between each interval, until the chocolate is completely smooth and melted.
Pour the melted chocolate into the peanut butter mixture and stir until everything is combined into a creamy fudge batter.
Transfer the fudge batter into the prepared baking dish. Use a spatula to evenly spread the mixture into the corners and flatten the top.
If desired, sprinkle chopped nuts on top of the fudge for an added crunch and flavor boost.
Place the baking dish in the refrigerator and let the fudge chill for about 2-3 hours, or until it is fully set and firm to the touch.
Once the fudge is set, carefully lift it out of the dish using the parchment paper overhang and place it on a cutting board. Slice the fudge into squares for serving.
Any leftovers can be stored in an airtight container in the refrigerator, where they'll stay fresh for up to a week.
For an appealing display, arrange the fudge squares on a cute serving platter and garnish with a sprinkle of sea salt or a drizzle of melted chocolate for added flair.
Keyword chocolate, fudge, peanut butter, vegan
WANT TO SAVE THIS RECIPE?